

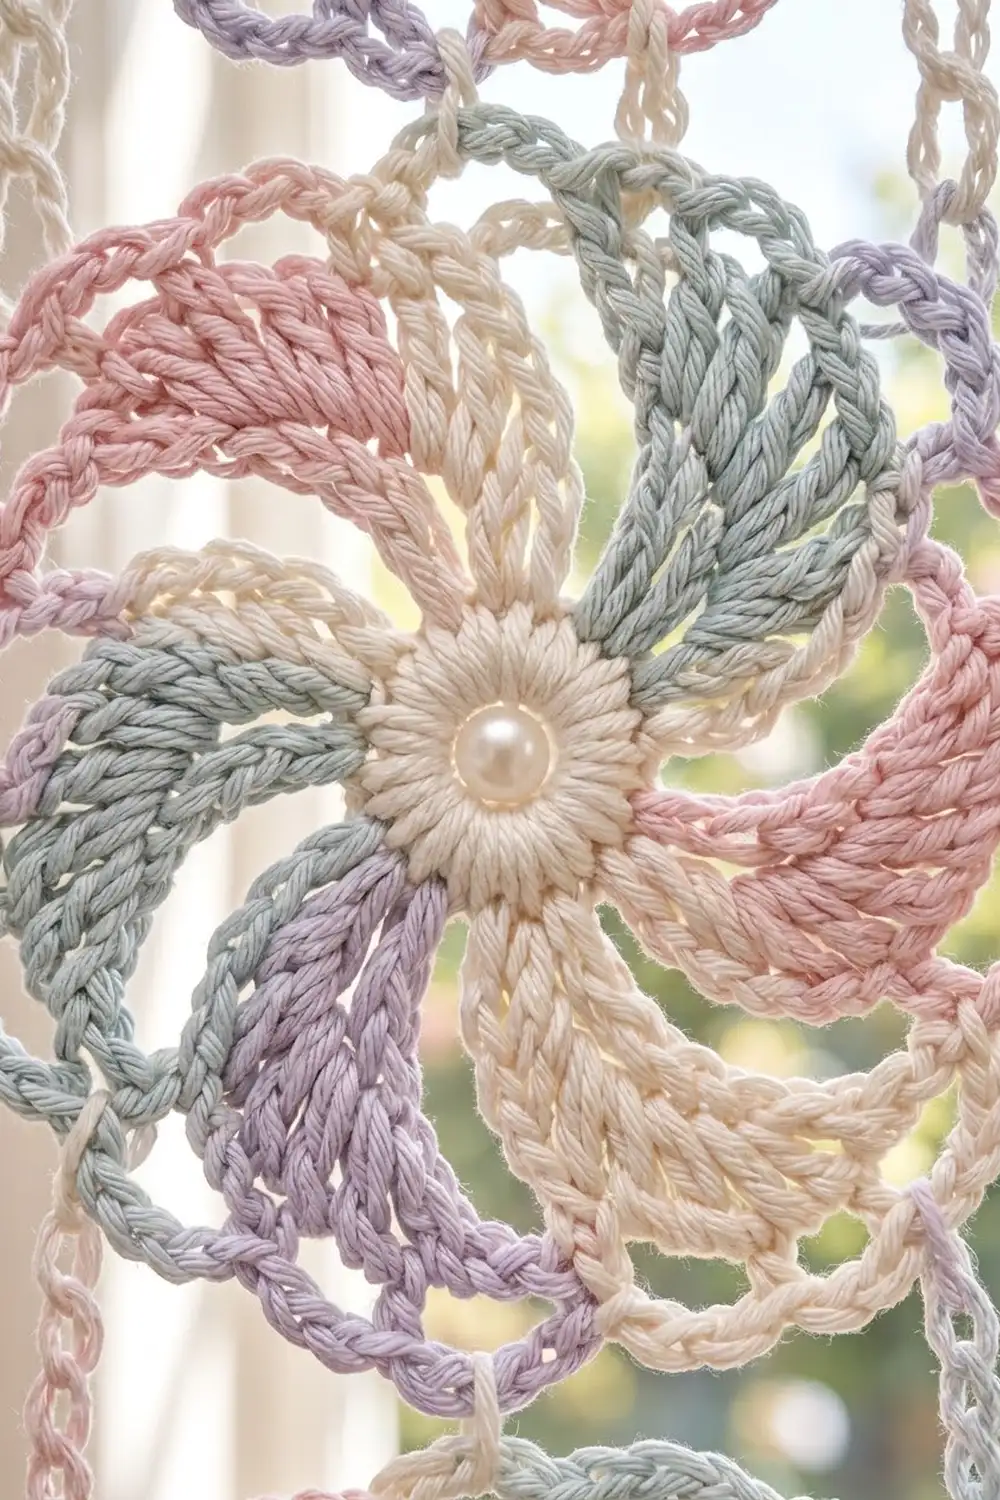
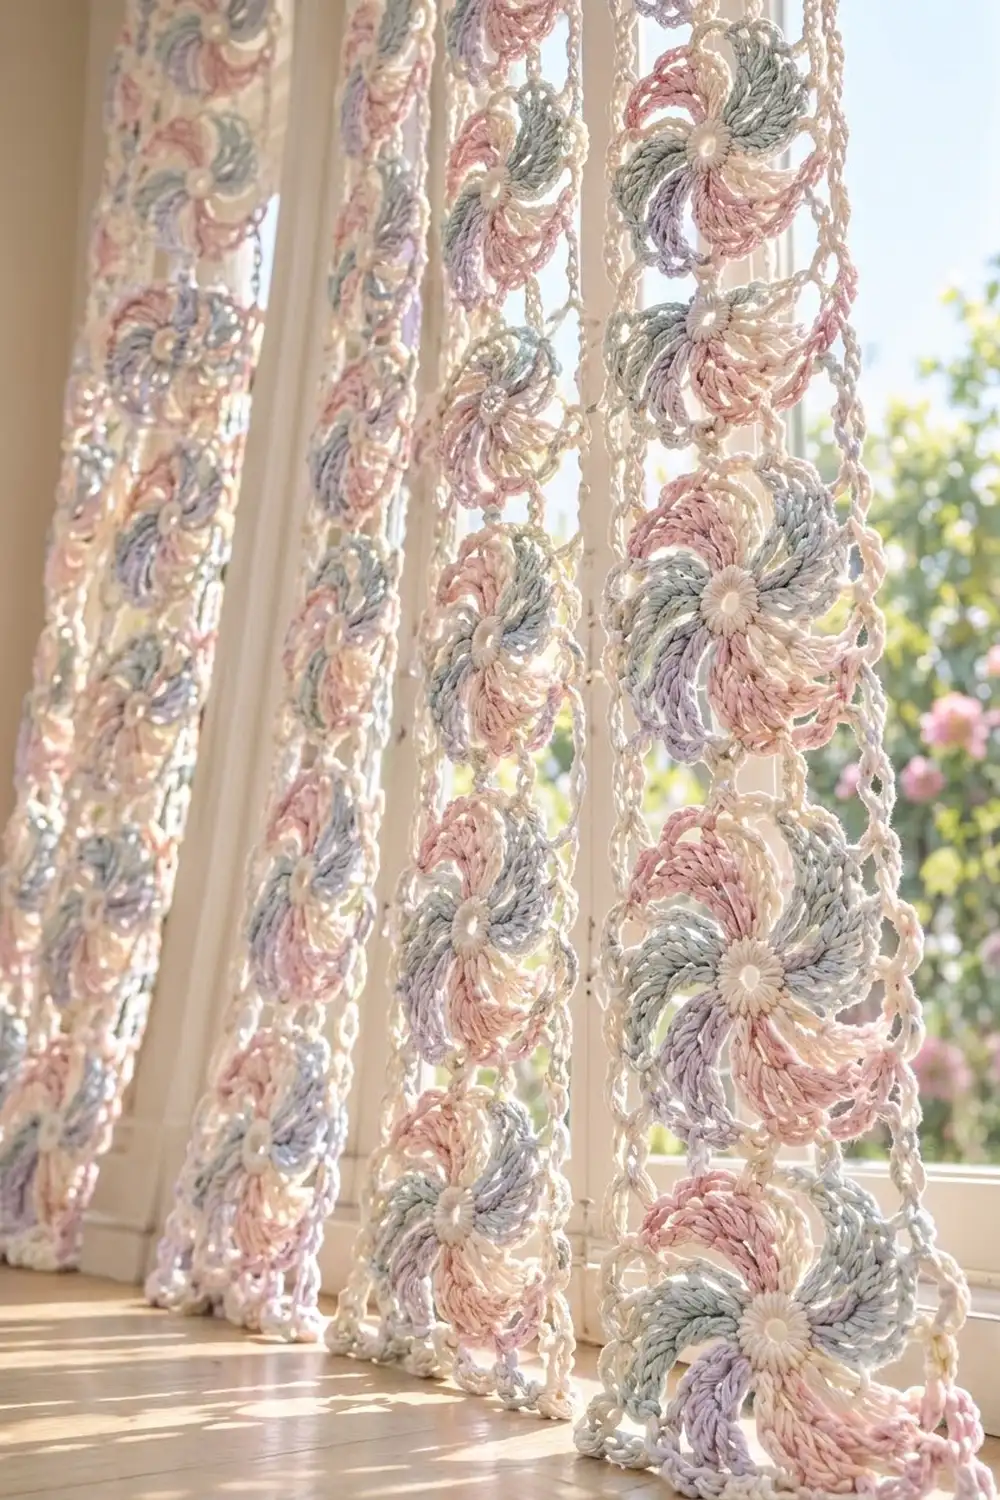
This curtain panel is made from swirling pinwheel motifs in soft pastels. Each motif starts with a firm ivory ring. Eight petals fan out around it, each one leaning into the next, and chain arches outline every petal to give a light, scalloped edge. Once joined, the motifs form an airy lace panel that filters sunlight without blocking it.
The palette uses ivory, blush pink, sage-blue and lavender. Each petal is worked in one solid color, so the swirl shows clearly. Ivory frames every motif and also works the border, which keeps the whole panel calm and cohesive.
This pattern uses US crochet terms. One finished panel measures 13 in x 68 in (33.0 cm x 172.7 cm) and is 2 motifs wide by 12 motifs tall. Make two panels for a standard window pair.
You will make each motif from the center out: the ivory ring, eight two-row petals worked one at a time, then an ivory framing round. From the second motif on, the framing round also joins the motif to its neighbors. A two-round ivory border finishes the edges.
Finished Size and Construction
- Finished panel size: 13 in x 68 in (33.0 cm x 172.7 cm)
- Skill level: Intermediate
- Terminology: US crochet terms
- Yarn weight: DK (#3), cotton or cotton blend
- Hook: 3.5 mm (E-4)
- Number of pieces: 24 motifs per panel
- Layout: 2 motifs wide x 12 motifs tall
- Motif size (after framing round): 5.5 in (14.0 cm) square
- Panel size before border: 11 in x 66 in (27.9 cm x 167.6 cm)
- Border depth: 1 in (2.5 cm) on every side
Materials
Choose a smooth mercerized cotton or cotton blend in DK weight, about 120 m per 50 g. Cotton gives crisp stitch definition, holds the swirl well and drapes nicely in sunlight. Avoid fuzzy yarns, because they blur the chain arches.
Yarn for one panel:
- Color A, Ivory (centers, 2 petals per motif, framing round, border): 120 g / 288 m
- Color B, Blush Pink (2 petals per motif): 40 g / 96 m
- Color C, Sage-Blue (2 petals per motif): 40 g / 96 m
- Color D, Lavender (2 petals per motif): 40 g / 96 m
These quantities include a margin of about 15% for gauge differences and tails. Double them for a pair of panels.
Tools:
- 3.5 mm (E-4) crochet hook
- Tapestry needle
- Scissors
- Stitch markers
- Blocking mats and rust-proof pins
- Spray bottle
- Optional: 24 pearl beads, 10 mm (0.4 in / 1.0 cm), plus ivory sewing thread
- Optional: curtain clip rings for hanging
Abbreviations (US Terms)
- ch – chain
- sl st – slip stitch
- sc – single crochet
- dc – double crochet
- tr – treble crochet (yarn over twice)
- dtr – double treble crochet (yarn over 3 times, then work off 2 loops at a time 4 times)
- sk – skip
- st(s) – stitch(es)
- sp – space
Special stitch – Joining loop: where the framing round would normally have a ch-5 or ch-7 loop, work half the chains, sl st into the matching loop of the neighboring motif, then work the rest of the chains. For a ch-5 loop that is ch 2, sl st, ch 2. For a ch-7 corner loop it is ch 3, sl st, ch 3. In each case the sl st takes the place of the middle chain, so the loop keeps its full length.
Gauge and Checkpoints
Make one complete motif and block it before you start the rest. Gauge matters because 24 small differences add up quickly over a 66 in (167.6 cm) column.
Checkpoints:
- After Rnd 2: ring is 1.5 in (3.8 cm) across, with a center hole of about 0.5 in (1.3 cm).
- After Rnd 3: motif is 5 in (12.7 cm) across from arch tip to arch tip.
- After Rnd 4: motif is 5.5 in (14.0 cm) square, measured side to side through the middle.
If your motif is too large: go down to a 3.25 mm hook, or tighten your chains. Loose chains are the most common cause.
If your motif is too small: go up to a 3.75 mm hook. Make sure the tall stitches are fully extended rather than pinched.
A difference of 0.25 in (0.6 cm) per motif becomes 3 in (7.6 cm) over the panel length, so it is worth matching the gauge.
Motif (Make 24)
Rnd 1 (Color A)
Ch 6 and sl st to the first ch to form a ring. Ch 1, then work 24 sc into the ring. Sl st to the first sc to join. (24 sc)
Rnd 2 (Color A)
Ch 1. Sc in the same st and in each st around, then sl st to the first sc to join. (24 sc) Fasten off.
This round thickens the ring into the firm, raised center you see in the photo. Use markers to divide the 24 sc into 8 groups of 3. Each group is the base for one petal.
Rnd 3 – Petals (8 petals, worked one at a time)
Work the petals in this color order, going around the ring: B, A, C, D, B, A, C, D. Each color appears twice.
Row 1: Join the petal color with a sl st in the first sc of a 3-st group. Ch 3 (this counts as a dc) and work 2 dc in the same st. Work 3 tr in the next st, then 4 dtr in the next st. (10 sts) Turn.
Row 2: Ch 1. Sc in the first st, ch 5, sk 4 sts, sc in the next st, ch 5, sk 3 sts, sc in the top of the turning ch-3. (3 sc, 2 ch-5 arches) Fasten off.
Join the next color in the first sc of the next group and repeat. Work all 8 petals in the same direction. Because each fan grows from a short dc to a tall dtr, every petal leans, and its tall edge sits against the short edge of the next petal. That is what creates the pinwheel swirl.
Count after Rnd 3: 8 petals, 80 petal sts, 16 ch-5 arches.
Weave in the petal tails now, along the back of the ring. With 16 tails per motif, it is easier to deal with them while the motif is small.
Optional: sew a pearl bead into the center ring after blocking.
Rnd 4 – Framing Round (Color A)
Number the 16 arches from 1 to 16, starting with the first arch of a Color B petal.
Join Color A with a sc in arch 1. Ch 7 (corner loop), sc in the next arch, [ch 5, sc in the next arch] 2 times, ch 5*. Sc in the next arch and repeat from * 2 more times, then repeat from * to ** once more. Sl st to the first sc to join. Fasten off.
Count: 16 sc, 4 corner ch-7 loops and 12 side ch-5 loops.
Per-side definition: each side has 3 side ch-5 loops between 2 corner ch-7 loops. In this pattern, the corner loops are counted separately and are not part of the per-side count.
The longer corner chains pull the round motif into a soft square, which makes it possible to join motifs in a grid.
Make All Pieces
For one panel, make 24 motifs. Every motif uses the same color order:
- Color A: 24 centers, 48 petals, 24 framing rounds
- Color B: 48 petals
- Color C: 48 petals
- Color D: 48 petals
Make the first motif as a complete, separate piece. Work Rnds 1–3 for all the others, then add their framing rounds one at a time as you join them.
Layout (2 columns x 12 rows):
Row 1:  [M1 ] [M2 ]
Row 2:  [M3 ] [M4 ]
Row 3:  [M5 ] [M6 ]
Row 4:  [M7 ] [M8 ]
Row 5:  [M9 ] [M10]
Row 6:  [M11] [M12]
Row 7:  [M13] [M14]
Row 8:  [M15] [M16]
Row 9:  [M17] [M18]
Row 10: [M19] [M20]
Row 11: [M21] [M22]
Row 12: [M23] [M24]
Place every motif with arch 1 in the same position, for example at the top-left corner. The swirls will then all turn in the same direction.
Joining
Method: join-as-you-go on Rnd 4.
Work Rnd 4 as written until you reach the first side that touches a finished motif. Along that side:
- At the shared corner, replace the ch 7 with a corner joining loop: ch 3, sl st into the neighbor’s corner ch-7 loop, ch 3.
- Replace each of the 3 side ch-5 loops with a side joining loop: ch 2, sl st into the neighbor’s matching ch-5 loop, ch 2.
- At the second shared corner, work another corner joining loop.
Stitch-to-stitch logic: joined sides match loop for loop. Side loop 1 joins to the neighbor’s side loop 3, loop 2 to loop 2, and loop 3 to loop 1, because the motifs face each other. Corner loops join only to corner loops.
Four-way corners: where 4 motifs meet, sl st into the sl st of the first corner join instead of into a loop. This keeps all 4 corners stacked at a single point.
Tension: keep the joining sl sts loose, about the same height as a ch. If they are tight, the sides pucker and the panel narrows.
Size checkpoint: after joining Rows 1–6, the panel should measure 11 in x 33 in (27.9 cm x 83.8 cm). The fully joined panel should measure 11 in x 66 in (27.9 cm x 167.6 cm).
Border (Color A)
Border gauge: 4 ch-6 loops per motif side. Each loop lies flat across about 1.375 in (3.5 cm), and 4 x 1.375 in = 5.5 in (14.0 cm), which is exactly one motif side.
Starting counts per edge:
- Short edge (top or bottom): 2 motifs x 3 side loops = 6 side loops, plus 1 seam junction
- Long edge: 12 motifs x 3 side loops = 36 side loops, plus 11 seam junctions
A seam junction is the sl st where two corner loops meet. It is the only stitch the border works into at a seam, and it is included in the counts above.
Border Rnd 1
Join Color A in an outer corner ch-7 loop and work (sc, ch 7, sc) in it. Along each edge:
- *Ch 6, sc in the next side loop. Repeat across that motif’s 3 side loops.
- Ch 6, sc in the seam junction.*
- Repeat from * to * for each seam.
- After the last motif’s 3 side loops, ch 6 and work (sc, ch 7, sc) in the outer corner loop.
Continue around all 4 edges and sl st to the first sc to join.
Counts:
- Short edge: 6 side-loop sc + 1 junction sc = 7 anchors, with 8 ch-6 loops between the corner sc’s
- Long edge: 36 + 11 = 47 anchors, with 48 ch-6 loops
- Total: 112 ch-6 loops and 4 corner ch-7 loops
Border Rnd 2
Sl st into the corner ch-7 loop. In each corner ch-7 loop, work (4 sc, ch 5, 4 sc). In each ch-6 loop, work (3 sc, ch 3, 3 sc). Sl st to the first sc to join and fasten off.
Counts:
- Short edge: 8 loops x 6 = 48 sc + 8 picots
- Long edge: 48 loops x 6 = 288 sc + 48 picots
- Each corner: 8 sc + 1 ch-5 picot
Why the math works: each motif side contributes 3 side loops and each seam contributes 1 junction. For n motifs along an edge, that gives 3n + (n − 1) = 4n − 1 anchors and exactly 4n ch-6 loops. That works out to 4 loops per 5.5 in (14.0 cm) of edge, all the way around. Border Rnd 1 adds 0.75 in (1.9 cm) and Border Rnd 2 adds 0.25 in (0.6 cm), for a 1 in (2.5 cm) border. The panel grows from 11 in x 66 in (27.9 cm x 167.6 cm) to 13 in x 68 in (33.0 cm x 172.7 cm).
Final Blocking
- Weave in all remaining tails along solid stitches, not through chains.
- Soak the panel in cool water for 10 minutes, then gently press out the water. Do not wring it.
- Roll the panel in a towel to remove excess moisture.
- Lay it flat on blocking mats in two overlapping sections if needed.
- Pin the outer corners first, to 13 in x 68 in (33.0 cm x 172.7 cm).
- Pin each border picot so the edges are straight.
- Pin every 4-way corner so the motif columns line up at 5.5 in (14.0 cm) intervals.
- Ease each petal into its swirl with your fingers and open the arches.
- Let it dry completely. Sew on the optional pearl beads.
Final Quality-Control Checklist
- [ ] All 24 motifs are 5.5 in (14.0 cm) square, within 0.25 in (0.6 cm).
- [ ] Every motif has 8 petals in the order B, A, C, D, B, A, C, D.
- [ ] All swirls turn in the same direction.
- [ ] Each motif has 16 arches, 12 side loops and 4 corner loops.
- [ ] All 4-way corners meet at a single point.
- [ ] Border Rnd 1 has 8 loops on each short edge and 48 on each long edge.
- [ ] The finished panel is 13 in x 68 in (33.0 cm x 172.7 cm).
- [ ] All tails are woven in securely.
Troubleshooting
Petals don’t swirl: check that every petal is worked dc → tr → dtr in the same direction.
Motif cups: your ring may be too tight. Use a ch-6 starting ring and make sure there are exactly 24 sc in Rnd 1.
Motif ruffles: check that each petal has 10 sts, not 11.
Panel narrows at the seams: the joining sl sts are too tight. Redo them with looser tension.
Border waves: check the loop counts per edge. If they are right, try a slightly shorter chain, ch 5 instead of ch 6.
Columns drift sideways: rotation varies between motifs. Place arch 1 at the top-left corner every time.
Care
Hand wash cool, roll in a towel and dry flat, re-pinning lightly if needed. Avoid hanging the panel while it is wet, because the weight of the water stretches the lace lengthwise.
Final Notes
The measurements build on each other: a 1.5 in (3.8 cm) ring becomes a 5 in (12.7 cm) swirl, then a 5.5 in (14.0 cm) framed square. Twenty-four squares joined 2 x 12 give 11 in x 66 in (27.9 cm x 167.6 cm), and a 1 in (2.5 cm) border brings the panel to 13 in x 68 in (33.0 cm x 172.7 cm). If you check each stage before moving on, the panel will come out true and evenly spaced.
Happy crocheting!