

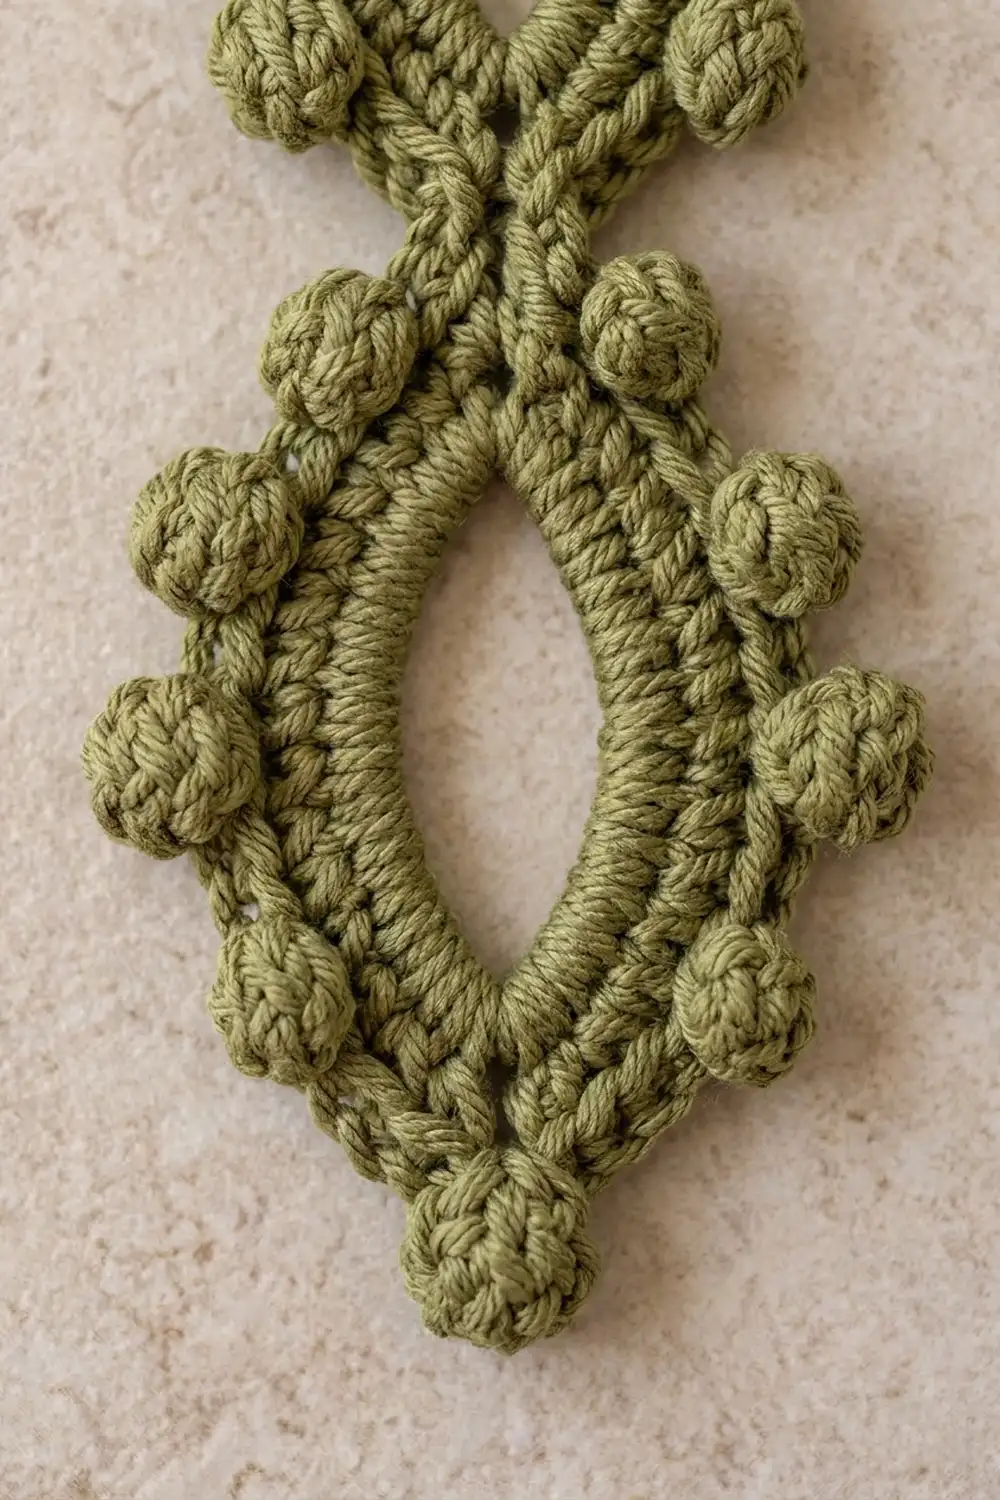
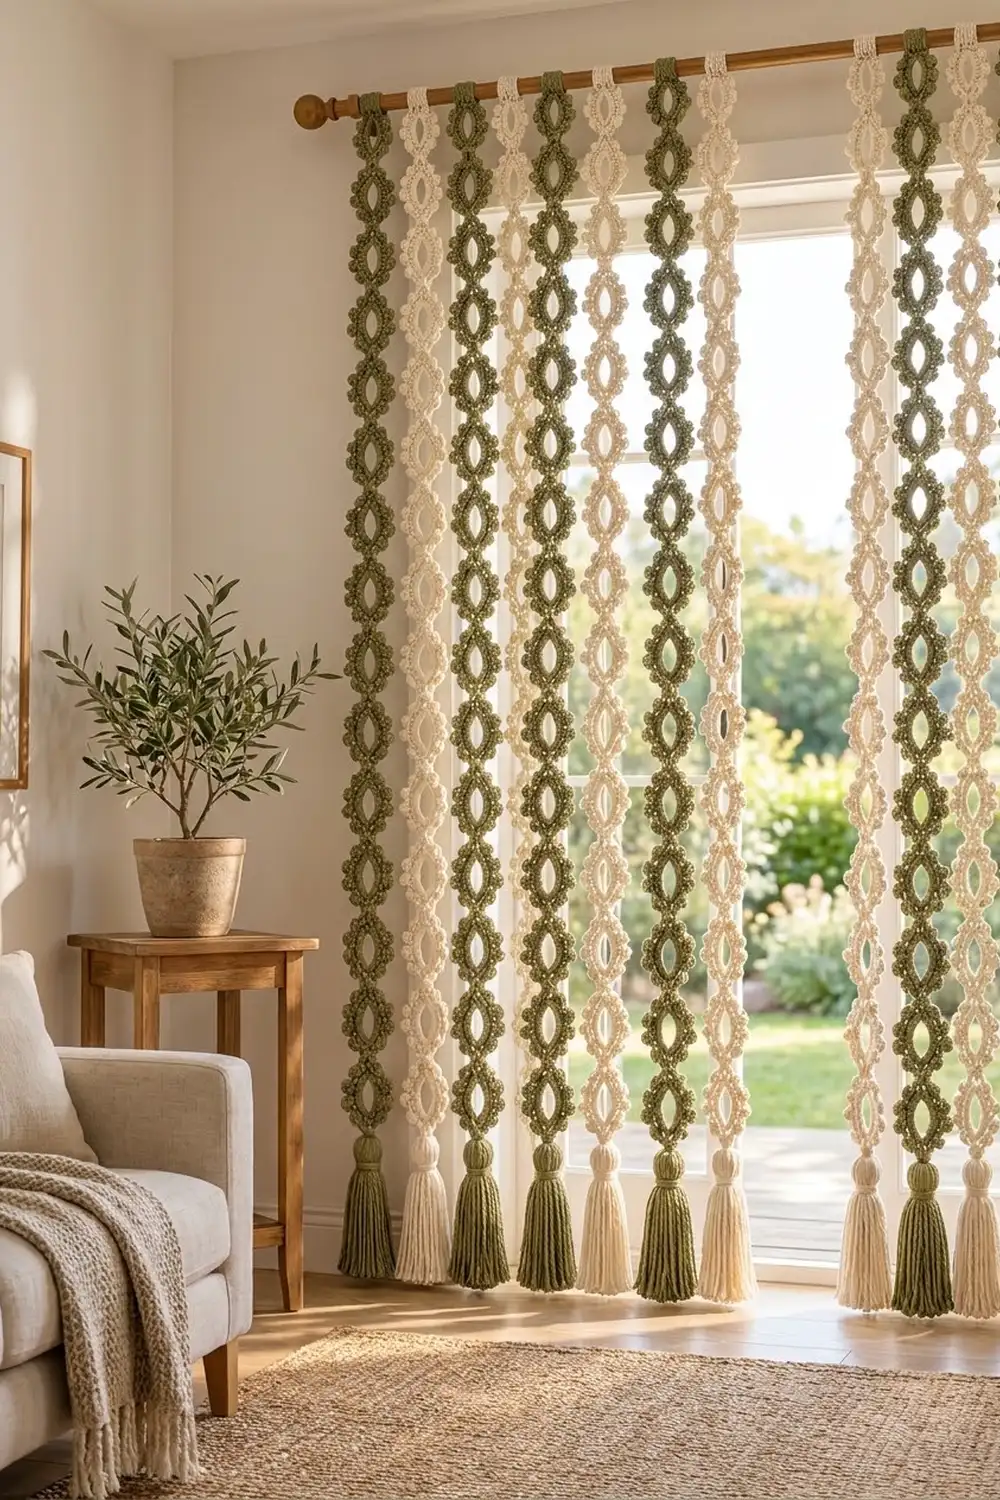
This curtain strand is a vertical chain of three open almond motifs joined tip to tip. A row of round bobbles frames the whole strip, and a thick tassel hangs from the bottom. Hang one as a tieback or wall accent, or make several in olive green and cream and hang them side by side on a rod as a boho curtain.
The look is soft and sculptural. The almond openings let light through, and the bobbles give the edges a beaded texture. The sample is olive green worsted-weight cotton, and the same instructions work for a cream strand.
The pattern uses US crochet terms. One finished strand measures 3.5 in (8.9 cm) wide at the stitched edge and 4 in (10.2 cm) across the bobbles. The body is 13 in (33.0 cm) long. With the hanging loop and tassel, the total length is about 19.25 in (48.9 cm).
Construction is simple and easy to measure as you go. You make three almond motifs in two rounds each. Motifs 2 and 3 are joined to the motif above them at the tip while you work their last round. A two-round border goes around the whole strip; the second round adds the bobbles and the hanging loop. A tassel finishes the bottom tip.
Finished Size and Construction
- Finished size: 3.5 x 13 in (8.9 x 33.0 cm) body; 19.25 in (48.9 cm) including loop and tassel
- Skill level: Intermediate
- Terminology: US crochet terms
- Yarn weight: Worsted (#4), cotton or cotton blend
- Hook: 5 mm (US H-8)
- Number of pieces: 3 almond motifs + 1 tassel
- Layout: 1 motif wide x 3 motifs tall, joined tip to tip
- Single motif size: 2.5 x 4 in (6.4 x 10.2 cm)
- Size before border: 2.5 x 12 in (6.4 x 30.5 cm)
- Border depth: 0.5 in (1.3 cm) per side; bobbles stand out another 0.25 in (0.6 cm)
Materials
Choose a smooth, firm worsted-weight cotton or cotton blend. Cotton shows the bobbles clearly, holds the almond points well, and stays straight when it hangs. Avoid fuzzy or very stretchy yarn. A long, narrow strand will lengthen under its own weight and the tassel’s.
If you plan to make several strands for a curtain, buy all of each color from the same dye lot. Small shade differences are easy to see when strands hang side by side in daylight.
- Olive green: 30 g, about 50 m (55 yd) per strand
- Cream (optional, for alternate strands): 30 g, about 50 m (55 yd) per strand
These quantities include a margin of about 15% for your gauge swatch and the tassel.
Tools:
- 5 mm (US H-8) crochet hook
- Tapestry needle
- Scissors
- Stitch markers (at least 4)
- Stiff card 5.5 in (14.0 cm) tall, for the tassel
- Ruler or tape measure
- Blocking mat and rust-proof pins
- Spray bottle
Abbreviations (US Terms)
- ch – chain
- sl st – slip stitch
- sc – single crochet
- hdc – half double crochet
- dc – double crochet
- st(s) – stitch(es)
- sp – space
- RS – right side
Special stitch – Bobble: (Yarn over, insert hook in the indicated st, yarn over and pull up a loop, yarn over and draw through 2 loops) 5 times in the same st. You now have 6 loops on the hook. Yarn over and draw through all 6 loops. A bobble counts as 1 st. Use your finger to push it outward so it sits on the outer edge.
Gauge and Checkpoints
Gauge: 16 sc and 16 rows = 4 in (10.2 cm) with a 5 mm hook.
Use your first motif as the swatch. Make Motif 1, block it lightly, and measure it before you go on.
Checkpoints:
- After motif Round 1: about 1.5 x 3 in (3.8 x 7.6 cm), with an opening about 1 in (2.5 cm) wide.
- After motif Round 2: 2.5 x 4 in (6.4 x 10.2 cm), tip to tip.
- After joining three motifs: 2.5 x 12 in (6.4 x 30.5 cm).
- After border: 3.5 x 13 in (8.9 x 33.0 cm) at the stitched edge.
If your motif is too big: Go down to a 4.5 mm hook. If Round 1 ruffles, you are working too loosely over the ring. Pack the stitches closer together instead of skipping any.
If your motif is too small or cups: Go up to a 5.5 mm hook. Also check that Round 2 has exactly 2 increases on each side.
Almond Motif (Make 3)
The motif starts as a chain ring, which becomes the almond-shaped opening. Round 2 does the shaping: short stitches at the tips and taller stitches along the sides make the sides bow outward, and the ch-2 spaces make the points.
Foundation: Ch 30, sl st in first ch to form a ring. Do not twist the chain.
Round 1 (RS): Ch 1 (does not count as a st). Work 32 sc into the ring, working over the chain rather than into the individual chains. Sl st in first sc to join. (32 sts)
Place a marker in the first sc (st 1, top tip). Place a second marker in st 17 (bottom tip). There are 15 sts between the markers on each side.
Round 2 (RS): Ch 1.
- Top tip: (sc, ch 2, sc) in st 1.
- Side A (sts 2–16): sc in next st, hdc in next st, dc in next 3 sts, 2 dc in next st, dc in next 3 sts, 2 dc in next st, dc in next 3 sts, hdc in next st, sc in next st. (15 sts worked, 17 sts made)
- Bottom tip: (sc, ch 2, sc) in st 17.
- Side B (sts 18–32): repeat Side A.
- Sl st in first sc to join.
Round 2 total: 38 sts + 2 ch-2 sps. That is 17 + 17 side sts, plus 4 tip sc.
Per-side count: Go around the motif. Each long side runs from the sc after one ch-2 tip to the sc before the next ch-2 tip. That gives 1 tip sc + 17 side sts + 1 tip sc = 19 sts per side, including both tip sts. The two sides together make 38.
Fasten off Motif 1 and weave in the ends. For Motifs 2 and 3, work Round 2 with the join described under Joining below.
Make All Pieces
Quantities per color (one strand):
- Olive green (or cream): 3 almond motifs + 1 tassel
- Make all three motifs from the same ball so the color matches exactly.
Layout grid (1 wide x 3 tall):
[ Hanging loop ]
[ Motif 1 ]
     |  tip join
[ Motif 2 ]
     |  tip join
[ Motif 3 ]
[ Tassel ]
Motif 1 is finished before you start the others. Motifs 2 and 3 are joined while you work them. Keep the RS of every motif facing you so all the stitches lean the same way.
Joining
The motifs are joined as you go, at the tips only. No stitches are added along the sides, so each motif keeps its own 19 sts per side.
Join method for Motif 2 (and then Motif 3): Work the Foundation and Round 1 as usual. On Round 2, replace the top tip with:
- Joined top tip: sc in st 1, ch 1, sl st into the bottom ch-2 sp of the previous motif, ch 1, sc in same st 1.
Then finish Round 2 exactly as written. The ch 1, sl st, ch 1 takes the place of the ch-2 sp, so the stitch count does not change: 38 sts per motif.
Stitch-to-stitch logic: Line up the two motifs with their RS facing you. The bottom tip of the upper motif points down at the top tip of the lower motif, and their Side A edges are on the same side. Joining through the ch-2 sp keeps the tips centered and lets the side stitches run straight from one motif into the next.
Tension advice: Keep the ch 1 on each side of the sl st snug, but not tight. If they are too tight, the motifs pinch together and the strip curves. If they are too loose, a gap opens and the strip sags at each joint.
Size checkpoint: After joining all three motifs, lay the strip flat. It should measure 2.5 x 12 in (6.4 x 30.5 cm) tip to tip.
Border
Border gauge: Work 1 sc in each motif st. On the stitched edge, each border round adds 0.25 in (0.6 cm) per side.
Starting count: Each long side of the strip covers 3 motifs x 19 sts = 57 sts per side. The only ch-2 sps left open are the top tip of Motif 1 and the bottom tip of Motif 3.
Border Round 1 (RS): Join yarn with a sc in the first st of Side A after the top ch-2 sp of Motif 1.
- Side A: sc in each st down the strip. When you reach a joint, go straight from the last st of the upper motif to the first st of the lower motif. Do not work into the joined tip space. (57 sts)
- Bottom end: 3 sc in the ch-2 sp of Motif 3. (3 sts)
- Side B: sc in each st up the strip, crossing each joint the same way. (57 sts)
- Top end: 3 sc in the ch-2 sp of Motif 1. (3 sts)
- Sl st in first sc to join.
Round 1 total: 120 sts (57 + 3 + 57 + 3).
Border Round 2 (RS): Ch 1.
- Side A: (sc in next 3 sts, bobble in next st, sc in next 5 sts, bobble in next st, sc in next 5 sts, bobble in next st, sc in next 3 sts) 3 times. (57 sts: 48 sc + 9 bobbles)
- Bottom end: sc in next st, (sc, ch 3, sc) in center st, sc in next st. (4 sts + ch-3 tassel loop)
- Side B: repeat Side A. (57 sts)
- Top end: sc in next st, (sc, ch 14, sc) in center st, sc in next st. (4 sts + ch-14 hanging loop)
- Sl st in first sc to join. Fasten off.
Round 2 total: 120 sts worked 1 per existing st + 2 extra sts (one at each center tip) = 122 sts, plus the two chain loops.
Why the math works: Each long side of a motif has 19 sts, and the bobble repeat also covers 19 sts: 3 + 1 + 5 + 1 + 5 + 1 + 3. So every motif side gets exactly three bobbles, on its sts 4, 10, and 16. St 10 is the center and widest point of the motif. Where two motifs meet, the last bobble of the upper motif and the first bobble of the lower motif are 6 sc apart, so the bobbles sit in pairs on either side of the narrow joint. The sides are curved, so 1 sc per st lies flat. At the ends, 3 sc in each tip space turns the sharp point without pulling.
Tassel
- Wrap yarn 40 times around the 5.5 in (14.0 cm) card.
- Slide a 12 in (30.5 cm) strand under the wraps at the top edge and tie it tightly. Leave both ends long.
- Cut through all the loops at the bottom edge.
- To form a rounded head, wrap a separate strand 6–8 times around the bundle, 0.75 in (1.9 cm) below the top. Knot it and hide the ends inside the tassel.
- Trim the tassel to 5 in (12.7 cm) long.
- Thread the long tie ends through the ch-3 tassel loop, knot them firmly, and hide the ends inside the tassel head.
Final Blocking
- Weave in all ends before blocking. Leave the tassel off for now.
- Lay the strip RS up on the blocking mat.
- Pin the top and bottom tips first, 13 in (33.0 cm) apart.
- Pin each motif at its widest point (the middle bobble) so the stitched edge is 3.5 in (8.9 cm) across.
- Pin each joint so it lies straight and centered.
- Spray the strip until it is damp, not soaked. Pat the almond openings into even, matching points.
- Let it dry completely, at least 4–6 hours.
- Unpin, then attach the tassel. Steam or lightly dampen the tassel and comb the strands straight.
Final Quality-Control Checklist
- Each motif has 38 sts plus 2 tip spaces.
- Each motif measures 2.5 x 4 in (6.4 x 10.2 cm).
- Joints are centered with no gaps or twists.
- Border Round 1 has 120 sts.
- Border Round 2 has 122 sts, 18 bobbles, and both chain loops.
- Each motif side has exactly 3 bobbles, at sts 4, 10, and 16.
- The body measures 3.5 x 13 in (8.9 x 33.0 cm).
- The tassel is 5 in (12.7 cm) long and trimmed evenly.
- All ends are woven in and hidden.
Troubleshooting
Almond looks round, not pointed: Check that each tip is sc with a ch-2 between. Then pin the tips firmly during blocking.
Motif ruffles: Round 1 is too loose, or Round 2 has extra increases. Recount to 32 and 38.
Motif cups: Your hook or tension is too tight. Go up a hook size.
Strip bends to one side: One side of a motif has the wrong count. Recount every side to 19.
Bobbles fall to the back: Push each bobble forward with your finger as you close it.
Hanging loop too small for your rod: Rework the top center st with more chains. The stitch count does not change.
Strand stretches when hung: Use a firmer cotton, or pin it out dry and steam it lightly instead of wetting it.
Care
Hand wash in cool water with mild soap, press out the water in a towel, and dry flat. Comb the tassel straight while it is damp.
Final Notes
Here is the measurement chain from start to finish. Each motif is 2.5 x 4 in (6.4 x 10.2 cm) with 19 sts per side. Three motifs joined tip to tip make a strip 2.5 x 12 in (6.4 x 30.5 cm) with 57 sts per side. A 0.5 in (1.3 cm) border brings the body to 3.5 x 13 in (8.9 x 33.0 cm). With the hanging loop and a 5 in (12.7 cm) tassel, the strand is about 19.25 in (48.9 cm) long. If you check your size at every stage, each strand will match the next. Make one for a tieback, or make a row of them in olive and cream for a curtain.
Happy crocheting!