

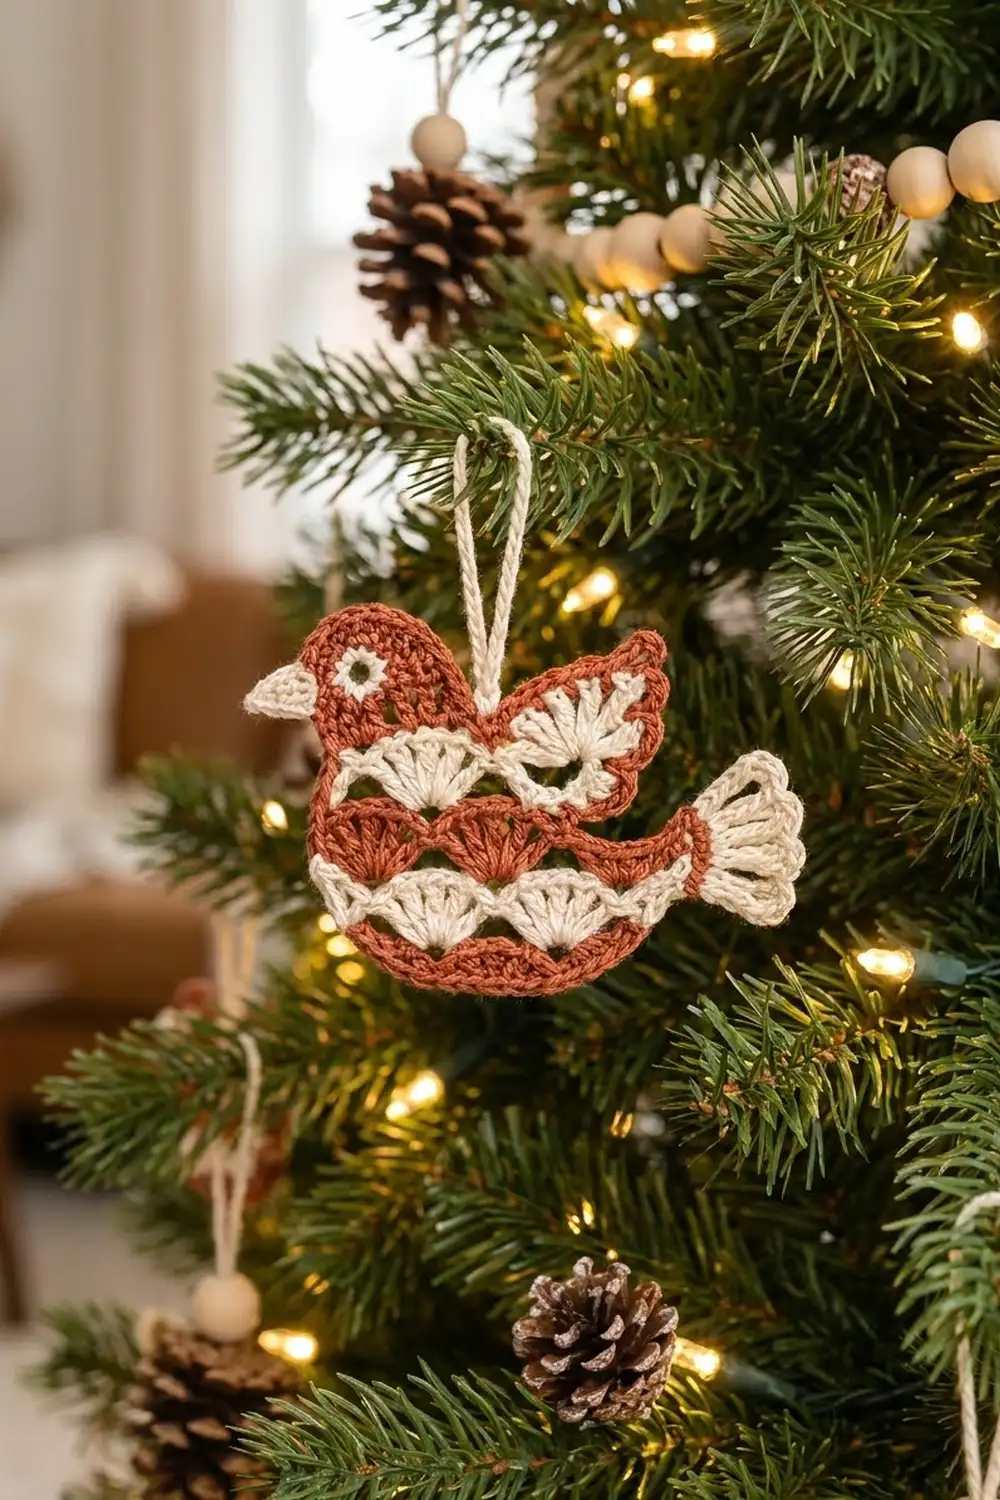
This little songbird is a flat, lacy Christmas ornament worked in two colors: a warm terracotta rust and a soft cream. Alternating rows of shells and open arches create the striped belly, a cream fan wing sweeps up behind the head, and a scalloped fan tail finishes the back. A small cream eye ring, a pointed cream beak, and a cream chain loop complete the look.
The style is folk-inspired and cozy, and it suits a natural tree, a gift tag, or a window hook. The pattern is written in US crochet terms throughout.
The finished body measures 4.5 in (11.4 cm) wide by 3.75 in (9.5 cm) tall after the border. With the beak and tail added, the bird is about 6.25 in (15.9 cm) from beak tip to tail tip. The hanging loop adds about 2.5 in (6.4 cm).
The bird is one single piece. You work the body in flat rows from the bottom up, then work the head and the wing on top of the last body row. One rust border round outlines everything. The beak, tail, and loop are worked directly into the border, and the small eye is crocheted separately and sewn on.
Finished Size and Construction
- Finished body size: 4.5 in x 3.75 in (11.4 cm x 9.5 cm)
- Overall width with beak and tail: 6.25 in (15.9 cm)
- Skill level: Intermediate (shells, color changes, working into row ends)
- Terminology: US crochet terms
- Yarn weight: DK (#3) cotton
- Hook: 3.5 mm (E-4)
- Number of pieces: 1 ornament (plus a tiny eye ring sewn on)
- Layout: single flat motif, no joining
- Piece size before border: 4.25 in x 3.5 in (10.8 cm x 8.9 cm)
- Border depth: 1/8 in (0.3 cm) on every edge
Materials
Choose a smooth, tightly plied cotton or cotton blend in DK weight. Mercerized cotton gives crisp shells and holds its shape well on a tree. Avoid fuzzy yarns, because they blur the open arches.
- Color A, Terracotta Rust: 8 g, about 18 m
- Color B, Cream: 5 g, about 11 m
Quantities include a margin of about 20 percent for gauge checking and weaving in ends.
Tools:
- 3.5 mm (E-4) crochet hook
- Tapestry needle
- Scissors
- Stitch markers (2)
- Rustproof pins and a foam blocking mat
- Spray bottle with water
- Optional: light spray starch
Abbreviations (US Terms)
- ch – chain
- sl st – slip stitch
- sc – single crochet
- hdc – half double crochet
- dc – double crochet
- tr – treble crochet
- sk – skip
- st(s) – stitch(es)
- sp – space
- RS – right side
Special stitch – Shell: 7 dc worked into the same stitch. The center of a shell is its 4th dc.
Half shell: 4 dc worked into the same stitch (the first may be a ch-3).
Gauge and Checkpoints
Gauge: 20 sc and 22 rows = 4 in (10.2 cm) in sc rows with a 3.5 mm hook.
Because this is a single small piece, the best swatch is the bird itself. Work Rows 1 to 3 and measure before going on.
Checkpoints:
- After Row 1: 17 sc measure 3.4 in (8.6 cm) wide.
- After Row 2: 19 sc measure 3.8 in (9.7 cm) wide.
- After Row 7: the body measures 4.25 in (10.8 cm) wide and 2.5 in (6.4 cm) tall.
- After the head and wing: the piece measures 4.25 in x 3.5 in (10.8 cm x 8.9 cm).
- After the border: 4.5 in x 3.75 in (11.4 cm x 9.5 cm).
A tolerance of 1/4 in (0.6 cm) either way is fine for an ornament.
If your piece is too big: go down to a 3.25 mm (D-3) hook, or tighten your foundation chain.
If your piece is too small: go up to a 3.75 mm (F-5) hook. Check that your dc stitches are pulled up to full height.
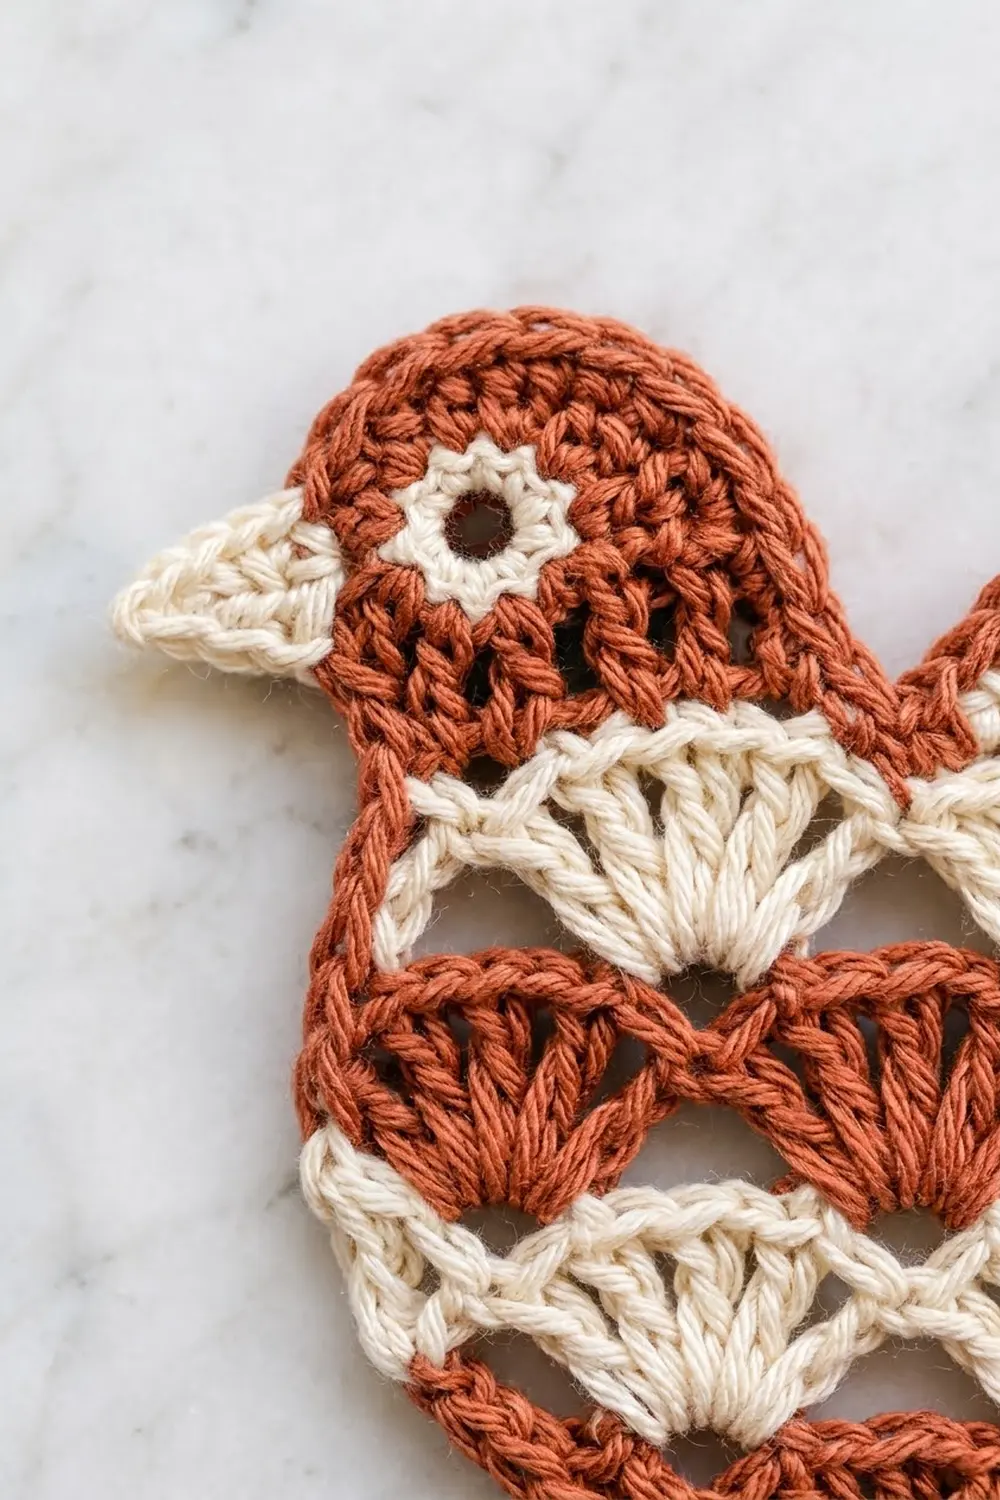
Body
The body is worked in turned rows. Fasten off at each color change, leaving 4 in (10.2 cm) tails. Tails sit at the side edges and are hidden under the border later.
Row 1 (RS), Color A: Ch 18, sc in 2nd ch from hook and in each ch across. Turn. (17 sc)
Row 2, A: Ch 1, 2 sc in first st, sc in next 15 sts, 2 sc in last st. Turn. (19 sc)
This growth row gives the rounded underside of the belly.
Row 3, A: Ch 1, sc in first st, sk 2 sts, shell in next st, sk 2 sts, sc in next st; rep from * 2 more times. Fasten off A. (3 shells and 4 sc = 25 sts)*
Check: the shells sit in sts 4, 10, and 16, and the sc sit in sts 1, 7, 13, and 19.
Row 4, Color B: Join B in the last sc of Row 3. Ch 3 (counts as dc), 3 dc in same st (half shell), sc in center dc of next shell, shell in next sc, sc in center dc of next shell; rep from * once more, 4 dc in last sc (half shell). Fasten off B. (2 shells, 2 half shells, and 3 sc = 25 sts)*
These cream shells sit between the rust shells, which creates the offset scallop band.
Row 5, A: Join A in the top of the ch-3 at the end of Row 4. Ch 1, sc in same st, shell in next sc, sc in center dc of next shell; rep from * once more, shell in next sc, sc in last dc. Fasten off A. (3 shells and 4 sc = 25 sts)*
Row 6, B: Join B in the last sc of Row 5. Ch 1, sc in same st, ch 4, sc in center dc of next shell, ch 4, sc in next sc; rep from * 2 more times. Fasten off B. (7 sc and 6 ch-4 sps)*
The ch-4 spaces form the open cream arches across the chest.
Row 7, A: Join A in the last sc of Row 6. Ch 1, sc in same st, 3 sc in next ch-4 sp, sc in next sc; rep from * 5 more times. Fasten off A. (7 sc + 18 sc = 25 sc)*
Count check: 7 sc are worked one per existing sc, plus 18 sc added in the six spaces, for 25 sc.
Lay the body flat. It should measure 4.25 in (10.8 cm) wide and 2.5 in (6.4 cm) tall. Place a marker in st 1 at the left (beak) end of Row 7, and a marker in st 13.
Head
The head is worked over sts 1 to 9 of Row 7.
Head Row 1, A: With RS facing, join A in st 1 (marked). Ch 1, sc in same st and in next 8 sts. Turn. (9 sc)
Head Row 2, A: Ch 3 (counts as dc), dc in each of next 8 sts. Turn. (9 dc)
Head Row 3, A: Ch 1, sc in first st, hdc in next st, dc in next 5 sts, hdc in next st, sc in last st. Fasten off. (9 sts)
The stepped heights round off the crown. Sts 10 to 12 of Row 7 stay unworked, which forms the dip between the head and the wing.
Wing
The wing is worked over sts 13 to 25 of Row 7.
Wing Row 1, B: With RS facing, join B in st 13 (marked). Ch 1, sc in same st, sk 2 sts, shell in next st, sk 2 sts, sc in next st; rep from * once more. Turn. (2 shells and 3 sc = 17 sts)*
Check: shells sit in sts 16 and 22, and the sc sit in sts 13, 19, and 25.
Wing Row 2, B: Ch 3 (counts as dc), 6 dc in first sc, sc in center dc of next shell, 5 dc in next sc, sc in center dc of next shell, sl st in last sc. Fasten off. (15 sts)
The tall 7-st fan at the back end and the smaller 5-dc fan toward the neck make the wing sweep upward toward the tail. The piece now measures 4.25 in x 3.5 in (10.8 cm x 8.9 cm).
Eye
Color B: Make a magic ring, ch 1, 8 sc in ring, pull the ring closed but leave a small hole, sl st in first sc. Fasten off, leaving an 8 in (20.3 cm) tail. (8 sc)
The eye measures about 0.4 in (1.0 cm). Set it aside until after blocking.
Border
The border is a single round of sc in Color A. It outlines the body, head, and wing, and it gives you even stitches to work the beak, tail, and loop into.
Border gauge: the same as the main gauge, 5 sc per 1 in (2.5 cm) along stitch tops. Along row ends, work 1 sc per sc row and 2 sc per dc or shell row.
Border Round, A: With RS facing, join A in the first foundation ch at the bottom left corner. Ch 1 and work as follows:
- Bottom edge: 2 sc in first ch, sc in next 15 ch, 2 sc in last ch. (19 sc)
- Right body side, up the row ends of Rows 1 to 7: 1, 1, 2, 2, 2, 1, 1. (10 sc)
- Wing back edge: 2 sc along Wing Row 1, 2 sc along Wing Row 2. (4 sc)
- Wing top: 3 sc in top of ch-3 (wing tip), sc in next 6 dc, sc in sc, sc in next 5 dc, sc in sc, sc in sl st. (17 sc)
- Wing front edge: 2 sc down Wing Row 1. (2 sc)
- Back dip: sc in sts 12, 11, and 10 of Row 7. (3 sc)
- Head back: up the row ends of Head Rows 1 to 3: 1, 2, 1. (4 sc)
- Head top: sc in sc, sc in hdc, 2 sc in each of next 5 dc, sc in hdc, sc in sc. (14 sc)
- Head front: down Head Rows 3 to 1: 1, 2, 1. (4 sc)
- Left body side: down Rows 7 to 1: 1, 1, 2, 2, 2, 1, 1. (10 sc)
Sl st in first sc to join and fasten off. (87 sc total)
Why the math works: 19 + 10 + 4 + 17 + 2 + 3 + 4 + 14 + 4 + 10 = 87. The bottom edge is 17 sc worked one per foundation ch, plus 2 corner increases, so each corner is counted once. The row-end rule matches the height of each row: a sc row is about one sc tall, and a dc row is about two sc tall, so the edges stay flat. The 3 sc at the wing tip and the 5 doubled sts on the crown add just enough length to turn those curves without ruffling.
Beak
Color B: Join B in the 2nd sc of the Head front section (counting from the top). Ch 4, sc in 2nd ch from hook, hdc in next ch, dc in next ch, sk next border sc, sl st in following sc. Fasten off. (3-st triangle)
The beak points out toward the left and is about 0.4 in (1.0 cm) long.
Tail
Stem, Color A: Join A in the 5th sc of the Right body side section (counting up from the bottom corner, at Row 4). Ch 4, sc in 2nd ch from hook and in next 2 ch, sl st in same border sc. Fasten off. (3 sc)
Fan Row 1, Color B: Join B in the first sc of the stem (at the outer tip). Ch 4 (counts as tr), 9 tr in same st. Turn. (10 tr)
Fan Row 2, B: Ch 1, sc in first tr, ch 3, sc in next tr; rep from * 8 more times. Fasten off. (10 sc and 9 ch-3 loops)*
The tiny loops give the tail its scalloped, feathered edge. Tack the base of the first and last tr lightly to the body border with the B tail so the fan stays angled slightly upward.
Hanging Loop
Color B: Join B in the center sc of the Back dip section. Ch 30, sl st in same st. Fasten off and secure the end firmly. The loop hangs about 2.5 in (6.4 cm) above the bird.
Final Blocking
- Weave in all ends along the border on the wrong side.
- Draw a 4.5 in x 3.75 in (11.4 cm x 9.5 cm) rectangle on paper and place it under your mat cover as a guide.
- Spray the bird until evenly damp, but not dripping.
- Pin the bottom edge straight and the belly curve smooth.
- Pin the center of each shell and each ch-4 arch so the openings are clear.
- Pin the wing tip upward and fan the tail loops out evenly.
- Lightly starch if you want a stiffer ornament.
- Let it dry completely, at least 6 hours, before unpinning.
- Sew the eye onto Head Row 2, about 0.25 in (0.6 cm) behind the beak. Add an A French knot in the center for the pupil.
Final Quality-Control Checklist
- Body is 4.5 in x 3.75 in (11.4 cm x 9.5 cm), within 1/4 in (0.6 cm).
- Overall width with beak and tail is about 6.25 in (15.9 cm).
- Rows 3 and 5 each have 3 rust shells; Row 4 has 2 cream shells plus 2 half shells.
- Row 6 shows 6 clean open arches.
- Wing has 2 cream fans, taller toward the tail.
- Border round counts 87 sc and lies flat with no ruffles.
- Beak, tail, and loop are secure, and no ends show on the front.
- Eye is centered on the head and stitched firmly.
Troubleshooting
The belly cups or curls up. Your foundation chain is too tight. Redo Row 1 with a hook one size larger for the chain only.
Shells look crowded. Make sure you skip exactly 2 sts on each side of every shell in Row 3 and Wing Row 1.
The border ruffles. You have too many sc on the row ends. Use 1 sc per sc row and 2 sc per dc row only.
The border pulls the edges in. Your border tension is tighter than the body. Relax your hand or use a hook half a size larger for the border.
The wing leans forward. Check that Wing Row 2 starts with the 7-st fan at the tail end, not the neck end.
The tail droops. Tack the outer tr more firmly, and starch the fan during blocking.
The ornament twists when hanging. Move the loop one stitch toward the heavier side until it hangs level.
Care
Hand wash in cool water with mild soap, press out the water in a towel, and dry flat. Re-pin to shape if the shells relax after washing.
Final Notes
The measurement chain is simple. Row 1 sets the base at 3.4 in (8.6 cm). The shell rows widen the body to 4.25 in (10.8 cm), and Row 7 brings it to 2.5 in (6.4 cm) tall. The head and wing raise the piece to 3.5 in (8.9 cm). The 87-stitch border adds 1/8 in (0.3 cm) on every edge for a finished body of 4.5 in x 3.75 in (11.4 cm x 9.5 cm). The beak and tail stretch the bird to 6.25 in (15.9 cm) overall.
If each checkpoint matches, your songbird will look crisp on the tree and match every other bird you make. Make a small flock in one evening and tie them onto gifts.
Happy crocheting!