

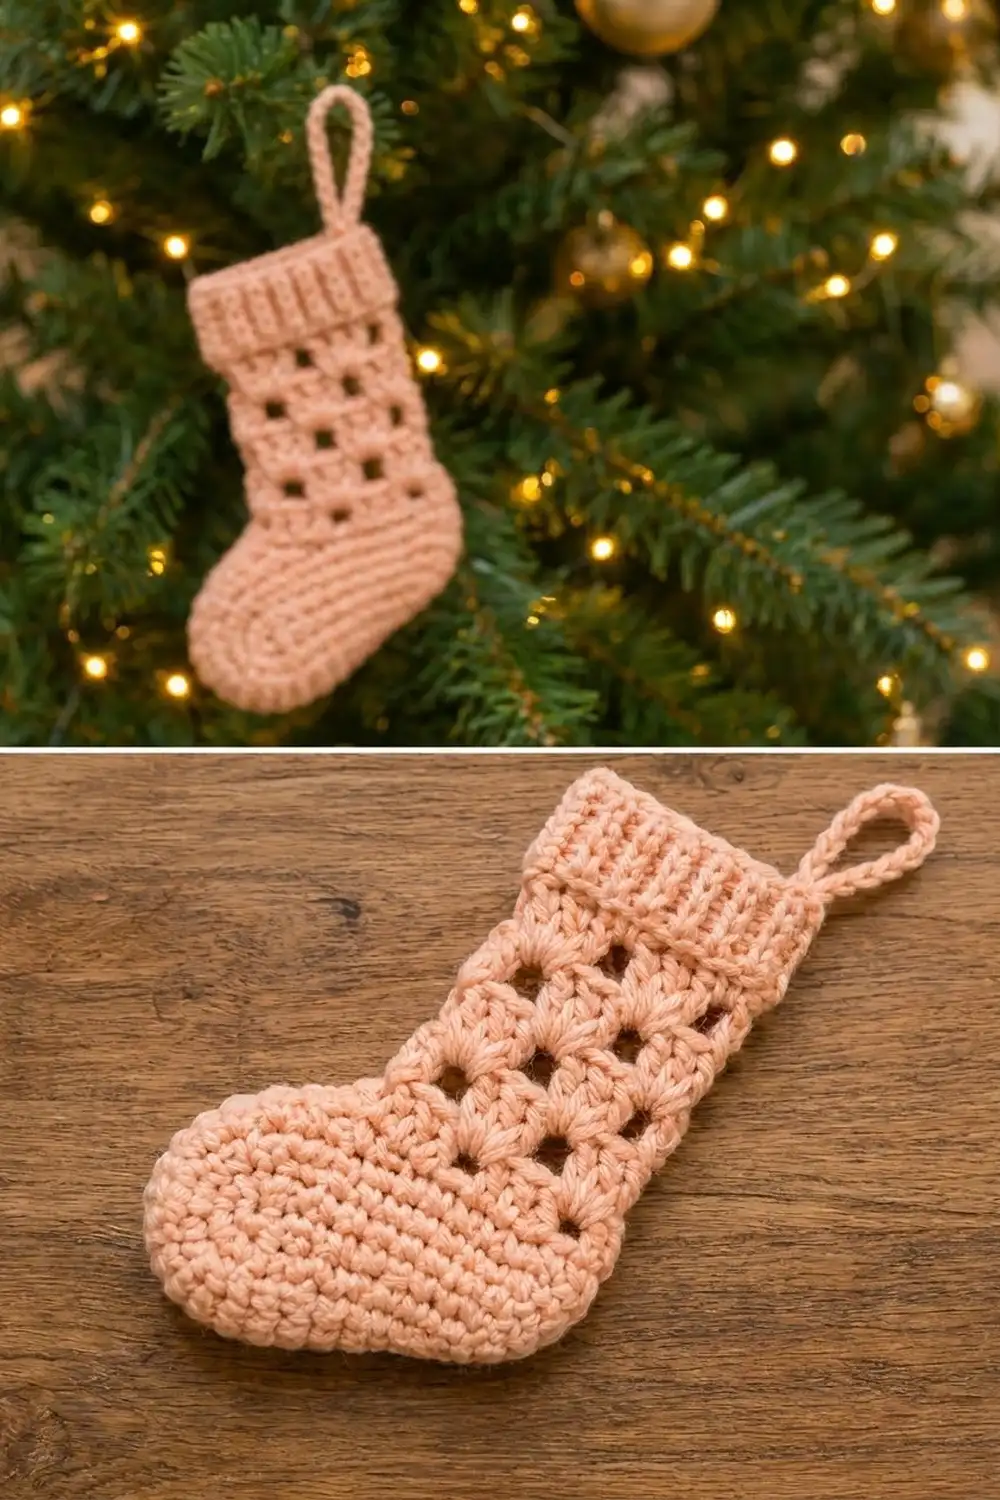
This little stocking ornament combines three textures in one small piece. The foot is a solid, rounded shape in single crochet. The leg is lacy, made of staggered shell stitches with tiny windows between them. The top has a crisp ribbed cuff and a sturdy hanging loop.
The sample is worked in one soft peach shade, which looks warm against green branches and gold baubles. It also works well in cream, blush, sage or classic red. The style is simple and vintage-inspired, with no appliqués, so it’s quick to repeat when you want a matching set for the tree.
This pattern uses US crochet terms. The finished ornament measures about 4 in (10.2 cm) wide at the foot and 4.25 in (10.8 cm) tall, not counting the loop. The loop adds about 1.25 in (3.2 cm).
Construction is flat and single-layer. You crochet the body from the sole upward in rows: first the solid foot, then the shell-stitch leg. Next you work a single-crochet edging around the sides and bottom. Finally, you make the cuff sideways as a small ribbed strip, sew it across the top and add the loop.
Finished Size and Construction
- Finished size: 4 in (10.2 cm) wide at the foot × 4.25 in (10.8 cm) tall, plus a 1.25 in (3.2 cm) loop
- Skill level: Easy / advanced beginner
- Terminology: US
- Yarn weight: DK (light worsted, #3)
- Hook: 3.5 mm (E-4)
- Number of pieces: 1 ornament (body + cuff strip, sewn together)
- Layout: Single flat stocking, toe pointing left, loop at the heel-side corner
- Body size before border: 3.6 in (9.1 cm) wide at the foot, 2.6 in (6.6 cm) wide at the leg, 3.25 in (8.3 cm) tall
- Border depth: about 0.2 in (0.5 cm) per edge
- Cuff size: 3.1 in (7.9 cm) × 0.8 in (2.0 cm)
Materials
Yarn: Use a smooth DK yarn so the shells and ribbing show clearly. Cotton or a cotton blend gives crisp stitch definition and holds its shape on the tree. Soft acrylic also works and is a little more forgiving. Avoid fuzzy or highly textured yarns, because they fill in the shell windows.
- Peach (main color): about 8 g / 18 m per ornament
These quantities include a small safety margin for the gauge swatch and sewing tails. For a set of six ornaments, plan on about 48 g / 108 m.
Tools:
– 3.5 mm (E-4) crochet hook
– Tapestry needle
– Scissors
– 2 stitch markers
– Ruler or tape measure
– Pins and a blocking surface
– Spray bottle with water
Abbreviations (US Terms)
- ch – chain
- sl st – slip stitch
- sc – single crochet
- dc – double crochet
- sc2tog – single crochet 2 together (insert in next st, pull up a loop, insert in following st, pull up a loop, yarn over and draw through all 3 loops)
- BLO – back loop only
- sk – skip
- st(s) – stitch(es)
- RS / WS – right side / wrong side
Special stitch – Shell: Work 5 dc in the same stitch.
Half shell: Work 3 dc in the same stitch. At the start of a row, ch 3 counts as the first dc, so you add 2 dc.
Gauge and Checkpoints
Gauge: 20 sc and 22 rows = 4 in (10.2 cm) in sc. In other words, 5 sc and 5.5 rows per inch.
The ornament is small, so a full swatch is optional. Instead, treat the first foot as your test piece and measure it at each checkpoint below.
- After Row 3 of the foot: the widest row (18 sts) should measure 3.6 in (9.1 cm).
- After Row 8: the foot should be about 1.5 in (3.8 cm) tall.
- After Row 12: the four shell rows should measure about 1.6 in (4.1 cm) tall and 2.6 in (6.6 cm) wide.
- After Row 13: the full body should be 3.25 in (8.3 cm) tall.
- After the border: the foot should measure 4 in (10.2 cm) wide and the leg 3 in (7.6 cm) wide.
If your piece is too big, go down to a 3.25 mm hook. If it’s too small, go up to a 3.75 mm hook. Compare the leg width with the cuff width as well: the cuff should be equal to or slightly wider than the bordered leg.
Body
Foot
The foot is worked in sc rows from the sole upward. Rows 1–5 shape a rounded sole. Rows 6–8 decrease at the toe end only, which slopes the instep down from the toe and leaves 13 sts above the heel for the leg.
Row 1 is a RS row. All odd-numbered rows are RS rows.
Row 1 (RS): Ch 15, sc in 2nd ch from hook and in each ch across, turn. (14 sc) This row measures 2.8 in (7.1 cm).
Row 2: Ch 1, 2 sc in first st, sc in next 12 sts, 2 sc in last st, turn. (16 sc)
Row 3: Ch 1, 2 sc in first st, sc in next 14 sts, 2 sc in last st, turn. (18 sc)
Rows 4–5: Ch 1, sc in each st across, turn. (18 sc)
Row 5 ends at the left edge with the RS facing you. That edge is the toe, so place a marker there. The opposite edge is the heel.
Row 6 (begins at toe): Ch 1, sc2tog twice, sc in next 14 sts, turn. (16 sts)
Row 7 (ends at toe): Ch 1, sc in next 12 sts, sc2tog twice, turn. (14 sts)
Row 8 (begins at toe): Ch 1, sc2tog, sc in next 12 sts, turn. (13 sts)
Row 8 ends at the heel edge. The heel edge stays straight from Row 3 upward, and the toe now curves up and in toward the leg.
Checkpoint: The foot is about 1.5 in (3.8 cm) tall and 3.6 in (9.1 cm) wide at its widest point.
Leg (Shell Pattern)
The leg is worked over all 13 sts of Row 8. Two row types alternate: Row A has 2 full shells, and Row B has a center shell with a half shell at each edge. This makes the shells stagger like brickwork. The small openings appear where each sc anchor sits between two fans.
Row 9 (Row A, RS): Ch 1, sc in first st, sk 2 sts, shell in next st, sk 2 sts, sc in next st; rep from * once more, turn.
(3 sc + 2 shells = 13 sts)
Row 10 (Row B): Ch 3 (counts as dc), 2 dc in first sc (half shell), sk 2 dc, sc in center dc of shell, sk 2 dc, shell in next sc, sk 2 dc, sc in center dc of next shell, sk 2 dc, 3 dc in last sc, turn.
(3 + 1 + 5 + 1 + 3 = 13 sts)
Row 11 (Row A): Ch 1, sc in first dc, sk 2 dc, shell in next sc, sk 2 dc, sc in center dc of shell, sk 2 dc, shell in next sc, sk 2 dc, sc in top of turning ch, turn.
(13 sts)
Row 12 (Row B): Repeat Row 10. (13 sts)
Checkpoint: The shell section is about 1.6 in (4.1 cm) tall and 2.6 in (6.6 cm) wide.
Row 13 (leveling row, RS): Ch 1, sc in first 3 sts, dc in next sc, sc in next 5 dc, dc in next sc, sc in last 3 sts (the last one goes into the top of the turning ch).
(11 sc + 2 dc = 13 sts)
The dc stitches fill the dips above the sc anchors, so the top edge is straight and ready for the cuff. Don’t turn and don’t fasten off, because the border starts here.
Checkpoint: The body measures 3.25 in (8.3 cm) tall.
Border
Border gauge: The border uses the same sc gauge, 5 sts per inch along the edge. One sc row adds about 0.2 in (0.5 cm) to each worked edge.
The border goes around the toe side, the sole and the heel side. The top edge stays unworked because the cuff covers it. You’ll be working into row ends, so insert the hook under 2 strands of the edge stitch for a firm edge.
Row 13 ended at the top toe-side corner. Keep the RS facing you and continue as follows.
Toe side (working down), 20 sc:
– 1 sc in the end of Row 13
– 2 sc in the end of each shell row, Rows 12–9 (8 sc)
– 2 sc in the end of each decrease row, Rows 8–6 (6 sc)
– 1 sc in the end of each row, Rows 5–1 (5 sc)
Sole, 16 sc: Working across the opposite side of the starting chain, 2 sc in the first ch, sc in the next 12 ch, 2 sc in the last ch.
Heel side (working up), 17 sc:
– 1 sc in the end of each row, Rows 1–8 (8 sc)
– 2 sc in the end of each shell row, Rows 9–12 (8 sc)
– 1 sc in the end of Row 13
Total: 20 + 16 + 17 = 53 sc. Fasten off and weave in the ends.
Why the math works:
– Each sc row is 0.18 in (0.5 cm) tall, which matches 1 sc at 5 sts per inch, so 1 sc per sc row-end lies flat.
– A dc-height shell row is about 0.4 in (1.0 cm), so it needs 2 sc.
– The toe slope is a diagonal: 5 sts across over 3 rows, about 1.15 in (2.9 cm) long. It needs 6 sc instead of 3, or it will pucker.
– On the sole, the 2-sc increases at each end follow the rounded heel and toe.
Checkpoint: The foot is 4 in (10.2 cm) wide and the leg 3 in (7.6 cm) wide.
Ribbed Cuff
The cuff is worked sideways in sc BLO. Its rows become the vertical ridges you see across the top of the stocking.
Row 1: Ch 5, sc in 2nd ch from hook and in each ch across, turn. (4 sc)
Rows 2–17: Ch 1, sc BLO in each st across, turn. (4 sc per row)
Fasten off and leave a 12 in (30.5 cm) tail.
Checkpoint: The cuff is 3.1 in (7.9 cm) long (17 rows at 5.5 rows per inch) and 0.8 in (2.0 cm) tall. It should be 0.05 in (0.1 cm) longer than the bordered leg on each side.
Attach the Cuff
- Lay the body RS up. Place the cuff above it with the ridges running vertically, so one long edge (the 17 row ends) touches the top edge of the body.
- Butt the edges together and pin at both ends and in the center. The top of the body has 15 positions: 13 sts from Row 13 plus 1 border sc at each corner.
- Whipstitch the 17 cuff row ends to these 15 positions. Ease in the 2 extra rows by working twice into a row end near each third of the seam.
- Stitch through both layers firmly, but don’t pull so tight that the seam ruffles.
- Weave the tail in through the back of the cuff.
Hanging Loop
- Join yarn with a sl st at the top heel-side corner of the cuff.
- Ch 16, then sl st in the same corner st to form the loop.
- Ch 1 and work 22 sc into the loop to cover the chain completely.
- Sl st in the first sc. Fasten off and weave the end in down through the cuff.
Checkpoint: The loop stands about 1.25 in (3.2 cm) tall, giving a total hanging height of 5.5 in (14.0 cm).
Final Blocking
- Lightly mist the ornament with water until it’s damp but not wet.
- Lay it RS up on a blocking mat.
- Pin the sole straight at 4 in (10.2 cm) wide, then round the toe and heel curves with 2–3 pins each.
- Pin the leg sides straight and parallel at 3 in (7.6 cm) wide.
- Open each shell gently with your fingertip and press the small windows square.
- Pin the cuff flat at 3.1 in (7.9 cm) × 0.8 in (2.0 cm). Don’t stretch the ribbing lengthwise.
- Straighten the loop so it stands upright.
- Let it dry completely, then unpin.
For acrylic yarn, you can steam lightly instead: hold the iron above the piece and never press it onto the stitches.
Final Quality-Control Checklist
- Foot is 4 in (10.2 cm) wide, with a rounded toe on the left and the heel on the right
- Leg is 3 in (7.6 cm) wide with straight, parallel sides
- Four shell rows, staggered, with open windows between the fans
- Top edge of Row 13 is level
- Border count is 53 sc and the edge lies flat without ruffles or puckers
- Cuff has 17 rows, ridges run vertically and it’s slightly wider than the leg
- Total height is 4.25 in (10.8 cm), plus a 1.25 in (3.2 cm) loop
- Loop is securely anchored at the heel-side corner
- All ends are woven in invisibly on the WS
Troubleshooting
Toe looks pointed instead of rounded: Check that the toe-side decreases are in Rows 6–8 only and that Rows 2–3 have increases at both ends. Blocking also helps round the curve.
Leg is wider than the foot’s heel area: The shells are too loose. Shorten your dc by pulling the first loop up less, or use a smaller hook for Rows 9–13 only.
Shell windows are closed up: Make sure you skip exactly 2 sts on each side of every shell and sc. Fuzzy yarn will also fill in the gaps.
Border ruffles: You’ve worked too many sc. Recount each side against the 20 / 16 / 17 totals.
Border puckers at the toe: You probably worked only 1 sc per row-end on Rows 6–8. Use 2 sc there.
Cuff is shorter than the leg: Add 1–2 rows to the cuff, keeping an odd number of rows so the strip looks the same at both ends.
Ornament hangs crooked: The loop is too far from the corner. Re-anchor it right at the top heel-side corner of the cuff.
Care
Hand wash in cool water with a mild soap, press out the water in a towel, and dry flat, reshaping as you go. Store flat or hanging, away from direct sunlight, so the peach color doesn’t fade.

Final Notes
Here is the full measurement chain from start to finish:
- Gauge: 20 sc × 22 rows = 4 in (10.2 cm)
- Foot: 18 sts at its widest, 3.6 in (9.1 cm), over 8 rows, 1.5 in (3.8 cm) tall
- Leg: 13 sts, 2.6 in (6.6 cm) wide, 1.6 in (4.1 cm) of shells
- Body: 3.25 in (8.3 cm) tall
- Border: 53 sc, bringing the piece to 4 in (10.2 cm) at the foot and 3 in (7.6 cm) at the leg
- Cuff: 17 rows, 3.1 in (7.9 cm) wide, 0.8 in (2.0 cm) tall, giving a total of 4.25 in (10.8 cm)
- Loop: adds 1.25 in (3.2 cm)
If each checkpoint matches, the ornament will turn out the right size and shape. Once your first one is right, the rest of the set will follow the same numbers.
Happy crocheting!