

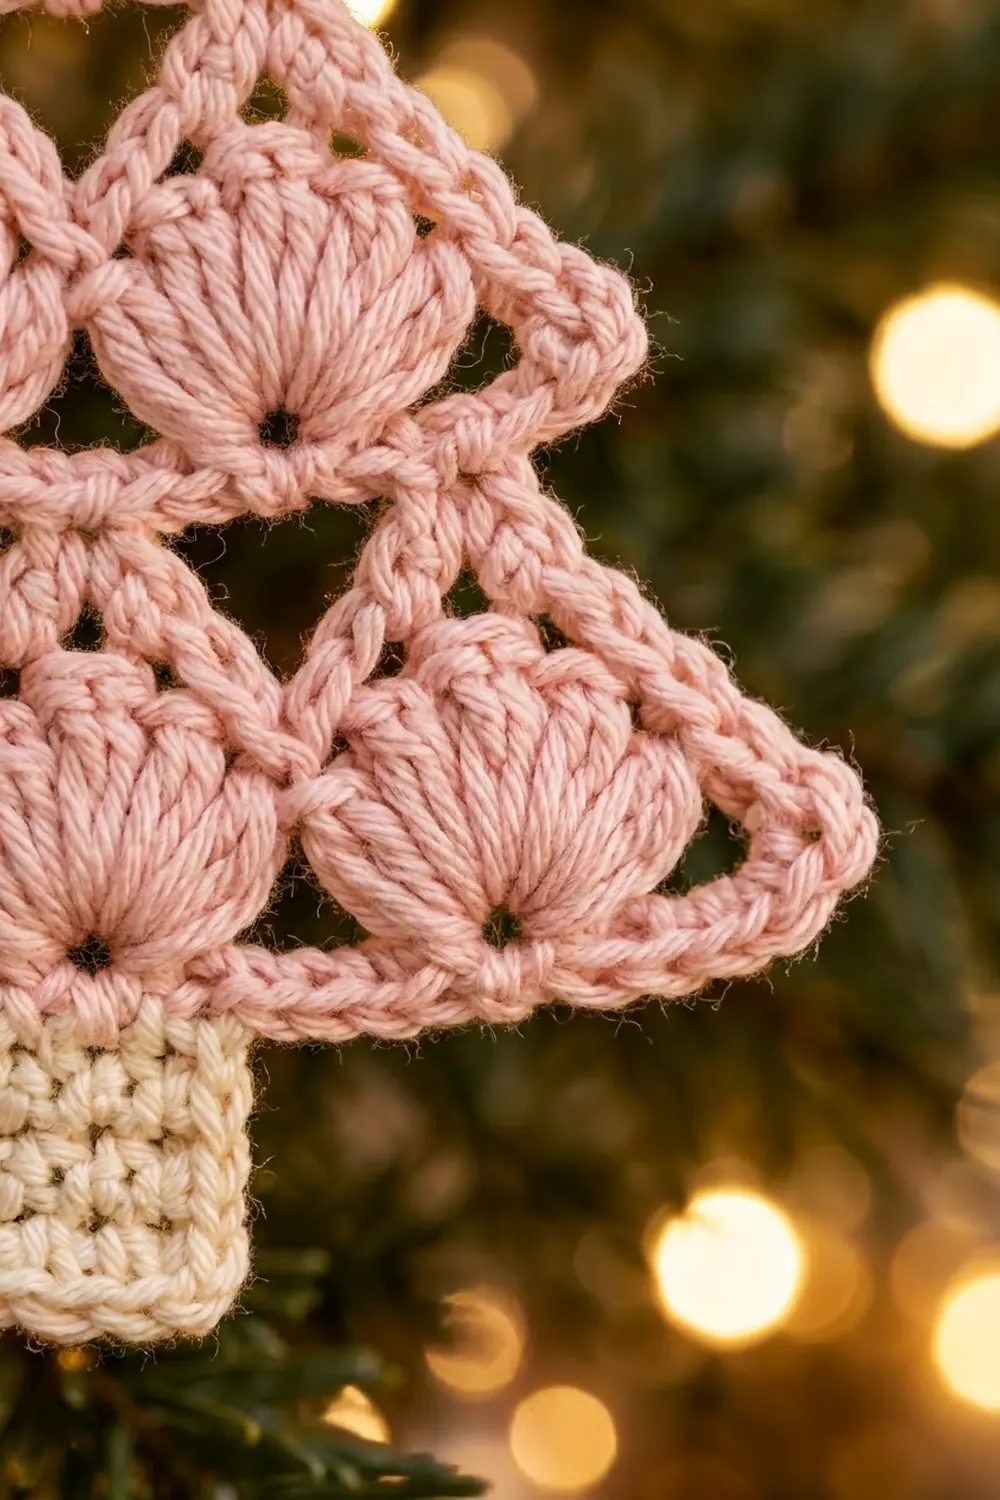
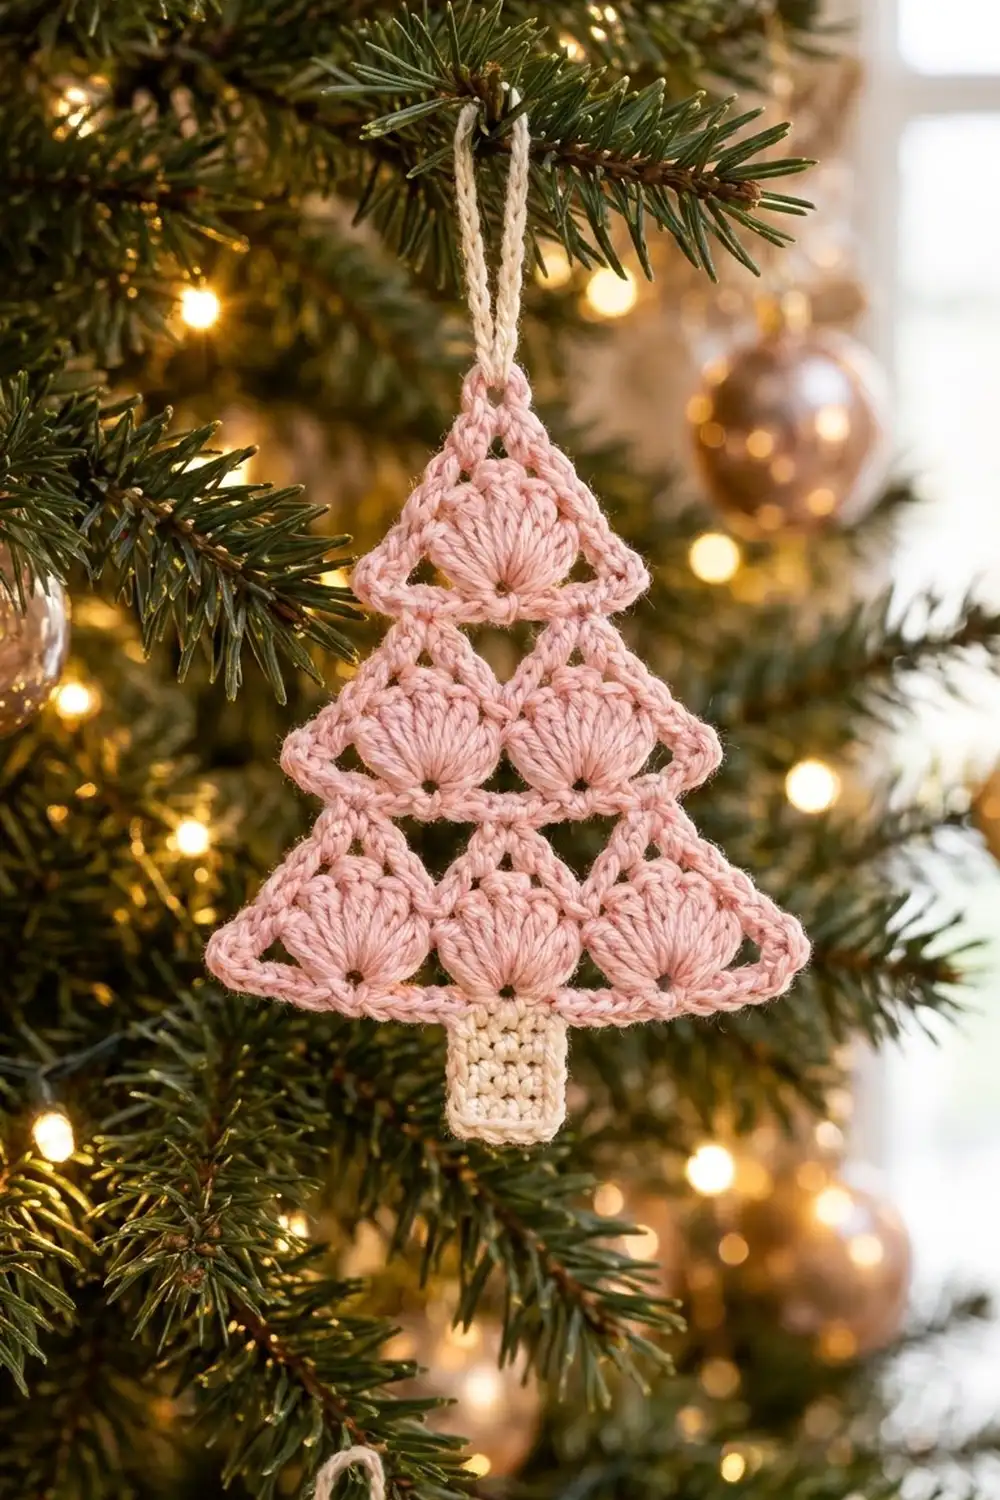
This little tree ornament is built from soft shell fans stacked in three tiers: three fans at the bottom, two in the middle, and one at the top. Small triangular windows between the fans let light through. A neat single crochet outline gives the triangle a crisp, corded edge.
The tree is worked in blush pink, with a cream trunk and a cream hanging loop. The look is gentle and vintage, and it fits a pastel or neutral Christmas theme. A set of these looks lovely on a tree, but you make each ornament on its own as one piece.
The pattern uses US crochet terms. The finished ornament is about 4.5 in (11.4 cm) wide and 4.6 in (11.7 cm) tall including the trunk. The hanging loop adds about 2 in (5.1 cm) above the tip.
You work the tree flat in rows from the bottom up. Each tier has three rows: a shell row, a mesh row, and a solid single crochet row. Slip-stitch steps make each tier narrower than the one below it, and a short tip is decreased to a point. One round of single crochet edges the whole triangle. Then you work the trunk down from the bottom border and add the loop at the tip.
Finished Size and Construction
- Finished size: 4.5 in (11.4 cm) wide x 4.6 in (11.7 cm) tall, including the trunk
- Skill level: Easy+ (simple shells, basic decreases, working into row ends)
- Terminology: US crochet terms
- Yarn weight: #2 fine (sport) cotton
- Hook: 2.5 mm (between US B-1 and C-2)
- Number of pieces: 1. The trunk and loop are worked directly onto the tree, so there is no sewing.
- Layout: one triangle with fans in 3 tiers (3 / 2 / 1)
- Piece size before border: 4.2 in (10.7 cm) wide x 3.2 in (8.1 cm) tall
- Border depth: about 0.15 in (0.4 cm) on each edge, adding 0.3 in (0.8 cm) to both width and height
- Tree size after border: 4.5 in (11.4 cm) wide x 3.5 in (8.9 cm) tall
- Trunk: 1.2 in (3.0 cm) wide x 1.1 in (2.8 cm) tall
Materials
Choose a smooth sport-weight cotton or cotton blend. Mercerized cotton gives the shells clear definition and blocks flat and crisp. Fuzzy yarns will hide the windows between the fans.
- Color A, Blush Pink (tree and border): 7 g / about 21 m (23 yd)
- Color B, Cream (trunk and hanging loop): 3 g / about 9 m (10 yd)
These amounts include a margin of about 30% for testing and tension differences.
Tools:
– 2.5 mm crochet hook
– Tapestry needle
– Scissors
– 2 stitch markers
– Ruler or tape measure
– Blocking mat, rustproof pins, and a spray bottle
– Optional: diluted fabric stiffener
Abbreviations (US Terms)
- ch – chain
- sl st – slip stitch
- sc – single crochet
- dc – double crochet
- sc2tog – single crochet 2 together
- sc3tog – single crochet 3 together
- sp – space
- st(s) – stitch(es)
- rep – repeat
Special stitch – Shell: 9 dc in the same stitch. The 5th (center) dc is the top of the fan. The point where all 9 stitches meet is the fan’s dark center at its base.
Gauge and Checkpoints
Gauge: 24 sc and 22 sc rows = 4 in (10.2 cm). One shell row is about 0.4 in (1.0 cm) tall.
You don’t need a separate swatch. Use Rows 1–4 as your test, because they set the full width of the tree.
Checkpoints:
– After Row 4: 4.2 in (10.7 cm) wide and about 0.9 in (2.3 cm) tall
– After Row 7: about 1.7 in (4.3 cm) tall
– After Row 10: about 2.5 in (6.4 cm) tall
– After Row 14: 3.2 in (8.1 cm) tall at the center
– After the border: 4.5 in (11.4 cm) wide x 3.5 in (8.9 cm) tall
– After the trunk: 4.6 in (11.7 cm) total height
If Row 4 is wider than 4.4 in (11.2 cm): go down to a 2.25 mm hook.
If Row 4 is narrower than 4.0 in (10.2 cm): go up to a 2.75 mm hook.
Change only the hook size. Keep every stitch count the same, because the design depends on its 8-stitch repeat.
Tree Body
Use Color A for the whole body. The ch 1 at the start of a row does not count as a stitch.
Tier 1 (3 fans)
Row 1: Ch 26. Sc in the 2nd ch from the hook and in each ch across. Turn. (25 sc)
Row 2 (shells): Ch 1, sc in the first sc. Skip 3 sc, Shell in the next sc, skip 3 sc, sc in the next sc. Rep from * 2 more times. Turn. (3 shells, 4 sc)*
Each repeat uses 8 base stitches, and 1 + (3 x 8) = 25, so every stitch of Row 1 is used. The fans open upward. The sc between them are the anchor points.
Row 3 (mesh): Ch 1, sc in the first sc. Ch 3, skip 3 dc, sc in each of the next 3 dc (the center of the shell), ch 3, skip 3 dc, sc in the next sc. Rep from * 2 more times. Turn. (13 sc, 6 ch-3 sps)*
The ch-3 loops arch over the outer stitches of each fan. Next to each anchor sc they leave small open triangles, which form the windows between the fans.
Row 4 (solid line): Ch 1, sc in the first sc. 2 sc in the ch-3 sp, sc in each of the next 3 sc, 2 sc in the next ch-3 sp, sc in the next sc. Rep from * 2 more times. Turn. (25 sc)*
This is a conversion row: 13 sc worked 1 per existing sc, plus 12 sc in the 6 ch-3 sps (2 in each), for 25 sc. The width stays the same as Row 1.
Checkpoint: 4.2 in (10.7 cm) wide.
Stitches 9 and 17 of Row 4 sit directly above the anchor sc between the fans. This places the Tier 2 fans right over the windows.
Tier 2 (2 fans)
Row 5: Sl st in each of the first 5 sts. Ch 1, sc in the same st as the last sl st (st 5). Skip 3 sts, Shell in the next st, skip 3 sts, sc in the next st. Rep from * once more. Leave the last 4 sts unworked. Turn. (2 shells, 3 sc)*
The shells land in stitches 9 and 17, and the row spans 17 base stitches (sts 5–21). The 4 stitches left at each end form the first step of the outline.
Row 6: Ch 1, sc in the first sc. Ch 3, skip 3 dc, sc in each of the next 3 dc, ch 3, skip 3 dc, sc in the next sc. Rep from * once more. Turn. (9 sc, 4 ch-3 sps)*
Row 7: Ch 1, sc in the first sc. 2 sc in the ch-3 sp, sc in each of the next 3 sc, 2 sc in the next ch-3 sp, sc in the next sc. Rep from * once more. Turn. (17 sc)*
That is 9 sc worked 1 per stitch, plus 8 sc in the ch-3 sps, for 17 sc.
Checkpoint: about 1.7 in (4.3 cm) tall.
Tier 3 (1 fan)
Row 8: Sl st in each of the first 5 sts. Ch 1, sc in the same st as the last sl st. Skip 3 sts, Shell in the next st, skip 3 sts, sc in the next st. Leave the last 4 sts unworked. Turn. (1 shell, 2 sc)
Row 9: Ch 1, sc in the first sc, ch 3, skip 3 dc, sc in each of the next 3 dc, ch 3, skip 3 dc, sc in the last sc. Turn. (5 sc, 2 ch-3 sps)
Row 10: Ch 1, sc in the first sc, 2 sc in the ch-3 sp, sc in each of the next 3 sc, 2 sc in the next ch-3 sp, sc in the last sc. Turn. (9 sc)
That is 5 sc worked 1 per stitch, plus 4 sc in the ch-3 sps, for 9 sc.
Checkpoint: about 2.5 in (6.4 cm) tall.
Tip
Row 11: Ch 1, sc2tog, sc in each of the next 5 sts, sc2tog. Turn. (7 sc)
Row 12: Ch 1, sc2tog, sc in each of the next 3 sts, sc2tog. Turn. (5 sc)
Row 13: Ch 1, sc2tog, sc in the next st, sc2tog. Turn. (3 sc)
Row 14: Ch 1, sc3tog. (1 st) Do not fasten off.
Checkpoint: 3.2 in (8.1 cm) tall from Row 1 to the tip.
Border
Border gauge: the same as the body, 6 sc per 1 in (2.5 cm). The border is one round of sc in Color A and adds about 0.15 in (0.4 cm) to every edge.
Round 1: Continue from Row 14. Ch 1 and rotate the piece to work down the first slanted side.
- Slanted side 1: Work these 24 sc in order. 1 sc in the end of each of Rows 13, 12, 11, 10, and 9. 2 sc in the end of Row 8 (the shell row). 1 sc in each of the 4 step sts. 1 sc in the end of each of Rows 7 and 6. 2 sc in the end of Row 5. 1 sc in each of the 4 step sts. 1 sc in the end of each of Rows 4 and 3. 2 sc in the end of Row 2. 1 sc in the end of Row 1. (24 sc)
- Base corner: 3 sc in the first free loop of the foundation chain.
- Bottom edge: 1 sc in each of the next 23 free loops. (23 sc)
- Base corner: 3 sc in the last free loop.
- Slanted side 2: 24 sc, working the same sequence in reverse from Row 1 up to Row 13. (24 sc)
- Apex: 2 sc in the top of the Row 14 stitch. Sl st to the first sc of the round.
Total: 24 + 3 + 23 + 3 + 24 + 2 = 79 sc. Fasten off and weave in the end.
Why the math works:
– Bottom edge: The 23 middle sc plus the center sc of each corner group make 25 stitches. That matches the 25 foundation stitches, so the base stays straight. The 2 extra sc in each corner group turn the corner without pulling.
– Slanted sides: 10 sc row ends at 1 sc each, plus 3 shell row ends at 2 sc each (6 sc), plus 2 steps of 4 sts (8 sc), gives 24 sc. Each side is about 3.8 in (9.7 cm) long, which needs about 23 sc at 6 sc per inch. The 1 extra stitch lets the border ease around the steps without tightening.
– Apex: Working only 2 sc into the apex keeps the tip sharp.
Checkpoint: 4.5 in (11.4 cm) wide x 3.5 in (8.9 cm) tall.
Trunk
Use Color B. Hold the tree upside down, with the right side facing you.
Row 1: Count the 23 sc along the bottom edge between the two corner groups. Join Color B with a standing sc in the 9th sc, then sc in each of the next 6 sc. Turn. (7 sc)
This leaves 8 sc free on each side: 8 + 7 + 8 = 23, so the trunk is centered.
Rows 2–6: Ch 1, sc in each st across. Turn. (7 sc)
Fasten off. The trunk measures 1.2 in (3.0 cm) wide x 1.1 in (2.8 cm) tall.
Checkpoint: 4.6 in (11.7 cm) total height.
Hanging Loop
Join Color B with a sl st between the 2 apex sc. Ch 28, then sl st in the same spot. Turn and sl st in the back bump of each of the 28 ch to make a firm cord. Sl st at the apex again and fasten off. The loop hangs about 2 in (5.1 cm) above the tip.
Final Blocking
- Weave in all ends along the border or through the solid sc rows. Don’t weave through the fans.
- Soak the ornament in cool water for 5 minutes. Press it in a towel to remove water; don’t wring it.
- Pin the base flat at 4.5 in (11.4 cm) wide, with a pin at each corner.
- Pin the apex 3.5 in (8.9 cm) above the center of the base. Use a ruler to straighten both slanted sides.
- Put a pin into each window to open it into a clear triangle.
- Pin the trunk square at 1.2 in (3.0 cm) x 1.1 in (2.8 cm).
- Optional: dab on diluted fabric stiffener.
- Let it dry completely (6–12 hours) before unpinning.
Final Quality-Control Checklist
- 3 / 2 / 1 fans, each with 9 dc and a centered base point
- Open windows on both sides of every anchor sc, matching left to right
- Straight base measuring 4.5 in (11.4 cm)
- Border of 79 sc, with both slanted sides the same
- Trunk centered, with 8 border sts free on each side
- Total height of 4.6 in (11.7 cm), plus a 2 in (5.1 cm) loop
- No yarn ends showing on the front
Troubleshooting
The fans ruffle or cup. Your dc are too loose for the 3 skipped stitches on each side. Pull up less yarn, or use a hook one size smaller for the shell rows.
The windows close up. The ch-3 loops are too tight or short. Make sure each has 3 chains, keep them relaxed, and pin the windows open when you block.
The tree leans. The steps are probably uneven. Each step must leave exactly 4 sts on each side.
The base flares or puckers. Recount the bottom of the border. You should have 23 sc between the corner groups.
The trunk is off-center. Recount from the corner group and start in the 9th sc.
Care
Hand wash in cool water with mild soap and lay flat to dry. If you used stiffener, wipe the ornament with a damp cloth instead of soaking it, and store it flat.
Final Notes
Each stage of this pattern builds on the measurements before it. Rows 1–4 set the 4.2 in (10.7 cm) width with 25 stitches. Each tier is 8 stitches narrower than the one below (25, then 17, then 9), and the tip decreases to 1 stitch at 3.2 in (8.1 cm). The 79-sc border brings the tree to 4.5 in (11.4 cm) x 3.5 in (8.9 cm). The 7-stitch trunk adds 1.1 in (2.8 cm), for a total height of 4.6 in (11.7 cm). If Row 4 measures correctly, the rest of the ornament will come out the right size.
Make one, check your numbers, then make a whole forest of blush pink trees.
Happy crocheting!