

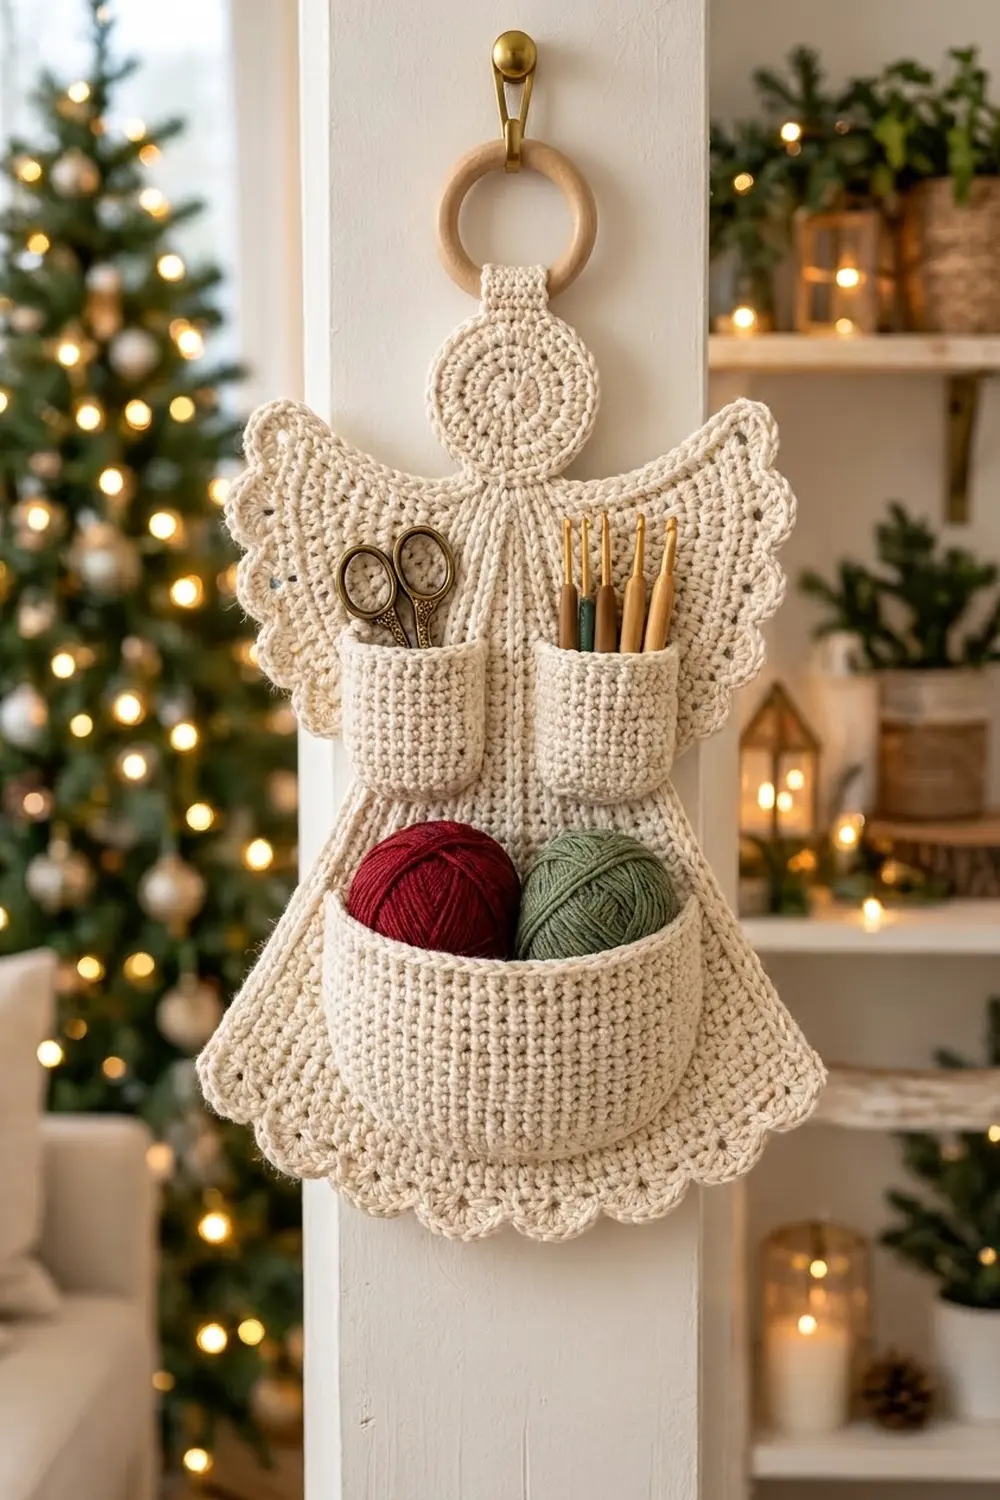
This angel is a holiday decoration that also stores things. She has a round head, a flared A-line body, and two fan-shaped wings. Two small chest pockets hold scissors and hooks, and a deep basket pocket across her skirt holds yarn balls.
She is worked in a single cream cotton, so the texture does the decorating. Dense single crochet keeps the pockets firm. Stacked increases form soft drape lines down the gown. The hem and wings end with eyelets and five-double-crochet scallops.
The pattern uses US terms. The finished angel is about 15.5 in (39.4 cm) tall from head to hem and about 15 in (38.1 cm) across the wings. With the tab and ring, she’s about 19 in (48.3 cm) tall.
You’ll make seven pieces: head with tab, body, two half-circle wings, two small pockets, and an oval basket pocket. Then you sew them together and add the scalloped borders.
Finished Size and Construction
- Finished size: 15.5 in (39.4 cm) tall without the ring, 15 in (38.1 cm) across the wings
- Skill level: Intermediate
- Terminology: US
- Yarn weight: worsted (#4) cotton
- Hook: 4.5 mm (US 7)
- Number of pieces: 7
- Layout: head at the top, wings behind the upper body, small pockets at the chest, large pocket across the skirt
- Piece sizes: head 4 in (10.2 cm); body 2.25 in (5.7 cm) wide at the neck, 12.25 in (31.1 cm) at the hem, 11 in (27.9 cm) tall; wings 4 in (10.2 cm) radius
- Size before border: hem 12.25 in (31.1 cm); wing radius 4 in (10.2 cm)
- Border depth: 1 in (2.5 cm)
Materials
Yarn: Use a smooth, tightly plied worsted cotton or cotton blend. Cotton holds its shape when the pockets are full.
- Cream: 150 g, about 260 yd (238 m)
These amounts include about a 10% margin for the gauge check and sewing.
Tools:
- 4.5 mm (US 7) hook
- Wooden ring, 2.5 in (6.4 cm) diameter
- Tapestry needle
- 4 locking stitch markers
- Rust-proof pins and a tape measure
- Spray bottle and blocking mat
Abbreviations (US Terms)
- ch: chain
- sc: single crochet
- dc: double crochet
- sl st: slip stitch
- st(s): stitch(es)
- sp: space
- inc: 2 sc in the same st
- BLO: back loop only
- RS / WS: right side / wrong side
Scallop (special stitch): 5 dc in the same st or ch-1 sp.
Note: The ch 1 at the start of a sc row or round doesn’t count as a stitch. In the border, every dc and every ch-1 sp counts as one stitch.
Gauge and Checkpoints
Gauge: 16 sc x 18 rows = 4 in (10.2 cm), worked firmly.
Make the head first and use it as your test piece. Measure at these checkpoints:
- Head, Rnd 9: 4 in (10.2 cm) across
- Body, Row 25: 29 sts, 7.25 in (18.4 cm) wide, about 5.5 in (14.0 cm) tall
- Body, Row 50: 49 sts, 12.25 in (31.1 cm) wide, 11 in (27.9 cm) tall
- Wing, Row 18: straight edge 8 in (20.3 cm)
- Large pocket base, Rnd 4: 8.75 in (22.2 cm) by 1.75 in (4.4 cm)
If the head is too big (over 4.25 in / 10.8 cm), use a 4 mm hook. If it’s too small (under 3.75 in / 9.5 cm), use a 5 mm hook. Check the body again at Row 25.
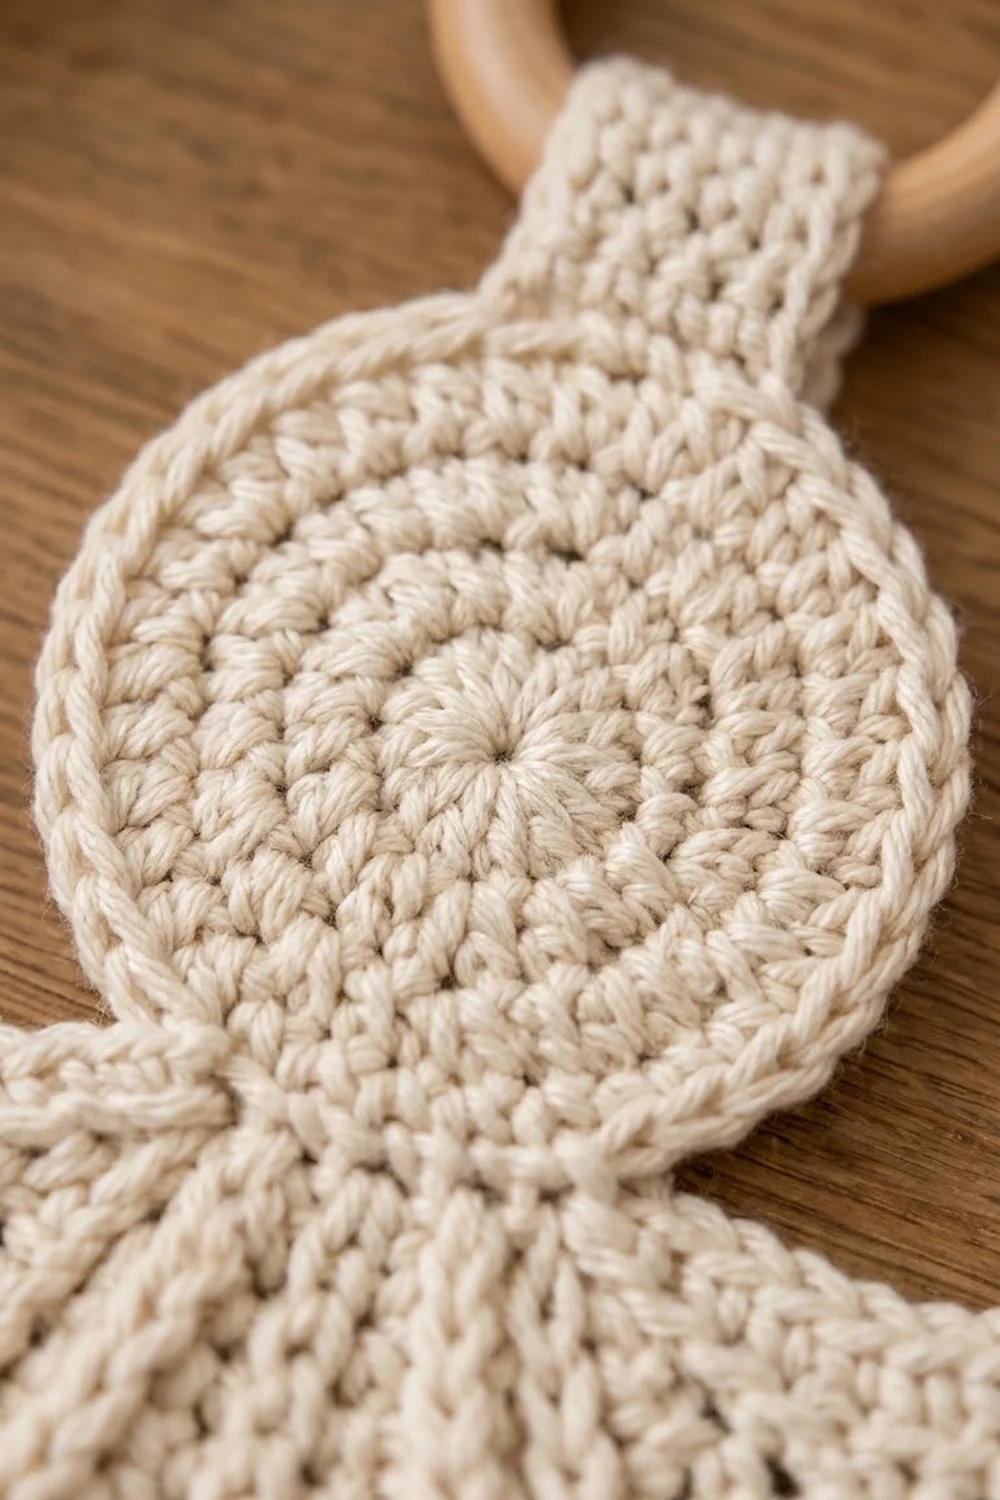
Head and Hanging Tab
Rnd 1: Make a magic ring. Ch 1, work 6 sc in the ring, and join with a sl st to the first sc. (6)
Rnd 2: Ch 1, inc in each st around, join. (12)
Rnd 3: Ch 1, (sc 1, inc) 6 times, join. (18)
Rnds 4–9: Ch 1, (sc [round number − 2], inc) 6 times, join. For example, Rnd 4 is (sc 2, inc) 6 times. Stitch counts: Rnd 4: 24, Rnd 5: 30, Rnd 6: 36, Rnd 7: 42, Rnd 8: 48, Rnd 9: 54.
Rnd 10 (rim): Sl st loosely in each st around. (54) This gives the head its raised outline. Fasten off.
Tab: Turn the head so the seam is at the bottom. With the RS facing, join the yarn 2 sts to the right of top center.
Row 1: Ch 1, sc in the next 5 sl sts, turn. (5)
Rows 2–16: Ch 1, sc across, turn. (5)
The tab measures 1.25 in (3.2 cm) by about 3.5 in (8.9 cm). Leave a 12 in (30.5 cm) tail. Fold the tab over the ring toward the back and sew Row 16 to the back of the head.
Body
The body is worked from the neck down. You increase at both edges and on two inner lines. The inner increases stack up to form the drape lines.
Row 1: Ch 10, sc in the 2nd ch from the hook and in each ch across, turn. (9) Place markers in the 3rd and 7th sts.
Rows 2–4: Ch 1, sc across, turn. (9)
Increase row: Ch 1, inc in the first st, sc to the marked st, inc in the marked st, sc to the next marked st, inc in the marked st, sc to the last st, inc in the last st, turn. (+4)
After each increase row, move each marker into the outer sc of its pair. This makes the lines spread apart as they go down.
Work the increase row on Rows 5, 10, 15, 20, 25, 30, 35, 40, 45, and 50. On all other rows, work 1 sc in each st.
Stitch counts:
- Rows 5–9: 13
- Rows 10–14: 17
- Rows 15–19: 21
- Rows 20–24: 25
- Rows 25–29: 29
- Rows 30–34: 33
- Rows 35–39: 37
- Rows 40–44: 41
- Rows 45–49: 45
- Row 50: 49
Don’t fasten off. You’ll work the hem border from here.
Wings (Make 2)
Each wing is a half circle worked in turned rows. The last row forms the curved edge.
Row 1: Make a magic ring. Ch 1, work 3 sc in the ring, turn. (3)
Row 2: Ch 1, inc in each st, turn. (6)
Row 3: Ch 1, (sc 1, inc) 3 times, turn. (9)
Rows 4–18: Ch 1, (sc [row number − 2], inc) 3 times, turn.
Each row’s total is 3 times the row number: Row 9: 27, Row 12: 36, Row 15: 45, Row 18: 54.
The straight edge, made of the row ends, measures 8 in (20.3 cm). Don’t fasten off. You’ll work the wing border next.
Small Pockets (Make 2)
Row 1: Ch 9, sc in the 2nd ch from the hook and in each ch across, turn. (8)
Row 2: Ch 1, inc, sc 6, inc, turn. (10)
Row 3: Ch 1, inc, sc 8, inc, turn. (12) Rows 1–3 round off the bottom of the pocket.
Rows 4–13: Ch 1, sc across, turn. (12)
Row 14 (rim): Ch 1, sc in the BLO across. (12) This makes a ridge along the top. Fasten off, leaving a 20 in (50.8 cm) tail.
Each pocket measures 3 in (7.6 cm) wide by 3 1/8 in (7.9 cm) tall.
Large Pocket
Work this pocket as an oval basket in joined rounds, with the RS facing.
Rnd 1: Ch 29. Sc in the 2nd ch from the hook and in the next 26 ch, then 3 sc in the last ch. Working along the other side of the chain, sc in the next 26 ch, then 2 sc in the last ch. Join. (58)
Rnd 2: Ch 1, inc, sc 26, inc 3 times, sc 26, inc 2 times, join. (64)
Rnd 3: Ch 1, sc 1, inc, sc 26, (sc 1, inc) 3 times, sc 26, (sc 1, inc) 2 times, join. (70)
Rnd 4: Ch 1, sc 2, inc, sc 26, (sc 2, inc) 3 times, sc 26, (sc 2, inc) 2 times, join. (76)
Rnd 5: Ch 1, sc in the BLO around, join. (76) This turns the edge up to start the wall.
Rnds 6–22: Ch 1, sc around, join. (76) The wall is now 4 in (10.2 cm) tall.
Rnd 23 (rim): Sl st loosely around. (76) Fasten off, leaving a 36 in (91.4 cm) tail.
Make All Pieces
Make all pieces in cream:
- Head with tab: 1 (12 g)
- Body: 1 (45 g)
- Wings: 2 (15 g each)
- Small pockets: 2 (6 g each)
- Large pocket: 1 (35 g)
            ( ring )
             [tab]
            ( HEAD )
   /WING\  [ BODY ]  /WING\
      [ SP ]    [ SP ]
    [   LARGE  POCKET   ]
    ~~~~ scallop hem ~~~~
Joining
Whipstitch all seams with matching yarn, going through one loop of each layer.
- Wings: Slide each wing behind the body with the arc facing out. The straight edge should run 0.5 in (1.3 cm) behind the body’s side, from Row 2 to Row 38. Sew 1 body row end to each wing row end.
- Head: Lay the head over the top of the body, overlapping it by 0.5 in (1.3 cm) and centered on Row 1. Sew it in place from the back.
- Small pockets: Place the rims at Row 12, with a 0.5 in (1.3 cm) gap between them. Each pocket overlaps its wing. Pin the top corners 2.5 in (6.4 cm) apart so the pocket bows forward. Sew the sides and bottom through all layers.
- Large pocket: Flatten the back half of the rim (38 sts) along Row 31, centered, and sew it down. Then sew the back of the base along Row 48 and sew the back wall’s ends to the body.
Tension: Pull the yarn snug but not tight. Puckers will show on a flat wall piece.
Size checkpoint: Measure 14.5 in (36.8 cm) from the top of the head to Row 50. The hem should still be 12.25 in (31.1 cm) wide.
Border
Border gauge: The eyelet row plus the scallop row add 1 in (2.5 cm) of depth. One 6-st scallop repeat is about 1.5 in (3.8 cm) wide.
Hem Border (49 sts on Body Row 50)
Row 1 (eyelet): Ch 4 (counts as dc + ch 1), skip the next st. Dc in the next st, ch 1, skip the next st; repeat from * to the last st, then dc in the last st. Turn. (25 dc + 24 ch-1 sps = 49)
Row 2 (scallop): Ch 1, sc in the first dc. Skip 2 sts, Scallop in the next ch-1 sp, skip 2 sts, sc in the next dc; repeat from * 8 times in all. (8 scallops of 5 dc + 9 sc = 49) Fasten off.
Wing Border (54 sts on Wing Row 18, arc only)
Row 19 (eyelet): Ch 4 (counts as dc + ch 1), skip the next st. Dc in the next st, ch 1, skip the next st; repeat from * until you’ve worked a dc in the 53rd st. Then ch 1 and dc in the last st without skipping. Turn. (54 sts worked into + 1 extra ch-1 sp = 55: 28 dc + 27 ch-1 sps)
Row 20 (scallop): Ch 1, sc in the first dc. Skip 2 sts, Scallop in the next ch-1 sp, skip 2 sts, sc in the next dc; repeat from * 9 times in all. (9 scallops of 5 dc + 10 sc = 55) Fasten off.
Why the math works: Each scallop repeat uses 6 sts, and you need 1 more st for the final sc. The hem’s 49 sts fit as is (6 x 8 + 1). The wing’s 54 sts are one short, so the eyelet row adds one ch-1 sp to make 55 (6 x 9 + 1). The dc sts sit in the odd positions and the ch-1 sps in the even ones. That’s why every Scallop lands in a ch-1 sp and every sc lands on a dc.
Final Blocking
- Weave in all ends along the WS seams.
- Pin the angel face up, with the hem at 12.25 in (31.1 cm).
- Pin out each scallop point evenly.
- Pin the head into a 4 in (10.2 cm) circle.
- Fill the large pocket with a rolled towel.
- Mist with water until damp.
- Let it dry for at least 24 hours.
Final Quality-Control Checklist
- The head is 4 in (10.2 cm) across, and the rim lies flat
- The body has 49 sts at Row 50, and the drape lines show
- Each wing has 9 scallops, and the hem has 8
- The small pockets sit level at Row 12
- The large pocket is centered and open at the top
- The tab is secure, and the ring hangs centered
- No tails show, and no seams pucker
Troubleshooting
- Body ripples: Make sure you increase only every 5th row.
- Head cups: Go up a hook size for Rnds 6–9.
- Wings ruffle: Stagger the increases or go down a hook size.
- Scallops don’t fit: Recount the base. You need 49 sts on the hem and 55 after the wing eyelet row.
- Large pocket sags: Restitch the base along Row 48.
- Angel tilts: Re-center the tab on the ring.
Care
Spot clean with mild soap and cool water. If it needs a full wash, hand wash it, reshape it, and dry it flat.
Final Notes
The measurements build on each other. A 4 in (10.2 cm) head confirms your gauge. The body grows from 9 to 49 sts, widening from 2.25 in to 12.25 in (5.7 cm to 31.1 cm) over 11 in (27.9 cm). The wings reach a 4 in (10.2 cm) radius at 54 sts. Both borders fit because 49 and 55 are each a multiple of 6 plus 1. If each stage measures right, the angel will finish at 15.5 in (39.4 cm) tall and 15 in (38.1 cm) across the wings.
Happy crocheting!