

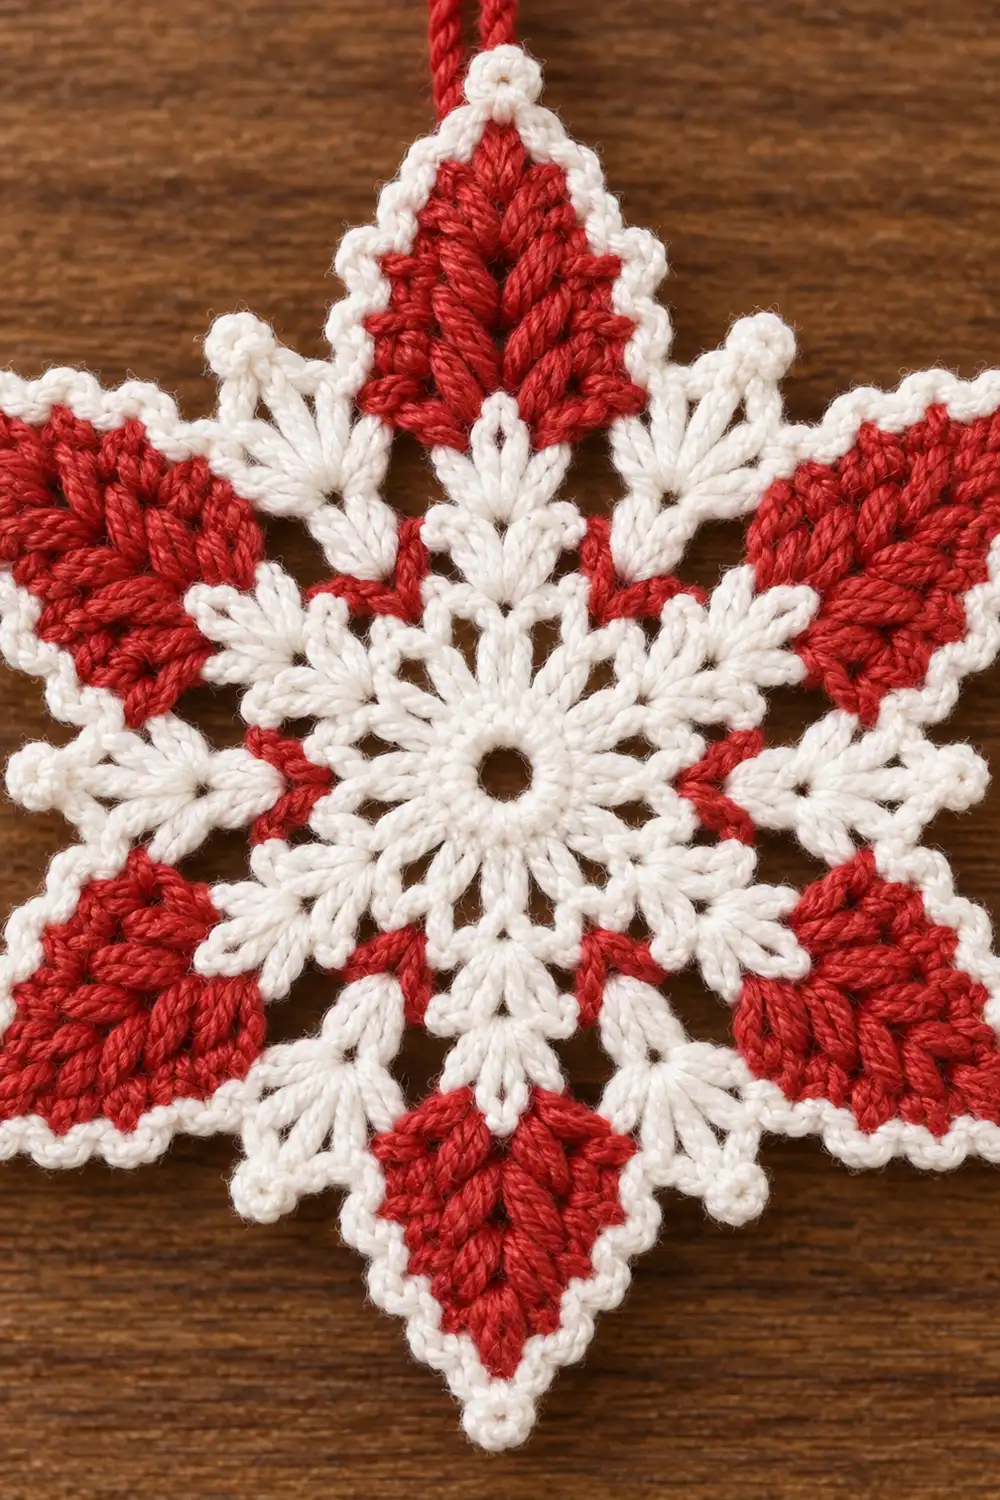
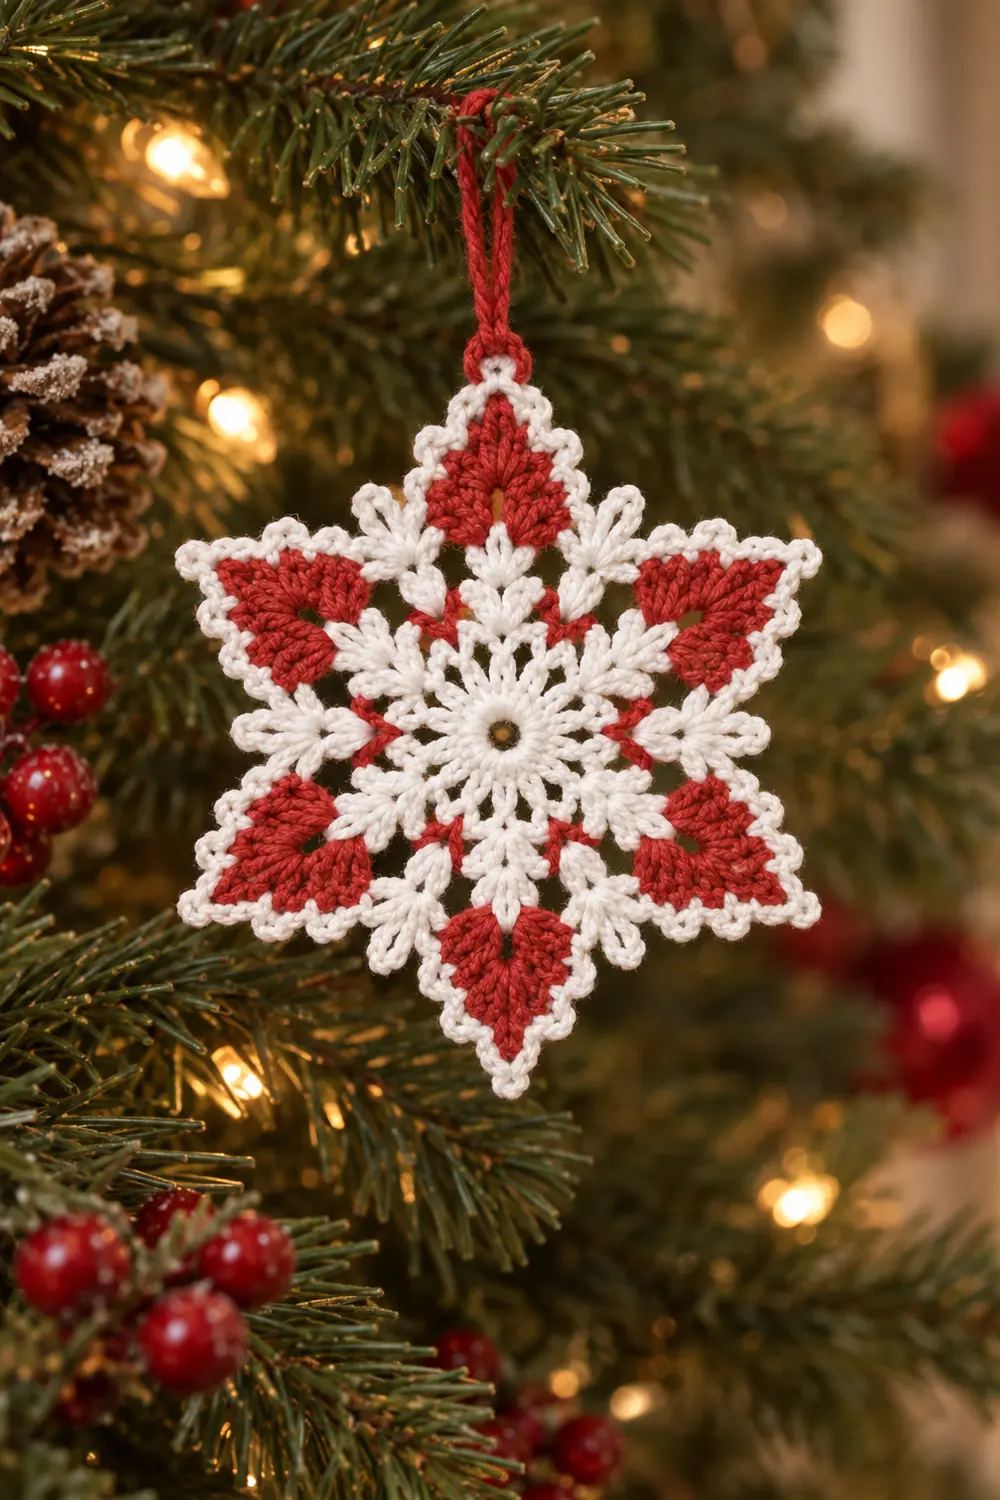
This little snowflake uses candy-cane colors. A lacy white center opens into six crisp points, and each point is filled with a solid red chevron wedge. Small white fans sit in the valleys between the points. A tidy white edging with picots outlines the whole star.
The motif is one flat piece in sport-weight cotton. It works well as a tree ornament, gift tag, package topper, or window hanging. Once starched, it holds a sharp six-point shape.
This pattern uses US crochet terms. The finished snowflake measures about 4.5 in (11.4 cm) from point to point and about 3.5 in (8.9 cm) across from valley to valley.
The center is worked in the round in white. Next, each red point wedge is worked in two short rows on its own point loop. A final white edging round then goes around the entire outline and locks everything together. Starch-blocking finishes the piece.
Finished Size and Construction
- Finished size: 4.5 in (11.4 cm) point to point; 3.5 in (8.9 cm) valley to valley
- Skill level: Easy-intermediate
- Terminology: US crochet terms
- Yarn weight: Sport weight (2), mercerized cotton
- Hook: 3.0 mm (US C/2 or D/3)
- Number of pieces: 1 (single motif)
- Layout: One six-pointed snowflake
- Size before border: 4.25 in (10.8 cm) point to point
- Border depth: about 0.125 in (0.3 cm) along each edge
- Construction: 4 white rounds, 6 red point wedges (2 rows each), 1 white edging round
Materials
Yarn
Choose a smooth, mercerized cotton in sport weight, roughly 130 m per 50 g. Cotton gives crisp stitch definition and takes starch well. Acrylic will work, but the points will be softer.
- White: 6 g, about 16 m
- Red: 3 g, about 8 m, plus about 25 cm (9.8 in) extra for the hanging loop
These quantities include a margin of about 25% for swatching and weaving in ends.
Tools
- 3.0 mm crochet hook
- Tapestry needle
- Scissors
- Stitch marker
- Rust-proof pins and a foam blocking mat
- Spray starch or fabric stiffener
- Ruler or tape measure
Abbreviations (US Terms)
- MR – magic ring
- ch – chain
- sl st – slip stitch
- sc – single crochet
- dc – double crochet
- sp – space
- st(s) – stitch(es)
- tch – turning chain
- rnd – round
Special stitches
- V-st (V-stitch): (dc, ch 2, dc) in the same stitch or space.
- Fan: 5 dc in the same space.
- Picot: worked here as (sc, ch 3, sc) in the same stitch or space, which makes a small pointed loop.
Gauge and Checkpoints
Gauge is not critical for an ornament, but it controls the final size and how sharp the points look. Crochet the center first, measure it, and adjust before adding the red.
Base gauge: Rounds 1–2 measure 1.75 in (4.4 cm) across.
Checkpoints (measured flat, before blocking):
- After Rnd 1: 1 in (2.5 cm) across
- After Rnd 2: 1.75 in (4.4 cm) across
- After Rnd 3: 2.25 in (5.7 cm) across
- After Rnd 4: 2.75 in (7.0 cm), point loop to opposite point loop
- After red wedges: 4.25 in (10.8 cm) point to point
- After edging: 4.5 in (11.4 cm) point to point
If your center is too big: go down one hook size (2.75 mm) or tighten your chains.
If your center is too small or cupping: go up one hook size (3.25 mm) and keep the chain spaces loose.
A center that ruffles has too many loose chains. A center that cups is too tight. Fix it at Rnd 3, because every later round follows these spaces.
Snowflake Center (White)
Work in white. Do not turn between rounds. Join each round with a sl st as stated.
Rnd 1: Make a MR. Ch 3 (counts as dc), work 11 dc into the ring. Pull the ring closed, leaving a small hole about 0.25 in (0.6 cm) wide. Sl st to the top of the beginning ch-3.
Count: 12 dc.
Rnd 2: Ch 5 (counts as dc + ch 2). Dc in next dc, ch 2. Repeat from * 10 more times. Sl st to the 3rd ch of the beginning ch-5.
Count: 12 dc and 12 ch-2 sps.
These 12 dc form the white spokes around the center hole.
Rnd 3: Sl st into the first ch-2 sp. Ch 5 (counts as dc + ch 2), dc in the same sp to make the first V-st. Ch 1. V-st in next ch-2 sp, ch 1. Repeat from * 10 more times. Sl st to the 3rd ch of the beginning ch-5.
Count: 12 V-sts (24 dc) and 12 ch-1 sps.
The 12 V-sts now alternate between two jobs. Starting with the first V-st, call them A (point) and B (valley). You have 6 A and 6 B, alternating around. Place a marker in the first A V-st if that helps.
Rnd 4: Sl st into the ch-2 sp of the first V-st (an A). Ch 1.
In the A ch-2 sp work (sc, ch 4, sc). Ch 2, skip the ch-1 sp. Work a fan (5 dc) in the next B ch-2 sp. Ch 2, skip the next ch-1 sp.
Repeat from * 5 more times. Sl st to the first sc. Fasten off white and weave in the ends.
Count: 12 sc, 30 dc (6 fans of 5), 6 ch-4 point loops, and 12 ch-2 sps.
Checkpoint: The piece should now look like a small hexagon with six ch-4 loops sticking out. It should lie flat and measure 2.75 in (7.0 cm) from one ch-4 loop to the opposite one.
Red Point Wedges (Make 6)
Each red wedge is worked in two rows directly on one ch-4 point loop. The wedge opens outward into a V-shaped chevron with a sharp tip.
For the wedge you want at the top, leave a 25 cm (9.8 in) red tail when you fasten off. You will use it for the hanging loop.
Row 1 (right side): Join red with a sl st in any ch-4 point loop. Ch 3 (counts as dc). Work (2 dc, ch 2, 3 dc) in the same loop. Turn.
Count: 6 dc (3 each side of the ch-2 tip).
Row 2 (wrong side): Ch 3 (counts as dc). Dc in next 2 dc. Work (2 dc, ch 2, 2 dc) in the ch-2 sp. Dc in next 2 dc. Dc in the top of the tch.
Count: 10 dc (5 on each side of the ch-2 tip).
Fasten off, leaving a 10 cm (3.9 in) tail.
Repeat in each of the remaining five ch-4 loops.
Why this shape works: Row 1 places 3 dc on each side of the tip. Row 2 adds one extra dc per side, worked into the tip space, and keeps the tip ch-2 open. The wedge widens by one stitch per side while the corner stays sharp. The result is a clean chevron that points straight out from the center.
Checkpoint: After all six wedges are done, measure from one red tip to the opposite red tip. You should get about 4.25 in (10.8 cm).
Weave all red tails except the hanging-loop tail into the back of their own wedge, so no red shows through the white.
Border: White Picot Edging
This single round outlines the entire snowflake. It follows each red wedge up to its tip, then dips down into the white valley fan.
Border gauge: about 6 sc per inch (2.5 cm) along the wedge sides. Work the sc snugly so the red edges stay straight.
Edging Rnd: Join white with a sl st in the ch-2 tip space of any red wedge. Ch 1.
*
1. Tip: (sc, ch 3, sc) in the tip ch-2 sp. (2 sc, 1 picot)
2. Down the wedge: sc in each of the next 5 dc of Row 2. The last of these is the Row 2 tch. (5 sc)
3. Row-end: work 2 sc over the side of Row 1. (2 sc)
4. Rnd 4 space: sc in the next ch-2 sp of Rnd 4. (1 sc)
5. Valley fan: sc in next 2 dc, (sc, ch 3, sc) in the center dc, sc in next 2 dc. (6 sc, 1 picot)
6. Rnd 4 space: sc in the next ch-2 sp. (1 sc)
7. Row-end: 2 sc over the side of Row 1 of the next wedge. (2 sc)
8. Up the wedge: sc in each of the next 5 dc of Row 2, ending next to the tip. (5 sc)
*
Repeat from * 5 more times, skipping the first step on the final repeat because the tip is already worked. Sl st to the first sc. Fasten off and weave in.
Count per repeat: 2 + 5 + 2 + 1 + 6 + 1 + 2 + 5 = 24 sc and 2 picots.
Total count: 24 sc × 6 = 144 sc, and 2 picots × 6 = 12 picots.
Why the math works: Rnd 1 has 12 dc, which gives 12 spaces in Rnd 2 and 12 V-sts in Rnd 3. Those alternate into 6 points and 6 valleys. Every point wedge has exactly 5 dc per side, and every valley fan has exactly 5 dc. Each of the 6 repeats is identical, so the edging closes evenly at 144 sc with no leftover or missing stitches.
Checkpoint: The finished, unblocked snowflake should measure about 4.5 in (11.4 cm) point to point. The edging adds about 0.125 in (0.3 cm) at each tip.
Hanging Loop
Use the long red tail left on your top wedge. Thread it through the tip picot from back to front. Chain 16 with the tail, or simply fold the tail into a loop about 2.5 in (6.4 cm) long. Tie it securely at the base of the picot with a double knot. Weave the short end into the back of the red wedge.
If you prefer to add the loop after blocking, cut a new 25 cm (9.8 in) piece of red and attach it the same way.
Final Blocking
Blocking turns a soft motif into a crisp snowflake. Starch-blocking is recommended.
- Wet the piece. Soak the snowflake in cool water for a few minutes. Gently press out the extra water in a towel. Do not wring it.
- Apply stiffener. Dip it in diluted fabric stiffener, or lay it flat and spray it well with starch. Press out any excess.
- Pin the center. Place the snowflake right side up on the blocking mat. Pin through the center hole to anchor it.
- Pin the six tips. Pin each red tip picot outward, evenly spaced, so the point-to-point width is 4.5 in (11.4 cm). Adjacent tips should be about 2.25 in (5.7 cm) apart.
- Pin the valleys. Pin each valley picot so the valley-to-valley width is 3.5 in (8.9 cm).
- Shape the spaces. Use a pin or hook to open the Rnd 2 and Rnd 3 spaces so the spokes and V-sts look even.
- Dry fully. Let it dry completely, usually 6–12 hours. Unpin only when the piece feels stiff and dry.
Final Quality-Control Checklist
- The snowflake is one single piece with six points and six valleys.
- The center hole is small and closed firmly. The tail is woven in securely.
- Rnd 1 has 12 dc spokes. Rnd 3 has 12 V-sts.
- All six red wedges have 10 dc (5 per side) and a sharp ch-2 tip.
- All six valley fans have 5 dc.
- The edging has 144 sc and 12 picots.
- No red tails show through on the front.
- The piece measures 4.5 in (11.4 cm) point to point and 3.5 in (8.9 cm) valley to valley.
- The piece lies completely flat after blocking.
- The hanging loop is knotted tightly at the top tip.
Troubleshooting
The center cups or bowls.
Your chains are too tight. Loosen the ch-2 spaces in Rnd 2, or go up a hook size.
The center ruffles.
Your chains are too loose, or you added extra stitches. Recount Rnd 2 for 12 dc.
The red wedges lean to one side.
Make sure you work exactly 3 dc on each side of the tip in Row 1, and that you finish Row 2 in the top of the tch.
The red tips are rounded, not sharp.
Keep the ch-2 tip in both rows. Pin the tip picot firmly outward during blocking.
The edging puckers along the red wedges.
Work the 2 sc over the Row 1 row-end slightly looser. If it still puckers, work that row-end with 2 hdc instead.
The edging waves or flares.
You may have worked more than 5 sc per wedge side. Recount to 24 sc per repeat.
The white edging leaves gaps at the valleys.
Work the sc in the Rnd 4 ch-2 space firmly, and push it down into the space before moving on.
Red shows through the white.
Weave red tails only into the red wedge, following the dc posts on the back.
Care
Spot clean with a damp cloth or hand wash gently in cool water. Re-starch and re-block to restore the crisp points.
Final Notes
This snowflake is built on a simple measurement chain. Rnd 1 has 12 dc and measures 1 in (2.5 cm). Rnd 3 has 12 V-sts and measures 2.25 in (5.7 cm). Rnd 4 divides into 6 points and 6 valleys at 2.75 in (7.0 cm). Six red wedges of 10 dc each bring it to 4.25 in (10.8 cm). The 144-sc picot edging finishes it at 4.5 in (11.4 cm) point to point.
If you check your size at each checkpoint, the rest of the snowflake falls into place. Optional: make several in different colorways and string them together as a garland, or tie one onto a wrapped gift.
Happy crocheting!