

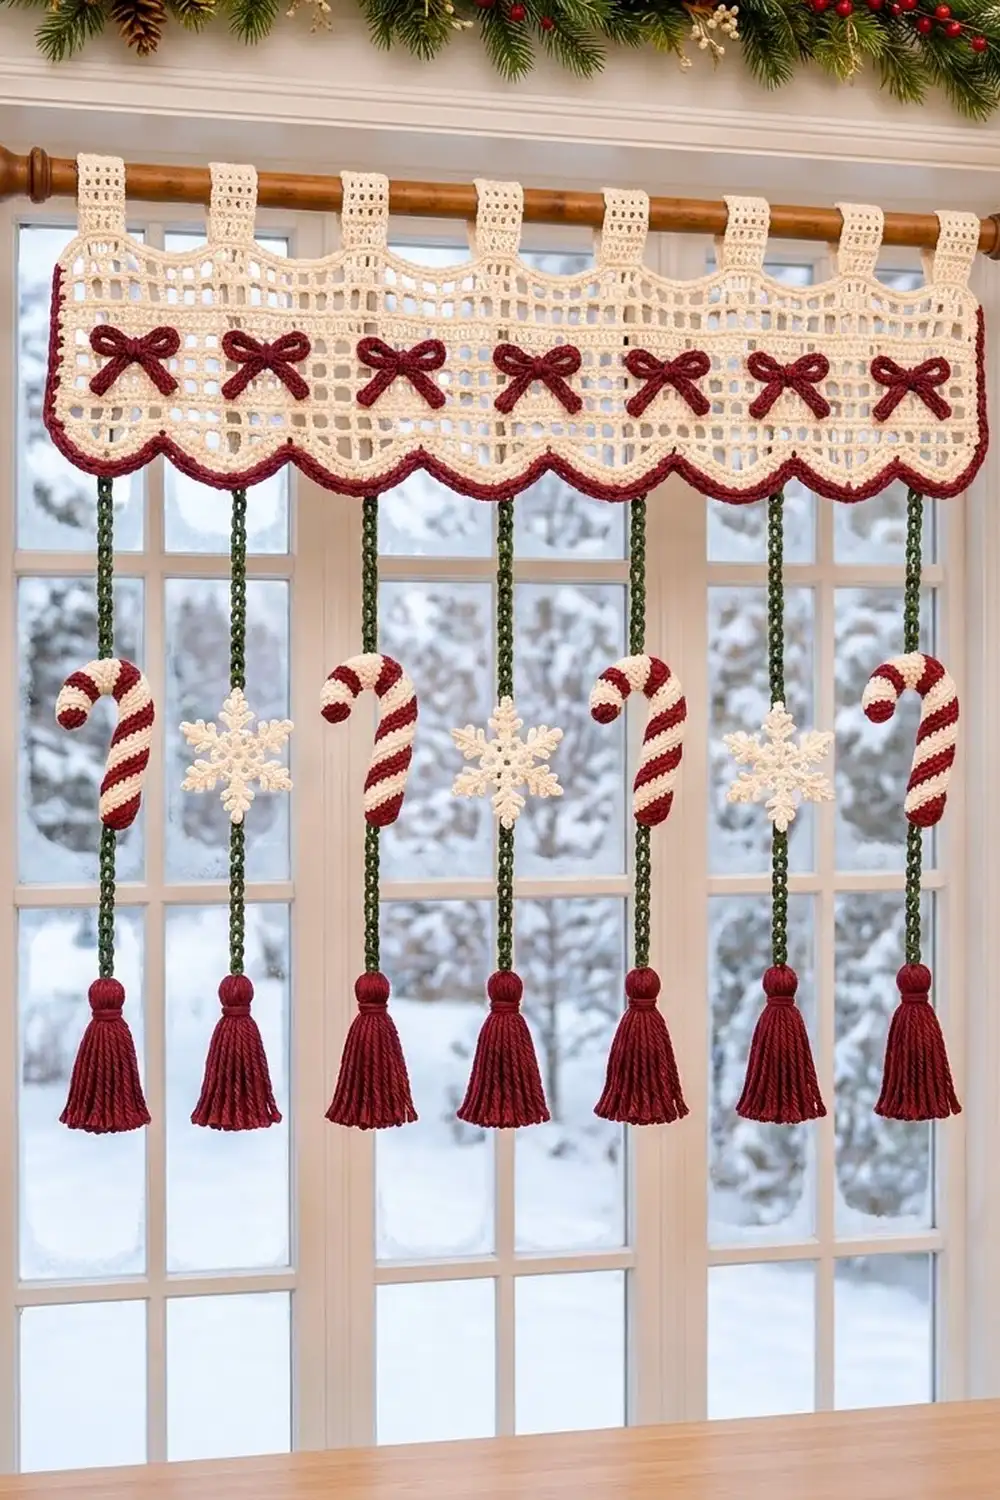
The Peppermint Window Valance is a short Christmas curtain topper built on a classic filet-mesh panel. It has a soft cream grid, six rounded scallops trimmed in thick burgundy, and a neat row of burgundy bows. Below the panel, seven green cords swing freely, carrying striped candy canes, lacy snowflakes, and full burgundy tassels.
The palette sticks to three traditional holiday colors: cream, burgundy, and deep pine green. The look is cozy and a little vintage, and the open mesh lets winter light through the window.
This pattern uses US crochet terms. The finished panel is 24 in (61.0 cm) wide and 7.5 in (19.1 cm) deep at the center of each scallop. Measured from the top of the tab loops to the bottom of the tassels, the valance is 27.75 in (70.5 cm) long.
Construction is simple and modular. First you work the mesh panel from the top edge down, then crochet the scallops directly onto the last row. The burgundy edging is the border. The tab loops are worked into the foundation chain. Finally, you make the small parts (bows, cords, canes, snowflakes, tassels) and attach them.
Finished Size and Construction
- Finished panel size: 24 in (61.0 cm) wide × 7.5 in (19.1 cm) deep at the scallop centers
- Total drop: 27.75 in (70.5 cm), from the top of the tabs to the bottom of the tassels
- Skill level: Intermediate
- Terminology: US
- Yarn weight: Worsted (#4)
- Hook: 5.0 mm (H-8)
- Number of pieces: 1 main panel plus 27 small components (6 bows, 7 cords, 4 candy canes, 3 snowflakes, 7 tassels)
- Layout: 60 mesh squares wide, divided into 6 sections of 10 mesh; 7 tabs; 7 hanging cords
- Panel size before border: 24 in (61.0 cm) × 7 in (17.8 cm) at the scallop centers
- Border depth: 0.5 in (1.3 cm)
Materials
Yarn: Use a smooth worsted-weight yarn. Cotton or a cotton blend keeps the mesh crisp and blocks well. Acrylic also works, but it needs firmer blocking.
- Cream: 120 g / 240 m (panel, tabs, scallops, snowflakes, candy-cane stripes)
- Burgundy: 90 g / 180 m (border, bows, candy-cane stripes, tassels)
- Pine green: 60 g / 120 m (hanging cords)
These quantities include a margin of about 15–20% for swatching and tassels.
Tools:
– 5.0 mm (H-8) crochet hook
– Tapestry needle
– Scissors
– 4 locking stitch markers
– 4 in (10.2 cm) piece of cardboard for the tassels
– 2 chenille stems (pipe cleaners), 12 in (30.5 cm) long, cut in half
– Blocking mats, rust-proof pins, and spray starch
Abbreviations (US Terms)
- ch: chain
- sl st: slip stitch
- sc: single crochet
- hdc: half double crochet
- dc: double crochet
- tr: treble crochet
- sk: skip
- sp: space
- st(s): stitch(es)
- rev sc: reverse single crochet (crab stitch)
- RS: right side
Special stitches
- Mesh square: one dc plus one ch-1 space. A row of 60 mesh squares has 61 dc and 60 ch-1 spaces, for 121 sts in total.
- Rev sc: Work single crochet from left to right (right-handed). Insert the hook into the next stitch to the right, pull up a loop, yarn over, and draw through both loops. This makes the corded edge.
Gauge and Checkpoints
Mesh gauge: 10 mesh squares × 8 rows = 4 in (10.2 cm) square. One mesh square is 0.4 in (1.0 cm) wide, and one row is 0.5 in (1.3 cm) tall.
Cord gauge: 16 ch = 4 in (10.2 cm).
Border gauge: 18 sc = 4 in (10.2 cm).
Test first: Ch 24 and work Row 1 and Rows 2–12 of the panel instructions over 10 mesh squares instead of 60, stopping after 8 rows. Block the swatch, then measure.
Checkpoints:
– After Row 1: 24 in (61.0 cm) wide
– After Row 12: 6 in (15.2 cm) tall
– After Row 13 (scallops): 7 in (17.8 cm) at the scallop centers
– After the border: 7.5 in (19.1 cm)
If your swatch is too big, use a 4.5 mm (US 7) hook. If it is too small, use a 5.5 mm (I-9) hook. Mesh is very sensitive to the height of your dc, so check both width and height.
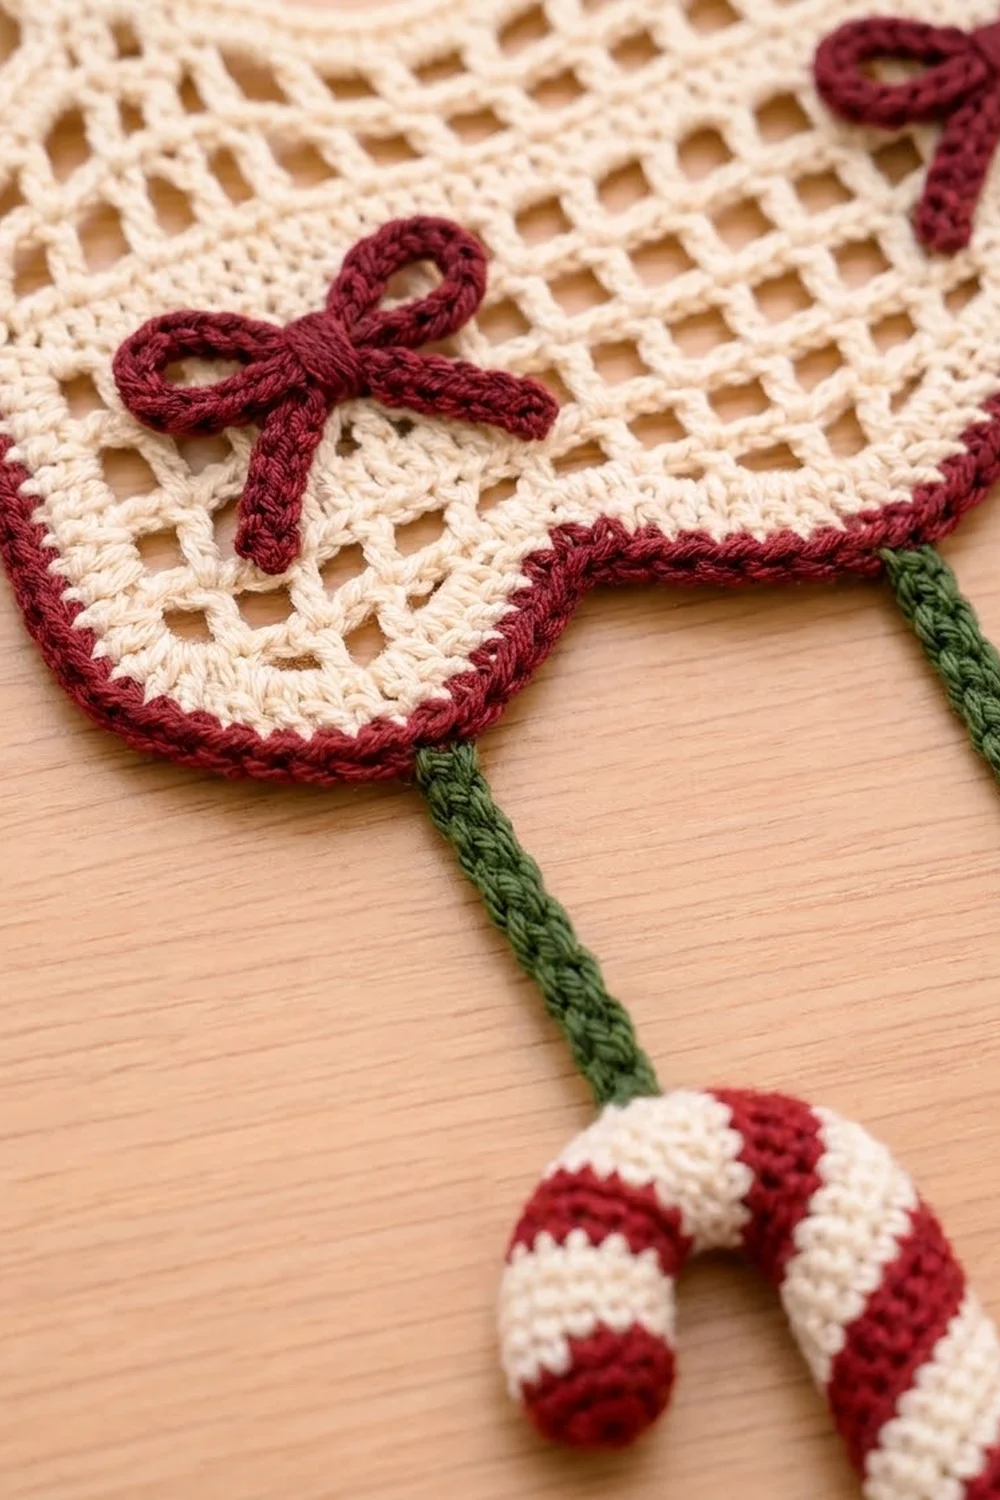
The Mesh Panel
The panel is worked from the top edge down. Row 1 forms the top edge.
With cream, ch 124.
Row 1: Dc in 6th ch from hook. The 5 skipped chains count as the first dc, a ch-1 space, and a skipped base chain. Then [ch 1, sk 1 ch, dc in next ch] 59 times. Turn.
(60 mesh squares: 61 dc + 60 ch-1 sps = 121 sts)
Rows 2–12: Ch 4 (counts as dc + ch 1), sk the first ch-1 sp, dc in next dc. Then [ch 1, sk ch-1 sp, dc in next dc] 58 times. Ch 1, sk last sp, and dc in the turning chain of the previous row. Turn.
(121 sts in each row)
Checkpoint: The panel should measure 24 in (61.0 cm) × 6 in (15.2 cm). Do not fasten off.
Mark the sections. Counting the dc of Row 12 from the right as 1 to 61, place markers on dc 11, 21, 31, 41, and 51. These dc are the section boundaries, and each section contains exactly 10 ch-1 spaces.
Row 13: Scallops
Row 13: Ch 1, turn, sl st in first dc. Work the following into each section’s 10 ch-1 spaces, in order:
- Space 1: sc
- Space 2: (hdc, dc)
- Space 3: 2 dc
- Spaces 4–7: 2 tr in each space
- Space 8: 2 dc
- Space 9: (dc, hdc)
- Space 10: sc
Then sl st in the next dc, which is either a boundary dc or the final edge dc. Repeat across all 6 sections. Fasten off.
(Each scallop has 18 sts: 1 sc, 1 hdc, 3 dc, 8 tr, 3 dc, 1 hdc, 1 sc. Row total: 6 × 18 = 108 sts, plus 7 sl sts = 115)
The tr in the middle of each section form the deepest part of the scallop. The sl sts pull the boundary dc up into the dips between scallops.
Checkpoint: The panel should be 7 in (17.8 cm) deep at each scallop center.
Tab Loops
The tabs are worked into the free loops on the underside of the foundation chain. Each tab is 2 mesh squares wide. Count the dc of Row 1 from 1 to 61, starting at the same end you used for Row 12, and work tabs over:
- Tab 1: dc 1–3
- Tab 2: dc 10–12
- Tab 3: dc 20–22
- Tab 4: dc 30–32
- Tab 5: dc 40–42
- Tab 6: dc 50–52
- Tab 7: dc 59–61
The five inner tabs are centered on the boundary dc, so each one sits directly above a scallop dip.
Tab Row 1: Join cream in the free loop at the base of the first dc of the tab. Ch 3 (counts as dc), ch 1, sk 1 ch, dc in the next free loop, ch 1, sk 1 ch, dc in the next free loop. Turn.
(2 mesh squares: 3 dc + 2 ch-1 sps = 5 sts)
Tab Rows 2–7: Ch 4 (counts as dc + ch 1), dc in middle dc, ch 1, dc in 3rd ch of turning chain. Turn.
(5 sts in each row)
Fasten off, leaving a 10 in (25.4 cm) tail. Fold the tab to the back so its last row lies against the wrong side of panel Row 1, and whipstitch it in place.
Checkpoint: Each tab strip is 3.5 in (8.9 cm) long before folding. When folded, it forms a loop 1.75 in (4.4 cm) tall that fits a rod up to 1 in (2.5 cm) thick. Tab centers should be 4 in (10.2 cm) apart.
Small Components
Bows (make 6, burgundy)
Ch 15.
Row 1: Sc in 2nd ch from hook and in each ch across. Turn. (14 sts)
Row 2: Ch 1, sc in each st across. (14 sts)
Fasten off, leaving a 12 in (30.5 cm) tail. The strip measures 3.5 in (8.9 cm) × 0.5 in (1.3 cm).
- Whipstitch the short ends together to make a ring.
- Flatten the ring with the seam at the center back.
- Wrap the tail tightly around the center 8 times.
Tails (make 2 per bow): Ch 7, sl st in 2nd ch from hook and in each ch across (6 sl sts). Each tail is 1.5 in (3.8 cm) long. Sew both tails behind the bow center so they angle down and apart.
The finished bow is 1.75 in (4.4 cm) wide.
Hanging Cords (make 7, green)
Ch 65. Sl st into the back bump of the 2nd ch from hook and of each ch across. (64 sl sts)
Fasten off, leaving 8 in (20.3 cm) tails at both ends. Each cord measures 16 in (40.6 cm).
Candy Canes (make 4, cream and burgundy)
Use tapestry crochet: work each stitch in the color shown and carry the unused color inside the stitches. The color blocks shift by 1 stitch each row, which creates the diagonal stripe.
With cream, ch 21.
Row 1: Starting in 2nd ch from hook, sc [2 cream, 2 burgundy] 5 times. Turn. (20 sts)
Row 2: Ch 1, sc 1 cream, [2 burgundy, 2 cream] 4 times, 2 burgundy, 1 cream. Turn. (20 sts)
Row 3: Ch 1, sc [2 burgundy, 2 cream] 5 times. Turn. (20 sts)
Row 4: Ch 1, sc 1 burgundy, [2 cream, 2 burgundy] 4 times, 2 cream, 1 burgundy. (20 sts)
Fasten off. The strip measures 5 in (12.7 cm) × 1 in (2.5 cm).
- Lay a 6 in (15.2 cm) piece of chenille stem along the wrong side.
- Fold the strip lengthwise so Row 1 meets Row 4.
- Whipstitch the long edges together on the back, then close the ends.
- Bend the top 1.5 in (3.8 cm) into a hook.
The finished cane is 4 in (10.2 cm) tall and 0.5 in (1.3 cm) wide.
Snowflakes (make 3, cream)
Rnd 1: Make a magic ring. Ch 1, work 12 sc into the ring, join with sl st to first sc. (12 sts)
Rnd 2: Ch 1, sc in same st, ch 3, sk 1. Then [sc in next st, ch 3, sk 1] 5 times. Join to first sc. (6 sc + 6 ch-3 sps)
Rnd 3: Ch 1. Work the following 6 times:
1. Sc in the next sc.
2. Ch 7, sl st in 4th ch from hook to make the tip picot.
3. [Ch 3, sl st in the same ch] twice to make the 2 side picots.
4. Sl st in each of the next 3 ch, back down to the base.
5. Work 3 sc in the next ch-3 sp.
Join to the first sc. Fasten off.
(6 arms with 3 picots each + 18 sc between the arms)
Spray with starch and pin flat to dry. The finished snowflake is about 3 in (7.6 cm) across.
Tassels (make 7, burgundy)
- Wrap burgundy 30 times around the 4 in (10.2 cm) card.
- Thread the bottom tail of one green cord under all the wraps at the top edge and knot it tightly.
- Slide the wraps off the card and cut through the bottom loops.
- Wrap a separate strand 6 times around the tassel 0.5 in (1.3 cm) below the top, knot it, and bury the ends inside.
- Trim the tassel to 3.5 in (8.9 cm).
Assembly
Bows: Center one bow over Row 8 in each section, directly above the middle of its scallop (between dc 6 and 7 of that section). Sew around the bow center and tack the tips of both tails to the mesh.
Cords: Sew the top tail of each cord to the back of the burgundy border at each of the 7 hanging points: the 2 outer corners and the 5 scallop dips. The dips sit 6.5 in (16.5 cm) below the panel’s top edge.
Ornaments: Attach these from left to right with the valance facing you:
| Cord | 1 | 2 | 3 | 4 | 5 | 6 | 7 |
|---|---|---|---|---|---|---|---|
| Ornament | Cane | Flake | Cane | Flake | Cane | Flake | Cane |
Center each ornament 5 in (12.7 cm) below the top of its cord. Sew canes along the back seam and snowflakes through the center ring. Turn every cane so its hook faces the same direction.
Border
The burgundy border trims the scalloped lower edge. It is worked after Row 13 and before assembly.
Border gauge: 18 sc = 4 in (10.2 cm).
Border Row 1: With the RS facing, join burgundy with sc in the first sl st of Row 13. Then work across each of the 6 scallops as follows:
- sc in the sc
- sc in the hdc
- sc in each of the 3 dc
- 2 sc in each of the 8 tr
- sc in each of the 3 dc
- sc in the hdc
- sc in the sc
Sk each of the 5 boundary sl sts between scallops. After the last scallop, sc in the final sl st.
(Per scallop: 18 sts worked 1-per-st, plus 8 extra sts = 26. Row total: (6 × 18 + 2 end sc = 110) + 48 extra = 158 sts)
Border Row 2: Do not turn. Ch 1 and work rev sc in each st across. (158 sts) Fasten off.
Why the math works: Each scallop’s 18 Row 13 stitches sit on a curve. After Row 1, the outer edge of that curve is roughly 5.75 in (14.6 cm) long. At 4.5 sc per inch, 26 sc cover about 5.75 in (14.6 cm), so the border lies flat without cupping or ruffling. The 8 extra stitches all go into the tr at the outer edge of the curve, where the extra length is needed. Skipping the boundary sl sts keeps each dip sharp and defined. The border adds 0.5 in (1.3 cm), bringing the panel to 7.5 in (19.1 cm) deep.
Final Blocking
- Before attaching the cords, soak the panel and bows in cool water for 10 minutes.
- Press out the water in a towel without wringing.
- Pin the panel to 24 in (61.0 cm) × 7.5 in (19.1 cm), placing a pin at each boundary dc so the sections stay 4 in (10.2 cm) apart.
- Pin each scallop into a smooth curve with its center 1 in (2.5 cm) below the mesh.
- Run a long pin through each row of mesh squares to keep the squares straight.
- Mist with spray starch and let it dry completely.
- Then assemble the valance, comb out the tassels, and steam them lightly.
Final Quality-Control Checklist
- The panel measures 24 in (61.0 cm) × 7.5 in (19.1 cm).
- There are 60 mesh squares across and 12 mesh rows.
- There are 6 even scallops, each 1 in (2.5 cm) deep.
- Border Row 1 has 158 sts.
- 7 tabs are evenly spaced, with the inner tabs centered over the dips.
- 6 bows sit in a straight horizontal line.
- 7 cords hang 16 in (40.6 cm) each.
- Canes and snowflakes alternate and sit at the same height.
- Tassels are 3.5 in (8.9 cm) and trimmed evenly.
- All ends are woven in.
Troubleshooting
- Mesh squares are tall and narrow: Your dc are loose. Wrap the yarn snugly and pull each loop up only to the height of one ch.
- Scallops ruffle: Work only 1 tr in spaces 4 and 7 instead of 2, and reduce border Row 1 to match (2 fewer border sts per scallop).
- Border cups: Use a larger hook for the rev sc row.
- Tabs lean sideways: Re-sew the tab end centered over its 3 dc.
- Cords twist: Steam them while they hang, with a tassel weighting each one.
- Cane stripes break apart: Keep the carried yarn snug and change colors on the final yarn over of the previous stitch.
Care
Hand wash in cool water, press flat in a towel, and lay flat to dry. Starch the panel and snowflakes again after washing, and store the valance flat with the ornaments wrapped in tissue.
Final Notes
Every measurement builds on the gauge.
- 10 mesh squares to 4 in (10.2 cm) gives the 24 in (61.0 cm) width.
- 12 rows give 6 in (15.2 cm) of mesh.
- The scallops add 1 in (2.5 cm), and the 158-stitch border adds 0.5 in (1.3 cm), for a 7.5 in (19.1 cm) panel.
- The 1.75 in (4.4 cm) tabs, the dips at 6.5 in (16.5 cm), the 16 in (40.6 cm) cords, and the 3.5 in (8.9 cm) tassels bring the total drop to 27.75 in (70.5 cm).
Check each stage before moving on, and your valance will hang straight and even. Happy crocheting!