

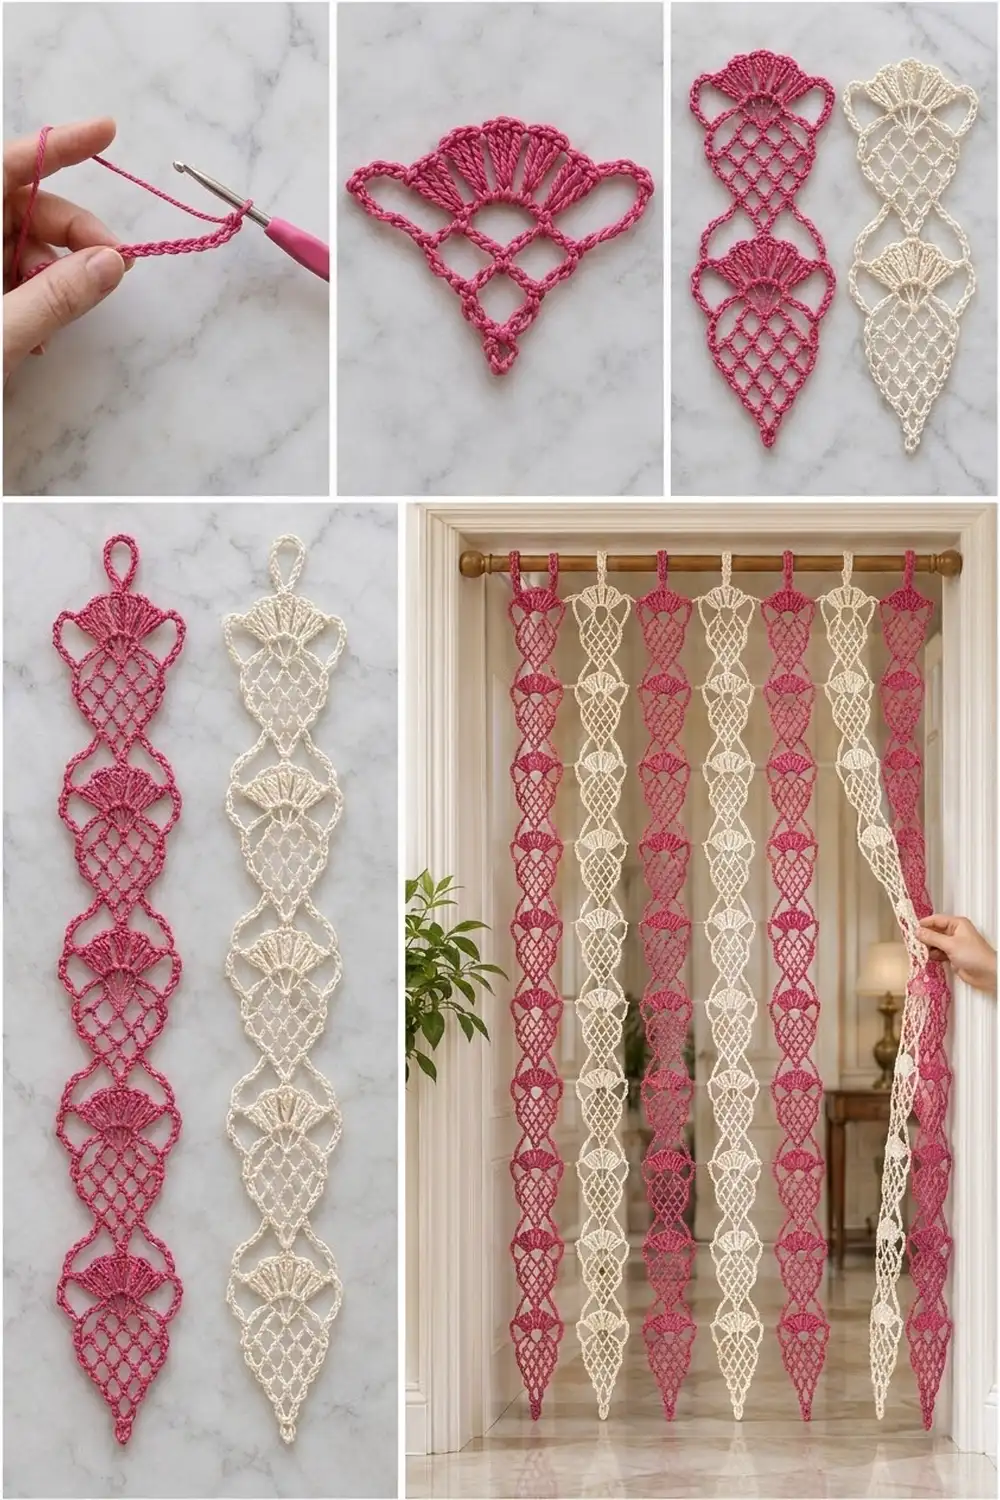
This doorway curtain is made of seven hanging lace strips, each one a chain of pointed pineapple-fan motifs stacked tip to waist. It’s light and airy, and it swings open when you walk through it.
The strips alternate raspberry pink and cream: pink, cream, pink, cream, pink, cream, pink. Each motif has open diamond mesh at the bottom, a fan of four tall wedges, and a small chain lobe on each side of the fan. The style is vintage thread lace scaled up to DK cotton, so it works up fast and still reads clearly from across a room.
The pattern uses US crochet terms. Each strip measures 4.5 in (11.4 cm) wide and 74.5 in (189.2 cm) long, including the hanging tab. With seven strips and 1 in (2.5 cm) gaps between them, the curtain is 37.5 in (95.3 cm) wide.
Each strip is worked flat in rows from the bottom tip upward, one motif at a time and without cutting the yarn. A motif starts in a chain ring, grows through five mesh rows, finishes with a fan row, and ends with two chain arcs that close into the next ring. On the last motif, the arcs close into a hanging tab instead, and the tab gets a single-crochet edging.
Finished Size and Construction
- Finished curtain: 37.5 in (95.3 cm) wide x 74.5 in (189.2 cm) long, hung with 1 in (2.5 cm) gaps
- Skill level: Intermediate
- Terminology: US crochet terms
- Yarn weight: DK (light worsted, #3) mercerized cotton
- Hook: 4.0 mm (G-6)
- Number of pieces: 7 strips (4 pink, 3 cream)
- Layout: 7 strips side by side, alternating colors, starting and ending with pink
- Piece size: one motif is 4.5 in (11.4 cm) wide x 6.5 in (16.5 cm) long; one strip is 11 motifs plus tab
- Size before border: 71.5 in (181.6 cm) long (11 motifs)
- Border depth: the hanging tab adds 3 in (7.6 cm) of length
Materials
Yarn: Use a smooth, mercerized DK cotton, about 120 m (131 yd) per 50 g. Mercerized cotton holds stitch definition, hangs straight, and won’t stretch much under its own weight. Avoid acrylic and soft cotton blends, which tend to droop on a long vertical strip.
- Color A, raspberry pink: 125 g, 300 m (328 yd), for 4 strips
- Color B, cream: 100 g, 240 m (262 yd), for 3 strips
One strip uses about 62 m (68 yd), or 26 g. The quantities above include a margin for a test motif and for gauge variation.
Tools:
- 4.0 mm (G-6) crochet hook
- Tapestry needle
- Scissors
- Locking stitch markers
- Rust-proof pins and a blocking surface at least 40 in (101.6 cm) long, or a clean floor area with towels
- Spray bottle
- Curtain rod up to 1.75 in (4.4 cm) in diameter
Abbreviations (US Terms)
- ch – chain
- sl st – slip stitch
- sc – single crochet
- tr – treble crochet (yo twice, insert hook, yo and pull up a loop, [yo, pull through 2 loops] 3 times)
- sp – space
- sk – skip
- yo – yarn over
Special stitch – Wedge: work 5 tr into the same ch-5 sp. All five stitches share one base, so they fan out at the top and form a narrow-bottomed wedge.
Gauge and Checkpoints
Gauge: 5 ch = 1 in (2.5 cm), and 5 sc = 1 in (2.5 cm).
Make one full test motif before starting a strip. It takes about 20 minutes and tells you everything about size and yarn use.
Checkpoints for one motif (lightly stretched, not pinned):
- After Row 5: the mesh is 4 in (10.2 cm) across the widest row and 3 in (7.6 cm) from tip ring to top.
- After Row 6: the motif is 4.5 in (11.4 cm) across the side lobes and 4.25 in (10.8 cm) long.
- After Row 7: the motif is 6.5 in (16.5 cm) from bottom tip to the top of the new ring.
If your motif is too big, go down to a 3.75 mm hook. If it’s too small, go up to a 4.5 mm hook. Each 0.25 in (0.6 cm) of error per motif adds up to 2.75 in (7.0 cm) over 11 motifs, so match the length checkpoint closely.
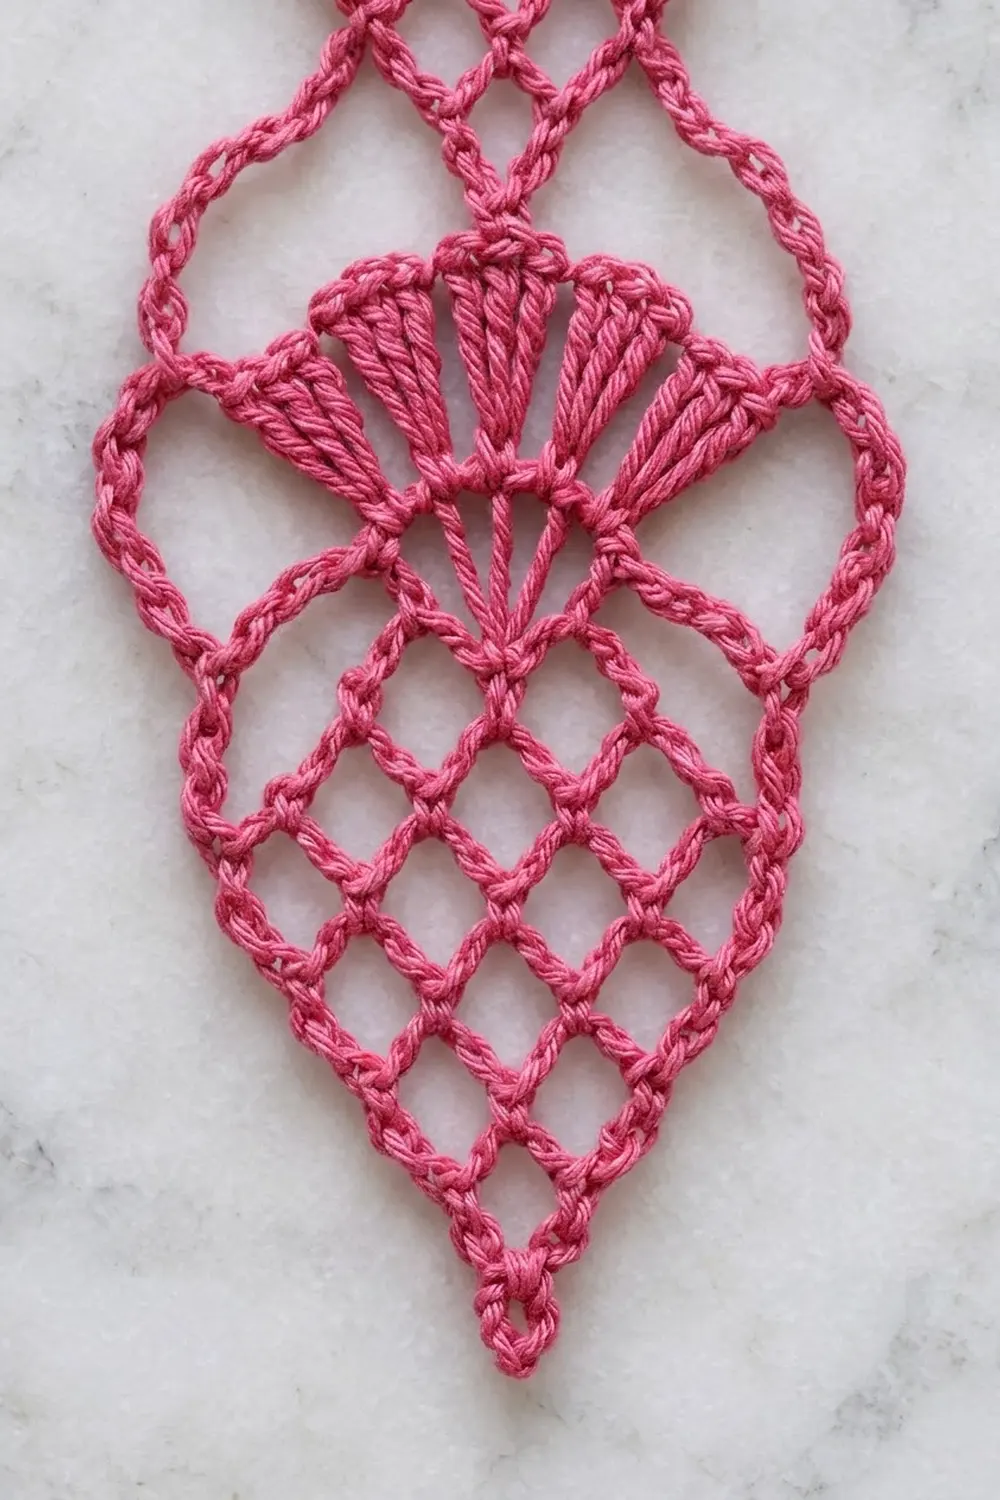
Motif Pattern (Strip Base)
Work with Color A for a pink strip or Color B for a cream strip.
Tip ring: Ch 6, sl st in first ch to form a ring.
Row 1 (RS): Ch 1, sc in ring, (ch 5, sc in ring) twice. (3 sc, 2 ch-5 sps)
Row 2: Ch 5, turn, sc in first ch-5 sp, ch 5, sc in next ch-5 sp, ch 5, sc in same sp. (3 sc, 3 ch-5 sps)
The turning ch-5 counts as the first sp of every mesh row. Working (ch 5, sc) a second time into the last sp is the increase. Because you turn after every row, the increase lands on alternate edges, so the mesh widens evenly into a point-down triangle.
Row 3: Ch 5, turn, sc in first ch-5 sp, (ch 5, sc in next ch-5 sp) twice, ch 5, sc in same sp. (4 sc, 4 ch-5 sps)
Row 4: Ch 5, turn, sc in first ch-5 sp, (ch 5, sc in next ch-5 sp) 3 times, ch 5, sc in same sp. (5 sc, 5 ch-5 sps)
Row 5: Ch 5, turn, sc in first ch-5 sp, (ch 5, sc in next ch-5 sp) 4 times, ch 5, sc in same sp. (6 sc, 6 ch-5 sps)
Check: from Row 2 on, each mesh row’s sc count matches its sp count, and each row has exactly one more sp than the row before (2, 3, 4, 5, 6).
Row 6 (fan row): Ch 1, turn, sc in last sc made, ch 7, sk next ch-5 sp, sc in next sc, (Wedge in next ch-5 sp, sc in next sc) 4 times, ch 7, sc in 3rd ch of the turning ch-5 at the end of Row 5. (7 sc, 4 Wedges = 20 tr, 2 ch-7 lobes)
The two ch-7 lobes arch over the first and last mesh sps and bulge outward on each side of the fan. The four Wedges sit in the four center sps and form the fan.
Row 7 (closing arcs): Ch 15, ch 6 more, sl st in 6th ch from hook to form the new tip ring, ch 15, sl st in the first sc of Row 6 (the opposite edge). Turn and sl st in the back bump of each of the 15 ch just made, ending at the base of the ring. (two 15-ch arcs, 1 ring, 15 sl st)
The arcs rise from the outer edges of the fan and meet in a narrow waist. The new ring is the tip of the next motif. Don’t fasten off.
Next motif: Work Rows 1–7 into the new ring.
Strip length: Make 11 motifs in total. On the 11th motif, replace Row 7 with Row 7T below.
Row 7T (top tab): Ch 15, ch 30 more, sl st in 30th ch from hook to form the tab loop, ch 15, sl st in first sc of Row 6. Turn and sl st in the back bump of each of the 15 ch just made, ending at the base of the tab loop. Continue with the Border section.
Strip checkpoint (before border): 11 motifs x 6.5 in = 71.5 in (181.6 cm). Hold the strip up by its last arcs. It should hang straight and every motif should look the same length. If one motif is clearly longer, a mesh row probably picked up an extra sp, so count the sps.
Make All Pieces
- Color A (pink): 4 strips x 11 motifs = 44 motifs
- Color B (cream): 3 strips x 11 motifs = 33 motifs
- Total: 7 strips, 77 motifs
Layout (as seen facing the doorway, left to right):
| A | B | A | B | A | B | A |
  1   2   3   4   5   6   7
Each column is one strip, 4.5 in (11.4 cm) wide, with a 1 in (2.5 cm) gap between strips.
Joining (Hanging the Strips)
The strips aren’t sewn or crocheted together. Each one hangs from its own tab, so the curtain parts easily when someone walks through. Because the strips never become one fabric, there’s no shared border stitch count across pieces. Each strip’s tab border stands alone.
Method: Slide the tabs onto the rod in layout order, 1 to 7.
Spacing logic: Space the strips 5.5 in (14.0 cm) center to center. That’s one strip width, 4.5 in (11.4 cm), plus one 1 in (2.5 cm) gap. Mark each center point on the rod with removable tape. Total span: 7 x 4.5 in + 6 x 1 in = 37.5 in (95.3 cm).
Tension advice: Hang the strips without pulling on them. Cotton lace relaxes downward over the first day or two. If you stretch it by hand while hanging, the motifs end up uneven.
Size checkpoint: Measure from the top of the rod to the bottom tip of each strip. All seven should be within 0.5 in (1.3 cm) of each other. If one is longer, re-block it shorter (see Final Blocking).
Border (Hanging Tab Edging)
The tab is a ch-30 loop. Edging it with sc firms it up so it slides along the rod without twisting.
Border gauge: 5 sc = 1 in (2.5 cm), the same as the chain gauge.
Rnd 1: Ch 1, work 30 sc into the tab loop, sl st in first sc. (30 sc: 15 sc along each side of the flattened loop)
Rnd 2: Ch 1, sl st in each sc around, sl st in first sl st. (30 sl st: 15 per side) Fasten off.
Why the math works: The ch-30 loop measures 30 ÷ 5 = 6 in (15.2 cm) around. Rnd 1 places 30 sc at 5 sc per inch, which is also 6 in (15.2 cm), so the edging neither cups nor ruffles. Rnd 2 adds no stitches. Flattened, the loop is 3 in (7.6 cm) long, which is the tab depth. A 1.75 in (4.4 cm) rod has a circumference of about 5.5 in (14.0 cm), which leaves 0.5 in (1.3 cm) of ease.
Bottom tip: Weave the starting tail through the first tip ring and back along Row 1 to close the ring neatly. Weave the final tail down through the tab edging.
Final Blocking
- Soak each strip in cool water for 10 minutes, then press out the water in a towel. Don’t wring it.
- Lay the strip flat on the blocking surface with the tab at the top.
- Pin the bottom tip ring and then the tab so the strip measures 74.5 in (189.2 cm).
- Working motif by motif, pin the waist rings in a straight center line, 6.5 in (16.5 cm) apart.
- Pin each fan out to 4.5 in (11.4 cm) across the side lobes, and shape each lobe into a round bulge.
- Pin each closing arc into a smooth curve, and open the mesh diamonds with a pin at each side point.
- Mist lightly and let the strip dry completely, usually overnight.
- Unpin and hang it. Block the remaining strips the same way, measuring each one against the first.
Final Quality-Control Checklist
- [ ] Each strip has 11 motifs.
- [ ] Each motif’s mesh rows have 2, 3, 4, 5 and 6 ch-5 sps.
- [ ] Each fan row has 4 Wedges (20 tr), 7 sc and 2 ch-7 lobes.
- [ ] Every closing arc is 15 ch, and every ring is ch 6.
- [ ] Each tab has 30 sc and 30 sl st.
- [ ] Each strip is 74.5 in (189.2 cm) long and 4.5 in (11.4 cm) wide at the fans.
- [ ] Colors run A, B, A, B, A, B, A.
- [ ] All tails are woven in at least 1.5 in (3.8 cm) and trimmed.
- [ ] Strips hang 5.5 in (14.0 cm) apart, center to center.
Troubleshooting
Mesh triangle leans to one side: You’ve probably increased at the same edge on two rows in a row. The (ch 5, sc in same sp) increase always goes in the last sp of each row.
Fan curls or cups: Your tr are too tight. Pull each loop up to full height, or try a 4.5 mm hook for Row 6 only.
Lobes look flat: Make sure you skipped the edge sp. The ch-7 should bridge over it, not anchor into it.
Waist is lopsided: Count both arcs. Each must be exactly 15 ch.
Strip twists when hung: Block it again, pinning the waist rings in a ruler-straight line.
Strips are different lengths: Re-wet the long one and block it to 74.5 in (189.2 cm). If it’s off by more than 1 in (2.5 cm), check its motif count and mesh counts.
Care
Hand wash in cool water and lay flat to dry, reshaping the motifs as you go. Between washes, shake each strip gently to remove dust.
Final Notes
Here’s how the measurements build. A gauge of 5 ch and 5 sc per 1 in (2.5 cm) gives a motif 4.5 in (11.4 cm) wide x 6.5 in (16.5 cm) long. Eleven motifs make 71.5 in (181.6 cm). The 3 in (7.6 cm) tab brings each strip to 74.5 in (189.2 cm). Seven strips with 1 in (2.5 cm) gaps make 37.5 in (95.3 cm) of curtain. Check your test motif first, and the rest follows.
Happy crocheting!