

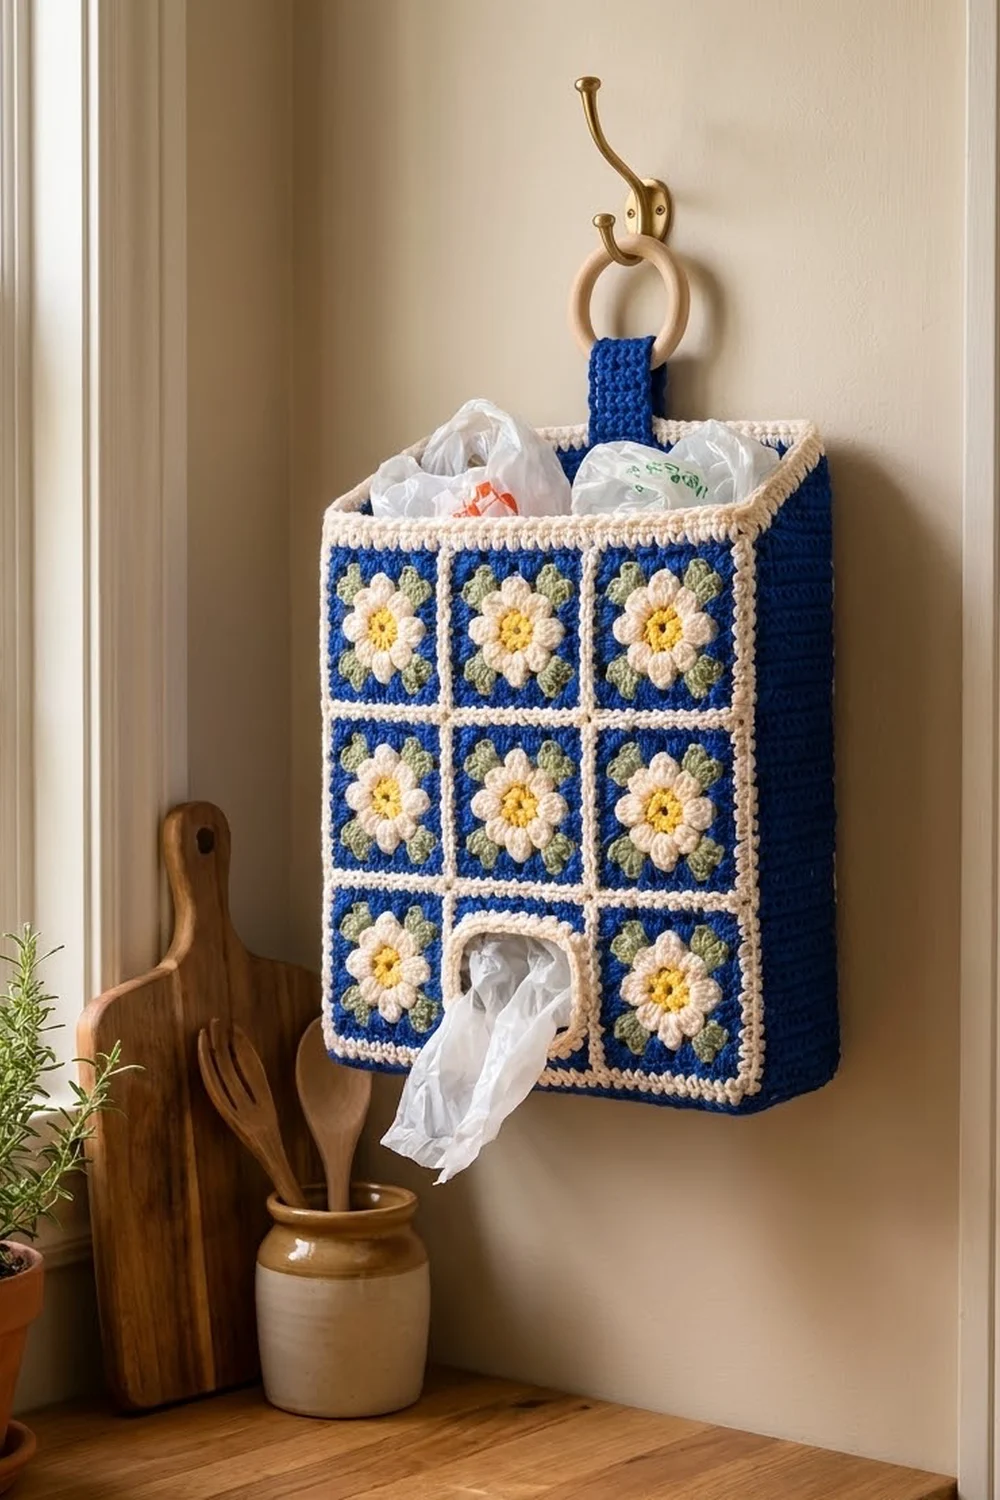
This hanging bag holder turns a kitchen chore into something pretty. The front is a grid of daisy granny squares with cream outlines, and it’s attached to a sturdy royal blue box that holds a big bundle of plastic grocery bags. You push bags in at the open top and pull them out one at a time through a cream-edged opening in the bottom center square.
The colors are royal blue, cream, sunny yellow and sage green, which gives a crisp, tile-like look. Each daisy has eight rounded petals and a yellow center, with small green leaf clusters tucked between the petals at the corners. Raised cream seams between the squares look like grout lines.
The pattern uses US crochet terms. The finished holder measures 12 in wide x 12.4 in tall x 4 in deep (30.5 x 31.5 x 10.2 cm), not counting the hanging loop.
Construction: You make 8 daisy squares and 1 opening square, then join them into a 3 x 3 front panel. The back and sides are one blue rectangle (the “wrap”) folded into a U, and the bottom is a separate blue rectangle. Cream single crochet seams join everything. Then you add a two-round cream rim and work a blue strap from the rim to hold a wooden ring.
Finished Size and Construction
- Finished size: 12 x 12.4 x 4 in (30.5 x 31.5 x 10.2 cm)
- Skill level: Intermediate
- Terminology: US
- Yarn weight: Worsted (#4), cotton recommended
- Hook: 4.0 mm (G-6)
- Number of pieces: 9 squares, 1 wrap, 1 base, plus a strap worked onto the box
- Layout: 3 x 3 front panel, opening square at bottom center
- Square size: 4 x 4 in (10.2 x 10.2 cm), 19 stitches per side
- Size before border: 12 x 12 x 4 in (30.5 x 30.5 x 10.2 cm)
- Border depth: 2 rounds, 0.4 in (1.0 cm)
Materials
Use cotton or a cotton blend in worsted weight. Cotton holds its shape well, so the box stands square. The amounts below assume about 190 m per 100 g.
- Royal blue: 260 g (494 m)
- Cream: 90 g (171 m)
- Sage green: 20 g (38 m)
- Yellow: 15 g (29 m)
Tools:
– 4.0 mm (G-6) hook
– 1 wooden ring, 2.75 in (7.0 cm) across
– Tapestry needle
– Stitch markers
– Scissors
– Optional: plastic canvas cut to 11.5 x 3.5 in (29.2 x 8.9 cm) as a base insert
All quantities include a margin of about 10%.
Abbreviations (US Terms)
- ch – chain
- sl st – slip stitch
- sc – single crochet
- dc – double crochet
- BPsc – back post single crochet
- sp – space
- st(s) – stitch(es)
- RS / WS – right side / wrong side
Special stitch:
– Cluster (cl): Yarn over, insert the hook in the space, pull up a loop, yarn over and pull through 2 loops. Repeat 2 more times in the same space (4 loops on the hook), then yarn over and pull through all 4.
Gauge and Checkpoints
Gauge: 19 sc and 21 rows = 4 in (10.2 cm), worked firmly.
Make one complete daisy square first and measure it before you continue. Checkpoints:
- After Round 2: the flower is about 2.3 in (5.8 cm) across.
- After Round 5: about 3.0 in (7.6 cm) square.
- After Round 7: about 3.6 in (9.1 cm) square.
- After Round 8: 4 in (10.2 cm) square, give or take 0.25 in (0.6 cm).
If your square is too big, go down 0.5 mm in hook size. If it’s too small, go up 0.5 mm. Don’t change stitch counts, because every later seam depends on 19 stitches per side.

Daisy Square (make 8)
Round 1 (yellow): Make a magic ring, ch 1, work 8 sc in the ring, then sl st to the first sc. (8 sc) Pull the ring closed tightly. Fasten off.
Round 2 (cream): Join to any sc. (Sl st, ch 2, 3 dc, ch 2, sl st) in the same sc, move to the next sc. Repeat 8 times in total. (8 petals) Fasten off.
Round 3 (green): Fold the petals toward you so you’re working behind them. Join with a BPsc around any Round 1 sc. Ch 3, BPsc around the next Round 1 sc. Repeat around, then finish with ch 3 and a sl st to the first BPsc. (8 BPsc, 8 ch-3 sps) These loops stay hidden behind the petals.
Round 4 (green, leaves): Sl st into the next ch-3 sp. (Cl, ch 3, cl) in this ch-3 sp for a corner, ch 1, sc in the next ch-3 sp, ch 1. Repeat 4 times, then sl st to the first cl. (8 cl, 4 sc, 4 ch-3 corner sps) Fasten off. The cluster pairs peek out diagonally between the petals as the leaves.
Round 5 (blue): Join in any corner ch-3 sp. Ch 3 (counts as dc), then work (2 dc, ch 2, 3 dc) in the same sp. Dc in the next cl, 2 dc in the ch-1 sp, dc in the sc, 2 dc in the ch-1 sp, dc in the next cl, then (3 dc, ch 2, 3 dc) in the corner sp. Repeat around, leaving out the last corner group, and sl st to the top of the ch-3. (13 dc per side, 52 dc, 4 ch-2 sps)
Round 6 (blue): Ch 1. Sc in each dc and work (sc, ch 2, sc) in each corner sp, then sl st to join. (15 sc per side, 60 sc)
Round 7 (blue): Repeat Round 6. (17 sc per side, 68 sc) Fasten off.
Round 8 (cream): Join in any corner. Work (sc, ch 2, sc) in each corner sp and sc in each sc, then sl st to join. (19 sc per side, 76 sc, 4 ch-2 sps)
In this pattern, “per side” always includes the sc on either side of the corner ch-2.
Opening Square (make 1)
This square is worked in rows so you can leave a clean hole.
Foundation (blue): Ch 18. Sc in the 2nd ch from the hook and in each ch across. (17 sc)
Rows 1–4 (17 sc counts start here): The foundation row is Row 1. For Rows 2–4, ch 1, turn and sc in each st. (17 sc)
Left strip, Row 5: Ch 1, turn, sc in the first 3 sts, then turn. Leave the remaining sts unworked.
Left strip, Rows 6–15: Ch 1, sc in 3 sts, turn. (3 sc, 11 strip rows total) Fasten off.
Right strip, Row 5: With the same side facing as the left strip’s Row 5, skip 11 sts of Row 4 and join in the 15th st. Ch 1, sc in that st and the next 2. (3 sc)
Right strip, Rows 6–15: Ch 1, turn, sc 3. Don’t fasten off.
Row 16: Ch 1, turn, sc 3 across the right strip, ch 11, sc 3 across the left strip. (6 sc + 11 ch)
Row 17: Ch 1, turn, sc in each sc and each ch. (17 sc)
Rows 18–19: Ch 1, turn, sc 17. Fasten off.
This leaves a hole 11 stitches wide by 11 rows tall, about 2.3 x 2.1 in (5.8 x 5.3 cm). It has 4 rows below it and 4 rows above it.
Opening edge, Round 1 (cream): Join at a bottom corner of the hole and work around the hole. Work 11 sc into the skipped sts of Row 4, 11 sc into the strip row-ends, 11 sc into the free loops of the ch-11, and 11 sc into the other strip’s row-ends. Sl st to join. (44 sc)
Opening edge, Round 2: Sl st loosely in each sc. (44 sl st) The finished opening is about 1.9 x 1.7 in (4.8 x 4.3 cm), with rounded corners.
Outer round (cream): With RS facing and Row 19 at the top, join in the first st.
– Top: 2 sc in the first st, sc in the next 15, 2 sc in the last st, ch 2. (19 sc)
– Side: Work along the row-ends. 2 sc in the first row-end. Then work into the next 17 row-ends, skipping the 6th and 12th of them, for 15 sc. Finish with 2 sc in the last row-end and ch 2. (19 sc)
– Bottom: Work into the foundation ch: 2 sc in the first, sc in the next 15, 2 sc in the last, ch 2. (19 sc)
– Second side: Work it like the first side, ch 2, and sl st to join. (76 sc, 4 ch-2 sps)
This square has exactly the same counts as Round 8 of the daisy square and measures 4 in (10.2 cm).
Make All Pieces
| Piece | Qty | Colors |
|---|---|---|
| Daisy square | 8 | yellow R1, cream R2, green R3–4, blue R5–7, cream R8 |
| Opening square | 1 | blue body, cream edges |
| Wrap | 1 | blue |
| Base | 1 | blue |
Wrap (back and sides): In blue, ch 96. Sc in the 2nd ch from the hook and across. (95 sc) Work Rows 2–63 as ch 1, turn, sc 95. The wrap measures 20 x 12 in (50.8 x 30.5 cm). Place markers between sts 19/20 and sts 76/77. These are the fold lines, so the wrap is 19 sts of side, 57 sts of back, and 19 sts of side.
Base: In blue, ch 58. Sc in the 2nd ch from the hook and across. (57 sc) Work Rows 2–21 as sc 57. The base measures 12 x 4 in (30.5 x 10.2 cm).
Panel layout (F = daisy, O = opening):
F  F  F
F  F  F
F  O  F
Joining
Method: Cream sc seam. Hold two squares with WS together and RS facing you, then sc through both loops of both squares. This makes the raised cream ridge on the front.
Stitch logic: Each seam edge is 1 sc in the matched corner ch-2 sps, then 19 sc stitch-to-stitch, then 1 sc in the next matched corner sps.
- Join the squares into three horizontal rows. Seam each row’s squares together, then seam the rows to each other. A long seam across 3 squares is 3 x (1 + 19 + 1) = 63 sc.
- Work the vertical seams the same way, crossing over the horizontal ridges.
Tension: Keep the seams at the same tension as your fabric. Tight seams make the panel cup, and loose seams make it ripple.
Checkpoint: The panel should be 12 x 12 in (30.5 x 30.5 cm) and have 57 sts per edge (3 squares x 19). Corner ch-2 sps at the seams aren’t part of this count.
Box assembly (cream sc seams, WS together):
- Front corners: Join each side edge of the panel (57 sts) to a short row-end edge of the wrap (63 row-ends). Work 57 sc, skipping wrap row-ends 10, 20, 30, 40, 50 and 60.
- Bottom: Pin the base in place. Work one continuous round:
- Front: 57 sc (panel and base).
- Side: 19 sc, matching the wrap’s 19 side sts to the base’s 21 row-ends. Skip base row-ends 7 and 14.
- Back: 57 sc.
- Second side: 19 sc.
- Sl st to join. (152 sc)
If you’re using the plastic canvas insert, slip it in before you close the last side.
Border (Top Rim)
Border gauge: The rim uses the same gauge, 19 sc = 4 in (10.2 cm).
Round 1 (cream): Join at a back corner and work 1 sc in each top stitch:
– Front: 57 sc (19 from each square; skip the seam and corner ch-2 sps)
– Side: 19 sc
– Back: 57 sc
– Side: 19 sc
Sl st to join. (152 sc)
Round 2: Ch 1 and sc in each st around, keeping the same per-side counts of 57 / 19 / 57 / 19. Sl st to join. (152 sc) Fasten off.
Why the math works:
– 57 = 3 squares x 19, and 19 sc = 4 in, so 57 sc = 12 in (30.5 cm). That matches the panel width exactly.
– The sides use 19 sc for 4 in (10.2 cm).
– No stitches are added at seams or corners, so the rim lies flat and doesn’t flare.
– The rim adds 0.4 in (1.0 cm) of height.
Hanging strap (blue):
1. Count to the center 7 sts of the back rim, which are back sts 26–32. Join there, ch 1, and sc 7.
2. Work 30 rows of ch 1, turn, sc 7. The strap is 1.5 x 5.7 in (3.8 x 14.5 cm).
3. Fold the strap over the wooden ring, bring the end inside the box, and whipstitch it to the inside of the rim, directly behind the strap base.
The loop rises about 2.5 in (6.4 cm) above the rim.
Final Blocking
- Weave in all ends along same-color stitches.
- Fill the box with a small cardboard box or folded towels sized to 12 x 4 x 12 in (30.5 x 10.2 x 30.5 cm).
- Square up the corners and pin the cream rim level.
- Mist or steam lightly, keeping the iron off the fabric.
- Gently shape each daisy so the petals stand evenly.
- Let it dry completely before removing the form.
Final Quality-Control Checklist
- [ ] All 9 squares have 19 sts per side
- [ ] The panel is 12 x 12 in (30.5 x 30.5 cm)
- [ ] The opening square is at the bottom center
- [ ] The seams are raised on the RS
- [ ] The bottom seam has 152 sc
- [ ] Both rim rounds have 152 sc (57 / 19 / 57 / 19)
- [ ] The strap is centered and sewn securely
- [ ] The box stands square and the corners are sharp
Troubleshooting
- Petals look flat: Pull the magic ring closed tighter and work the 3 dc loosely.
- Leaves are hidden: Make sure the Round 3 BPsc are worked behind the petals, not in front of them.
- Square cups: Your Round 5 is too tight. Go up a hook size for that round only.
- Opening is too small: Work Round 2 of the opening edge loosely, or leave it out.
- Panel is wider than the wrap: Check that you skipped the seam ch-2 sps in the rim. Re-block to size.
- Box sags: Add the plastic canvas insert or use firmer tension on the wrap.
Care
Hand wash in cool water, press out the excess, and dry flat or over the blocking form. Avoid the dryer, because heat can shrink cotton unevenly.
Final Notes
The measurement chain is simple. Each square has 19 sts per side and measures 4 in (10.2 cm). Three squares give a 57-st, 12 in (30.5 cm) panel. The wrap and base match it at 57 and 19 sts, and the 152-st rim adds 0.4 in (1.0 cm) for a finished height of 12.4 in (31.5 cm). Check your first square, trust the counts, and the box will come together square and steady.
Happy crocheting!