

The Rosy Lattice Hanging Bag Holder is a two-tier dispenser for plastic grocery bags. Two rounded pouches hang one above the other from a wooden ring. You stuff bags in through the top and pull them out one at a time through a round opening on the front.
Each pouch is worked in a raspberry-rose open V-stitch lattice. Cream single crochet edges the top rim and the dispensing hole, and the straps are cream too. A small cream flower with a soft yellow center and two green leaves sits on the front of each pouch, opposite the opening.
This pattern uses US crochet terms. Each pouch measures 8 in (20.3 cm) wide and 7 in (17.8 cm) tall when flattened. The whole holder hangs about 24 in (61.0 cm) from the top of the ring to the bottom of the lower pouch.
Each pouch starts with an oval single crochet base. You then work the V-stitch body in joined rounds and switch to turned rows for four rows to leave the opening. A chain bridges the gap, and the body finishes in rounds. Cream rim rounds and an opening trim come next. Last, you add the straps and sew on the flowers.
Finished Size and Construction
- Finished size: about 24 in (61.0 cm) hanging length, 8 in (20.3 cm) wide
- Skill level: Intermediate
- Terminology: US
- Yarn weight: Worsted (#4) cotton
- Hook: 5.0 mm (H-8)
- Number of pieces: 2 pouches, 4 straps, 2 flowers, 4 leaves
- Layout: 2 pouches stacked vertically, 1 column x 2 rows
- Piece size (one pouch, flattened): 8 in x 7 in (20.3 x 17.8 cm)
- Size before rim: 8 in x 6 in (20.3 x 15.2 cm)
- Rim depth: 1 in (2.5 cm)
Materials
Choose a smooth worsted-weight cotton or cotton blend, about 190 m per 100 g. Cotton holds its shape when the pouch is full and doesn’t stretch out under the weight of the bags. Avoid splitty or very soft yarns; the lattice looks crispest in a firm, plied yarn.
- Color A, raspberry rose: 130 g (about 247 m)
- Color B, cream: 50 g (about 95 m)
- Color C, soft yellow: 5 g (about 10 m)
- Color D, leaf green: 5 g (about 10 m)
Tools:
- 5.0 mm (H-8) crochet hook
- Wooden ring, 2.75 in (7.0 cm) diameter
- Tapestry needle
- 4 stitch markers
- Scissors and a measuring tape
- Blocking mat, rust-proof pins and a spray bottle
These quantities include a margin of roughly 15% for gauge swatching and variation in tension.
Abbreviations (US Terms)
- ch – chain
- sl st – slip stitch
- sc – single crochet
- hdc – half double crochet
- dc – double crochet
- sc2tog – single crochet 2 together
- sp – space
- st(s) – stitch(es)
- MR – magic ring
- RS / WS – right side / wrong side
Special stitch – V-stitch (V-st): (dc, ch 1, dc) in the stitch or space indicated.
Beginning V-st (beg V-st): ch 4 (counts as dc and ch 1), dc in the same stitch or space.
Gauge and Checkpoints
- Single crochet: 15 sc x 16 rows = 4 in (10.2 cm)
- V-st lattice: 5 V-sts (15 sts) x 6 rounds = 4 in (10.2 cm)
One V-st repeat spans 3 sts and measures 0.8 in (2.0 cm) wide. Three V-st rounds measure 2 in (5.1 cm) tall.
Make one complete pouch first and check it before you start the second. Checkpoints:
- After base Rnd 4: the oval measures about 7.25 in x 2.25 in (18.4 x 5.7 cm).
- After Rnd 6: the flattened body measures 8 in (20.3 cm) across.
- After Rnd 13: the body is 6 in (15.2 cm) tall above the base.
- After the rim: the pouch is 7 in (17.8 cm) tall.
If your pouch is too big, go down half a hook size. If it’s too small, go up half a size. Change the hook, not the stitch counts, because the counts must stay at 60 for the rim to fit.
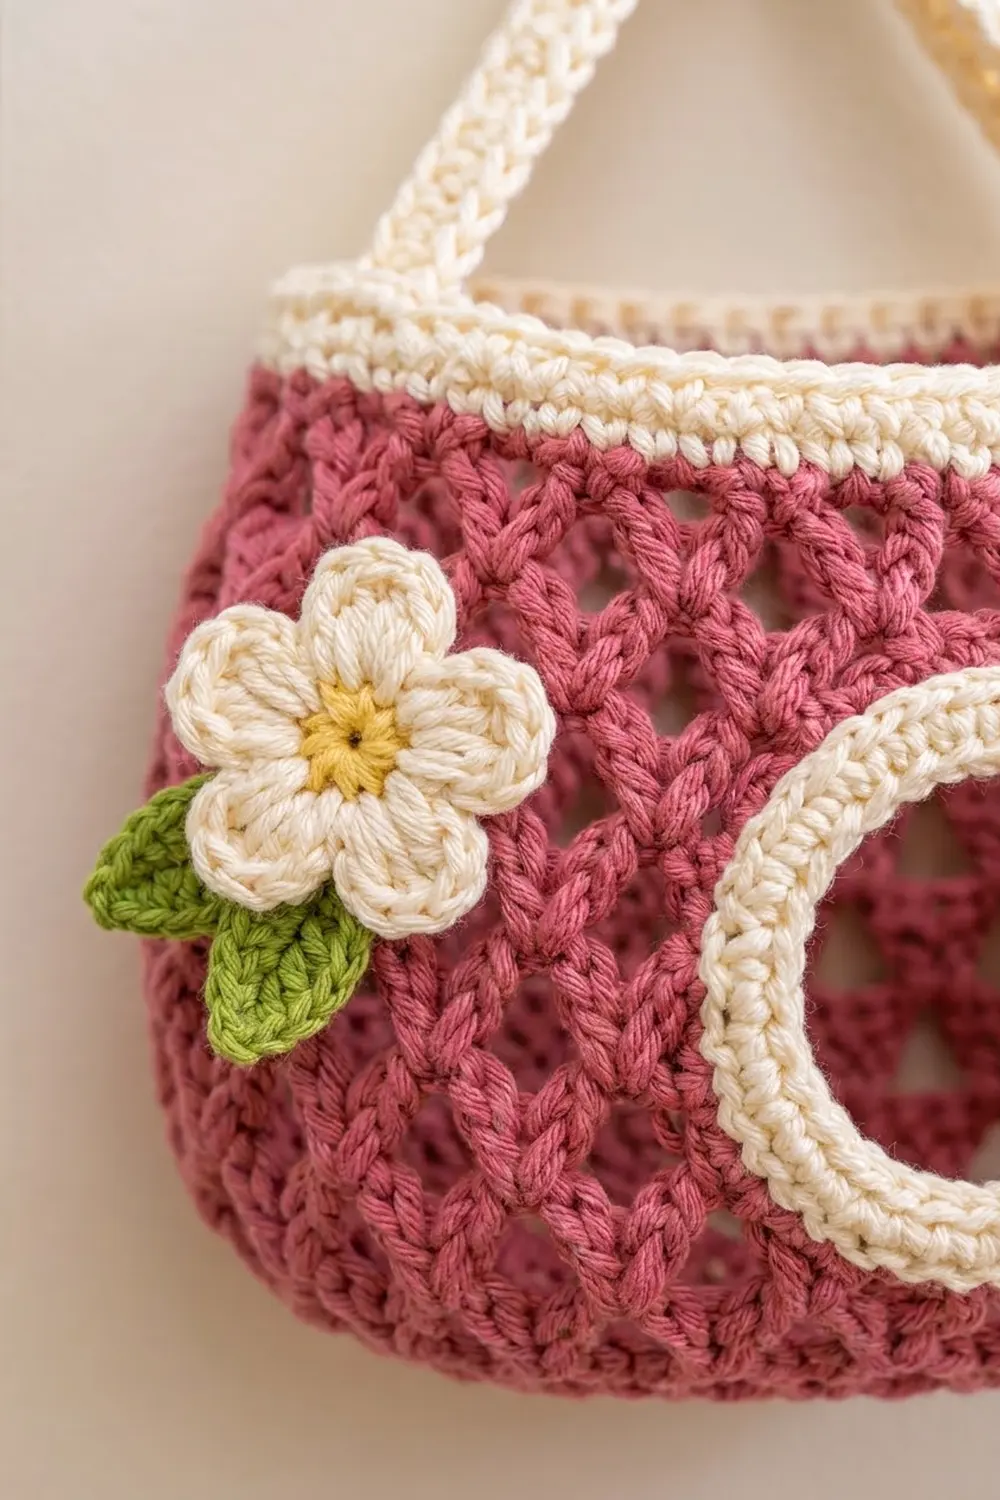
Pouch (Make 2)
Base
With A, ch 21.
Rnd 1: Sc in 2nd ch from hook, sc in next 18 ch, 3 sc in last ch. Working along the other side of the chain, sc in next 18 ch, 2 sc in last ch (the same ch as the first sc). Join with sl st to first sc. (42 sts)
Rnd 2: Ch 1, 2 sc in first st, sc in next 18 sts, 2 sc in each of next 3 sts, sc in next 18 sts, 2 sc in each of last 2 sts. Join. (48 sts)
Rnd 3: Ch 1, 2 sc in first st, sc in next 19 sts, [2 sc in next st, sc in next st] twice, 2 sc in next st, sc in next 19 sts, [2 sc in next st, sc in next st] twice. Join. (54 sts)
Rnd 4: Ch 1, 2 sc in first st, sc in next 20 sts, [2 sc in next st, sc in next 2 sts] twice, 2 sc in next st, sc in next 20 sts, [2 sc in next st, sc in next 2 sts] twice. Join. (60 sts)
Check: the oval measures about 7.25 in x 2.25 in (18.4 x 5.7 cm).
Body
The V-sts stack directly on top of each other, so each round has the same count. The 2 skipped stitches between V-sts make the open triangles of the lattice.
Rnd 5: Beg V-st in first st, *sk 2 sts, V-st in next st; rep from * to last 2 sts, sk 2 sts. Join with sl st to 3rd ch of beg ch-4. (20 V-sts)
Number the V-sts 1 to 20 from the start of the round. Put a marker in V-st 17 and another in V-st 1. Fold the pouch flat with the round start at one side fold. V-sts 11–20 are the front, and V-sts 1–10 are the back.
Rnd 6: Sl st in next ch-1 sp, beg V-st in same sp, V-st in each ch-1 sp around. Join. (20 V-sts)
Check: the flattened body is 8 in (20.3 cm) wide.
Opening Rows
Now you work back and forth, leaving V-sts 18–20 unworked so the opening forms.
Row 7 (RS): Sl st in next ch-1 sp, beg V-st in same sp, V-st in next 16 ch-1 sps. Turn. (17 V-sts)
Row 8 (WS): Sl st in first ch-1 sp, beg V-st in same sp, V-st in next 16 ch-1 sps. Turn. (17 V-sts)
Rows 9–10: Repeat Row 8. (17 V-sts per row)
The opening is now 3 V-sts (9 sts) wide, which is 2.4 in (6.1 cm). It is 4 rows tall, about 2.7 in (6.9 cm).
Rnd 11 (RS): Sl st in first ch-1 sp, beg V-st in same sp, V-st in next 16 ch-1 sps, ch 9. Join with sl st to 3rd ch of beg ch-4. Don’t turn. (17 V-sts and one ch-9)
Rnd 12: Sl st in next ch-1 sp, beg V-st in same sp, V-st in next 16 ch-1 sps. Sk first ch of ch-9, V-st in next ch, [sk 2 ch, V-st in next ch] twice, sk last ch. Join. (20 V-sts)
Rnd 13: Repeat Rnd 6. (20 V-sts)
Check: the body measures 6 in (15.2 cm) tall from the base to the top of Rnd 13 (9 V-st rounds at 3 rounds per 2 in). Fasten off A.
Make All Pieces
- Pouches: 2 in A, each with a B rim and opening trim
- Long straps: 2 in B (top pouch to ring)
- Short straps: 2 in B (top pouch to lower pouch)
- Flowers: 2, with C centers and B petals
- Leaves: 4 in D
Layout, front view:
        [ wooden ring ]
         /           \
   long strap     long strap
   +-----------------------+
   |  TOP POUCH   flower  O |
   +-----------------------+
   short strap     short strap
   +-----------------------+
   | LOWER POUCH  flower  O |
   +-----------------------+
(O = dispensing opening)
Straps
Long strap (make 2): With B, ch 31. Row 1: Sc in 2nd ch from hook and each ch across. Turn. (30 sc) Row 2: Ch 1, sc in each st across. (30 sc) Fasten off. Strap measures 8 in x 0.5 in (20.3 x 1.3 cm).
Short strap (make 2): With B, ch 22. Work Rows 1–2 as for the long strap. (21 sc per row) Strap measures 5.6 in x 0.5 in (14.2 x 1.3 cm).
Flower (make 2)
Rnd 1: With C, MR, 10 sc in ring. Join. Fasten off. (10 sts)
Rnd 2: Join B in any st. *(Hdc, 3 dc, hdc) in next st, sl st in next st; rep from * 4 more times. Fasten off. (5 petals)
The flower measures about 1.75 in (4.4 cm) across.
Leaf (make 4)
With D, ch 7. Sl st in 2nd ch from hook, sc in next ch, hdc in next ch, dc in next ch, hdc in next ch, 3 sc in last ch. Working along the other side of the chain: hdc, dc, hdc, sc, sl st. Fasten off. The leaf measures about 1.25 in (3.2 cm) long.
Joining
Do the joining after the rim and the opening trim are finished (next section). Seam with B and a whipstitch. Every stitch goes through both layers, one strap stitch matched to one rim stitch. Pull each stitch snug but not tight, so the cream sc ridges stay flat and the strap doesn’t pucker.
- Strap positions: Lay each pouch flat. The two side folds sit at the round start (between V-sts 20 and 1) and between V-sts 10 and 11.
- Long straps: Slide 1 in (2.5 cm) of a strap down inside the top pouch’s rim at each side fold. Whipstitch the strap edges to the 4 rim rounds.
- Ring: Pass the free ends of both long straps through the wooden ring. Fold 2 in (5.1 cm) back onto each strap and whipstitch it down. This leaves about 5 in (12.7 cm) of visible strap on each side.
- Short straps: Slide 1 in (2.5 cm) of each short strap inside the lower pouch’s rim at the side folds and sew it down the same way. Lay the top 2 in (5.1 cm) of each strap against the outside of the top pouch at its matching side fold, starting at the base. Whipstitch it through the lattice. That leaves a gap of about 2.6 in (6.6 cm) between the pouches.
- Flowers: Center a flower on V-sts 12–14 of the front, across Rnds 9–11. Tuck 2 leaves beneath the flower at the lower left so they angle outward. Sew everything on with matching yarn tails.
Size checkpoint: Hang the holder from a hook. It should measure about 24 in (61.0 cm) from the top of the ring to the bottom of the lower pouch, and both pouches should hang level.
Border: Cream Rim and Opening Trim
Border gauge: 15 sc = 4 in (10.2 cm), and 4 rounds = 1 in (2.5 cm).
Rim
Rnd 14 (conversion): Join B in any ch-1 sp. Ch 1, *sc in next dc, sc in ch-1 sp, sc in next dc; rep from * around, working each V-st’s 3 sts as 3 sc. Join. (40 sc in dc + 20 sc in ch-1 sps = 60 sc)
Rnds 15–17: Ch 1, sc in each st around. Join. (60 sc per round)
Fasten off and weave in the ends. When flattened, each side of the rim has 30 sc, which is 8 in (20.3 cm).
Why the math works: The base ends with 60 sts. Rnd 5 places 1 V-st per 3 sts, so you get 20 V-sts. Every V-st round holds those 20 V-sts, which is 60 sts’ worth of width. Rnd 14 turns each V-st back into 3 sc, so you’re back at 60. At 15 sc per 4 in, 60 sc is 16 in (40.6 cm) around, or 8 in (20.3 cm) flat, which matches the body exactly. The rim doesn’t flare or pull in.
Opening Trim
Rnd 1: Join B at a lower corner of the opening, RS facing. Ch 1. Work 9 sc across the tops of the V-sts at the bottom edge, 8 sc up the side (2 sc per row end over 4 rows), 9 sc along the underside of the ch-9, and 8 sc down the other side. Join. (9 + 8 + 9 + 8 = 34 sc)
Rnd 2: Ch 1, sc in each st around, working sc2tog at each of the 4 corners. Join. (26 sc + 4 sc2tog = 30 sts)
Rnd 3: Ch 1, [sc in next 3 sts, sc2tog] 6 times. Join. (24 sts)
Fasten off. The raw opening’s edges add up to about 10.2 in (25.9 cm) around. Rnd 1’s 34 sc covers 9.1 in (23.1 cm), so it gathers the corners gently, and Rnds 2–3 round the opening into a circle about 2 in (5.1 cm) across. The trim is 0.75 in (1.9 cm) deep.
Final Blocking
- Weave in all the ends before you block.
- Spray each pouch until it’s evenly damp but not dripping.
- Stuff each pouch firmly with a rolled towel to shape the rounded bottom.
- Flatten it lightly to 8 in (20.3 cm) wide and 7 in (17.8 cm) tall.
- Pin the opening trim into a circle 2 in (5.1 cm) across.
- Pin the straps straight at 0.5 in (1.3 cm) wide.
- Let everything dry completely, about 24 hours, before you remove the towel.
Final Quality-Control Checklist
- Each pouch has 20 V-sts per round and 60 sc in each rim round.
- The openings sit on the same side of both pouches.
- The rims are 1 in (2.5 cm) deep with no flare.
- The opening trims lie flat and round.
- The straps are sewn securely, and the ring folds are stitched down at 2 in (5.1 cm).
- The flowers and leaves are firmly attached, with no loose petals.
- The total hanging length is about 24 in (61.0 cm).
Troubleshooting
- The lattice slants: Make sure each new V-st goes into the ch-1 sp directly above, not between V-sts.
- The opening is lopsided: Count 17 V-sts in every opening row and turn each time.
- The rim ruffles: You’ve worked extra sc in the gaps. Use exactly 3 sc per V-st.
- The opening trim cups: Rnd 1 has too few stitches. Work exactly 34.
- The pouches hang crooked: Re-sew the straps exactly at the side folds.
- The straps stretch: Work them more tightly, or go down to a 4.5 mm hook.
Care
Hand wash in cool water and lay flat to dry, reshaping the pouches over a towel. Don’t hang the holder while it’s wet, or the straps may stretch.

Final Notes
The measurement chain runs like this: the 60-stitch oval base becomes 20 V-sts, which is 8 in (20.3 cm) flat. Nine lattice rounds make 6 in (15.2 cm) of body, and the 4-round rim brings each pouch to 7 in (17.8 cm). Two pouches, the straps and the wooden ring give a holder about 24 in (61.0 cm) long. Keep your counts at 60, and every piece will fit.
Happy crocheting!