

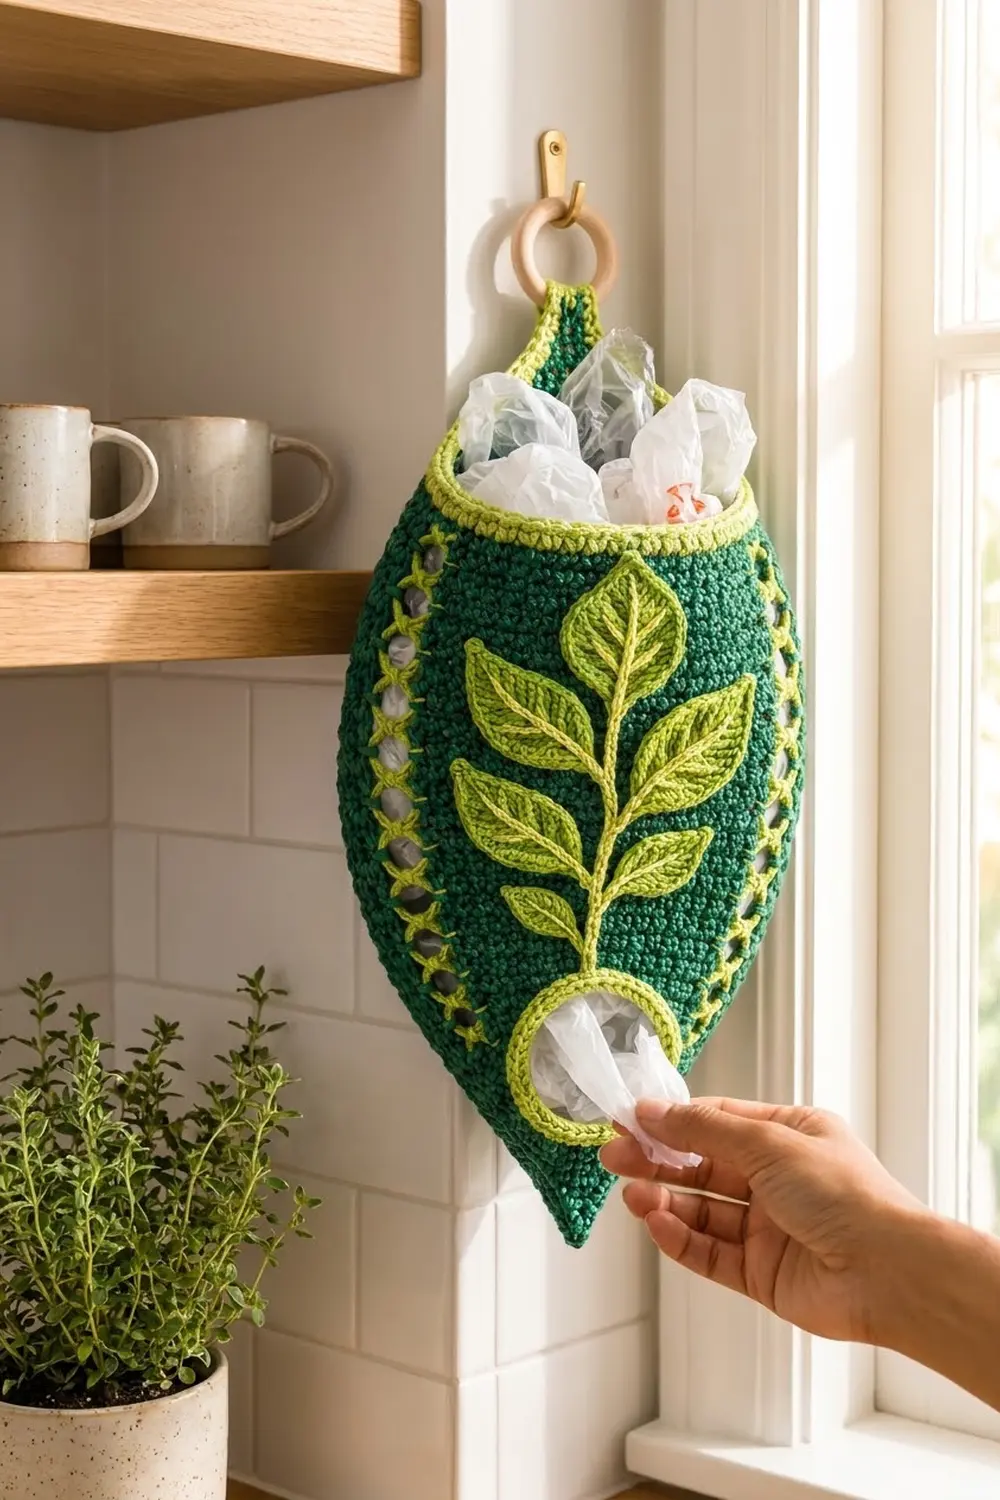
The Evergreen Sprig Bag Holder is one sculpted, leaf-shaped pouch that hangs from a wooden ring and keeps plastic grocery bags tidy. You stuff bags in through the wide top opening and pull them out one at a time through a round hole near the pointed tip.
The body is deep forest green single crochet. Lime green trims the top opening, the hanging tab and the dispensing hole, and it outlines a column of small open windows running up each side. On the front, a raised lime sprig grows up from the hole: a stem, three pairs of side leaves and one larger top leaf, each with pale celery veins.
This pattern uses US crochet terms. The finished body measures 9 in (22.9 cm) wide laid flat and 12.5 in (31.8 cm) tall from tip to rim. With the visible tab, the full length is 14.75 in (37.5 cm), not counting the ring.
You work the body in joined rounds from the pointed tip upward, making the side windows and the dispensing slit as you go. Next come a short tab, a lime rim border and a lime edging around the hole. Last, you sew on the sprig and add the lime lattice details.
Finished Size and Construction
- Finished size: 9 in (22.9 cm) wide flat x 12.5 in (31.8 cm) tall; 14.75 in (37.5 cm) including the tab
- Skill level: Intermediate
- Terminology: US
- Yarn weight: Worsted (#4)
- Hook: 4.5 mm (US 7)
- Number of pieces: 1 body, plus 8 appliqué pieces sewn on (1 stem, 7 leaves)
- Layout: Single standalone item; no joining of multiple pieces
- Piece size: Body is 18 in (45.7 cm) around at its widest
- Size before border: 12 in (30.5 cm) tall; the rim is 14 in (35.6 cm) around, or 7 in (17.8 cm) flat
- Border depth: 0.5 in (1.3 cm), 2 rounds
Materials
Choose a smooth worsted yarn with crisp stitch definition. Cotton or a cotton-acrylic blend holds the pouch shape best. Fuzzy yarn will hide the windows and the veins.
- Color A, Forest Green: 100 g / 180 m (body and tab)
- Color B, Lime Green: 30 g / 54 m (rim, hole edging, stem, leaves, lattice)
- Color C, Pale Celery: 10 g / 18 m (leaf veins)
These quantities include a safety margin of about 15 percent.
Tools:
– 4.5 mm (US 7) crochet hook
– 1 wooden ring, 2 in (5.1 cm) across
– 4 locking stitch markers
– Tapestry needle
– Sewing pins
– Scissors
– Small towel for blocking
Abbreviations (US Terms)
- ch chain
- sc single crochet
- hdc half double crochet
- dc double crochet
- sl st slip stitch
- inc 2 sc in the same stitch
- sc2tog single crochet 2 together
- sk skip
- sp space
- st(s) stitch(es)
- MR magic ring
- RS / WS right side / wrong side
Special stitch: reverse sc (crab stitch). Work from left to right (if you’re right-handed). Insert the hook into the next stitch to the right, yarn over and pull up a loop, then yarn over and draw through both loops.
Section system: Each body round is split into 4 equal sections, starting at back center:
– Section 1: back-left
– Section 2: front-left
– Section 3: front-right
– Section 4: back-right
Increases and decreases always fall on the last stitch of a section. Mark the section boundaries with your stitch markers.
Gauge and Checkpoints
Gauge: 16 sc and 18 rounds = 4 in (10.2 cm) in joined rounds.
Use the body itself as your gauge test. Work through Round 9, measure, and keep checking at each stage:
- After Rnd 9 (36 sts): 4.5 in (11.4 cm) wide flat, 2 in (5.1 cm) tall.
- After Rnd 31 (72 sts): 9 in (22.9 cm) wide flat, about 7 in (17.8 cm) tall.
- After Rnd 45: 10 in (25.4 cm) tall.
- After Rnd 54: 12 in (30.5 cm) tall; rim 7 in (17.8 cm) wide flat.
If your piece is too big, go down half a hook size. If it’s too small, go up half a size. Keep your sc firm so the pouch holds its shape and bags don’t poke through.

Body
Use Color A. End every round with a sl st into the first sc, then ch 1 (the ch 1 does not count as a stitch). Joined rounds keep the windows stacked straight. The join seam sits at back center, against the wall.
Rnd 1: Make a MR and work 4 sc into it. (4)
Rnds 2–9: Sc in the next k sts, inc; repeat 4 times. In Rnd 2, k = 0. Add 1 to k in each following round.
– Rnd 2: (8)
– Rnd 3: (12)
– Rnd 4: (16)
– Rnd 5: (20)
– Rnd 6: (24)
– Rnd 7: (28)
– Rnd 8: (32)
– Rnd 9: sc 7, inc; 4 times. (36)
These quick increases form the sharp point.
Rnd 10: Sc around. (36)
The remaining increase rounds:
– Rnd 11: sc 8, inc; 4 times. (40)
– Rnd 13: sc 9, inc; 4 times. (44)
– Rnd 15: sc 10, inc; 4 times. (48)
– Rnd 17: sc 11, inc; 4 times. (52)
– Rnd 19: sc 12, inc; 4 times. (56)
– Rnd 22: sc 13, inc; 4 times. (60)
– Rnd 25: sc 14, inc; 4 times. (64)
– Rnd 28: sc 15, inc; 4 times. (68)
– Rnd 31: sc 16, inc; 4 times. (72)
Every other round up to Rnd 45 is plain sc around at the current count. The exceptions are the window rounds and Rnds 20–21, explained below.
Side Windows
The window rounds are Rnds 12, 15, 18, 21, 24, 27, 30, 33, 36, 39, 42, 45 and 48. That makes 13 windows per side.
On each window round:
– Section 2: Sc 1, ch 3, sk 3, then finish the section as usual.
– Section 3: Work as usual until 4 sts remain in the section. Ch 3, sk 3, then work the last st as that round requires (sc, inc or sc2tog).
Both windows sit 1 st in from the fold, so the two columns mirror each other.
On the round after a window round, work 3 sc into each ch-3 sp. Each ch-3 stands in for 3 sts, so the stitch counts don’t change.
Dispensing Slit
Rnd 20: Sc 23, ch 10, sk 10, sc 23. (56: 46 sc + 10 ch)
The 10 skipped sts are sts 24–33, centered on front center (the boundary between Sections 2 and 3).
Rnd 21 (window round):
– Section 1: sc 14.
– Section 2 and the slit: sc 1, ch 3, sk 3, sc 5, then 1 sc into each of the 10 chains.
– Section 3: sc 5, ch 3, sk 3, sc 1.
– Section 4: sc 14.
That totals 56: 14 + 1 + 3 + 5 + 10 + 5 + 3 + 1 + 14 = 56.
Rnds 32–45: Sc around. (72) Keep making windows on Rnds 33, 36, 39, 42 and 45.
Shoulder Decreases
- Rnd 46: sc 16, sc2tog; 4 times. (68)
- Rnd 47: Sc around. (68)
- Rnd 48 (window round): sc 15, sc2tog; 4 times. (64)
- Rnd 49: Sc around. (64)
- Rnd 50: sc 14, sc2tog; 4 times. (60)
- Rnd 51: Sc around. (60)
- Rnd 52: sc 13, sc2tog; 4 times. (56)
- Rnds 53–54: Sc around. (56)
Fasten off.
Hanging Tab
Work the tab in rows over the 10 back-center sts: sts 52–56 and 1–5 of Rnd 54.
- Row 1: With the RS facing, join A in st 52. Sc in sts 52–56 and 1–5. (10)
- Row 2: Ch 1, turn, sc2tog, sc 6, sc2tog. (8)
- Row 3: Ch 1, turn, sc 8. (8)
- Row 4: Ch 1, turn, sc2tog, sc 4, sc2tog. (6)
- Row 5: Ch 1, turn, sc 6. (6)
- Row 6: Ch 1, turn, sc2tog, sc 2, sc2tog. (4)
- Rows 7–16: Ch 1, turn, sc 4. (4)
Fasten off, leaving a 10 in (25.4 cm) tail. Thread Rows 11–16 through the wooden ring, fold them to the WS and whipstitch the last row to the top of Row 10.
The visible part of the tab is Rows 1–10: about 2.25 in (5.7 cm) tall and 1 in (2.5 cm) wide.
Hole Edging
Use Color B. Join at one end of the slit.
Rnd 1: Work 10 sc along the chain edge, 2 sc at the end of the slit, 10 sc along the opposite edge, then 2 sc at the other end. Join. (24)
Rnd 2: Sc around. Join and fasten off. (24)
These 24 sts measure 6 in (15.2 cm) around. They pull the slit open into a round hole about 2 in (5.1 cm) across, framed by a lime ring about 3 in (7.6 cm) across.
Leaf Sprig Appliqués
Make all appliqué pieces in Color B. Leave 12 in (30.5 cm) tails for sewing.
Side leaves (make 6): Ch 11.
Rnd 1:
1. First side: sc in the 2nd ch from the hook, hdc in the next 2 ch, dc in the next 4 ch, hdc in the next ch, sc in the next ch.
2. Base: 3 sc in the last ch.
3. Rotate and work along the other side of the chain: sc in the next ch, hdc in the next ch, dc in the next 4 ch, hdc in the next 2 ch, sc in the next ch.
4. Tip: (sc, ch 2, sc) in the skipped tip ch.
5. Join with a sl st to the first sc. (23 sts + ch-2 tip)
The count is 9 + 3 + 9 + 2 = 23. Each side leaf is about 2.5 in (6.4 cm) long and 1.25 in (3.2 cm) wide.
Top leaf (make 1): Work Rnd 1 as for the side leaves, then:
Rnd 2: Ch 1, sc 9, inc in each of the 3 base sts, sc 9, sc 1, (sc, ch 2, sc) in the ch-2 sp, sc 1. Join. (28 sts + ch-2 tip)
The count is 9 + 6 + 9 + 1 + 2 + 1 = 28. The top leaf is about 3 in (7.6 cm) long and 1.75 in (4.4 cm) wide.
Stem: Ch 18. Starting in the 2nd ch from the hook, sl st into the back bump of each ch across. (17) The stem is about 4 in (10.2 cm) long.
Veins: With Color C, surface slip stitch a center vein up each leaf from base to tip. Then backstitch 3 short side veins on each side of it, angled toward the tip.
Assembly and Lattice
- Lay the body flat with the hole centered on the front.
- Pin the stem straight up from the top of the hole ring.
- Pin the top leaf so its base covers the top 0.75 in (1.9 cm) of the stem and its tip sits 0.5 in (1.3 cm) below the rim.
- Pin the 3 pairs of side leaves up the stem, 1 in (2.5 cm) apart, angled up and outward. The lowest pair starts just above the hole ring.
- Whipstitch each piece on through its outer loops. Keep your needle from catching the back wall of the pouch.
- Lattice: With Color B, surface slip stitch a vertical line up the stitch column on each side of every window column, from Rnd 12 to Rnd 48. Then wrap each solid green bar between two windows with 3 whipstitches.
Border (Top Rim)
Border gauge: 4 sc per 1 in (2.5 cm), the same as the body. Working 1 sc into each rim st keeps the opening at 14 in (35.6 cm) around.
Rnd 1: With Color B, join in st 6, the first free rim st to the left of the tab. Work:
– 9 sc across the back-left rim (sts 6–14)
– 28 sc across the front rim (sts 15–42)
– 9 sc across the back-right rim (sts 43–51)
– 10 sc up the side of the tab (1 per row, Rows 1–10)
– 10 sc down the other side of the tab
Join. (66)
The rim count is 9 + 28 + 9 = 46, which is the 56 sts of Rnd 54 minus the 10 sts the tab uses. Then 46 + 10 + 10 = 66.
Rnd 2: Ch 1, then work reverse sc in each st around. Join and fasten off. (66)
Why the math works: On the rim, 1 sc per st matches the body gauge exactly, so the opening doesn’t ruffle or pull in. On the tab, 1 sc per row puts 10 sts along each 2.25 in (5.7 cm) edge. That’s slightly more than gauge, and the extra slack helps the edging turn the inside corners at the base of the tab without puckering.
Final Blocking
- Weave in all ends on the WS, through stitches of the same color.
- Mist the piece with water until it’s damp, not soaked.
- Stuff a rolled towel inside to fill out the widest part without stretching it.
- Pinch the tip into a clean point and smooth the shoulders up toward the rim.
- Flatten each leaf with your fingers, and press each window open with a fingertip.
- Let it dry completely, front side up.
- Measure again: it should be 9 in (22.9 cm) wide and 12.5 in (31.8 cm) tall.
Final Quality-Control Checklist
- 13 windows on each side, mirrored and evenly spaced
- Hole centered and round, with 24 edging sts
- Rim lies flat at 66 sts
- Tab centered at the back and firmly sewn around the ring
- 7 leaves and the stem sewn on securely, with visible veins
- Point sharp and centered
- No yarn ends showing on the RS
Troubleshooting
- Window columns drift: You worked in a spiral. Join every round.
- Windows lean: Recount your sections. The incs and decs must stay on the last st of each section.
- Hole stays a slit: Work 2 sc at each end in Rnd 1 of the edging, not 1.
- Rim ruffles: Redo the border with a hook half a size smaller.
- Leaves curl: Steam-block them before sewing.
- Pouch sags: Your fabric is too loose. Remake it with a smaller hook.
Care
Hand wash in cool water, reshape over a towel and lay flat to dry. Do not tumble dry.
Final Notes
Here is the full measurement chain:
– Gauge: 16 sc = 4 in (10.2 cm)
– Widest round: 72 sts = 18 in (45.7 cm) around, or 9 in (22.9 cm) flat
– Rim: 56 sts = 14 in (35.6 cm) around
– Body height: 54 rounds = 12 in (30.5 cm)
– Border: adds 0.5 in (1.3 cm), for a finished height of 12.5 in (31.8 cm)
If each checkpoint matches, your finished holder will match too.
Happy crocheting!