

The Plum Dahlia Lace Bedspread is a romantic, heirloom-style coverlet. Each square motif holds one eight-petal flower. Chain-loop lace frames the flower, so when the squares are joined the flowers look like they float on a lace web.
The bedspread is worked in one color, a dusty plum that shows off the ribbed petals and the open mesh. Over a white or cream sheet, the lace shows through clearly. Over a dark sheet, the flowers stand out more and the mesh fades back.
This pattern uses US crochet terms. The finished bedspread measures 92 x 112 in (233.7 x 284.5 cm) after the border, which fits a queen bed with generous drops.
You’ll make 99 identical square motifs, join them in a grid 9 motifs wide by 11 motifs long, and finish with a three-round scalloped border. Every stage has a measurement checkpoint, so you can catch size problems early.
Finished Size and Construction
- Finished size: 92 x 112 in (233.7 x 284.5 cm)
- Skill level: Intermediate
- Terminology: US crochet terms
- Yarn weight: Worsted (#4)
- Hook: 5 mm (H-8)
- Number of pieces: 99 square motifs
- Layout: 9 motifs wide x 11 motifs long
- Motif size: 10 x 10 in (25.4 x 25.4 cm)
- Size before border: 90 x 110 in (228.6 x 279.4 cm)
- Border depth: 1 in (2.5 cm) on each side
Materials
Yarn: Use a smooth worsted-weight cotton or cotton blend at about 190 m per 100 g. Cotton gives crisp petals and keeps the lace from stretching out of shape. Avoid fuzzy yarns, because they blur the petal ribs and fill in the mesh.
- Plum: 2,400 g (about 4,560 m)
- Motifs: about 20 g (38 m) each x 99 = 1,980 g
- Joining: about 100 g
- Border: about 120 g
These quantities include a margin of about 10% for gauge differences and swatching. Buy all the yarn from one dye lot.
Tools:
– 5 mm (H-8) crochet hook
– Tapestry needle
– Stitch markers
– Scissors
– Measuring tape
– Blocking mats and rust-proof pins
– Spray bottle
Abbreviations (US Terms)
- ch – chain
- sl st – slip stitch
- sc – single crochet
- hdc – half double crochet
- dc – double crochet
- tr – treble crochet
- dtr – double treble crochet
- sp – space
- st(s) – stitch(es)
- BLO – back loop only
- RS / WS – right side / wrong side
Special stitch: dtr (double treble). Yarn over 3 times, insert the hook in the space, yarn over and pull up a loop (5 loops on hook). Then [yarn over, pull through 2 loops] 4 times.
Gauge and Checkpoints
Make one full motif and block it before you start production. Gauge here is measured by size at each stage, not by a swatch.
- After Rnd 1: center ring is 1.5 in (3.8 cm) across.
- After Rnd 3: the flower measures 6.5 in (16.5 cm) from petal tip to opposite petal tip.
- After Rnd 4: 7.75 in (19.7 cm) from corner loop to opposite corner loop.
- After Rnd 5: 8.5 in (21.6 cm) square.
- After Rnd 6: 9.25 in (23.5 cm) square.
- After Rnd 7 (blocked): 10 x 10 in (25.4 x 25.4 cm), with 29 sts per side. That is about 2.9 sts per inch along the edge.
If your motif is too big, go down to a 4.5 mm hook. If it is too small, go up to a 5.5 mm hook. A difference of 1/4 in (0.6 cm) per motif adds up to more than 2 in (5.1 cm) across the bedspread, so check the size.
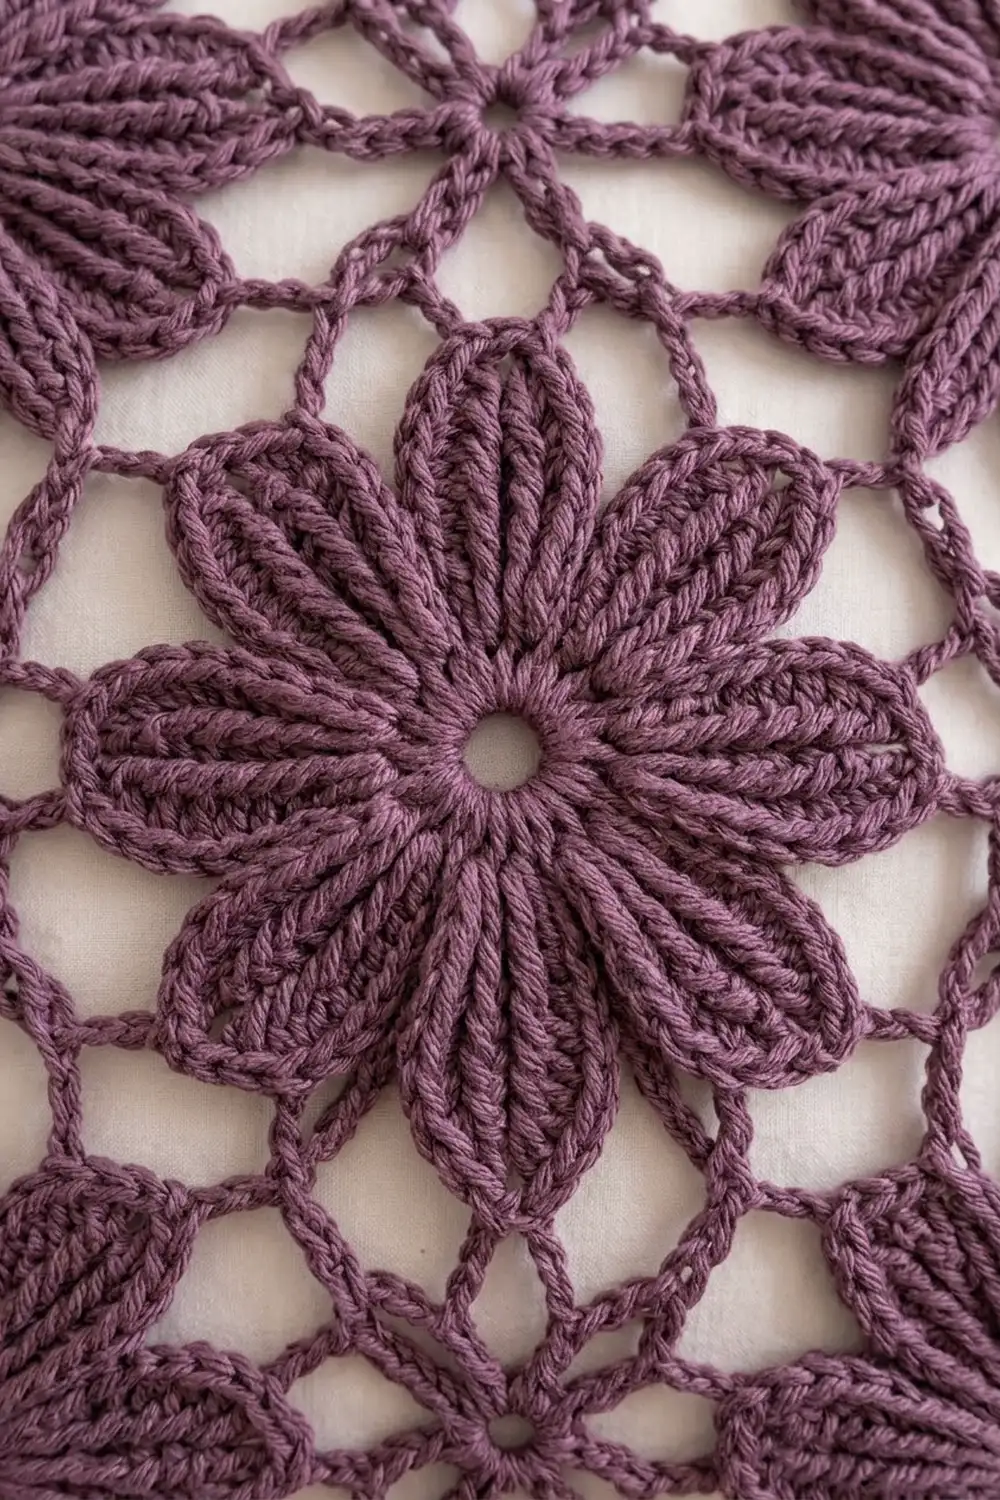
Motif (make 99)
Every round is worked with the RS facing. Do not turn.
Rnd 1: Make a magic ring. Ch 3 (counts as dc), work 15 dc in the ring, then sl st to the top of the ch-3. Pull the ring snug, but leave a small open hole at the center. (16 dc)
Rnd 2: Ch 1, sc in the same st. Ch 5, skip 1 st, sc in the next st. Repeat from * around, ending with ch 5, skip the last st, then sl st to the first sc. (8 sc, 8 ch-5 loops)
Rnd 3 (petals): Sl st into the first ch-5 loop. In each ch-5 loop, work: (sc, hdc, dc, 2 tr, dtr, ch 2, dtr, 2 tr, dc, hdc, sc). Sl st to the first sc. (8 petals; 96 sts plus 8 ch-2 tip sps; 12 sts per petal)
The rising heights (sc up to dtr and back down) form the pointed petal shape. The tall stitch posts sit side by side and create the ribbed look. Lay the flower flat and check it against the 6.5 in (16.5 cm) checkpoint.
Rnd 4 (framing): Sl st across the first 6 sts of the first petal (sc, hdc, dc, tr, tr, dtr), then sl st into the ch-2 tip sp. Ch 1.
- (sc, ch 5, sc) in this tip sp (this is a corner).
- Ch 7, sc in the next tip sp (this is a mid-side tip).
- Ch 7.
- Move to the next tip sp and repeat from the first * 3 more times. Omit the last ch 7 and sl st to the first sc instead.
Count: 12 sc, 4 corner ch-5 loops, and 8 ch-7 loops. The four corner tips now mark the square.
Rnd 5 (mesh): Sl st into the corner ch-5 loop. Ch 1. Then repeat the following 4 times:
- Work (sc, ch 5, sc) in the corner loop.
- Ch 5, sc in the next ch-7 loop.
- Ch 5, sc in the mid-side sc.
- Ch 5, sc in the next ch-7 loop.
- Ch 5.
After the 4th repeat, sl st to the first sc. (4 corner loops and 16 side loops, for 20 ch-5 loops; 20 sc; each side has 4 ch-5 loops)
Rnd 6 (mesh): Sl st into the corner loop. Ch 1. Then repeat the following 4 times:
- Work (sc, ch 5, sc) in the corner loop.
- Ch 5, sc in the next ch-5 loop. Work this 4 times.
- Ch 5.
After the 4th repeat, sl st to the first sc. (4 corner loops and 20 side loops, for 24 ch-5 loops; 24 sc; each side has 5 ch-5 loops)
Rnd 7 (edge): Sl st into the corner loop. Ch 1. Then repeat the following 4 times:
- Work 3 sc in the corner loop.
- Work 5 sc in each of the next 5 side loops.
Sl st to the first sc. Fasten off and weave in the ends.
Total: (4 corners x 3 sc) + (20 side loops x 5 sc) = 12 + 100 = 112 sc.
Per side: count from corner st to corner st, both included. That is 1 corner sc + 1 sc + 25 sc + 1 sc + 1 corner sc = 29 sts. The middle sc of each 3-sc group is the corner st, and it is shared by two sides. So the total is 4 x 28 = 112, which matches.
Block the motif to 10 x 10 in (25.4 x 25.4 cm) and check that each side is 29 sts.
Make All Pieces
Make 99 plum motifs, all identical. Block them in batches of 10–12 so that every motif reaches the same 10 in (25.4 cm) square before joining.
Layout, 9 columns x 11 rows. Each M is one motif.
Row 1:  M M M M M M M M M
Row 2:  M M M M M M M M M
Row 3:  M M M M M M M M M
Row 4:  M M M M M M M M M
Row 5:  M M M M M M M M M
Row 6:  M M M M M M M M M
Row 7:  M M M M M M M M M
Row 8:  M M M M M M M M M
Row 9:  M M M M M M M M M
Row 10: M M M M M M M M M
Row 11: M M M M M M M M M
All motifs are the same, so you don’t need to arrange them in any order. Do turn them so the starting joins point in the same direction, which keeps them out of sight.
Joining
Method: Slip stitch through the back loops, with WS together and RS facing you. This gives a flat seam with a thin chain line on the front, which matches the mesh lines.
Stitch-to-stitch logic: Each motif side has 29 sts, including both corner sts. Hold two motifs together. Insert the hook through the BLO of the corner st on both motifs and join the yarn. Then sl st through matching pairs of sts. Corner pairs with corner, and every st pairs 1:1, 29 sts to 29 sts. Don’t skip or add any stitches.
Order:
1. Join the motifs into 11 horizontal strips of 9 motifs each.
2. Join the strips together along their long edges. Each long seam is 9 x 29 = 261 sts.
3. Where four corners meet, work through both corner sts, carry the yarn across, and keep going without fastening off.
Tension: Keep your slip stitches as loose as your sc. If the seams pull tight, the panel will pucker. If that happens, go up one hook size for joining only.
Size checkpoint: The joined panel should measure 90 x 110 in (228.6 x 279.4 cm). Each strip of 9 motifs should be 90 in (228.6 cm) long. Check the first strip before you join the rest.
Border
Border gauge: Rnd 1 works into the motif edges at the same 2.9 sts per inch. Short sides: 261 sts ÷ 90 in = 2.9. Long sides: 319 sts ÷ 110 in = 2.9. Because the gauge matches, the border lies flat without ruffling or pulling.
Starting counts:
– Each short side is 9 motifs x 29 = 261 sts.
– Each long side is 11 motifs x 29 = 319 sts.
– These counts include the outer corner sts. Each outer corner st is shared by two sides, so the edge has 2 x 261 + 2 x 319 − 4 = 1,156 sts in total.
Rnd 1: With RS facing, join the yarn in any outer corner st. Ch 1.
– Work (sc, ch 2, sc) in each of the 4 outer corner sts.
– Work 1 sc in every other st, including the sts at the seams.
– Sl st to the first sc.
Count: 1,156 sc (1 in each existing st) + 4 extra sc (1 more at each corner) = 1,160 sc, plus 4 corner ch-2 sps. Each short side has 261 sc and each long side has 319 sc, counted between the corner sps.
Rnd 2: Sl st into a corner ch-2 sp. Ch 1. Then repeat the following around:
- Work (sc, ch 5, sc) in the corner sp.
- Ch 3, skip 1 sc, sc in the next sc. Repeat to the last sc of the side.
- Ch 3, skip the last sc.
Sl st to the first sc.
- Short sides: sc lands on even sts 2 through 260, which makes 130 sc and 131 ch-3 loops.
- Long sides: sc lands on even sts 2 through 318, which makes 159 sc and 160 ch-3 loops.
This works because both side counts are odd (261 and 319). A 2-st repeat that skips the first and last st fits exactly with no leftover sts.
Rnd 3 (scallops): Sl st into a corner ch-5 loop.
– In each corner loop, work: (sc, hdc, 2 dc, ch 2, 2 dc, hdc, sc).
– In each ch-3 loop, work: (sc, hdc, dc, hdc, sc).
– Sl st to the first sc. Fasten off.
Count: 131 scallops on each short side, 160 on each long side, and 4 corner scallops, for 586 scallops in total.
The border adds about 1 in (2.5 cm) on each side. The finished bedspread measures 92 x 112 in (233.7 x 284.5 cm).
Final Blocking
- Weave in any ends you have left, following the stitch paths. Leave about 2 in (5.1 cm) tails before trimming.
- Lay the bedspread flat on a clean sheet over blocking mats, a carpet, or a spare bed. Block one section at a time if space is tight.
- Spray it evenly until it is damp, not soaking.
- Pin the four outer corners to 92 x 112 in (233.7 x 284.5 cm).
- Pin along each seam line every 10 in (25.4 cm) so the grid stays square.
- Pin each corner scallop to a point. Pin the mid-side scallops lightly.
- Gently open each flower so the eight petals fan out evenly.
- Let it dry completely before you unpin it.
Final Quality-Control Checklist
- [ ] All 99 motifs measure 10 in (25.4 cm) square with 29 sts per side.
- [ ] Every motif has 8 petals, with 4 tips at the corners and 4 at the mid-sides.
- [ ] All seams are joined 1:1, corner to corner.
- [ ] The panel measures 90 x 110 in (228.6 x 279.4 cm) before the border.
- [ ] Border Rnd 1 has 261 sc on each short side and 319 sc on each long side.
- [ ] Border Rnd 2 has 131 loops on each short side and 160 on each long side.
- [ ] The finished bedspread measures 92 x 112 in (233.7 x 284.5 cm).
- [ ] All ends are secured and invisible from the RS.
Troubleshooting
- Petals curl forward: Your Rnd 3 tension is tight. Loosen the tall stitches or go up a hook size for that round only.
- The flower ruffles in Rnd 4: The ch-7 loops are too long for your tension. Try ch 6, and check that the motif still reaches 7.75 in (19.7 cm) after Rnd 4.
- Corners cup inward: Work 4 sc instead of 3 in the corner loops of Rnd 7. The middle 2 sts become the corner, so recount the sides to 29 sts that include both of them.
- Seams pucker: Rejoin with a larger hook.
- The border waves: Your Rnd 1 count is too high. Recount to 261 and 319 sts.
- The border pulls in: Your Rnd 2 chains are too tight. Loosen them or use ch 4 instead.
Care
Hand wash or machine wash on a cold, gentle cycle in a laundry bag. Dry the bedspread flat and reshape it while damp. Never hang it wet, because the weight will stretch the lace.

Final Notes
The measurement chain is simple. The center ring is 1.5 in (3.8 cm). The flower is 6.5 in (16.5 cm), and the finished motif is 10 in (25.4 cm) square with 29 sts per side. Joined 9 x 11, the panel is 90 x 110 in (228.6 x 279.4 cm). The border adds 1 in (2.5 cm) per side, for a finished bedspread of 92 x 112 in (233.7 x 284.5 cm). If each checkpoint is right, the next one will be too.
Happy crocheting!