

These curtain panels are made from small fan motifs strung into long vertical strands. Each fan opens upward from a tight center ring, with long open spokes and a softly scalloped top edge. The strands hang from a solid header band with tab tops, so light comes through the gaps and the fans make lacy shadows on the floor.
The pair shown is worked in one color, a dusty plum. It is a smooth cotton-blend DK yarn that gives clear stitch definition and drapes well. The style is boho, airy, and easy to change: a lighter color looks softer, and a deeper color looks more dramatic.
This pattern uses US crochet terms. Each finished panel is 28.7 in (72.9 cm) wide at the header and about 29 in (73.7 cm) wide across the fans. The longest strands reach 84 in (213.4 cm) from the top of the header, not counting tabs.
Construction is simple and repetitive. First you make all the fans as separate pieces. Next you crochet two header bands and add a border and tabs to each. Last, you join the fans into strands with one continuous yarn per strand, hanging each strand from the header.
Finished Size and Construction
- Finished size (per panel): 28.7 in (72.9 cm) header width; 84 in (213.4 cm) longest drop
- Skill level: Intermediate (simple stitches, a lot of repetition, careful finishing)
- Terminology: US
- Yarn weight: DK (light / 3)
- Hook: 4.0 mm (G-6)
- Number of pieces: 364 fans + 2 header bands (182 fans and 1 header per panel)
- Layout per panel: 7 strands × 26 fans
- Piece size (one fan): 5 in (12.7 cm) wide × 2.5 in (6.4 cm) tall at the shell tips
- Header size before border: 28.2 in × 4 in (71.6 cm × 10.2 cm)
- Border depth: 1 round of sc, about 0.25 in (0.6 cm) per edge
Materials
Yarn: Use a smooth DK cotton or cotton blend at about 115 m (126 yd) per 50 g. Cotton holds its shape when it hangs and doesn’t stretch as much as acrylic under the weight of 26 fans. Avoid fuzzy yarns, which hide the spokes.
- Dusty plum: 1,200 g / 2,760 m (24 balls of 50 g / 115 m), or 600 g / 1,380 m per panel
These quantities include a margin of about 10% for gauge differences and weaving in ends. Buy all of it from one dye lot.
Tools:
– 4.0 mm (G-6) crochet hook
– Tapestry needle
– 20+ locking stitch markers
– Measuring tape
– Blocking mats, rust-proof pins, and a spray bottle
– Curtain rod up to 1.25 in (3.2 cm) in diameter
Abbreviations (US Terms)
- ch – chain
- sl st – slip stitch
- sc – single crochet
- dc – double crochet
- tr – treble crochet
- sk – skip
- sp – space
- st(s) – stitch(es)
- MR – magic ring
Special stitch – surface slip stitch: Hold the working yarn behind the fabric. Insert the hook from front to back through the fabric at the given spot, pull up a loop, and draw it through the loop on your hook. This makes a neat chain-like line on the surface.
Gauge and Checkpoints
Header gauge: 18 dc and 9 rows = 4 in (10.2 cm) in dc rows.
Chain gauge: 8 ch = 1 in (2.5 cm) when gently stretched.
Fan gauge: 1 finished fan = 5 in (12.7 cm) wide.
Make and block one test fan before you make any others. Measure its width after each row:
- After Row 1: 1.6 in (4.1 cm) wide
- After Row 2: 3.1 in (7.9 cm) wide
- After Row 3: 4.1 in (10.4 cm) wide
- After Row 4: 5 in (12.7 cm) wide; 2 in (5.1 cm) from ring to center sc; 2.5 in (6.4 cm) from ring to shell tips
If your fan is too big by more than 0.25 in (0.6 cm), go down a hook size. If it’s too small, go up a hook size. Before making the header, also check a 4 in (10.2 cm) dc swatch, because many crocheters work dc rows at a different tension from rounds.
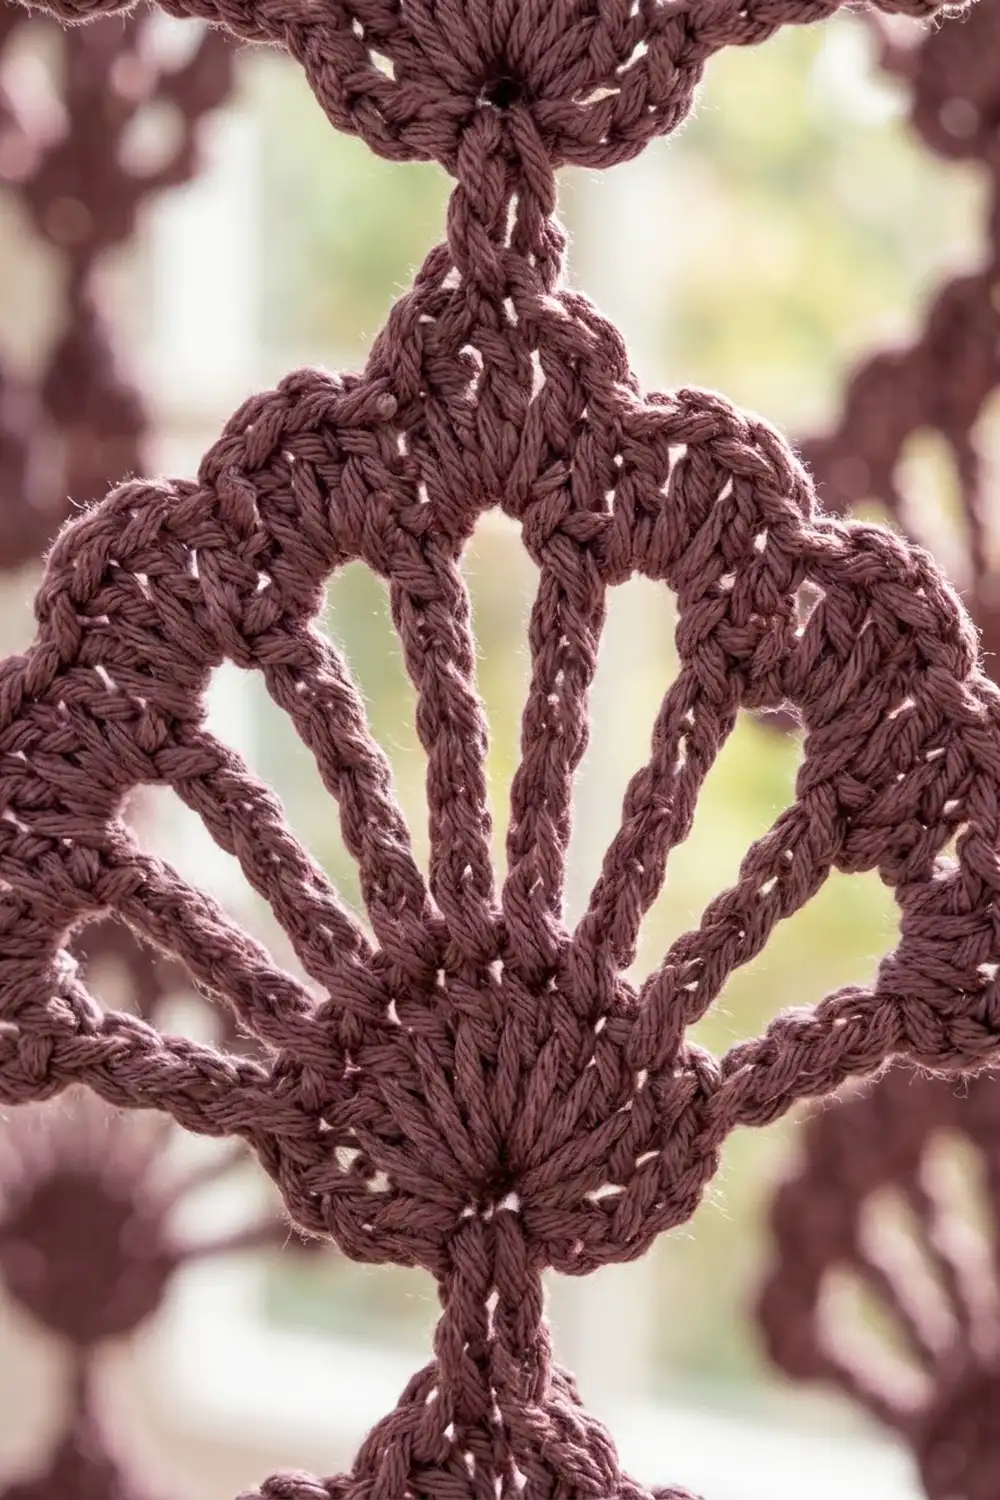
The Fan Motif (make 364)
The fan is worked flat in turned rows, starting at the point.
Row 1: Make a MR. Ch 4 (counts as tr), 8 tr into the ring. Pull the ring tight, then turn. (9 tr)
The 9 tr open into a half circle. The 5th tr is the center spoke.
Row 2: Ch 4 (counts as tr), ch 2, tr in next tr, ch 2; repeat from * 6 more times, tr in last st. Turn. (9 tr, 8 ch-2 sps)
This row makes the spokes longer and opens the gaps.
Row 3: Ch 3 (counts as dc), 3 dc in next ch-2 sp, dc in next tr; repeat from * 7 more times. Turn. (33 dc)
Check: 1 + (8 × 4) = 33. This is the solid band. Dc 17 sits directly over the center spoke.
Row 4 (scallops): Ch 1, sc in first dc, sk 1 dc, 5 dc in next dc, sk 1 dc, sc in next dc; repeat from * 7 more times. (8 shells, 9 sc, 49 sts)
Each repeat uses 4 stitches: 1 + (8 × 4) = 33. Every Row 3 stitch is used. The sc stitches land on dc 1, 5, 9, 13, 17, 21, 25, 29, and 33. That means the 5th sc (on dc 17) is the center sc, straight above the center spoke.
Fasten off and weave in both ends. Pull the ring tail extra tight before weaving it in.
The Header Band (make 2)
Row 1: Ch 129. Dc in 4th ch from hook and in each ch across. Turn. (127 dc, counting the skipped ch as a dc)
Rows 2–9: Ch 3 (counts as dc), dc in each st across. Turn. (127 dc)
Checkpoint: 28.2 in × 4 in (71.6 cm × 10.2 cm). Don’t fasten off. Go straight into the border (see Border section).
Make All Pieces
Per panel: 182 fans and 1 header. For the pair: 364 fans and 2 headers, all in dusty plum.
Store the fans in bags of 26, one bag per strand, so you can track progress. Block the fans in batches as you go (see Final Blocking).
Layout per panel (H = header, O = odd strand, E = even strand, F = fan). Even strands hang 1.5 in (3.8 cm) lower:
H  H  H  H  H  H  H
|  |  |  |  |  |  |
F  |  F  |  F  |  F
|  F  |  F  |  F  |
F  |  F  |  F  |  F
|  F  |  F  |  F  |
...26 fans per strand...
O1 E2 O3 E4 O5 E6 O7
Joining: Building the Strands
Work order: Finish the header border and tabs (Border section) before you join any strands. The strands hang from the bottom border sc.
Placing the strands: On the bottom edge, place a marker in the sc directly below dc 10, 28, 46, 64, 82, 100, and 118 of Row 1. These markers are 18 sts apart, which is 4 in (10.2 cm) at gauge. Each edge has 9 dc beyond the outer markers, so the strands sit centered: 9 + (6 × 18) + 1 + 9 = 127.
Strand logic: Each strand uses one continuous yarn. The stem chain drops to a fan’s center sc, travels down that fan’s center spoke on the surface, and leaves from the ring to make the next stem.
Odd strands (1, 3, 5, 7):
- With the right side of the header facing, join yarn with a sl st in the marked sc.
- Ch 8 (1 in / 2.5 cm).
- With the right side of a fan facing and the scallops pointing up, sl st into the center sc of Row 4.
- Work 4 surface slip stitches straight down the center spoke: one into center dc 17 of Row 3, one into the center tr of Row 2, one into the center tr of Row 1, and one into the center of the ring.
- Ch 8, then sl st into the center sc of the next fan.
- Repeat steps 4–5 until 26 fans are joined. After the last fan’s 4 surface sl sts, fasten off.
Even strands (2, 4, 6): Work the same way, but make the first stem ch 20 (2.5 in / 6.4 cm). This drops each fan 1.5 in (3.8 cm) lower than its neighbors, which is half of the 3 in (7.6 cm) fan-to-fan pitch, so the fans nest.
Tension advice: Keep the chains firm and even, matching your gauge swatch. Loose stems stretch a lot under 26 fans. Keep the surface slip stitches relaxed so they don’t pucker the spoke.
Size checkpoint (per strand, hanging):
– Odd: 1 + (26 × 2) + (25 × 1) = 78 in (198.1 cm)
– Even: 2.5 + 52 + 25 = 79.5 in (201.9 cm)
Here 26 × 2 = 52 in (132.1 cm) of fan height, measured ring to center sc.
Border: Header Edging and Tabs
Border gauge: 1 sc per dc along the top and bottom; 2 sc per dc row-end along the sides. A dc row is about as tall as two sc, so this ratio keeps the sides flat.
Border round: Don’t turn after Row 9. Ch 1.
- Work 3 sc in the first st (corner) and 1 sc in each of the next 125 sts, then 3 sc in the last st (corner).
- Work 2 sc in each row-end down the side. (18 sc)
- Work 3 sc in the first foundation ch (corner), 1 sc in each of the next 125 foundation ch, and 3 sc in the last foundation ch (corner).
- Work 2 sc in each row-end up the side. (18 sc)
- Sl st to the first sc. (298 sc)
Why the math works: 4 corners × 3 sc = 12, plus 2 × 125 single sc along the top and bottom, plus 2 × 18 along the sides: 12 + 250 + 36 = 298. Each corner group belongs to the corner only. The 125 singles cover dc 2–126, so no stitch is counted twice.
Checkpoint: 28.7 in × 4.5 in (72.9 cm × 11.4 cm).
Tabs (make 5 per header): On the top edge, mark the single sc above dc 2–8, 31–37, 61–67, 91–97, and 120–126. The sum is 1 corner + 7 + 22 + 7 + 23 + 7 + 23 + 7 + 22 + 7 + 1 corner = 127, so the tabs sit symmetrically.
- Row 1: Join yarn in the first marked sc. Ch 3 (counts as dc), then dc in the next 6 sc. Turn. (7 dc)
- Rows 2–9: Ch 3, dc across. Turn. (7 dc)
Each tab strip is 1.6 in × 4 in (4.1 cm × 10.2 cm). Fold the tab to the back and whipstitch its last row along the back of header Row 8. This makes a 2 in (5.1 cm) loop that fits rods up to 1.25 in (3.2 cm) in diameter.
Final Blocking
- Wet-block the fans in batches before joining. Pin each fan with the spokes fanned out evenly to 5 in (12.7 cm) wide, and pin each shell tip.
- Let the fans dry completely.
- Block the header flat to 28.7 in × 4.5 in (72.9 cm × 11.4 cm), pinning the tabs straight.
- After joining, hang the panel on the rod and mist the strands lightly.
- Let it hang dry for 24 hours. The fans’ own weight will even out the stems.
- Measure the drops again, then trim any loose ends.
Final Quality-Control Checklist
- Every fan has 9 spokes, 8 shells, and a tight ring.
- Every fan measures 5 in (12.7 cm) wide, within 0.25 in (0.6 cm).
- The header border has 298 sc and lies flat with square corners.
- The 5 tabs are evenly spaced and sewn securely.
- There are 7 strands, each with 26 fans, attached 4 in (10.2 cm) apart.
- All stems enter at the center sc and run straight down the center spoke.
- The even strands hang 1.5 in (3.8 cm) lower than the odd strands.
- All ends are woven in at least 1.5 in (3.8 cm).
Troubleshooting
- Fan cups instead of lying flat: Row 3 is too tight. Use a looser tension or go up a hook size for Rows 3–4.
- Fan ruffles: Check that Row 3 has exactly 33 dc and Row 4 has exactly 8 shells.
- Stems stretch unevenly: Rework the long ones with a firmer chain. All stems should hang at 1 in (2.5 cm).
- Fans twist sideways: The stem missed the center sc. Undo back to that fan and rejoin at the 5th sc.
- Header edge flares: Make sure you work 1 sc per stitch on the top and bottom, not 2.
- Header edge pulls in: Make sure you work 2 sc per row-end on the sides, not 1.
- Panel too short: Add fans in equal numbers to every strand. Each added fan lengthens the strand by 3 in (7.6 cm).
Care
Hand wash cold and lay flat to dry, keeping each strand straight and untangled. Don’t tumble dry, and rehang while slightly damp to restore the drape.
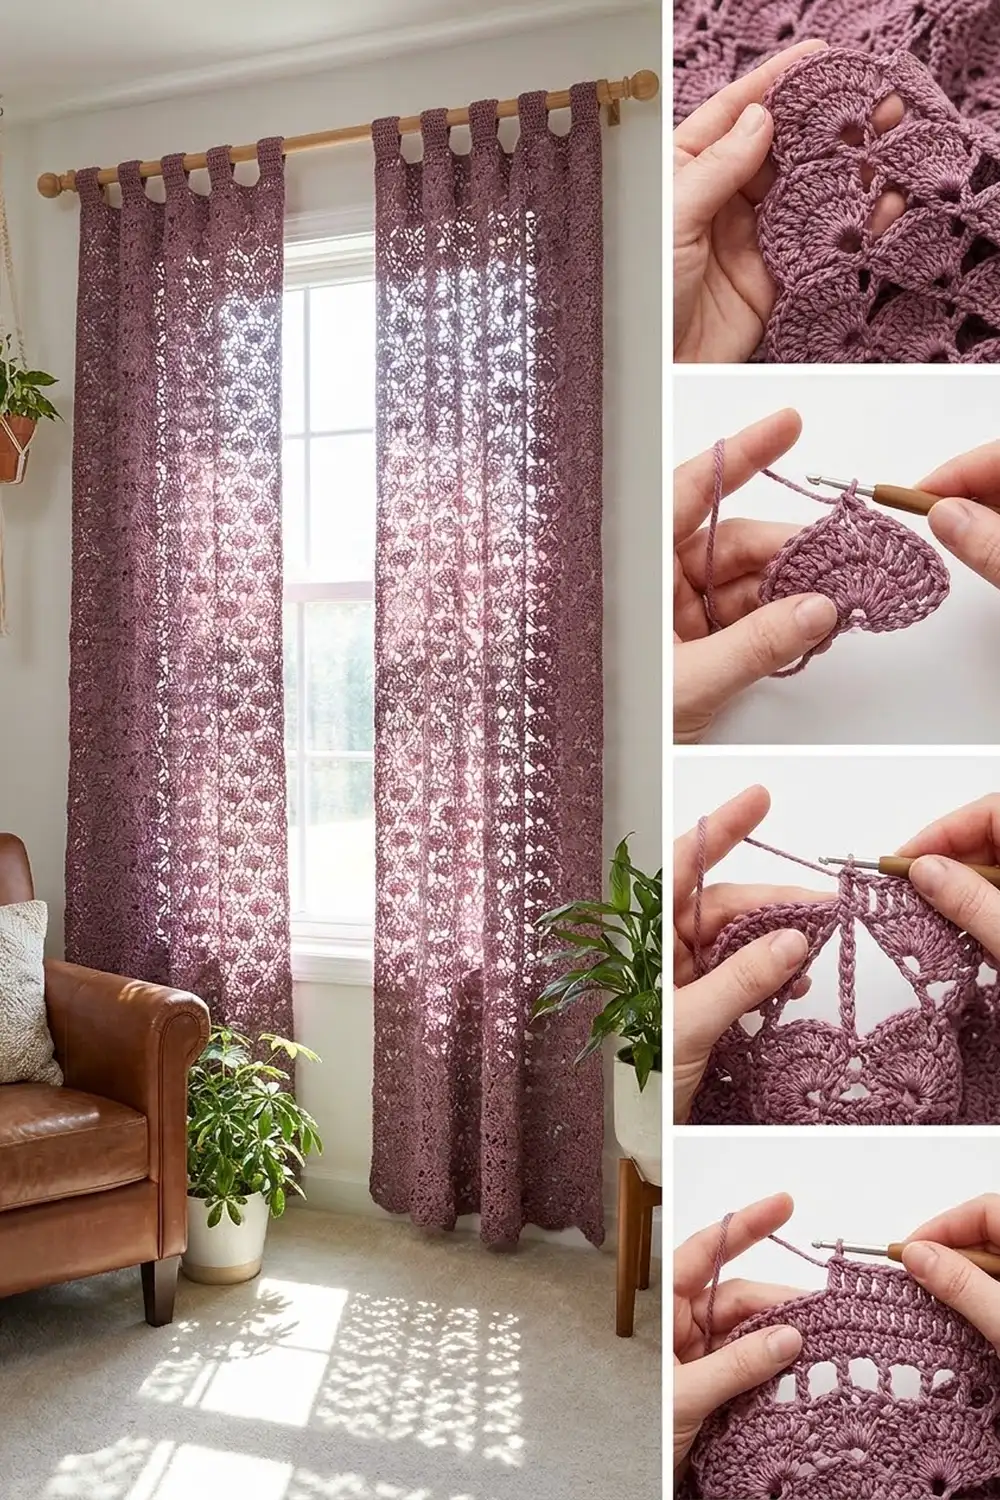
Final Notes
The measurement chain is short and reliable:
- 1 fan = 5 in (12.7 cm) wide and 2 in (5.1 cm) from ring to center sc.
- 1 stem = 1 in (2.5 cm), so the pitch is 3 in (7.6 cm) and 26 fans give 78 in (198.1 cm).
- 127 dc = 28.2 in (71.6 cm), and the border brings the header to 28.7 in (72.9 cm).
- 18-st spacing places 7 strands 4 in (10.2 cm) apart, and the offset stems nest the fans.
Check each link in that chain, and both panels will match. Happy crocheting!