

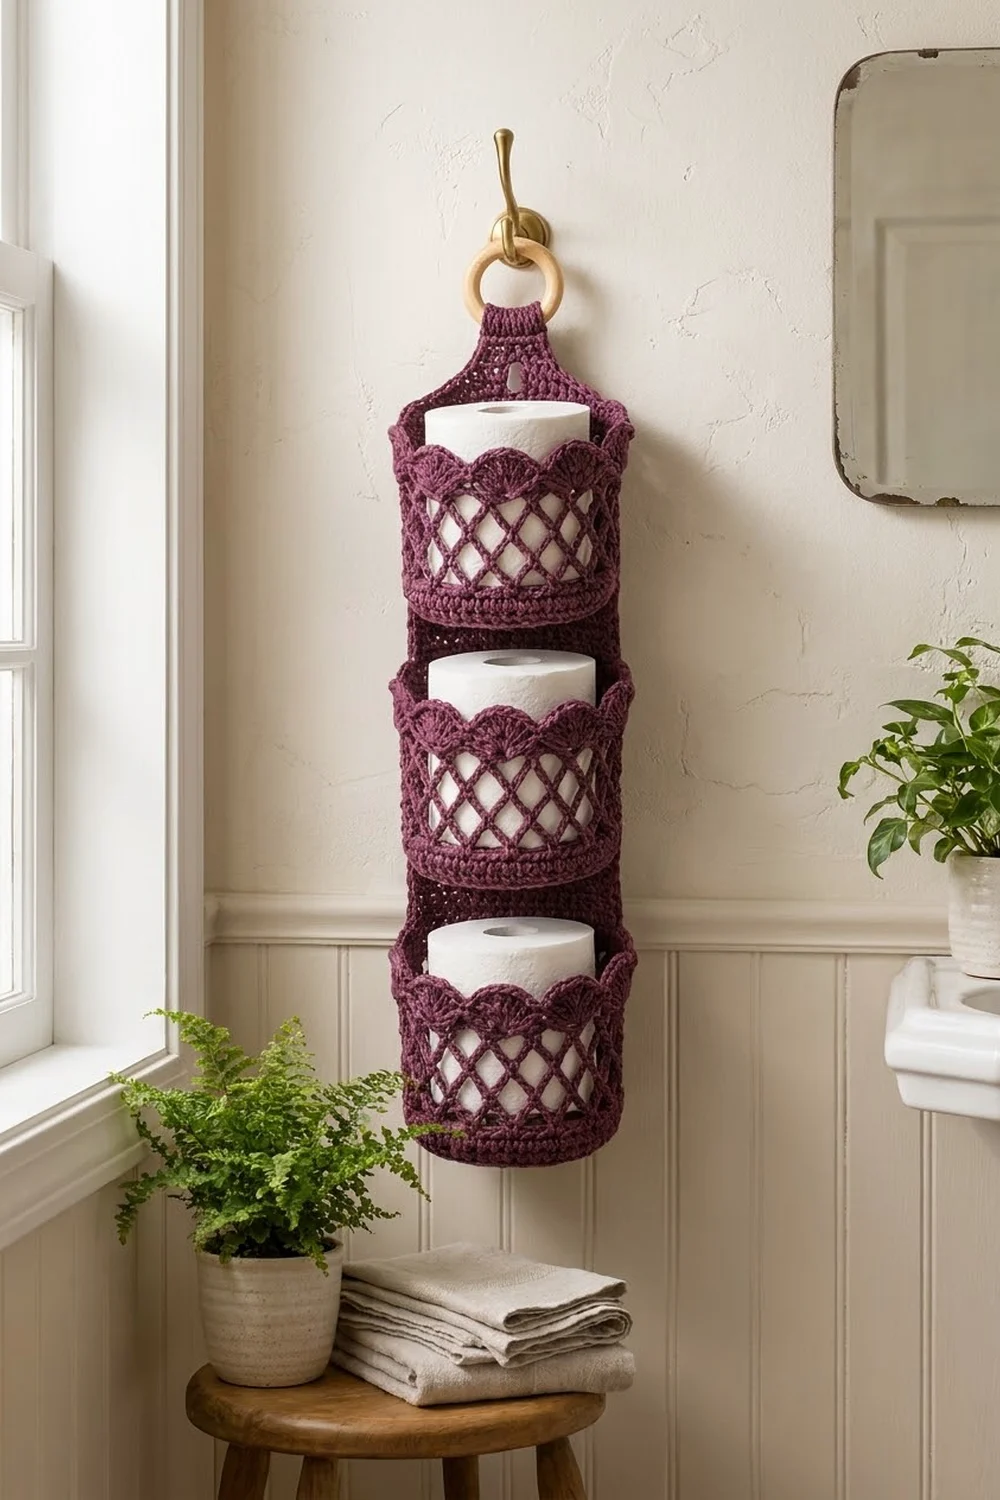
This three-tier holder hangs from a wooden ring and keeps three spare rolls within reach. Each round basket has a solid base, an open diamond lattice wall, and a rim of shell scallops. All three baskets are sewn to one back strap, which narrows at the top into a tab with a small eyelet.
The whole piece uses one deep plum cotton, so the texture stands out. The lattice looks like woven cane, and the scallops give it a soft, vintage edge.
The pattern uses US crochet terms. The finished holder hangs about 16 in (40.6 cm) below the ring. Each basket is 4 3/4 in (12.1 cm) across and 3 3/4 in (9.5 cm) tall, so it fits a standard roll with the top just showing.
You crochet three identical baskets in the round from the bottom up, then work the back strap flat in rows. Next you sew the baskets on, add a two-round border to the strap, and fold the tab over the ring.
Finished Size and Construction
- Finished size: about 16 in (40.6 cm) hanging length below the ring; strap 3 1/4 in (8.3 cm) wide with border
- Skill level: Intermediate
- Terminology: US crochet terms
- Yarn weight: worsted (#4) cotton
- Hook: 5.0 mm (H-8)
- Number of pieces: 4 (3 baskets + 1 back strap)
- Layout: 3 baskets stacked in one vertical column on the strap
- Piece size: each basket 4 3/4 in (12.1 cm) diameter x 3 3/4 in (9.5 cm) tall
- Strap size before border: 2 1/2 in (6.4 cm) wide x 16 1/2 in (41.9 cm) long
- Border depth: 3/8 in (1.0 cm) per edge
Materials
Choose a smooth, firm worsted cotton or cotton blend. Cotton holds its shape, handles bathroom humidity, and keeps the lattice crisp. Avoid stretchy acrylics, because the mesh will sag under a roll.
Yarn:
- Plum (deep purple-burgundy): 200 g / 310 m
Each basket uses about 41 g / 63 m. The strap with its border uses about 42 g / 64 m. The total includes a margin of about 15% for swatching, sewing tails, and tension differences.
Tools:
- 5.0 mm (H-8) crochet hook
- One 3 in (7.6 cm) wooden ring
- Tapestry needle
- 8 locking stitch markers
- Rust-proof pins
- Measuring tape
- Scissors
Abbreviations (US Terms)
- ch – chain
- sl st – slip stitch
- sc – single crochet
- dc – double crochet
- inc – 2 sc in the same stitch
- sc2tog – single crochet 2 together
- BLO – back loop only
- MR – magic ring
- sk – skip
- sp – space
- st(s) – stitch(es)
- rev sc – reverse single crochet (crab stitch)
Shell: 5 dc in the same stitch.
Reverse sc: Work from left to right (if you crochet right-handed). Insert the hook into the next stitch to the right, yarn over, and pull up a loop. Yarn over again and pull through both loops on the hook.
Gauge and Checkpoints
Gauge: 16 sc and 16 rounds/rows = 4 in (10.2 cm).
Test one piece first. Work Rounds 1–10 of the first basket base, then measure it flat before going on. This base is your gauge swatch, and you can keep it as part of the holder if it measures correctly.
Checkpoints:
- After Round 5 (30 sts): base is 2 3/8 in (6.0 cm) across
- After Round 10 (60 sts): base is 4 3/4 in (12.1 cm) across
- After Round 14: wall is 1 in (2.5 cm) tall
- After Round 18: wall is 3 in (7.6 cm) tall
- After Round 20: basket is 3 3/4 in (9.5 cm) tall
- Strap after Row 52: 13 in (33.0 cm) long, 2 1/2 in (6.4 cm) wide
Too big: Go down a hook size. A base wider than 5 in (12.7 cm) lets the rolls rattle.
Too small: Go up a hook size. A base under 4 1/2 in (11.4 cm) will not hold a standard roll.
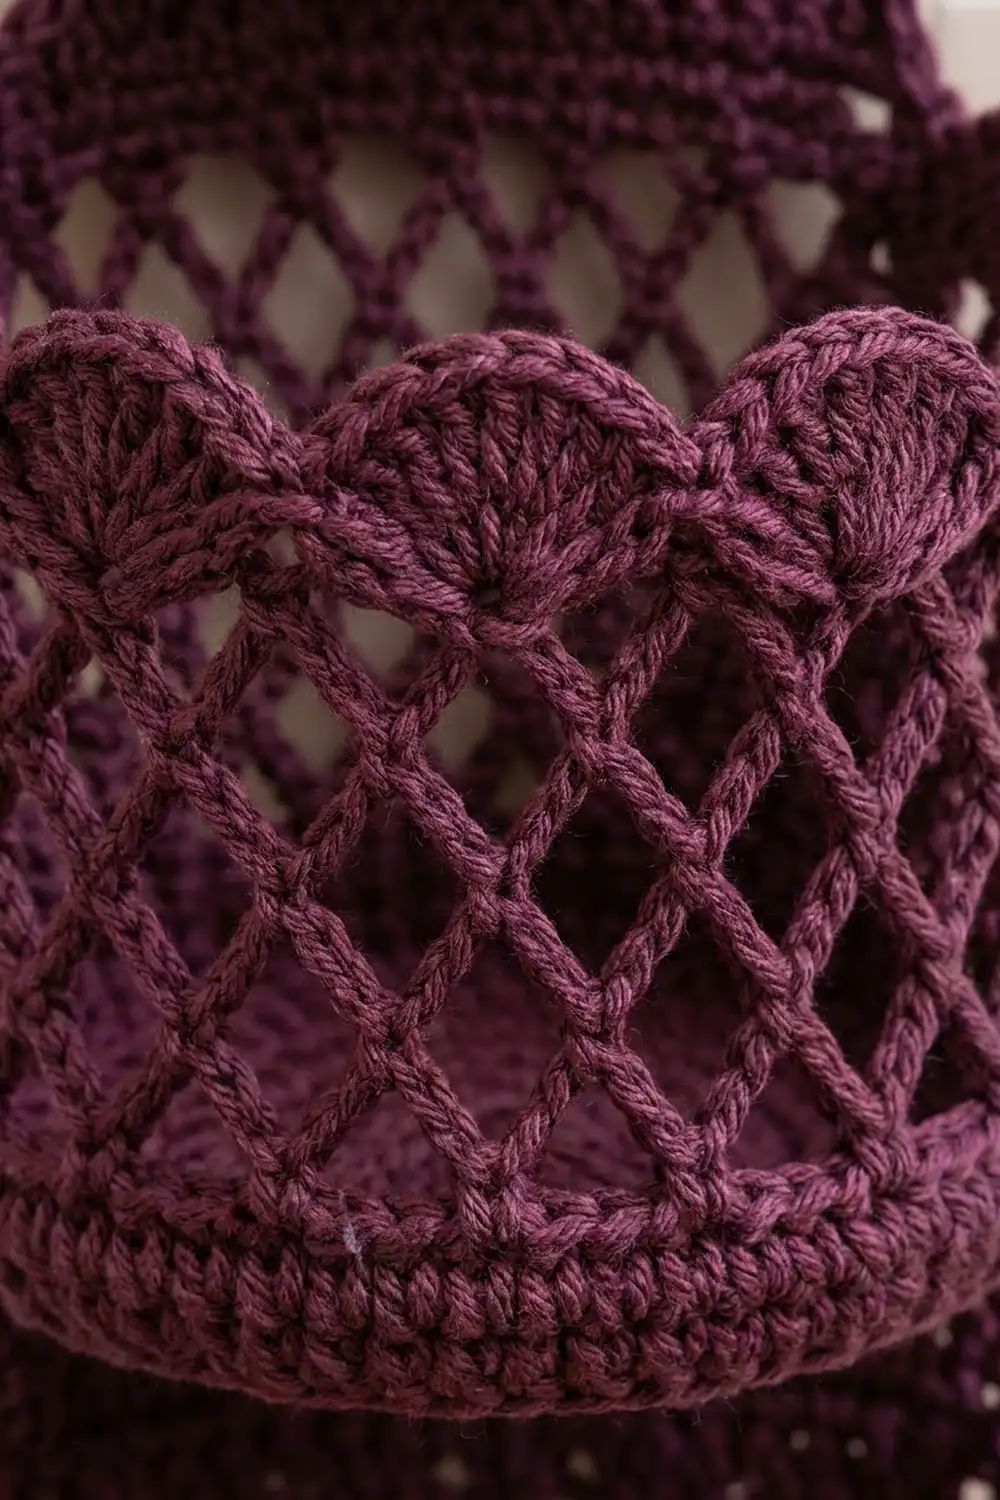
Basket (Make 3)
Work the base in continuous rounds. From Round 11 on, work joined rounds. Do not turn.
Base
Round 1: Make a MR, 6 sc in the ring, pull closed. (6 sts)
Round 2: Inc in each st around. (12 sts)
Round 3: (Sc in next st, inc) 6 times. (18 sts)
Round 4: (Sc in next 2 sts, inc) 6 times. (24 sts)
Round 5: (Sc in next 3 sts, inc) 6 times. (30 sts)
Round 6: (Sc in next 4 sts, inc) 6 times. (36 sts)
Round 7: (Sc in next 5 sts, inc) 6 times. (42 sts)
Round 8: (Sc in next 6 sts, inc) 6 times. (48 sts)
Round 9: (Sc in next 7 sts, inc) 6 times. (54 sts)
Round 10: (Sc in next 8 sts, inc) 6 times. Sl st in the next st. (60 sts)
Solid Wall
Round 11: Ch 1, sc in BLO of each st around, sl st in first sc. (60 sts) This makes the crisp fold line where the base turns up into the wall.
Rounds 12–14: Ch 1, sc in each st around, sl st in first sc. (60 sts)
The wall is now 1 in (2.5 cm) tall.
Lattice Mesh
The mesh is a diamond net of chain loops. Each loop is anchored by a sc in the center of the loop below. The joining dc at the end of a round leaves your hook at the top center of the last loop, so the diamonds stay in line.
Round 15 (set-up): Ch 1, sc in same st as join, *ch 5, sk 3 sts, sc in next st; repeat from * 13 more times, ch 2, sk last 3 sts, dc in first sc. (15 sc, 15 loops)
The 14 repeats use 57 sts. The final ch 2 + dc spans the last 3 sts and closes loop 15. That covers all 60 sts at 4 sts per loop.
Rounds 16–17: Ch 1, sc around the post of the joining dc, *ch 5, sc in next ch-5 sp; repeat from * 13 more times, ch 2, dc in first sc. (15 sc, 15 loops)
Round 18: Ch 1, sc around the post of the joining dc, *ch 5, sc in next ch-5 sp; repeat from * 13 more times, ch 5, sl st in first sc. (15 sc, 15 loops)
Rim Band and Shell Edge
Round 19 (conversion): Ch 1, sc in same sc as join, 3 sc in next ch-5 sp, *sc in next sc, 3 sc in next ch-5 sp; repeat from * 13 more times, sl st in first sc. (15 sc worked 1-per-existing-sc + 45 sc added in the spaces = 60 sts)
Round 20 (shells): Ch 1, sc in same st, *sk 2 sts, shell in next st, sk 2 sts, sc in next st; repeat from * 8 more times, sk 2 sts, shell in next st, sk 2 sts, sl st in first sc. (10 shells, 10 sc)
Each repeat uses 6 sts, and 10 repeats x 6 sts = 60 sts. Fasten off and leave a 24 in (61.0 cm) tail for sewing.
Back Strap
Work flat in rows and turn at the end of every row. The ch 1 at the start of a row does not count as a stitch.
Foundation: Ch 11.
Row 1: Sc in 2nd ch from hook and in each ch across, turn. (10 sts)
Rows 2–52: Ch 1, sc in each st across, turn. (10 sts)
The strap now measures 13 in (33.0 cm) long and 2 1/2 in (6.4 cm) wide.
Top Tab
Row 53: Ch 1, sc2tog, sc in next 6 sts, sc2tog, turn. (8 sts)
Row 54: Ch 1, sc2tog, sc in next 4 sts, sc2tog, turn. (6 sts)
Rows 55–56: Ch 1, sc in each st across, turn. (6 sts)
Row 57 (eyelet): Ch 1, sc in next 2 sts, ch 2, sk 2 sts, sc in next 2 sts, turn. (4 sc, 1 ch-2 sp)
Row 58: Ch 1, sc in next 2 sts, 2 sc in ch-2 sp, sc in next 2 sts, turn. (6 sts)
Rows 59–66: Ch 1, sc in each st across, turn. (6 sts)
Do not fasten off. Put a marker in the live loop. The strap is 16 1/2 in (41.9 cm) long, and the tab is 1 1/2 in (3.8 cm) wide.
Make All Pieces
All pieces use the single plum color:
- Baskets: 3 in plum
- Back strap: 1 in plum
Layout grid (top to bottom, by strap rows):
          [ Wooden ring ]
     [ Tab: Rows 53-66, eyelet at Row 57 ]
     [ Basket 3: Rows 37-49, shells to 51 ]
     [ Gap: Rows 35-36 ]
     [ Basket 2: Rows 20-32, shells to 34 ]
     [ Gap: Rows 18-19 ]
     [ Basket 1: Rows 3-15, shells to 17 ]
     [ Tail: Rows 1-2 ]
Each basket covers 15 strap rows, which equals its 3 3/4 in (9.5 cm) height.
Joining
Sew each basket to the right side of the strap using its tail and a tapestry needle.
Mark the basket back. On each basket, mark sts 58, 59, 60, 1, 2, and 3 of Round 11. These 6 sts sit over the round joins, so all the joins end up hidden against the strap.
Mark the strap. Mark strap sts 3 and 8. These two columns are 5 sts apart, the same spacing as basket sts 58 and 3.
Bottom seam (stitch to stitch): Place Basket 1 with its bottom edge on Row 3. Whipstitch the 6 marked sts of Round 11 to strap sts 3–8 of Row 3, one basket st to one strap st.
Side seams: Whipstitch Rounds 11–14 to strap Rows 3–6 along columns 3 and 8, one round to one row. Both gauges are 16 per 4 in (10.2 cm), so rounds and rows match. In Rows 7–14, tack each mesh sc knot that falls on column 3 or 8 to the strap.
Top seam: Whipstitch the 6 back sts of Round 19 to strap sts 3–8 of Row 15. Leave the shells free so they stand up.
Repeat for Basket 2 (bottom on Row 20, band on Row 32) and Basket 3 (bottom on Row 37, band on Row 49).
Tension advice: Pull each whipstitch snug but not tight. If the strap puckers between the columns, take out the last few stitches and sew them again more loosely.
Size checkpoint: From strap Row 1 to the top of Basket 3’s shells should measure 12 3/4 in (32.4 cm). Strap sts 1–2 and 9–10 stay unsewn so the border goes on cleanly.
Border
The border goes around the strap only, after the baskets are sewn on. Border gauge matches the strap: 4 sc per 1 in (2.5 cm), and 1 sc per row end.
Border Round 1: Pick up the live loop at Row 66. Ch 1, then work:
- Top edge (Row 66): 3 sc in first st, sc in next 4 sts, 3 sc in last st. (10 sts)
- First long side: 1 sc in each row end of Rows 65 to 2. (64 sts)
- Bottom edge (foundation ch): 3 sc in first ch, sc in next 8 ch, 3 sc in last ch. (14 sts)
- Second long side: 1 sc in each row end of Rows 2 to 65. (64 sts)
Sl st in first sc. (10 + 64 + 14 + 64 = 152 sts)
The top and bottom edge counts each include that edge’s 2 corner groups. The row ends of Rows 1 and 66 are covered by those corner groups, so each long side has 64 row ends (Rows 2–65). No corner is counted twice.
Border Round 2: Ch 1, rev sc in each st around, sl st in first st. (152 sts) Fasten off.
Why the math works: The sc gauge is square, so 1 sc per row end lies flat along the long sides. The 4 corner groups add 2 extra sts each, 8 in total, which is enough to turn the corners without cupping. Rev sc is worked 1 per stitch, so the count stays at 152.
With the border, the strap is 3 1/4 in (8.3 cm) wide and the tab is 2 1/4 in (5.7 cm) wide.
Attach the ring: Slide the ring onto the tab. Fold Rows 59–66 over the ring to the back of the strap, then whipstitch the top border edge to the back of Row 59. The eyelet at Row 57 stays visible just below the ring.
Final Blocking
- Soak the holder in cool water with a little mild soap for 10 minutes. Keep the wooden ring dry if it is unsealed.
- Press out the water gently. Do not wring.
- Roll the holder in a towel to remove more moisture.
- Lay the strap flat and pin it to 3 1/4 in (8.3 cm) wide.
- Place a roll or a jar about 4 1/2 in (11.4 cm) wide in each basket so the walls dry round.
- Pin each shell into a rounded scallop.
- Let it dry completely, usually about 24 hours.
Final Quality-Control Checklist
- Each base measures 4 3/4 in (12.1 cm) across.
- Each basket has 15 even mesh loops per round and 10 shells.
- All round joins are hidden at the center back.
- Both border rounds have 152 sts.
- The gaps between baskets are 1/2 in (1.3 cm).
- The strap hangs flat with no puckers.
- The ring is secure and the eyelet is open.
- All ends are woven in.
Troubleshooting
Mesh diamonds lean: Work each sc into the ch-5 space, not into a chain stitch.
Basket flares at the top: Work Round 20 with a 4.5 mm (G-7) hook.
Wall leans outward: Check that Round 11 was worked in BLO.
Strap ripples at the border: Recount. Each long side should have 64 sts.
Baskets tip forward: Add a second line of tacking through the mesh on columns 4 and 7.
Rolls fit loosely: Your gauge is loose. Remake the baskets with a smaller hook.
Care
Hand wash in cool water and lay flat to dry with a roll in each basket. Keep an unsealed wooden ring dry.
Final Notes
Here is how the measurements connect:
- A 60-st base measures 4 3/4 in (12.1 cm) across.
- The 60-st wall makes 15 mesh loops of 4 sts each.
- Round 19 returns to 60 sts, and Round 20 makes 10 shells of 6 sts each.
- Each basket stands 3 3/4 in (9.5 cm) tall and covers 15 strap rows.
- The 10-st strap is 2 1/2 in (6.4 cm) wide, or 3 1/4 in (8.3 cm) with its 152-st border.
- Folded over the ring, the holder hangs about 16 in (40.6 cm).
If your gauge is right on the first base and you match rounds to rows when sewing, the holder will hang straight and flat.
Happy crocheting!