

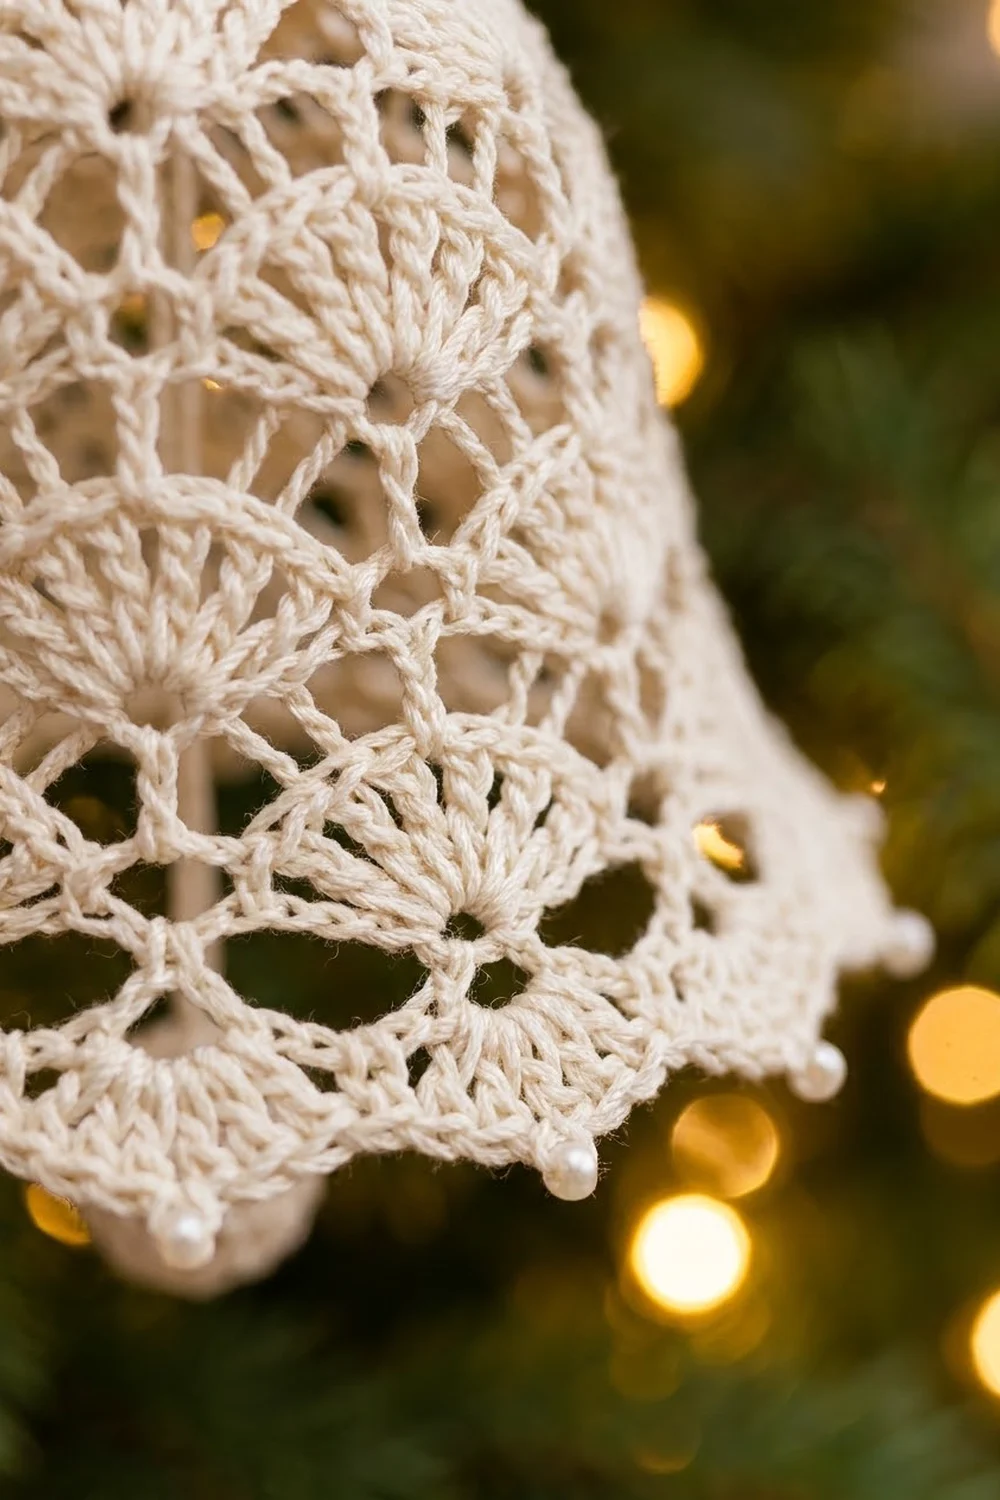
The Winter Chime Lace Bell is a flat, lacy Christmas ornament worked in ivory crochet thread. Tiers of open fan shells widen from a narrow crown to a broad hem, so the outline reads as a classic bell. A row of tiny picots trims the hem, and a small round clapper hangs from the center.
The whole ornament uses one color: a warm ivory or cream cotton thread. That keeps the look soft and heirloom-style, a lot like vintage doily lace. It looks good on a green tree, tied to a gift, or hung in a window.
This pattern uses US crochet terms. The finished bell body measures 4.25 in (10.8 cm) wide by 3.25 in (8.3 cm) tall. With the hanging loop and clapper, the ornament is 5.25 in (13.3 cm) from top to bottom.
You work the bell flat in turned rows from the crown down. Net rows of V-stitches alternate with fan rows of 7-dc shells, and each tier adds one fan. A single-crochet border runs around the whole outline and a picot round trims the hem. Last, you add a hanging loop and a tiny stuffed ball for the clapper.
Finished Size and Construction
- Finished size (bell body): 4.25 in wide x 3.25 in tall (10.8 cm x 8.3 cm)
- Overall length with loop and clapper: 5.25 in (13.3 cm)
- Skill level: Easy to Intermediate
- Terminology: US crochet terms
- Yarn weight: Size 3 cotton crochet thread (Lace / 0)
- Hook: 2.0 mm steel hook
- Number of pieces: 1 bell plus 1 small ball clapper. Together they make a single ornament.
- Layout: One flat bell. No joining needed.
- Bell size before border: 4 in wide x 2.875 in tall (10.2 cm x 7.3 cm)
- Border depth: 0.125 in (0.3 cm) at the sides and crown, 0.25 in (0.6 cm) at the hem
- Clapper: 0.5 in (1.3 cm) across, hung on a 0.25 in (0.6 cm) chain
Materials
Yarn advice: Pick a mercerized cotton crochet thread in size 3. Mercerized cotton has a slight sheen, keeps the fan shells crisp, and takes stiffener well. Avoid fuzzy or very soft threads, because they blur the open lacework.
- Ivory / cream (only color): 5 g, about 20 m (21.9 yd)
One ornament uses about 12 m (13.1 yd) of thread. The quantity above includes a margin for your test piece, the clapper and weaving in ends.
Tools:
- 2.0 mm steel crochet hook
- Fine tapestry needle
- Small scissors
- Rustproof pins and a foam blocking board
- Fabric stiffener, liquid starch, or sugar-water solution
- A few thread scraps or a pinch of fiberfill to stuff the clapper
- Stitch marker
Abbreviations (US Terms)
- ch – chain
- sl st – slip stitch
- sc – single crochet
- dc – double crochet
- sc2tog – single crochet 2 together
- st(s) – stitch(es)
- sp – space
- RS / WS – right side / wrong side
Special stitches:
- V-st (V): (dc, ch 2, dc) in the same stitch.
- Edge V: Ch 5 (counts as dc + ch 2), then dc in the first stitch.
- Fan: 7 dc in the same stitch or space.
- Picot: Ch 3, sl st in the 3rd ch from hook.
Gauge and Checkpoints
Gauge: 7 sc = 1 in (2.5 cm) with size 3 thread and a 2.0 mm hook. One fan of 7 dc spans about 0.8 in (2.0 cm) at its widest point.
Use your first bell as the test piece, since the bell itself works better as a swatch than a separate square. Measure it at each checkpoint below. Lay it flat and pat it gently into shape without stretching it.
| After | Width | Height |
|---|---|---|
| Row 1 | 1.875 in (4.8 cm) | — |
| Row 2 | 1.875 in (4.8 cm) | 0.625 in (1.6 cm) |
| Row 4 | 2.5 in (6.4 cm) | 1.375 in (3.5 cm) |
| Row 6 | 3.25 in (8.3 cm) | 2.125 in (5.4 cm) |
| Row 8 | 4 in (10.2 cm) | 2.875 in (7.3 cm) |
| Border | 4.25 in (10.8 cm) | 3.25 in (8.3 cm) |
If your bell is too big: Try a 1.75 mm hook, or tighten the ch-3 spaces in the net rows. Those loose chains add a lot of width.
If your bell is too small: Go up to a 2.25 mm hook. Also check that your dc aren’t pulled short.
Small differences are fine for an ornament. What matters is that the outline keeps its bell shape.
Bell Pattern
Work in turned rows from the crown down. Row 1 is the RS.
Row 1 (RS, crown): Ch 14. Sc in the 2nd ch from hook and in each ch across. Turn. (13 sc)
Checkpoint: 1.875 in (4.8 cm) wide.
Row 2 (WS, Tier 1 fans): Ch 1, sc in the first sc. Skip 2 sc, fan in the next sc, skip 2 sc, sc in the next sc. Repeat from * once more. Turn. (2 fans, 3 sc = 17 sts)
Row 3 (RS, net): Edge V in the first sc. Ch 3, skip 3 dc, sc in the 4th (center) dc of the fan, ch 3, V in the center sc. Ch 3, sc in the center dc of the next fan, ch 3, V in the last sc. Turn. (3 V, 2 sc, 4 ch-3 sps)
Row 4 (WS, Tier 2 fans): Ch 3 (counts as dc), 6 dc in the ch-2 sp of the first V. Skip the ch-3 sp, sc in the next sc, skip the ch-3 sp, fan in the ch-2 sp of the next V. Repeat from * once more. Turn. (3 fans, 2 sc = 23 sts)
The first fan is the ch 3 plus 6 dc, so every fan has 7 dc.
Checkpoint: 2.5 in (6.4 cm) wide, 1.375 in (3.5 cm) tall.
Row 5 (RS, net): Edge V in the first dc. Ch 3, sc in the center dc of the next fan, ch 3, V in the next sc. Repeat from * once more. Ch 3, sc in the center dc of the last fan, ch 3, V in the top of the turning ch-3. Turn. (4 V, 3 sc, 6 ch-3 sps)
The two edge Vs add one fan to each new tier.
Row 6 (WS, Tier 3 fans): Ch 3, 6 dc in the first V sp. Sc in the next sc, fan in the next V sp. Repeat from * 2 more times. Turn. (4 fans, 3 sc = 31 sts)
Checkpoint: 3.25 in (8.3 cm) wide, 2.125 in (5.4 cm) tall.
Row 7 (RS, net): Edge V in the first dc. Ch 3, sc in the center dc of the next fan, ch 3, V in the next sc. Repeat from * 2 more times. Ch 3, sc in the center dc of the last fan, ch 3, V in the top of the turning ch-3. Turn. (5 V, 4 sc, 8 ch-3 sps)
Row 8 (WS, Tier 4 fans): Ch 3, 6 dc in the first V sp. Sc in the next sc, fan in the next V sp. Repeat from * 3 more times. Do not fasten off. (5 fans, 4 sc = 39 sts)
Checkpoint: 4 in (10.2 cm) across the hem and 2.875 in (7.3 cm) tall. The outline should be a smooth trapezoid with a scalloped lower edge.
Stitch check: Each fan row equals (number of fans x 7) + the sc between fans. Row 2: 14 + 3 = 17. Row 4: 21 + 2 = 23. Row 6: 28 + 3 = 31. Row 8: 35 + 4 = 39.
Clapper (Ball)
Work in continuous rounds without joining. Mark the first stitch of each round.
Rnd 1: Make a magic ring and work 6 sc into it. Pull the ring closed. (6 sc)
Rnd 2: 2 sc in each st around. (12 sc)
Rnds 3–4: Sc in each st around. (12 sc)
Rnd 5: Sc2tog 6 times. (6 sc)
Stuff firmly with thread scraps or a pinch of fiberfill. Thread the tail through the front loops of the last 6 sts, pull tight and fasten off. Leave a 6 in (15.2 cm) tail.
Checkpoint: about 0.5 in (1.3 cm) across.
Border
Border gauge: 7 sc per 1 in (2.5 cm), the same as the main gauge. Space the stitches evenly and don’t crowd them.
Round 1 (sc outline): Keep working from the end of Row 8. Ch 1 and turn so the RS faces you.
- Hem: 1 sc in each st across Row 8. (39 sc)
- Corner: Ch 1. This is not counted as a stitch.
- First side: 3 sc in the end of each of Rows 8 through 2, then 1 sc in the end of Row 1. That is (7 x 3) + 1 = 22 sc.
- Corner: Ch 1.
- Crown: 1 sc in each foundation ch along the base of Row 1. (13 sc)
- Corner: Ch 1.
- Second side: Mirror the first side. (22 sc)
- Corner: Ch 1, then sl st to the first sc.
Round 1 total: 39 + 22 + 13 + 22 = 96 sc, plus 4 uncounted corner ch-1.
Round 2 (picot hem and crisp outline):
- Hem: Ch 1, sc in the first sc. Picot, sc in the next 2 sc. Repeat from * 18 more times. That gives 1 + (19 x 2) = 39 sc and 19 picots.
- Corner: Sl st in the corner ch-1 sp.
- Sides and crown: Sl st in each sc and each corner sp: 22 + 1 + 13 + 1 + 22 = 59 sl st.
- Finish: Sl st into the first sc and fasten off.
Why the math works: The hem stitches follow the fan curves, not a straight line. Five fan arcs plus the sc between them measure about 5.5 in (14.0 cm) along the scallops. At gauge, 39 sc also cover about 5.5 in (14.0 cm), so the hem lies flat without ruffling.
Each side edge is a slanted line about 3.1 in (7.9 cm) long, and 22 sc at gauge also cover about 3.1 in (7.9 cm). The 13 crown sc match the 13 foundation chains one-to-one. The picots fit evenly because 39 = 1 + (19 x 2).
Border check: Round 1 adds 0.125 in (0.3 cm) to every edge, and the picots add another 0.125 in (0.3 cm) at the hem.
- Width: 4 + 0.125 + 0.125 = 4.25 in (10.8 cm)
- Height: 2.875 + 0.125 + 0.25 = 3.25 in (8.3 cm)
Hanging Loop and Clapper
Hanging loop: Join the thread with a sl st in the 7th (center) sc of the crown. Ch 20, then sl st in the same st to form a loop. Work 28 sc into the loop, sl st at the base and fasten off. The finished loop stands about 1.25 in (3.2 cm) tall.
Clapper: Find sc 20 of the hem, the exact center of the 39 sc. It sits under the center dc of the middle fan, between two picots. Join the clapper tail there with a sl st and ch 3. Sew the end of the chain firmly to the top of the ball so the ball hangs 0.25 in (0.6 cm) below the hem. Weave in all ends.
Overall length: 1.25 in loop + 3.25 in bell + 0.75 in clapper drop = 5.25 in (13.3 cm).
Final Blocking
- Mix the stiffener according to the label, or use a 1:1 solution of white glue and water.
- Soak the bell thoroughly, keeping the clapper as dry as you can. Squeeze out the excess gently. Don’t wring it.
- Lay the bell RS up on the blocking board.
- Pin the crown edge straight at about 2.1 in (5.3 cm) wide.
- Pin the hem to 4.25 in (10.8 cm). Put one pin at each fan’s outer point and one in each picot so the scallops stay rounded.
- Check that the height is 3.25 in (8.3 cm) and that the two sides mirror each other.
- Open each ch-3 space and fan with a pin tip.
- Lay the hanging loop straight above the crown.
- Let it dry completely (12–24 hours), then unpin.
Final Quality-Control Checklist
- Rows 1, 2, 4, 6 and 8 count 13, 17, 23, 31 and 39 sts
- Each tier has one more fan than the tier above: 2, 3, 4, 5
- Every fan has exactly 7 dc
- Border Round 1 totals 96 sc
- The hem has 19 evenly spaced picots
- The clapper hangs from sc 20, at the exact center
- The bell measures 4.25 x 3.25 in (10.8 x 8.3 cm)
- The loop is centered and the ornament hangs straight
Troubleshooting
Bell leans to one side: You probably missed an edge V. Rows 3, 5 and 7 should have 3, 4 and 5 Vs.
Fans look cupped: Work each fan into a V ch-2 sp, never into a ch-3 sp.
Hem ruffles: You have extra or loose sc. Work exactly 39.
Hem puckers: Your tension is too tight. Go up a hook size for Round 1 only.
Side edges are wavy: Work 3 sc per row end, not 4.
Bell goes limp: Block it again with a stronger stiffener.
Care
Hand wash in cool water with mild soap, then re-stiffen and block flat again. Store it flat in tissue paper so it keeps its crisp shape.

Final Notes
The measurement chain is easy to follow:
- Crown: 13 sc, 1.875 in (4.8 cm) wide.
- Fan tiers: Each tier adds one fan, ending at 5 fans and 39 sts. The bell is then 4 x 2.875 in (10.2 x 7.3 cm).
- Border: Brings the bell to 4.25 x 3.25 in (10.8 x 8.3 cm).
- Loop and clapper: A 1.25 in (3.2 cm) loop and a 0.75 in (1.9 cm) clapper drop make the full ornament 5.25 in (13.3 cm) long.
Make one for the tree or a set for gift toppers. Each bell takes one evening and a few grams of thread.
Happy crocheting!