

This valance brings a Christmas window to life. A cream lace band holds seven deep red poinsettias, and a dark green scalloped edge runs below them. Seven slim green cords hang from the scallops, carrying cream snowflakes, layered green trees, small red bows and full red tassels.
The palette uses just three colors: cream, cranberry red and pine green. The style is traditional and cozy, a little like a vintage Scandinavian window decoration. The band is lacy enough to let the light through, so it glows on a bright winter day.
This pattern uses US crochet terms. The finished lace band measures 30.25″ × 4.75″ (76.8 × 12.1 cm) before the scallops. With tabs, cords and tassels, the valance hangs about 22.75″ (57.8 cm) long.
Here’s the construction. You make seven poinsettia lace squares and join them in a row. Next you work a border, add green scallops along the bottom edge and crochet seven tabs off the top. Finally you make the cords, snowflakes, trees, bows and tassels, and sew them in place.
Finished Size and Construction
- Finished band size: 30.25″ × 4.75″ (76.8 × 12.1 cm); 5.25″ (13.3 cm) deep at the scallop points
- Overall length: about 22.75″ (57.8 cm), from the top of the tabs to the ends of the tassels
- Skill level: Intermediate
- Terminology: US
- Yarn weight: DK (#3), cotton or cotton blend
- Hook: 3.5 mm (E-4)
- Number of pieces: 7 motifs, 7 cords, 4 snowflakes, 3 trees, 7 bows, 7 tassels
- Layout: 7 motifs in 1 row
- Motif size: 4.25″ (10.8 cm) square
- Size before border: 29.75″ × 4.25″ (75.6 × 10.8 cm)
- Border depth: 0.25″ (0.6 cm) cream on all sides, plus 0.5″ (1.3 cm) green scallops on the bottom edge
Materials
Choose a smooth mercerized cotton or a cotton blend in DK weight. Cotton holds the petals and lace crisply and blocks well. These estimates assume about 115 m per 50 g.
- Cream: 75 g / 173 m (motif lace, border, tabs, snowflakes)
- Cranberry red: 70 g / 161 m (poinsettias, bows, tassels)
- Pine green: 55 g / 127 m (scallops, cords, trees)
These quantities include a margin of about 25%. The tassels use the most red, so buy an extra skein if you plan to make them fuller.
Tools:
- 3.5 mm (E-4) crochet hook
- Tapestry needle
- Scissors
- Stitch markers
- A piece of stiff card 3.5″ (8.9 cm) wide
- Rust-proof pins and a blocking mat
- Spray bottle
- Measuring tape
Abbreviations (US Terms)
- ch – chain
- sl st – slip stitch
- sc – single crochet
- hdc – half double crochet
- dc – double crochet
- tr – treble crochet
- sc2tog – single crochet 2 together
- sc3tog – single crochet 3 together
- BLO / FLO – back loop only / front loop only
- sp – space
- st(s) – stitch(es)
- RS / WS – right side / wrong side
Petal (special stitch): Ch 5, sl st in the 2nd ch from the hook, sc in the next ch, hdc in the next ch, dc in the last ch. This makes one pointed petal of 4 sts worked along the chain.
Gauge and Checkpoints
Make one complete motif before you commit to the full project. Block it lightly and measure it.
- Gauge: 16 sc = 4″ (10.2 cm) along the edge of the motif in Round 6
- After Round 2: 1.25″ (3.2 cm) across
- After Round 3: 2.75″ (7.0 cm) from petal tip to petal tip
- After Round 4: 3.25″ (8.3 cm) across
- After Round 5: 4″ (10.2 cm) square
- After Round 6: 4.25″ (10.8 cm) square
A difference of 0.125″ (0.3 cm) is fine. If your motif measures more than 4.5″ (11.4 cm), go down 0.5 mm in hook size. If it measures less than 4″ (10.2 cm), go up 0.5 mm. Keep the same hook for the cords and appliqués so that everything stays in proportion.
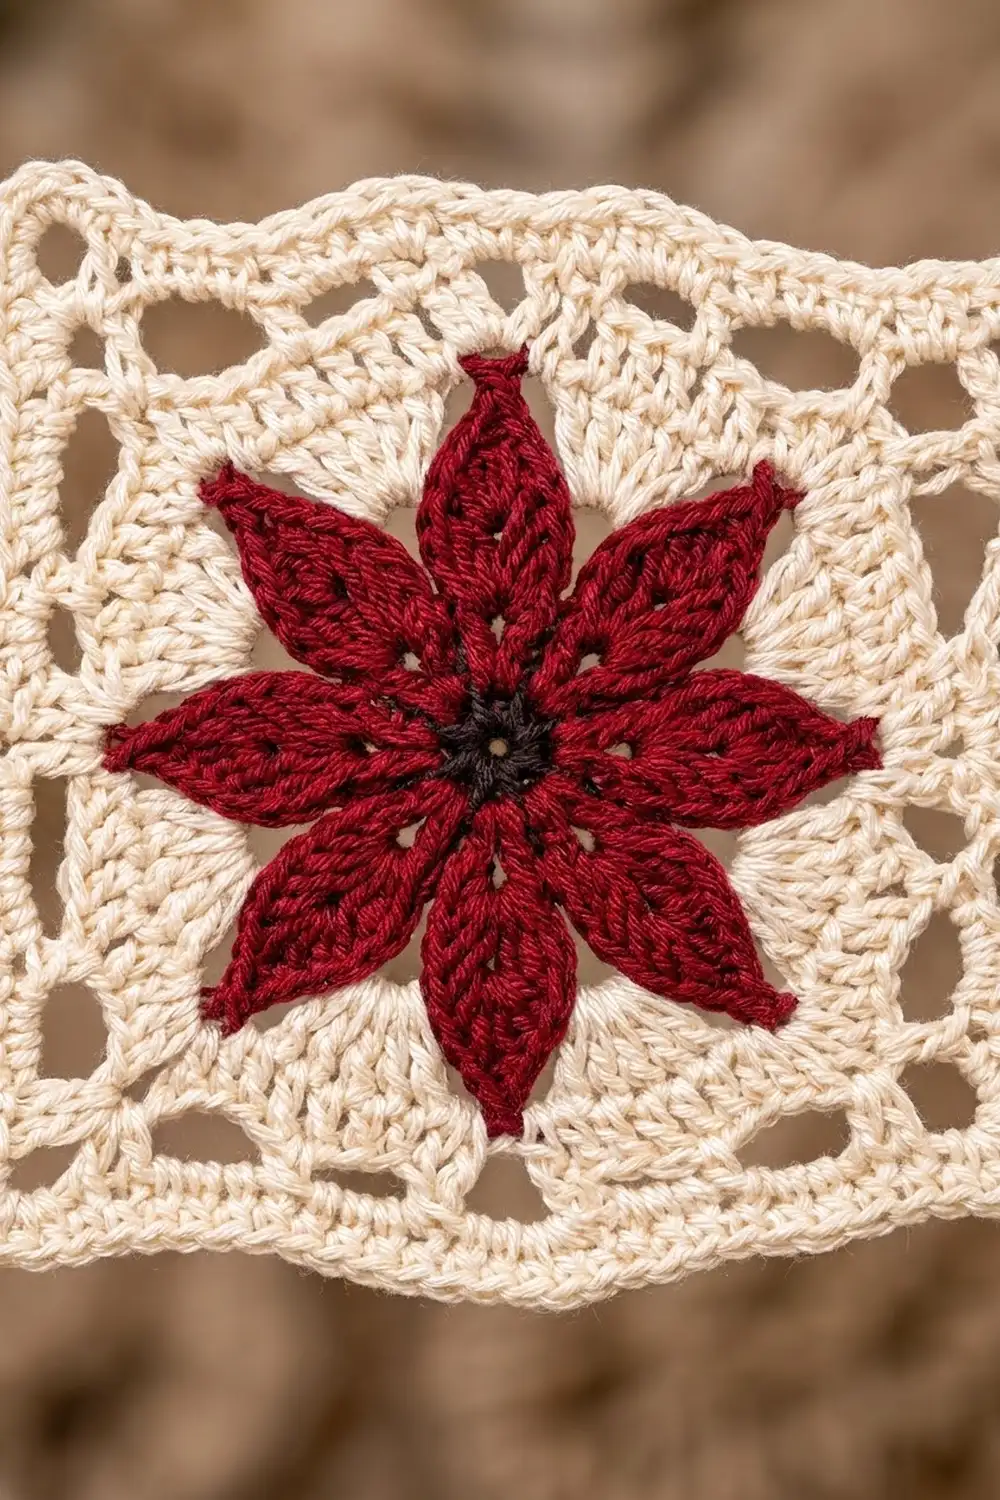
Poinsettia Lace Motif (make 7)
Poinsettia (Red)
Round 1: Make a magic ring, ch 1, work 8 sc into the ring, then join with a sl st to the first sc. (8 sc)
Round 2: Ch 3 (counts as dc), dc in the same st, work 2 dc in each remaining st, then join to the top of the ch-3. (16 dc)
Round 3: *Work 1 Petal, skip the next dc, sl st in the next dc*. Repeat from * to * 8 times in total. The final sl st goes into the joining st. (8 petals)
Each petal sits over one skipped dc. The 8 skipped dc are the anchors for the cream lace. Fasten off red. With a short piece of dark green or black yarn, work 3 small straight stitches in the center to make the dot in the middle.
Lace Surround (Cream)
Round 4: Working behind the petals, join cream with a sc in any skipped dc. Ch 7, then *sc in the next skipped dc, ch 7*. Repeat from * to * 6 more times and join to the first sc. (8 sc, 8 ch-7 loops)
Round 5: Sl st in the next 3 ch to reach the center of the loop. Ch 3 (counts as dc), then work (2 dc, ch 3, 3 dc) in the same loop for the first corner. Ch 3, sc in the next loop, ch 3. *In the next loop work (3 dc, ch 3, 3 dc) for a corner. Ch 3, sc in the next loop, ch 3.* Repeat from * to * 2 more times and join to the top of the ch-3.
Round 5 total: 24 dc, 4 sc, 4 corner ch-3 sps and 8 side ch-3 sps.
Round 6: Ch 1, sc in the same st and in the next 2 dc. *Work 3 sc in the corner sp. Sc in the next 3 dc, 3 sc in the ch-3 sp, sc in the sc, 3 sc in the ch-3 sp, sc in the next 3 dc.* Repeat from * to * around, leaving out the last 3 dc on the final repeat, and join to the first sc.
Round 6 total: 64 sc. Check the count: 24 + 4 + (4 × 3) + (8 × 3) = 64.
Per side: The middle sc of each 3-sc corner is the corner st. Between two corner sts there are 15 sc, so each side has 17 sts including both corners.
Fasten off, leaving a 12″ (30.5 cm) tail on 6 of the motifs for joining.
Make All Pieces
- Motifs: 7 (red Rounds 1–3, cream Rounds 4–6)
- Cords: 7 (green)
- Snowflakes: 4 (cream)
- Trees: 3 (green)
- Bows: 7 (red)
- Tassels: 7 (red)
Layout (RS facing, viewed from the front):
[ M1 ][ M2 ][ M3 ][ M4 ][ M5 ][ M6 ][ M7 ]
   |     |     |     |     |     |     |
  Snow  Tree  Snow  Tree  Snow  Tree  Snow
  Bow   Bow   Bow   Bow   Bow   Bow   Bow
 (high)(low) (high)(low) (high)(low) (high)
  Tsl   Tsl   Tsl   Tsl   Tsl   Tsl   Tsl
Joining
Block all 7 motifs to 4.25″ (10.8 cm) before you join them.
Method: Place two motifs RS together. Starting in the corner st, work a sl st through the back loops of both motifs. Then sl st through the back loops of each pair of matching sts, ending in the opposite corner st.
Stitch logic: Each seam joins 17 sts to 17 sts, from corner to corner. Do not skip any sts, and do not add any chains. Work all 6 seams in the same direction so that the ridges match.
Tension: Keep your sl sts as loose as the sc in Round 6. A tight seam pulls the band into a curve. If your slip stitches tend to be tight, go up 0.5 mm in hook size just for the seams.
Checkpoint: The joined strip should measure 29.75″ × 4.25″ (75.6 × 10.8 cm), within 0.75″ (1.9 cm).
Border
The border keeps the same gauge as Round 6, 16 sc = 4″ (10.2 cm).
Border Round 1 (cream): With RS facing, join cream in any st. Work 1 sc in each st around and 3 sc in each of the 4 outer corner sts of the strip. Join to the first sc.
- Long sides: The strip starts with 7 × 17 = 119 sts per long side. The 2 extra sts from the corners bring each long side to 121 sts, counting corner to corner.
- Short sides: 17 + 2 = 19 sts each.
- Total: 268 existing sts + 8 added = 276 sc.
At each seam, the two corner sts of the neighboring motifs get 1 sc each. Nothing is added at the seams, because those sts are already part of the 119.
The math works because every motif contributes exactly 17 sts to each long side. That keeps the motif centers evenly spaced at 4.25″ (10.8 cm). On a long side, motif k is centered on st 10 + 17(k – 1), so the centers fall on sts 10, 27, 44, 61, 78, 95 and 112. Counting from either end gives the same positions.
Border Row 2 (green scallops, bottom edge only): With RS facing, join green in the first st of the bottom long side (the corner st). Sc in that st. Then work the scallop 7 times:
- Scallop (worked over 17 sts): Sl st in the 1st st, sc in the next 2, hdc in the next 2, dc in the next 3, 3 dc in the next st (the center), dc in the next 3, hdc in the next 2, sc in the next 2, sl st in the next st.
Finish with sc in the last st (the corner st).
- Sts used: 1 + (7 × 17) + 1 = 121
- Sts made: 1 + (7 × 19) + 1 = 135
Each scallop peaks at the middle dc of its 3-dc group, directly below the center of its poinsettia. Two sl sts side by side form each dip, directly below a seam.
Tabs (make 7, cream)
With RS facing, look along the top long side. For tab k, join cream in st 8 + 17(k – 1). The tabs start at sts 8, 25, 42, 59, 76, 93 and 110. Each tab is worked over 5 sts and is centered on its motif.
- Row 1: Ch 3 (counts as dc), dc in the next 4 sts, turn. (5 sts)
- Row 2: Ch 4 (counts as dc + ch 1), skip the next dc, dc in the next dc, ch 1, skip the next st, dc in the top of the turning ch, turn. (3 dc + 2 ch-1 sps = 5 sts)
- Row 3: Ch 3, dc in the ch-1 sp, dc in the next dc, dc in the ch-1 sp, dc in the 3rd ch of the turning ch, turn. (5 sts)
- Rows 4–13: Repeat Rows 2 and 3, ending after a Row 3.
The finished strip measures 5.5″ (14.0 cm) long and 1.25″ (3.2 cm) wide. Fold it to the WS and sew Row 13 to the back of Border Round 1, overlapping 0.5″ (1.3 cm). This makes a loop 2.5″ (6.4 cm) tall that fits a rod up to 1.5″ (3.8 cm) in diameter.
Cords (make 7, green)
Leaving an 8″ (20.3 cm) tail, ch 61. Sl st in the back bump of the 2nd ch from the hook and in each ch across. (60 sl sts)
The finished cord measures 12″ (30.5 cm). Sew the top of each cord behind the middle dc of a scallop peak, so the cords hang 4.25″ (10.8 cm) apart.
Snowflakes (make 4, cream)
Round 1: Make a magic ring, ch 1, work 6 sc into the ring and join. (6 sc)
Round 2: Ch 3 (counts as dc), dc in the same st, ch 2. *Work 2 dc in the next st, ch 2.* Repeat from * to * 4 more times and join. (12 dc, 6 ch-2 sps)
Round 3: Sl st in the next dc and into the ch-2 sp. *In the ch-2 sp work (sc, ch 7, sl st in the 4th ch from the hook, ch 3, sc). This makes 1 arm. Then ch 3, sl st in the 3rd ch from the hook (1 small picot), and move to the next ch-2 sp.* Repeat from * to * 6 times in total and join. (6 arms, 6 picots)
The finished snowflake measures 2.25″ (5.7 cm) across.
Trees (make 3, green)
Row 1 is a RS row. To work a row in BLO, work into the back loops only; this leaves the front loops of the previous row free on the RS.
- Row 1: Ch 12, sc in the 2nd ch from the hook and in each ch across, turn. (11 sc)
- Row 2: Ch 1, sc in each st, turn. (11)
- Row 3 (BLO): Ch 1, sc2tog, sc in the next 7, sc2tog, turn. (9)
- Row 4: Ch 1, sc in each st, turn. (9)
- Row 5: Ch 1, sc2tog, sc in the next 5, sc2tog, turn. (7)
- Row 6 (BLO): Ch 1, sc in each st, turn. (7)
- Row 7: Ch 1, sc2tog, sc in the next 3, sc2tog, turn. (5)
- Row 8: Ch 1, sc in each st, turn. (5)
- Row 9 (BLO): Ch 1, sc2tog, sc in the next st, sc2tog, turn. (3)
- Row 10: Ch 1, sc in each st, turn. (3)
- Row 11: Ch 1, sc3tog. (1) Fasten off.
Tiers: With RS facing and the tip of the tree pointing up, join green in the free front loops of Row 2. Work 2 hdc in each of those loops (22 hdc). Repeat on the free loops of Row 5 (14 hdc) and Row 8 (10 hdc).
This gives three stacked ruffled tiers, each one narrower than the one below. The finished tree measures 2″ × 2.5″ (5.1 × 6.4 cm).
Bows (make 7, red)
- Leaving a 6″ (15.2 cm) tail, ch 12 and sl st in the first ch to make loop 1. Ch 12 and sl st in the same ch to make loop 2.
- Work 14 sc into loop 1 and sl st in the center. Work 14 sc into loop 2 and sl st in the center.
- For each of the 2 tails: ch 8, sl st in the 2nd ch from the hook and in the next 6 ch (7 sl sts), then sl st in the center.
- Wrap the center 6 times with the starting tail.
The finished bow measures 1.5″ (3.8 cm) across.
Tassels (make 7, red)
- Wrap red yarn 30 times around the 3.5″ (8.9 cm) card.
- Tie the top with a 10″ (25.4 cm) strand, then cut the loops at the bottom.
- Wrap the neck 0.5″ (1.3 cm) below the top.
- Trim the ends to 3″ (7.6 cm).
Assembly
- Sew a snowflake to cords 1, 3, 5 and 7, with its center 4″ (10.2 cm) below the scallop peak. Stitch through the center and the top arm.
- Sew a tree to cords 2, 4 and 6 at the same height, running the cord behind the tree.
- Sew a bow 7″ (17.8 cm) down on the odd-numbered cords and 8″ (20.3 cm) down on the even-numbered cords.
- Tie a tassel to the end of each cord.
Final Blocking
- Wet the lace band. Avoid wetting the tassels.
- Gently press the water out with a towel. Do not wring.
- Pin the band to 30.25″ × 4.75″ (76.8 × 12.1 cm), with one pin at every seam.
- Pin each scallop peak 0.5″ (1.3 cm) below Border Round 1.
- Pin the poinsettia petal tips flat.
- Let it dry completely, at least 12 hours.
- Steam the cords lightly and let them hang straight while they cool.
- Steam the tassels lightly, then comb and trim them evenly.
Final Quality-Control Checklist
- [ ] All 7 motifs measure 4.25″ (10.8 cm).
- [ ] Each seam joins 17 sts to 17 sts.
- [ ] Border Round 1 has 121 sts on each long side and 19 on each short side (276 in total).
- [ ] The scallop row has 135 sts, and each peak sits under a poinsettia.
- [ ] The tabs are centered on sts 10, 27, 44, 61, 78, 95 and 112.
- [ ] All cords are 12″ (30.5 cm) long and hang 4.25″ (10.8 cm) apart.
- [ ] The snowflakes and trees alternate, starting with a snowflake.
- [ ] The bows alternate high and low.
- [ ] Every tail is woven in securely.
Troubleshooting
- Petals curl forward: Block them flat, or tack each petal tip to the cream loop behind it.
- Round 6 ruffles: Work 2 sc instead of 3 in the side ch-3 sps, but keep the count at 17 per side by working 2 sc in a corner dc.
- Band curves: The seams are too tight. Undo them and rejoin with a larger hook.
- Scallops lie flat: Make sure the center group is 3 dc, and block the peaks downward.
- Cords twist: Steam them while they hang with a little weight at the bottom.
- Tabs stretch: Use firmer tension, or work all 13 tab rows as solid dc.
Care
Hand wash in cool water with mild soap. Lay the valance flat to dry, reshape it, and fluff the tassels once it is dry.
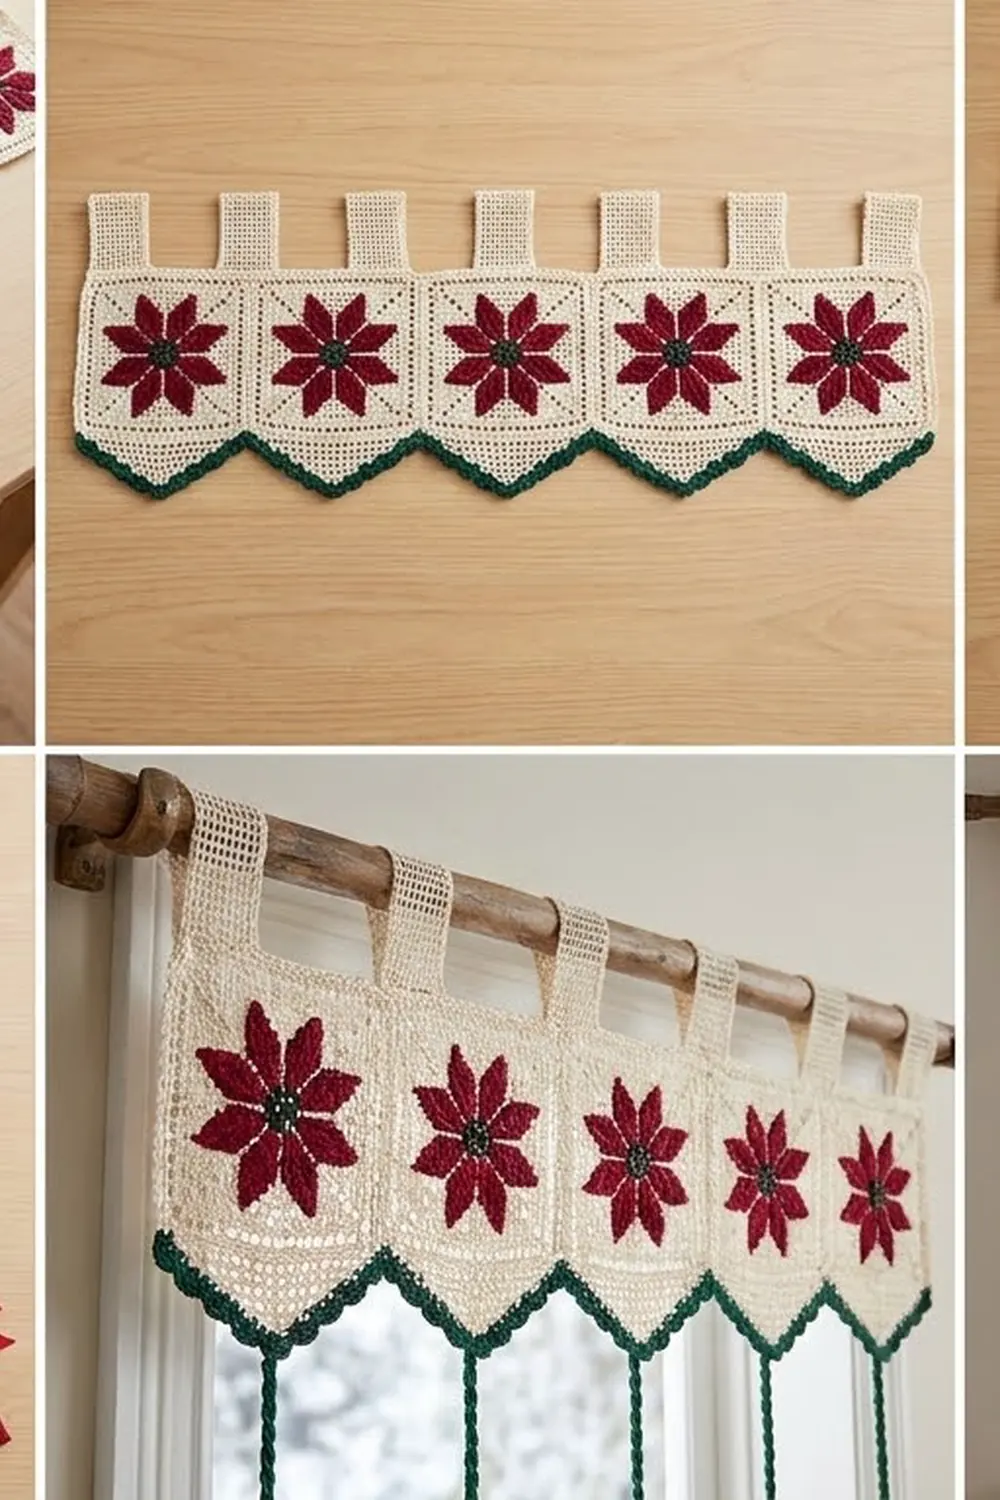
Final Notes
The measurement chain is simple: each motif is 4.25″ (10.8 cm) square with 17 sts per side. Seven motifs make 29.75″ (75.6 cm) and 119 sts per long side. Border Round 1 brings the band to 30.25″ × 4.75″ (76.8 × 12.1 cm), with 121 sts on each long side. The scallop row works 7 × 17 sts into 7 × 19 sts, and the 12″ (30.5 cm) cords carry the ornaments.
If each stage measures correctly, the finished valance will hang straight and evenly spaced. Happy crocheting!