
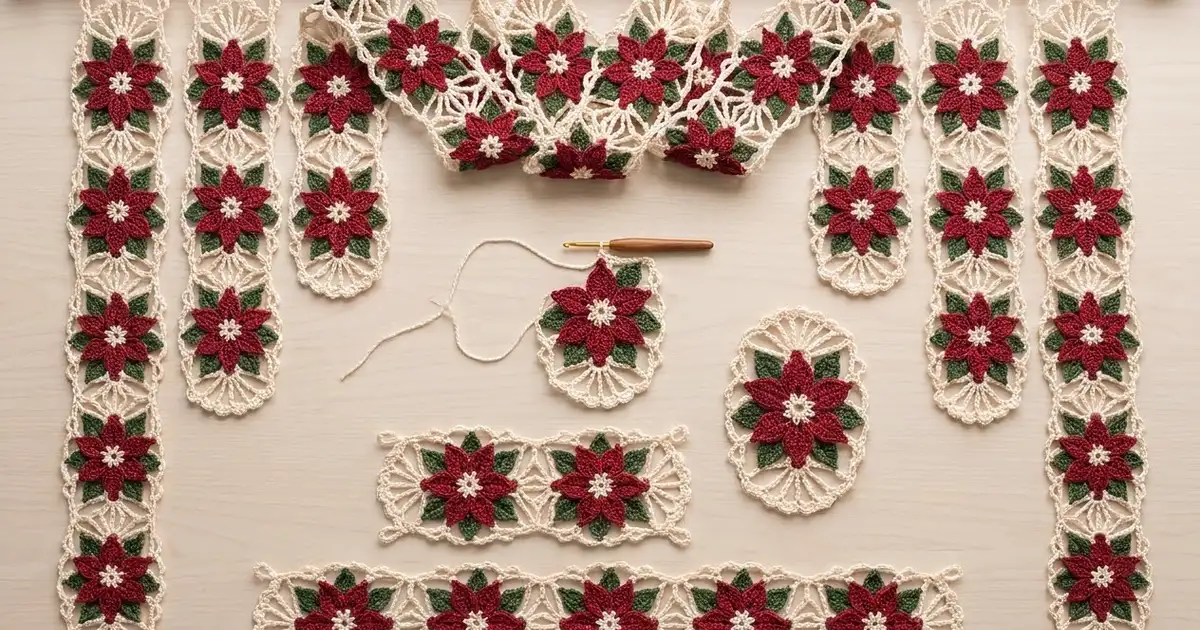
This hanging strip is a column of lacy cream motifs, each framing a deep-red poinsettia with dark-green leaves. Where two motifs meet, their scalloped fans join into a round sunburst. The strip alternates between flowers and open wheels.
The colors are classic holiday ones: cream, cranberry red, and pine green. The style feels like vintage thread lace, but it’s worked in fingering-weight cotton, so it goes quickly. This pattern uses US crochet terms.
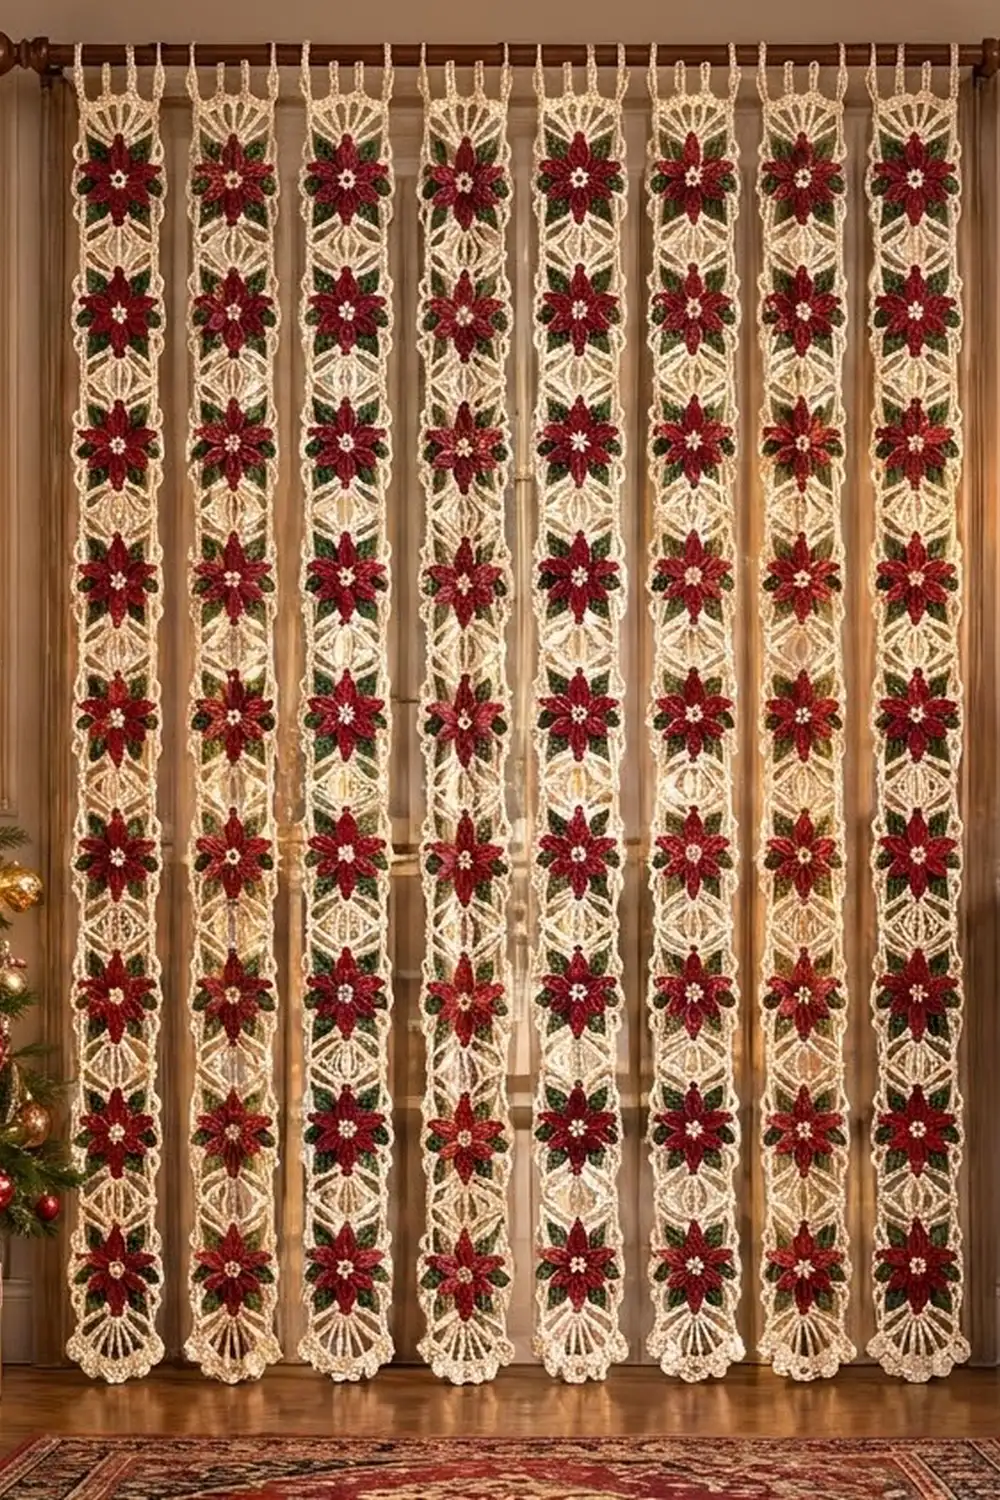
One strip of four motifs measures 6 in (15.2 cm) wide by 27 in (68.6 cm) long. The hanging loops add 1.5 in (3.8 cm), for 28.5 in (72.4 cm) overall. For a curtain like the one in the photo, make several strips and hang them side by side. The strips are not joined to each other.
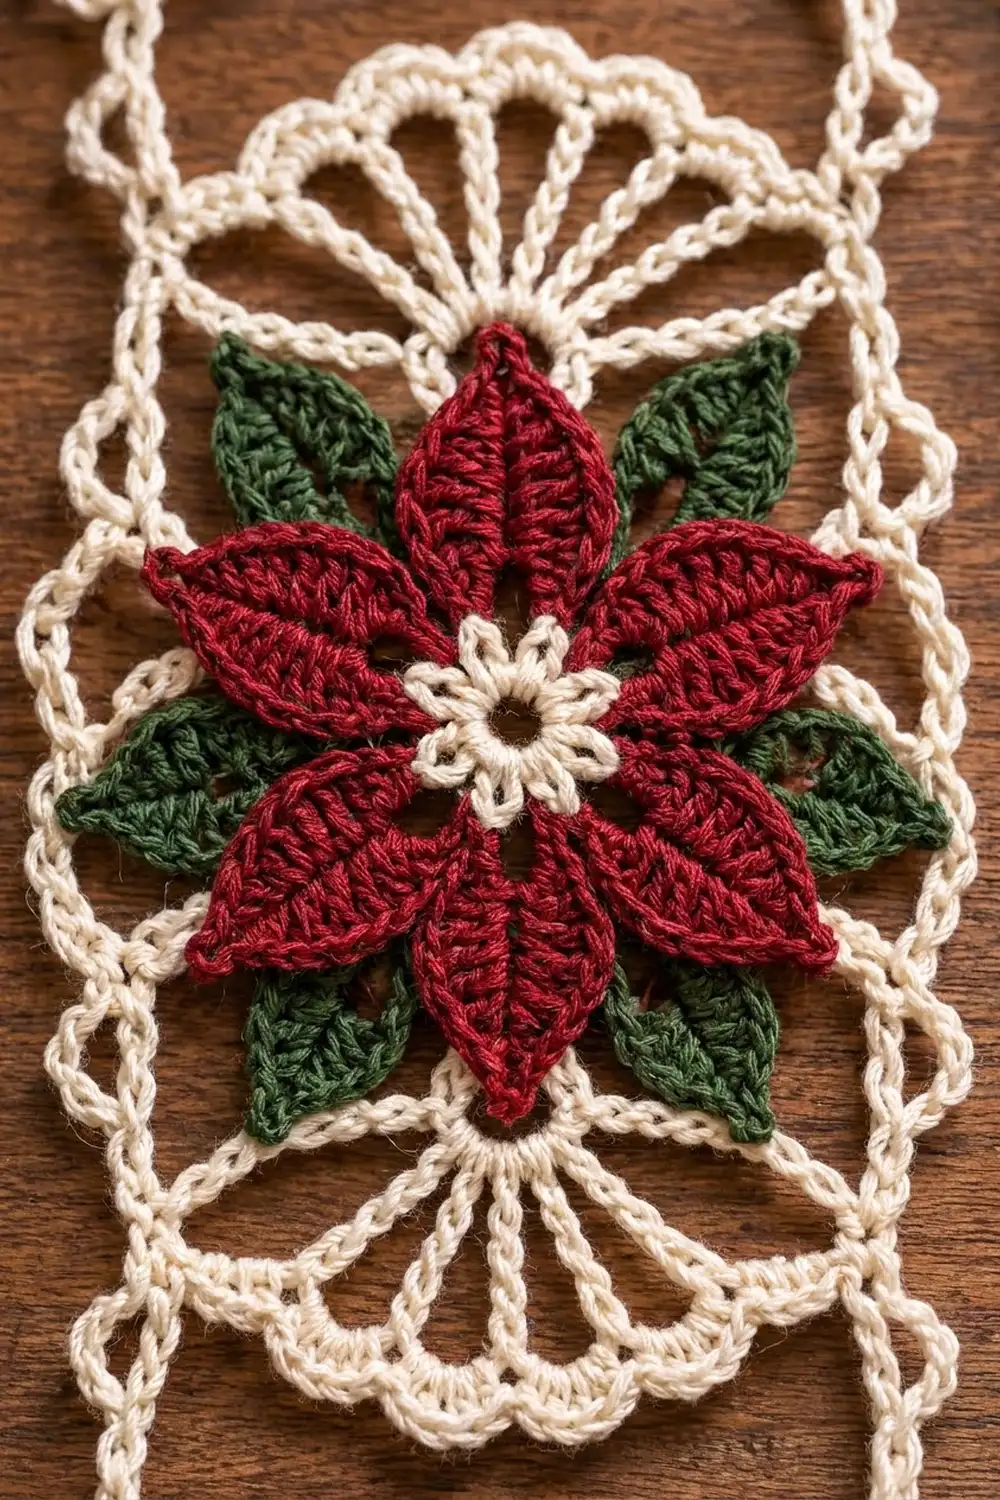
Each motif is worked from the center out: a cream ring, then red petals, then green leaves, then three cream frame rounds. Starting with the second motif, you join each new motif to the one above it in its last round. A two-round border goes around the whole strip and makes the hanging loops.
Finished Size and Construction
- Finished size: 6 in x 27 in (15.2 cm x 68.6 cm), plus 1.5 in (3.8 cm) of loops
- Skill level: Intermediate
- Terminology: US
- Yarn weight: Fingering (super fine, #1) mercerized cotton
- Hook: 2.75 mm (US C-2)
- Number of pieces: 4 motifs per strip
- Layout: 1 column x 4 rows
- Motif size: 5 in x 6.5 in (12.7 cm x 16.5 cm)
- Size before border: 5 in x 26 in (12.7 cm x 66.0 cm)
- Border depth: 0.5 in (1.3 cm) on every edge
Materials
Use a smooth mercerized cotton in fingering weight, about 170 m per 50 g. It shows the stitches clearly, blocks well, and doesn’t sag much when it hangs.
Yarn per strip of 4 motifs:
- Cream: 40 g (about 136 m)
- Red: 15 g (about 51 m)
- Green: 6 g (about 20 m)
Each extra motif needs about 10 g cream (34 m), 3.5 g red (12 m), and 1.5 g green (5 m).
Tools: 2.75 mm (US C-2) hook, tapestry needle, scissors, rustproof pins, blocking mats, spray bottle, measuring tape.
These amounts include an extra 10 percent or so for swatching and weaving in ends.
Abbreviations (US Terms)
- ch – chain
- sl st – slip stitch
- sc – single crochet
- hdc – half double crochet
- dc – double crochet
- tr – treble crochet
- sk – skip
- sp – space
- st(s) – stitch(es)
- rnd – round
Special stitch – Petal (worked into one sp): Sl st in the sp, then ch 9.
- Side one: Sc in the 2nd ch from the hook, hdc in the next ch, dc in the next ch, tr in the next 2 ch, dc in the next ch, hdc in the next ch, sc in the last ch (8 sts).
- Side two: Rotate and work back toward the tip, into the free loops of the same 8 ch: sc, hdc, dc, tr, tr, dc, hdc, sc (8 sts).
- Tip: Work (sc, ch 2, sc) in the skipped ch at the tip.
- Outline: Sc in each of the 8 side-one sts back down to the base, then sl st in the same sp.
Each Petal has 26 sts plus a ch-2 tip. The foundation chain becomes the center vein.
Special stitch – Leaf (worked into one st): Work the same way as the Petal, but start with ch 8. Each side has 7 sts (sc, hdc, dc, dc, dc, hdc, sc). Make the same tip, then outline with 7 sc. Each Leaf has 23 sts plus a ch-2 tip.
Gauge and Checkpoints
Gauge: 6 sc = 1 in (2.5 cm), and 6 ch = 1 in (2.5 cm).
Make one full motif before starting a whole strip. The side loops and border chains are sized to fit the motif’s measurements.
Checkpoints (pin the motif flat to measure):
- After Rnd 2: the center is 1 in (2.5 cm) across.
- After Rnd 4: the flower is 4 in (10.2 cm) from petal tip to petal tip.
- After Rnd 5: 4 in x 5.25 in (10.2 cm x 13.3 cm).
- After Rnd 6: 4.5 in x 6 in (11.4 cm x 15.2 cm).
- After Rnd 7: 5 in x 6.5 in (12.7 cm x 16.5 cm).
Too big: switch to a 2.5 mm hook, or tighten your chains. Loose chains are the usual cause in lace.
Too small: switch to a 3.0 mm hook. If only the petals are small, pull up the first loop of each tr a little taller.
Motif
Make the first motif complete, without joining.
Rnd 1 (cream): Ch 4 and sl st to the first ch to make a ring. Ch 1, then work 16 sc in the ring. Sl st to the first sc. (16 sc)
Rnd 2: Ch 1. Sc in the next st, ch 3, sk 1 st. Repeat from * 7 more times. Sl st to the first sc. (8 sc, 8 ch-3 sps) Fasten off.
Rnd 3 (red): Join red at the top ch-3 sp. Make 1 Petal in each ch-3 sp. After each Petal, sl st in the next sc to reach the next sp. (8 Petals) Fasten off. The Petals should lie flat like a star. If they cup, your tr sts are too tight.
Rnd 4 (green, worked behind the petals): Number the Rnd 2 sc from 1 to 8, going clockwise. Sc 1 is the one just right of the top Petal. Join green in sc 1.
Make 1 Leaf in this sc. Ch 5 loosely behind the work, sk the next sc, and sl st in the following sc. Repeat from * 3 more times. The last ch 5 ends with a sl st in sc 1.
You now have Leaves in sc 1, 3, 5, and 7. (4 Leaves) Fasten off. The Leaves peek out between the Petals toward the corners.
Rnd 5 (cream): Join cream in the ch-2 tip of the top Petal.
- Top fan: Make a standing tr in the same sp, then work (ch 2, tr) 6 times in that sp. (7 tr, 6 ch-2 sps)
- Right side: Ch 6, sc in the ch-2 tip of the next Petal. Repeat from * 2 more times, then ch 6.
- Bottom fan: In the bottom Petal’s tip, work tr, then (ch 2, tr) 6 times.
- Left side: Work as for the right side. Sl st to the top of the first tr.
Count: 14 tr, 6 sc, 12 ch-2 sps, 8 ch-6 loops (4 per side).
Rnd 6: Sl st into the first ch-2 sp of the top fan.
- Top fan: Ch 1. Sc in the same sp, then (ch 6, sc in the next ch-2 sp) 5 times. (6 sc, 5 ch-6 arcs)
- Ch 4.
- Right side:
- (Sc, ch 7, sc) in the first ch-6 loop. This is a corner.
- (Ch 7, sc in the next loop) twice.
- Ch 7, then (sc, ch 7, sc) in the fourth loop. This is the other corner.
- (6 sc, 5 ch-7 loops)
- Ch 4.
- Bottom fan: Work as for the top fan. (6 sc, 5 ch-6 arcs)
- Ch 4.
- Left side: Work as for the right side.
- Ch 4. Sl st to the first sc.
Count: 24 sc, 10 ch-6 arcs, 10 ch-7 loops, 4 ch-4 connectors.
Rnd 7: Sl st into the first ch-6 arc.
- Each ch-6 fan arc: Work 1 Scallop: (sc, hdc, 2 dc, ch 2, 2 dc, hdc, sc). Each Scallop has 8 sts and a ch-2 peak.
- Each ch-4 connector: Work 4 sc.
- Each ch-7 loop: Work (3 sc, ch 3, 3 sc), which makes a picot.
- Skip the Rnd 6 sc. Sl st to the first sc and fasten off.
Count: 80 Scallop sts + 16 connector sc + 60 side sc = 156 sts. There are also 10 ch-2 peaks (5 per fan) and 10 ch-3 picots.
Per-side count: Each long side has 5 picots, including its 2 corner picots. Each fan has 5 peaks.
Make All Pieces
Each strip needs 4 motifs:
- Motif 1: Work the whole motif as written above.
- Motifs 2–4: Work Rnds 1–6 as written. In Rnd 7, join each one to the motif above it.
Colors per motif: cream for Rnds 1–2 and 5–7, red for Rnd 3, green for Rnd 4.
Layout (1 column x 4 rows):
[ Motif 1 ]  <- top, hanging loops
[ Motif 2 ]
[ Motif 3 ]
[ Motif 4 ]  <- bottom
Joining (Join-As-You-Go)
Only the fans are joined. Each new motif’s top fan joins the bottom fan of the motif above it, peak to peak. Together the two half-fans make one round sunburst. The corner picots stay free.
To join in Rnd 7 of Motifs 2–4:
- Place the new motif below the finished one, both right side up, with the two fans facing each other.
- Work the first Scallop up to its peak. Instead of ch 2, work ch 1, sl st in the ch-2 sp of the facing peak, then ch 1.
- Finish that Scallop as written.
- Join the other 4 top-fan Scallops the same way. The order is mirrored: your first Scallop joins the facing fan’s fifth peak, your second joins its fourth, and so on.
- Finish Rnd 7 with no more joins.
Stitch logic: Each peak joins exactly one peak, 5 to 5. The ch 1, sl st, ch 1 takes the place of the ch 2, so the stitch counts don’t change.
Tension: Keep the joining sl st loose, about as tall as a ch. If it’s tight, the sunburst pinches into an oval.
Size checkpoint: Two joined motifs measure 5 in x 13 in (12.7 cm x 33.0 cm). All 4 measure 5 in x 26 in (12.7 cm x 66.0 cm).
Border
Border gauge: A ch-8 is about 1.3 in (3.3 cm) long. That matches the spacing between picots, since each 6.5 in side has 5 picots. A ch-6 is 1 in (2.5 cm) long, which matches the spacing between fan peaks.
Starting counts: Each side has 4 motifs x 5 picots = 20 picots. Each end has 5 peaks: the top fan of Motif 1 and the bottom fan of Motif 4. No stitches are added at the seams. The gap from one motif’s bottom corner picot to the next motif’s top corner picot gets the same ch-8 as every other gap.
Border Rnd 1 (cream): Join in the top-right corner picot of Motif 1.
- Right side: (Sc in the picot, ch 8) 19 times, then sc in the 20th picot. (20 sc, 19 ch-8)
- Bottom: Ch 3. (Sc in the next peak, ch 6) 4 times, then sc in the 5th peak. Ch 3. (5 sc, 4 ch-6, 2 ch-3)
- Left side: Work as for the right side. (20 sc, 19 ch-8)
- Top: Ch 3. (Sc in the next peak, ch 20) 4 times, then sc in the 5th peak. Ch 3, then sl st to the first sc. (5 sc, 4 ch-20 hanging loops, 2 ch-3)
Total: 50 sc.
Border Rnd 2: Ch 1.
- Each side: Sc in each sc, and work (3 sc, ch 3, 3 sc) in each ch-8. That’s 20 + (19 x 6) = 134 sc and 19 picots.
- Each of the 4 ch-3 corner sps: Work 3 sc, for 12 sc in all.
- Bottom: Sc in each sc, and work (3 sc, ch 3, 3 sc) in each ch-6. That’s 5 + (4 x 6) = 29 sc and 4 picots.
- Top: Sc in each sc, and work 22 sc in each ch-20. That’s 5 + (4 x 22) = 93 sc.
Sl st to the first sc and fasten off.
Total: 134 + 134 + 12 + 29 + 93 = 402 sc.
Why the math works: Each chain is the same length as the gap it spans, so the edges stay flat without ruffling or pulling in. Packing 22 sc into each ch-20 makes the hanging loops stiff enough to keep their shape on a rod. Each loop stands about 1.5 in (3.8 cm) tall.
Final Blocking
- Weave in each end through stitches of the same color.
- Soak the strip in cool water for 10 minutes. Roll it in a towel and press out the water without wringing.
- Pin it to 6 in x 27 in (15.2 cm x 68.6 cm), not counting the hanging loops.
- Pin every Petal and Leaf tip, fan peak, and side picot.
- Pin each sunburst into a round circle with evenly spaced spokes.
- Pin each hanging loop to stand 1.5 in (3.8 cm) tall.
- Let it dry completely, at least 24 hours.
Final Quality-Control Checklist
- Each motif measures 5 in x 6.5 in (12.7 cm x 16.5 cm).
- Each motif has 8 red Petals and 4 green Leaves.
- Each fan has 5 Scallops, and all 5 peaks of every sunburst are joined.
- Each long side has 20 picots and 19 border chains.
- There are 4 hanging loops, all the same height.
- The strip measures 6 in x 27 in (15.2 cm x 68.6 cm), plus 1.5 in (3.8 cm) of loops.
- No ends show on either side.
Troubleshooting
- Petals curl: Your tr sts are too tight. Pull up their loops taller, or use a hook 0.25 mm larger for Rnd 3.
- Fans ruffle: Your ch-6 arcs are too loose. Chain more firmly, or use ch 5.
- A sunburst is lopsided: A peak was joined out of order. Rip back to that Scallop and rejoin it in mirrored order.
- Sides wave: Your ch-8s are too long for your gauge. Use ch 7.
- Strip is under 6 in (15.2 cm) wide: Pin it wider during blocking.
- Hanging loops twist: Pin them flat while they dry.
Care
Hand wash in cool water with mild soap, then reshape and dry flat. Re-pin the sunbursts after washing so they dry round.
Final Notes
Here’s how the measurements build. A 1 in (2.5 cm) center grows into a 4 in (10.2 cm) flower and then a 5 in x 6.5 in (12.7 cm x 16.5 cm) motif. Four motifs make a 5 in x 26 in (12.7 cm x 66.0 cm) strip. The 0.5 in (1.3 cm) border brings it to 6 in x 27 in (15.2 cm x 68.6 cm). If your first motif hits its checkpoints, the rest of the numbers will follow. For a curtain, make more strips, add motifs if you want a longer drop, and hang the strips side by side.
Happy crocheting!