

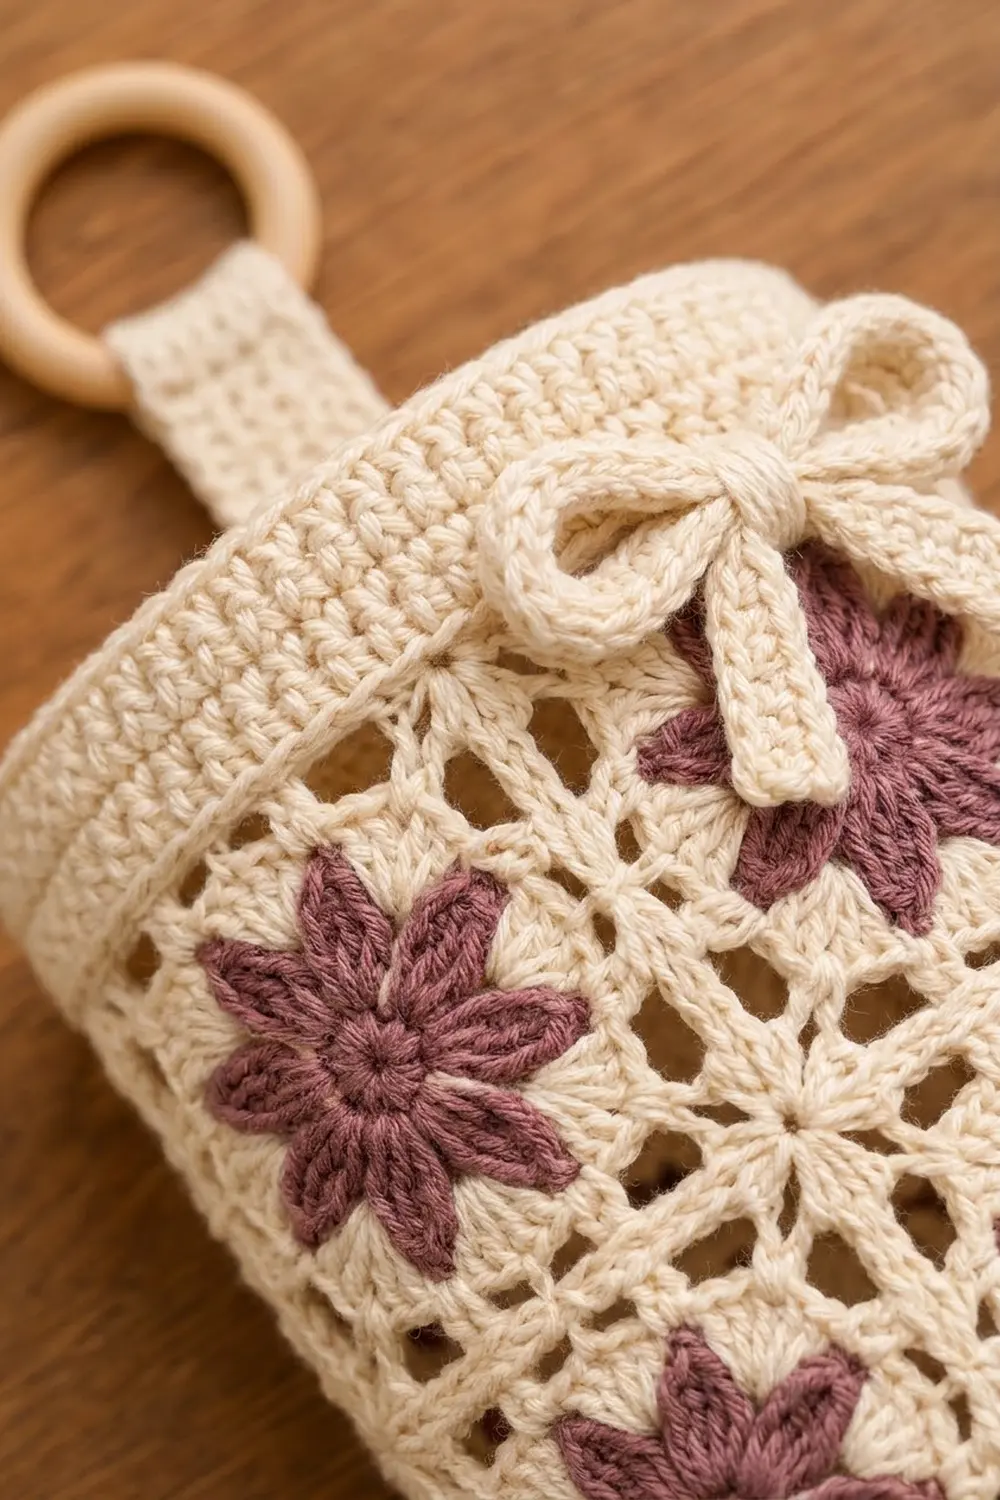
The Star Bloom Bag Holder is a hanging tube for storing plastic grocery bags. Six lacy granny squares wrap around the middle. Each square has a dusty mauve eight-petal star flower set in an open cream frame.
Solid cream bands finish the top and bottom, and the bottom band has a slot for pulling bags out. A round base closes the end, a tab loops around a wooden ring for hanging, and a small cream bow sits at the upper right. The style is soft and cottage-like. A dusty blue flower center works just as well as mauve.
This pattern uses US terms. The finished holder is a tube 14.5 in (36.8 cm) around and lies flat at 7.25 in (18.4 cm) wide. The body is 15 in (38.1 cm) tall, or about 19.5 in (49.5 cm) including the tab and ring.
To make it, you crochet six squares, join them flat into a 2 x 3 panel, add a border, and seam the panel into a tube. The bands, base, tab and bow are separate pieces that you sew on stitch by stitch.
Finished Size and Construction
- Finished size: 14.5 in (36.8 cm) around; 7.25 in (18.4 cm) flat width; 15 in (38.1 cm) body height
- Skill level: Intermediate
- Terminology: US
- Yarn weight: Worsted (#4 medium), cotton or cotton blend
- Hook: 5.0 mm (H-8)
- Number of pieces: 6 squares, top band, bottom band, base, hanging tab, bow (3 small parts)
- Layout: 2 squares tall x 3 squares around
- Piece size: each square 4.5 in (11.4 cm)
- Size before border: joined panel 13.5 x 9 in (34.3 x 22.9 cm)
- Border depth: 0.5 in (1.3 cm), making the panel 14.5 x 10 in (36.8 x 25.4 cm)
Materials
Use a smooth worsted cotton or cotton blend with about 190 m per 100 g. Cotton holds its shape and won’t sag when the holder is full. A matte cream shows the stitch texture best.
- Color A, Cream: 130 g / 247 m (squares Rounds 4–6, border, bands, base, tab, bow)
- Color B, Dusty Mauve: 25 g / 48 m (flower centers, Rounds 1–3)
All quantities include a margin of about 20 percent.
Tools: 5.0 mm (H-8) hook; one wooden ring 2 in (5.1 cm) across; tapestry needle; locking stitch markers; rust-proof pins and a blocking mat; spray bottle; scissors; measuring tape.
Abbreviations (US Terms)
- ch – chain
- sl st – slip stitch
- sc – single crochet
- hdc – half double crochet
- dc – double crochet
- tr – treble crochet
- sp – space
- st(s) – stitch(es)
- RS – right side
- BLO – back loop only
Special stitch – dc2tog (double crochet two together): [Yarn over, insert hook in next st, pull up a loop, yarn over, pull through 2 loops] twice, yarn over, pull through all 3 loops.
Beginning dc2tog: Ch 2, then dc in next st. This counts as the first dc2tog.
Gauge and Checkpoints
Single crochet gauge: 16 sts and 16 rows = 4 in (10.2 cm). This gauge applies to the border, bands, base, tab and bow.
Square gauge: one finished square = 4.5 in (11.4 cm) per side.
Make one full square first and check it at each stage:
- After Round 1: circle about 1.25 in (3.2 cm) across
- After Round 3: flower about 3 in (7.6 cm) from one petal tip to the opposite tip
- After Round 6: square 4.5 in (11.4 cm) per side, lightly pressed
If the square is too big, go down a hook size. If it is too small, go up a hook size. Being 0.25 in (0.6 cm) off per square adds up to 0.75 in (1.9 cm) around the tube, so fix it now.
Square (Make 6)
Work in the round with RS facing. Do not turn.
Round 1 (Color B): Make a magic ring. Ch 3 (counts as dc), 15 dc in ring. Join with sl st to top of beginning ch-3. (16 dc)
Round 2 (Color B): Beginning dc2tog, ch 5, dc2tog over next 2 sts, ch 5; repeat from * 6 more times. Join with sl st to top of first dc. (8 dc2tog, 8 ch-5 sps)
Round 3 (Color B): Sl st into first ch-5 sp. In each ch-5 sp work (sc, hdc, dc, tr, ch 2, tr, dc, hdc, sc). Join with sl st to first sc. Fasten off. (8 petals: 64 sts and 8 ch-2 tips)
Each petal rises to a pointed ch-2 tip, which gives the flower its star shape.
Round 4 (Color A): Join Color A with sc in any ch-2 petal tip. Ch 5, (tr, ch 3, tr) in next tip, ch 5, sc in next tip; repeat from * 3 more times, leaving out the last sc. Join with sl st to first sc. (4 sc, 8 tr, 4 ch-3 corner sps, 8 ch-5 sps)
The tr pairs form the corners and the sc tips mark the middle of each side. The long ch-5 spans create the open, lacy frame.
Round 5 (Color A): Ch 4 (counts as dc and ch 1), 3 dc in next ch-5 sp, ch 1, (2 dc, ch 2, 2 dc) in corner ch-3 sp, ch 1, 3 dc in next ch-5 sp, ch 1, dc in next sc, ch 1, 3 dc in next ch-5 sp, ch 1, (2 dc, ch 2, 2 dc) in corner sp, ch 1, 3 dc in next ch-5 sp, ch 1; repeat from * 2 more times. Join with sl st to 3rd ch of beginning ch-4. Skip the tr sts throughout. (44 dc, 16 ch-1 sps, 4 ch-2 corner sps)
Round 6 (Color A): Ch 1, sc in same st, then sc in each dc and each ch-1 sp around, working 3 sc in each corner ch-2 sp. Join with sl st to first sc. Fasten off, leaving a 6 in (15.2 cm) tail. (72 sc)
Per side: 15 sc along the side + 2 outer sc from the corner groups + 2 corner (middle) sts = 19 sts per side, including both corners. Check: 4 sides x 18 (each corner shared once) = 72.
Top Band
Foundation (Color A): Ch 60. Join with sl st to first ch, taking care not to twist the chain.
Round 1: Ch 1, sc in each ch around. Join. (60 sc)
Rounds 2–8: Ch 1, sc in each st around. Join. (60 sc)
Fasten off, leaving a 30 in (76.2 cm) tail. The band is 2 in (5.1 cm) tall. Relaxed, it measures about 15 in (38.1 cm) around. It eases onto the 14.5 in (36.8 cm) tube because you sew it stitch to stitch.
Bottom Band with Slot
Foundation and Rounds 1–4 (Color A): Work as Top Band Foundation and Rounds 1–4. (60 sc)
Row 5: Ch 1, sc in next 44 sts, turn. Leave the last 16 sts unworked. (44 sc)
Rows 6–8: Ch 1, sc in each sc across, turn. (44 sc)
Slot bridge: At the end of Row 8, ch 16. Join with sl st to the first sc of Row 8, across the gap.
Round 9: Ch 1, sc in each of the 44 sc and in each of the 16 chs. Join. (60 sc)
Rounds 10–12: Ch 1, sc in each st around. Join. (60 sc)
Fasten off, leaving a 30 in (76.2 cm) tail. The band is 3 in (7.6 cm) tall. The slot is about 4 in (10.2 cm) wide and 1 in (2.5 cm) tall.
Base
Round 1 (Color A): Magic ring, 6 sc in ring. Join. (6 sc)
Round 2: Ch 1, 2 sc in each st. Join. (12 sc)
Round 3: Ch 1, sc in next st, 2 sc in next st; repeat around. Join. (18 sc)
Rounds 4–10: Increase 6 sts evenly in each round, with one more sc between increases each time. Round 4: 24 sc. Round 5: 30 sc. Round 6: 36 sc. Round 7: 42 sc. Round 8: 48 sc. Round 9: 54 sc. Round 10: 60 sc.
Stagger the increases so the circle stays round. Fasten off. The base is about 5 in (12.7 cm) across.
Hanging Tab
Row 1 (Color A): Ch 7, sc in 2nd ch from hook and each ch across, turn. (6 sc)
Rows 2–20: Ch 1, sc in each st across, turn. (6 sc)
Fasten off, leaving a 12 in (30.5 cm) tail. The tab measures 1.5 x 5 in (3.8 x 12.7 cm).
Bow
Loops (Color A): Ch 31. Row 1: sc in 2nd ch from hook and each ch across, turn (30 sc). Row 2: ch 1, sc in each st across (30 sc). Fasten off. Sew the short ends together into a ring, then flatten it with the seam at center back. It measures about 3.75 in (9.5 cm) wide.
Tails: Ch 17. Work 2 rows of 16 sc as above. Fold in half into an upside-down V. Each tail hangs about 2 in (5.1 cm).
Center wrap: Ch 9. Row 1: sc in 2nd ch from hook and each ch across (8 sc). It is 2 in (5.1 cm) long.
Lay the loops over the fold of the tails and pinch the center. Wrap the center strip tightly around it and sew the ends together at the back.
Make All Pieces
- Squares: 6 total. Color B: Rounds 1–3 on all 6. Color A: Rounds 4–6 on all 6.
- Color A only: 1 top band, 1 bottom band, 1 base, 1 tab, 1 bow (loops, tails, center wrap).
Panel layout (RS up, S = one square):
S  S  S
S  S  S
The 3-square edge goes around the holder. The 2-square edge sets the height.
Joining
Use a flat slip-stitch join in Color A, worked through back loops only.
- Lay two squares RS up, side by side, with edges touching.
- Join Color A in the corner st of one square, then in the matching corner st of the other.
- Sl st loosely through the BLO of one st on each square, alternating sides. Match all 19 sts to 19 sts, corner to corner.
- Join the squares into 2 strips of 3 (2 seams per strip).
- Join the 2 strips along their long edge: 57 sts to 57 sts.
The unused front loops form a raised cream line between squares, which creates the grid look.
Tension: Keep each sl st as loose as the stitches beside it. If a seam puckers, go up one hook size for joining only.
Checkpoint: The joined panel measures 13.5 x 9 in (34.3 x 22.9 cm).
Border
Border gauge: The border follows the panel’s stitches, not the sc gauge. Work 1 sc in each st and 3 sc in each outer corner st, so the edges don’t stretch or ruffle.
Starting count per side:
- Long sides: 3 squares x 19 sts = 57 sts
- Short sides: 2 squares x 19 sts = 38 sts
These counts already include every corner st, including the pairs of corner sts at each seam. Nothing extra is added at seams.
Round 1 (Color A): With RS facing, join with sc in any st. Sc in each st around, working 3 sc in each of the 4 outer corner sts. Join.
- Long sides: 57 (1 per existing st) + 2 (extra) = 59 sts
- Short sides: 38 (1 per existing st) + 2 (extra) = 40 sts
- Total: 186 + 8 = 194 sc
Round 2: Ch 1, sc in each st, working 3 sc in each corner (middle) st. Join. Fasten off.
- Long sides: 59 (1 per existing st) + 2 (extra) = 61 sts
- Short sides: 40 (1 per existing st) + 2 (extra) = 42 sts
- Total: 194 + 8 = 202 sc
Why the math works: Each corner adds 2 sts per round, one to each side it touches, so every side grows by exactly 2. Two rounds add 0.5 in (1.3 cm) to each edge, taking the panel to 14.5 x 10 in (36.8 x 25.4 cm).
Assembly:
- Pin the panel flat to 14.5 x 10 in (36.8 x 25.4 cm), mist it and let it dry.
- Fold it RS out so the short sides meet. Whipstitch them together through both loops, 42 sts to 42 sts. This seam is the center back.
- At the top edge, the two end corner sts now sit side by side at the seam. Count them as one spot: 61 − 1 = 60 spots. The bottom edge also has 60.
- Whipstitch the top band to the top edge, 60 sts to 60, with the band’s join at the back seam.
- Whipstitch the bottom band to the bottom edge, 60 to 60, with the slot centered on the front, opposite the seam.
- Whipstitch the base to the lower edge of the bottom band, 60 to 60.
- Fold 1 in (2.5 cm) of the tab over the wooden ring and sew it down. Sew the other end 1 in (2.5 cm) down inside the top band, centered over the back seam.
- Sew the bow to the upper right of the front so it overlaps the top band and the top-right square.
Final Blocking
- Weave in all ends through stitches of the same color.
- Stuff the holder firmly with a rolled towel to hold its round shape.
- Mist it evenly until it is damp, not soaked.
- Smooth the squares so the grid lines run straight and level. Shape the base into a gentle dome and the slot into a neat oval.
- Open the bow loops and point the tails down.
- Let it dry completely, then remove the towel.
Final Quality-Control Checklist
- Each square is 4.5 in (11.4 cm), with 72 sc in Round 6.
- All 8 petals have a clear point.
- The bordered panel is 14.5 x 10 in (36.8 x 25.4 cm), with 61 sts on each long side and 42 on each short side.
- Both bands and the base have 60 sts.
- The slot is centered on the front, opposite the back seam.
- The tab and bow are stitched on securely.
Troubleshooting
- Petals look rounded: Check that each tip has ch 2 with a full tr on both sides.
- Square cups: The ch-5 spans in Round 4 are too tight. Chain more loosely.
- Square ruffles: The ch-5 spans are too loose, or Round 5 has extra stitches. Recount: you need 44 dc.
- Panel is skewed: A corner st was skipped while joining. Recount to 19 sts per side.
- Band is slightly loose: Up to 0.5 in (1.3 cm) is normal. Sew it stitch to stitch and it eases in.
- Holder leans when hung: Center the tab exactly over the back seam.
Care
Hand wash in cool water with mild soap and press out the water in a towel. Dry it stuffed with a towel to keep its shape, and don’t tumble dry.

Final Notes
Each square is 4.5 in (11.4 cm) with 19 sts per side. Six squares join into a 13.5 x 9 in (34.3 x 22.9 cm) panel. Two border rounds bring the panel to 14.5 x 10 in (36.8 x 25.4 cm), with 61 and 42 sts per side. Once seamed into a tube, each open edge has 60 stitch spots, which match the 60-st bands and base. The 2 in (5.1 cm) top band and 3 in (7.6 cm) bottom band complete the 15 in (38.1 cm) body. If your first square measures correctly, the rest of the holder will fit together.
Happy crocheting!