

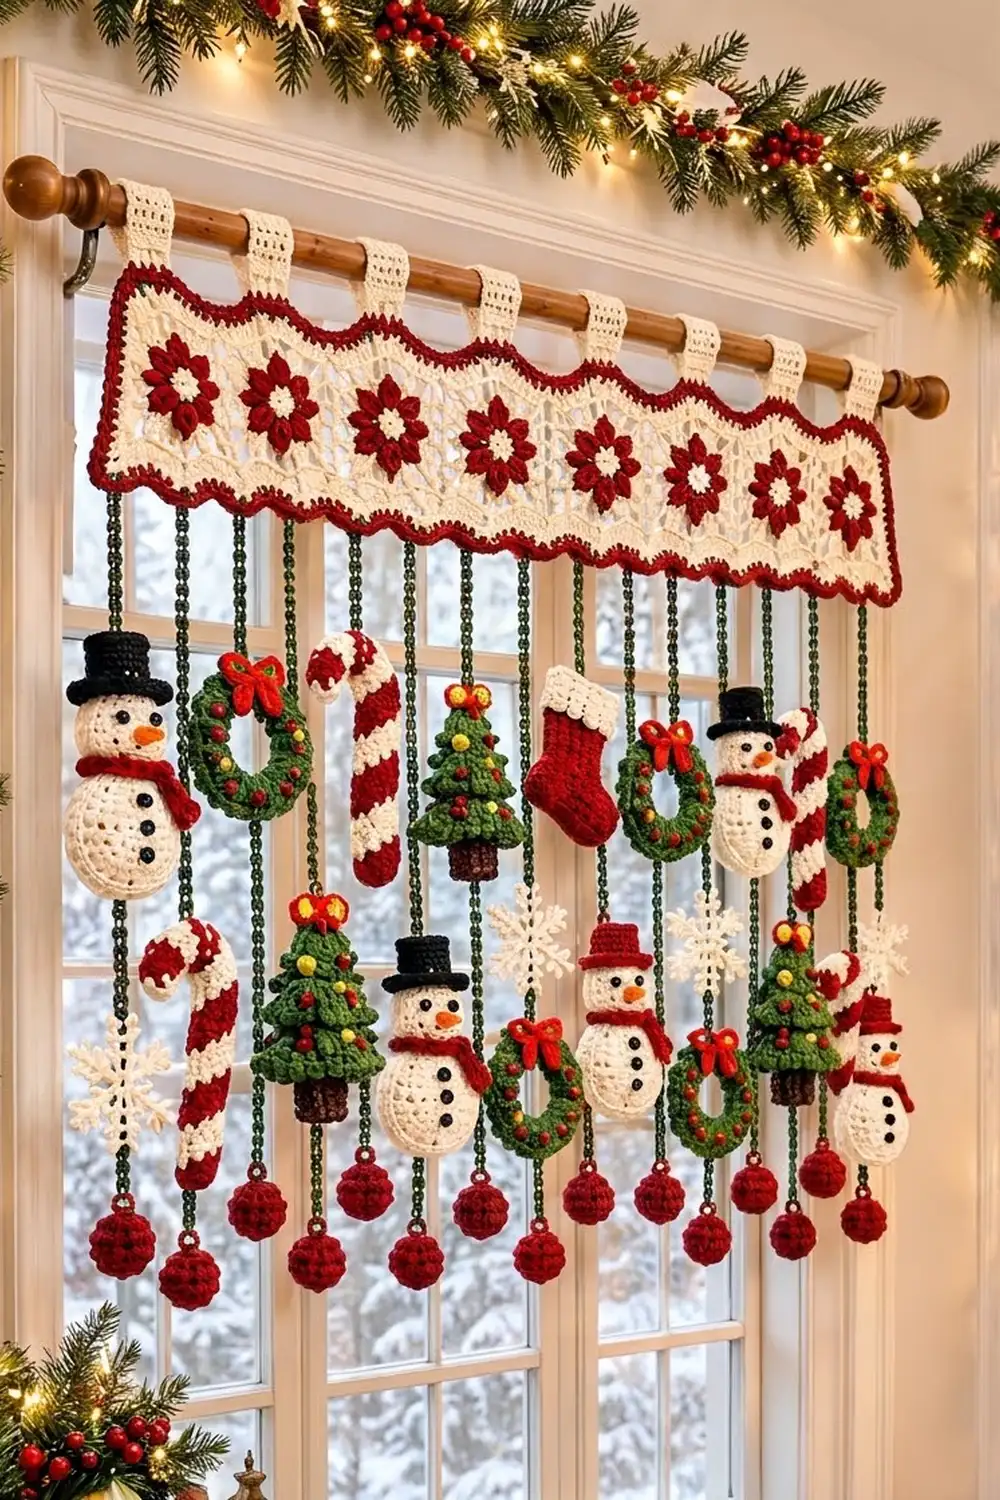
This window valance brings the holidays right up to the glass. A row of cream lace squares, each with a red poinsettia, sits inside a wavy red frame. Green cords hang below with little snowmen, wreaths, candy canes, a tree, a stocking, and snowflakes. Every cord ends in a red ball.
The colors are classic Christmas: cream, cranberry red, and deep green, with small touches of black, orange, brown, and yellow. The style is cozy farmhouse. Light comes through the lace, and the flat ornaments hang straight.
The pattern uses US crochet terms. The finished panel is 29.5 in (74.9 cm) wide and 6 in (15.2 cm) tall at the wave peaks. With the cords, the valance hangs about 21 in (53.3 cm) below the rod.
First you make 7 motifs, join them in a row, and work 3 border rounds. Then you crochet 7 tabs onto the top edge and 8 chain cords onto the bottom edge. Last, you make the ornaments and sew them onto the cords.
Finished Size and Construction
- Finished panel size: 29.5 in × 6 in (74.9 cm × 15.2 cm) at peaks; 5.5 in (14.0 cm) tall at troughs
- Skill level: Intermediate
- Terminology: US
- Yarn weight: DK (#3), cotton or cotton blend
- Hook: 4.0 mm (G-6)
- Number of motifs: 7, plus 12 ornaments and 8 balls
- Layout: 7 motifs × 1 row
- Motif size: 4 in (10.2 cm) square
- Size before border: 28 in × 4 in (71.1 cm × 10.2 cm)
- Border depth: 0.75 in (1.9 cm) on short sides and at troughs; 1 in (2.5 cm) at peaks
- Cord length: 14 in (35.6 cm) plus a 1 in (2.5 cm) ball
Materials
Cotton or a cotton blend gives crisp lace and firm ornaments, and it stretches very little when the panel hangs. The amounts assume about 230 m per 100 g.
- Cream: 100 g (230 m), for motifs, tabs, snowmen, candy canes, and cuff
- Red: 100 g (230 m), for poinsettias, border, balls, bows, scarves, and stocking
- Dark green: 50 g (115 m), for cords, wreaths, and tree
- White: 10 g (23 m), for snowflakes
- Black: 10 g (23 m), for hats, eyes, and buttons
- Orange, brown, yellow: 5 g (12 m) each
Tools: 4.0 mm hook, tapestry needle, stitch markers, scissors, a little fiberfill, blocking mat, rustproof pins.
All quantities include a margin of about 15–20%.
Abbreviations (US Terms)
- ch: chain
- sl st: slip stitch
- sc: single crochet
- hdc: half double crochet
- dc: double crochet
- tr: treble crochet
- sc2tog / sc3tog: single crochet 2 / 3 together
- sk: skip
- sp: space
- RS / WS: right side / wrong side
tr2tog cluster (special stitch): Yarn over twice, insert hook in the stitch, pull up a loop, [yarn over, pull through 2 loops] twice. Repeat from * once more in the same stitch. Yarn over and pull through all 3 loops.
Gauge and Checkpoints
Gauge: 20 sc and 16 sc rows = 4 in (10.2 cm). That is 5 sc and 4 rows per 1 in (2.5 cm).
Make one full motif first and check it at each stage:
- After Round 2 (flower): 1.75 in (4.4 cm) across
- After Round 4: 3 in (7.6 cm) square
- After Round 6: 4 in (10.2 cm) square, 20 sts per side
If the motif is too big, go down half a hook size. If it is too small, go up half a size. Being off by 0.25 in (0.6 cm) per motif adds up to 1.75 in (4.4 cm) across all 7 motifs.
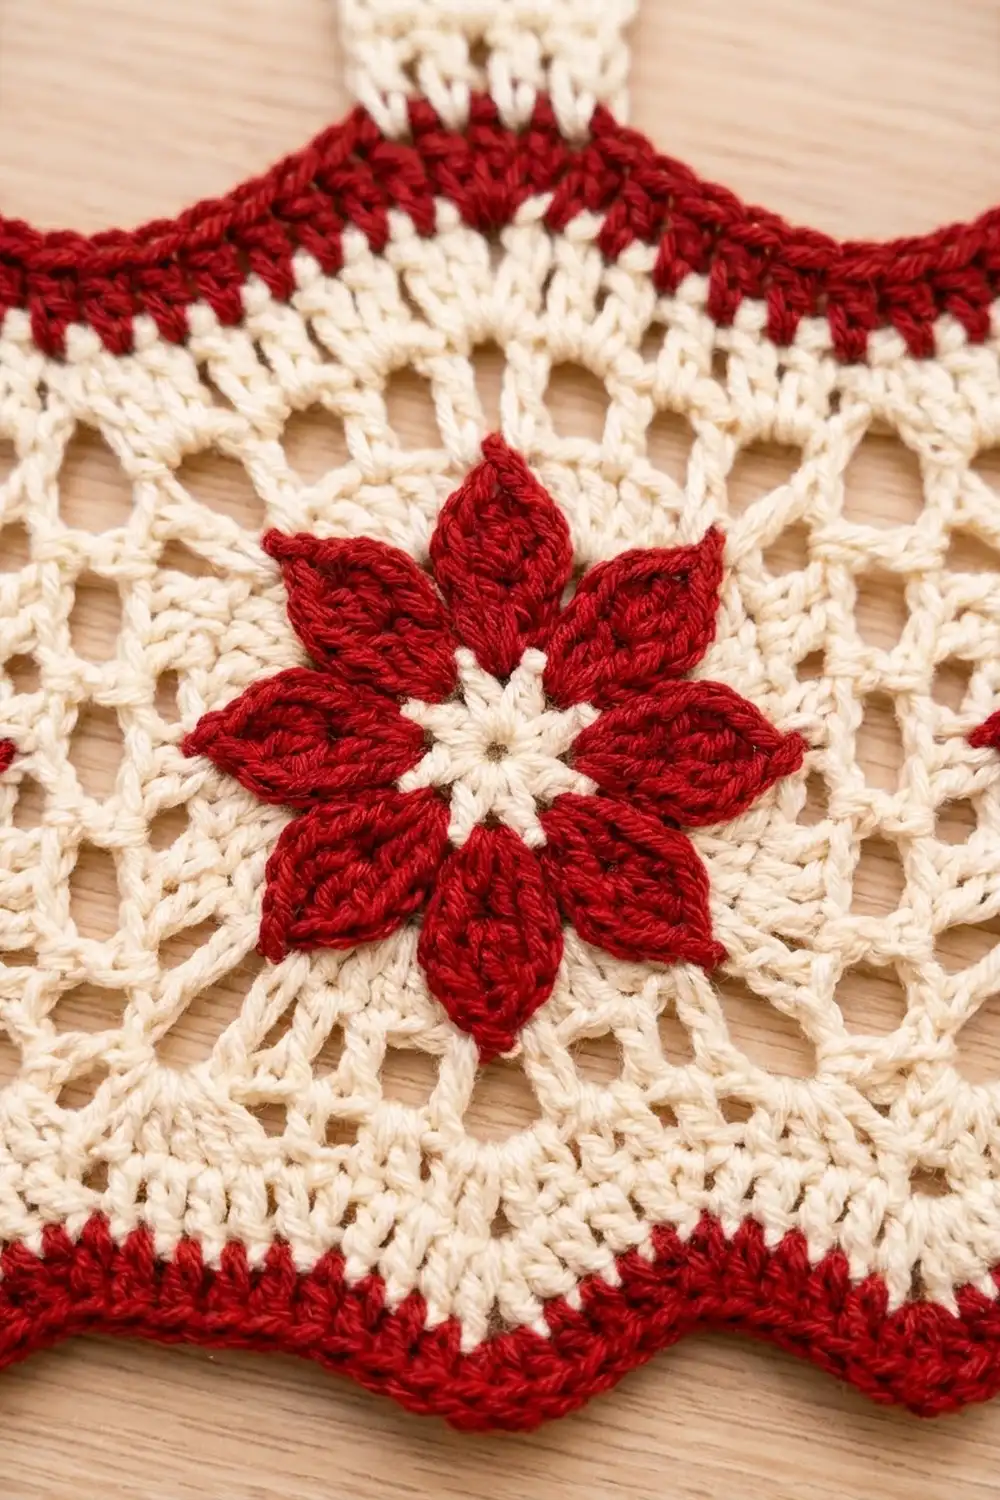
Poinsettia Lace Motif (make 7)
Round 1 (cream): Make a magic ring, ch 1, and work 8 sc in the ring. Join with a sl st to the first sc and fasten off. (8 sc)
Round 2 (red): Join red in any sc. Ch 4, tr2tog cluster in the same sc, ch 4, sl st in the same sc, sl st in the next sc. Repeat from * 7 more times, ending at the joining st. Fasten off. (8 pointed petals)
Round 3 (cream): Join cream with a sc in the top of any petal cluster. Ch 5, sc in the top of the next cluster. Repeat from * 6 more times, then ch 5 and join. (8 sc, 8 ch-5 sps)
Round 4: Sl st into the next ch-5 sp. Ch 3 (counts as a dc), work (2 dc, ch 3, 3 dc) in the same sp, ch 1, 3 dc in the next sp, ch 1. (3 dc, ch 3, 3 dc) in the next sp, ch 1, 3 dc in the next sp, ch 1. Repeat from * 2 more times and join. (36 dc: 9 per side between corner sps; 4 ch-3 corners; 8 ch-1 sps)
Round 5 (lace): Sl st in the next 2 dc and into the corner sp. Ch 3 (counts as a dc), then ch 3 and dc in the same sp. [Ch 4, sc in the next ch-1 sp] twice, ch 4, (dc, ch 3, dc) in the next corner sp. Repeat from * 2 more times. Finish with [ch 4, sc in the next ch-1 sp] twice, ch 4, and join. (8 dc, 8 sc, 12 ch-4 loops, 4 ch-3 corners)
Round 6: Sl st into the corner sp, ch 1, and work 3 sc in the same sp. Sc in the next dc, [4 sc in the next ch-4 loop, sc in the next sc] twice, 4 sc in the next loop, sc in the next dc, 3 sc in the corner sp. Repeat from * around, leaving out the last corner group, and join. (76 sc. Each side has 18 sts between corner sts, plus 2 corner sts, for 20 per side. Check: 4 × 20 − 4 shared corners = 76.)
Fasten off, weave in the ends, and lightly steam to 4 in (10.2 cm) square.
Make All Pieces
Make 7 motifs. Use cream for Rounds 1 and 3–6 and red for Round 2.
[M1][M2][M3][M4][M5][M6][M7]
Lay all motifs RS up. The order doesn’t matter.
Joining
Hold two motifs RS together. With cream, whipstitch through the outer loops only, from corner st to corner st. All 20 sts of one side should meet the matching 20 sts of the next motif. Join M1 to M2, then M2 to M3, and so on.
Keep the tension even and fairly loose so the seams lie flat, because tight seams make the strip cup. Checkpoint: the strip should measure 28 in × 4 in (71.1 cm × 10.2 cm).
Border
Border gauge: 5 sc per 1 in (2.5 cm). Each sc round is about 0.25 in (0.6 cm) tall.
Starting counts: Each long side has 7 × 20 = 140 sts, including the outer corner sts. Work both corner sts at every seam. Each short side has 1 × 20 = 20 sts.
Round 1 (red): Join red in the top-right corner st. Work 3 sc in each of the 4 corner sts and 1 sc in every other st. (Long sides: 140 + 2 = 142 each. Short sides: 20 + 2 = 22 each, including corners. Total: 316 + 8 = 324.)
Round 2 (wave): Work 3 sc in each corner st. On each long side, sc in the extra st after the corner. Then work the wave repeat 7 times over the next 140 sts: 3 sc, 3 hdc, 8 dc, 3 hdc, 3 sc (20 sts). Sc in the extra st before the next corner. On the short sides, sc in each st. (Long sides: 144 each. Short sides: 24 each. Total: 324 + 8 = 332.)
Round 3: Sc in each st, with 3 sc in each corner st. (Long sides: 146 each. Short sides: 26 each. Total: 332 + 8 = 340.) Fasten off.
Why the math works: Each wave repeat is 20 sts, the same as one motif side. The 8 dc land over the middle of each square to form a peak, and the sc groups land over the seams to form a trough. That gives 7 waves along the top and 7 along the bottom.
Tabs (cream, make 7)
On the top edge, start at the right-hand Round 3 corner and count the 144 sts between the corners. Join cream in st 9.
- Row 1: Ch 1, sc in sts 9–15. (7 sc)
- Row 2: Ch 4 (counts as dc + ch 1), sk 1, dc in the next st, [ch 1, sk 1, dc] twice. (4 dc + 3 ch-1 sps = 7 sts)
- Row 3: Ch 1, sc in each dc and each ch-1 sp. (7 sc)
- Rows 4–9: Repeat Rows 2–3 three more times.
Each tab is 1.4 in (3.6 cm) wide and 3.25 in (8.3 cm) long. Fold it to the WS and sew Row 9 to the base of border Round 1. Make the other tabs the same way on sts 29–35, 49–55, 69–75, 89–95, 109–115, and 129–135, so each tab sits over a wave peak.
Cords (dark green, make 8)
On the bottom edge, put one cord in each corner st. Put the other six in the seam troughs at sts 22, 42, 62, 82, 102, and 122, counting from the right corner.
For each cord, join green and ch until the chain measures 14 in (35.6 cm), about 64 ch. Then sl st in the back bump of each ch, working back up to the panel. This makes a firm cord that won’t twist.
Ornaments
Work each ornament flat with the 4.0 mm hook. Leave long tails for sewing.
Snowman (make 3):
– Body (cream): Magic ring, 8 sc. Next round: 2 sc in each st (16). Next round: [sc, 2 sc in next] 8 times (24). The body measures 1.5 in (3.8 cm).
– Head (cream): Work the first 2 rounds of the body only (16) and sew it on top.
– Hat (black): Ch 7, sc across (6). Next row: sk 1, sc 4 (4). Work 2 more rows of 4 sc.
– Scarf (red): Ch 16, sc across (15). Wrap it around the neck.
– Face and buttons: Embroider black eyes and buttons and an orange nose.
– Finished height: 3.5 in (8.9 cm).
Wreath (make 3):
– Ring (green): Ch 16 and join. Round 1: 32 sc into the ring. Round 2: (sl st, ch 2, dc, ch 2, sl st) in the next st, sc in the next st. Repeat around (16 leaves). The wreath measures 2.25 in (5.7 cm).
– Bow (red): Ch 16, sc across (15). Pinch it in the middle, wrap the center, and sew it to the top of the wreath.
– Berries: Add red French knots.
Candy Cane (make 2):
– Cane (cream): Ch 21, sc across (20). Work 1 more row of 20 sc.
– Stripes: Wrap red yarn diagonally around the strip every 0.5 in (1.3 cm).
– Shaping: Curve the top 1.25 in (3.2 cm) into a hook and stitch it in place.
Tree (make 1):
– Tree (green): Ch 14, sc across (13). On each following row, ch 1, sc2tog, sc to the last 2 sts, sc2tog. The rows go 11, 9, 7, 5, 3. Finish with sc3tog (1).
– Trunk (brown): 3 rows of 3 sc, sewn below the tree.
– Decoration: Add a yellow star and colored knots.
– Finished height: 2.5 in (6.4 cm).
Stocking (make 1):
– Leg (red): Ch 7, sc across (6). Work 7 more rows of 6 sc, then ch 5 at the end of the last row.
– Foot: Turn, sc in the 2nd ch from the hook and the next 3 ch, then sc across (10). Work 3 more rows of 10 sc.
– Cuff (cream): 2 rows of hdc across the top (6).
Snowflake (make 2):
– White: Magic ring, 6 sc. Sc in the next st, ch 6, [sl st, ch 3] twice in the 3rd ch from the hook, sl st in the same ch, sl st down the 3 ch, sc in the same st. Repeat from * 5 more times.
– Size: 2 in (5.1 cm) across.
Ball (make 8):
– Red: Magic ring, 6 sc. Next round: 2 sc in each st (12). Work 2 rounds of 12 sc.
– Finishing: Stuff, then sc2tog 6 times (6). Close the top and sew the ball to the end of a cord.
– Size: 1 in (2.5 cm) across.
Placement: Number the cords 1–8 from the left. Sew the upper ornaments 3 in (7.6 cm) below the panel and the lower ones 8 in (20.3 cm) below it.
| Cord | Upper | Lower |
|---|---|---|
| 1 | Snowman | Snowflake |
| 2 | Wreath | none |
| 3 | Candy cane | Snowman |
| 4 | Tree | none |
| 5 | Stocking | none |
| 6 | Wreath | Wreath |
| 7 | Candy cane | none |
| 8 | Snowman | Snowflake |
Final Blocking
- Lay the panel face down on a mat with the cords hanging off the edge.
- Pin it to 29.5 in × 6 in (74.9 cm × 15.2 cm) at the peaks and 5.5 in (14.0 cm) at the troughs.
- Pin each motif’s lace loops open.
- Mist or steam lightly and let it dry completely.
- Steam the ornaments flat separately, keeping the steam off the stuffed balls.
Final Quality-Control Checklist
- [ ] 7 motifs, each 4 in (10.2 cm) with 20 sts per side
- [ ] Joined strip measures 28 in × 4 in (71.1 cm × 10.2 cm)
- [ ] Border Round 3 totals 340 sts
- [ ] 7 waves top and bottom, lined up with the motifs
- [ ] 7 tabs centered over the peaks and sewn on securely
- [ ] 8 cords, each 14 in (35.6 cm)
- [ ] 12 ornaments and 8 balls at the correct heights
- [ ] All ends woven in
Troubleshooting
- The strip cups at the seams: The whipstitch is too tight. Redo it more loosely.
- The waves look flat: Check that each repeat has all 8 dc in the middle.
- The border ruffles: Recount the long sides against 142, 144, and 146.
- The cords twist: Work the return sl sts through the back bumps only.
- The ornaments tilt: Sew each one at both its top and bottom edge.
- The tabs are too tight for the rod: Add one more pair of Rows 2–3.
Care
Hand wash in cool water with mild soap and roll the valance in a towel. Dry it flat, reshaping the waves while it is damp, and store it flat with the cords straight.
Final Notes
Each measurement builds on the one before. Each motif is 4 in (10.2 cm) with 20 sts per side. Seven motifs make 28 in (71.1 cm) and 140 sts on each long side. Three border rounds bring each long side to 146 sts and the panel to 29.5 in × 6 in (74.9 cm × 15.2 cm). The 14 in (35.6 cm) cords and 1 in (2.5 cm) balls bring the total drop to about 21 in (53.3 cm). If your first motif matches gauge, the rest of the sizes will work out too.
Happy crocheting!