

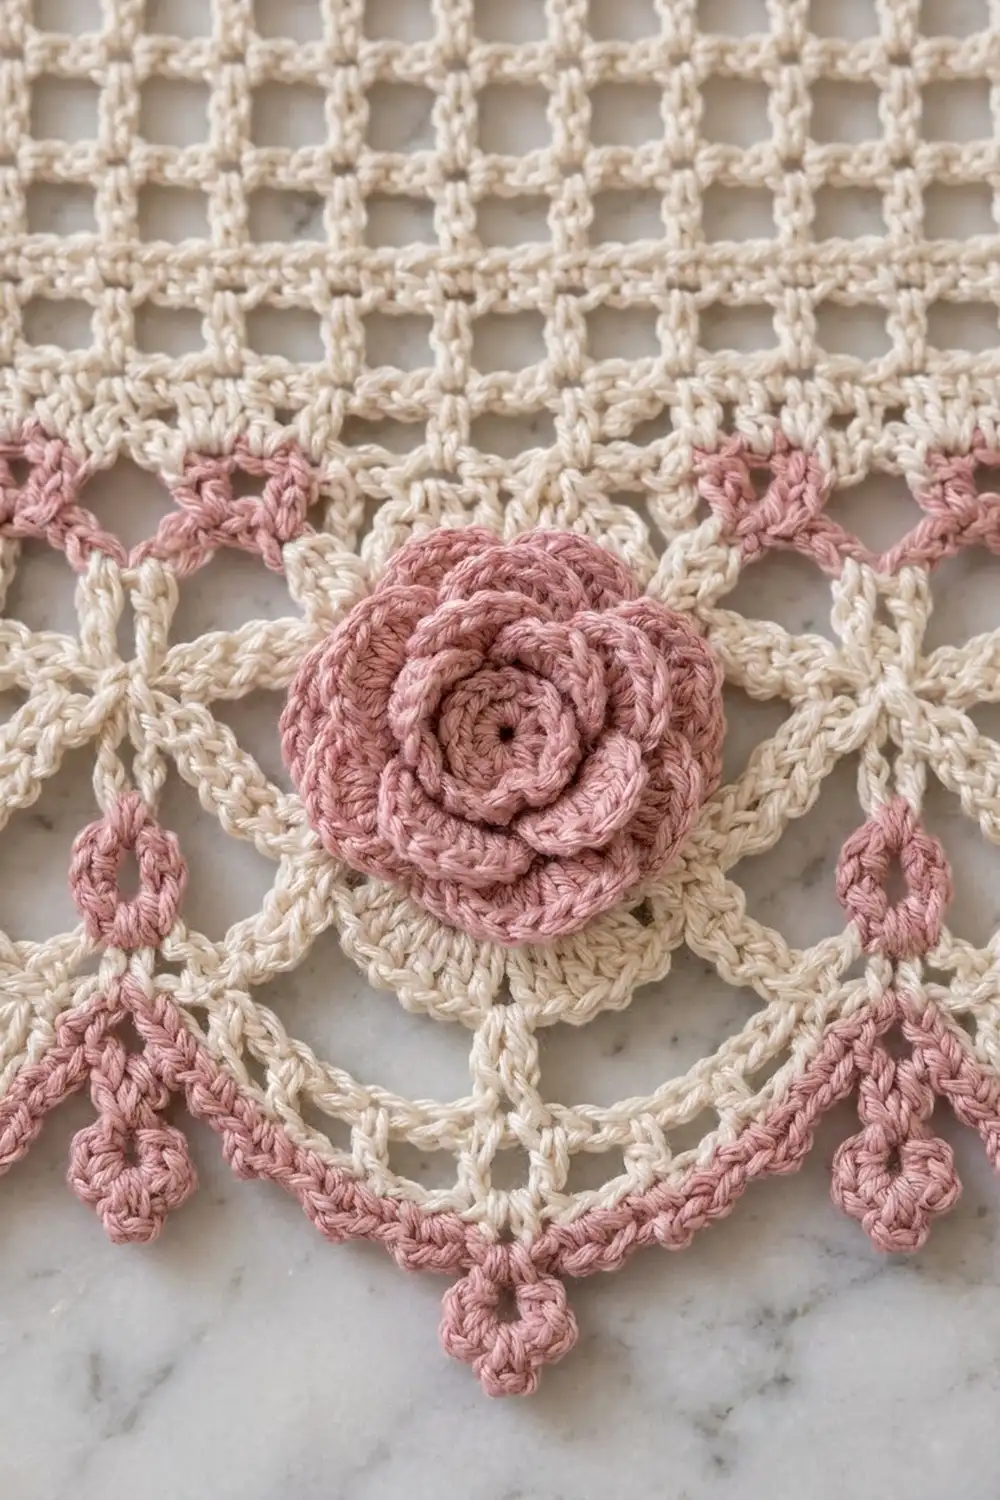
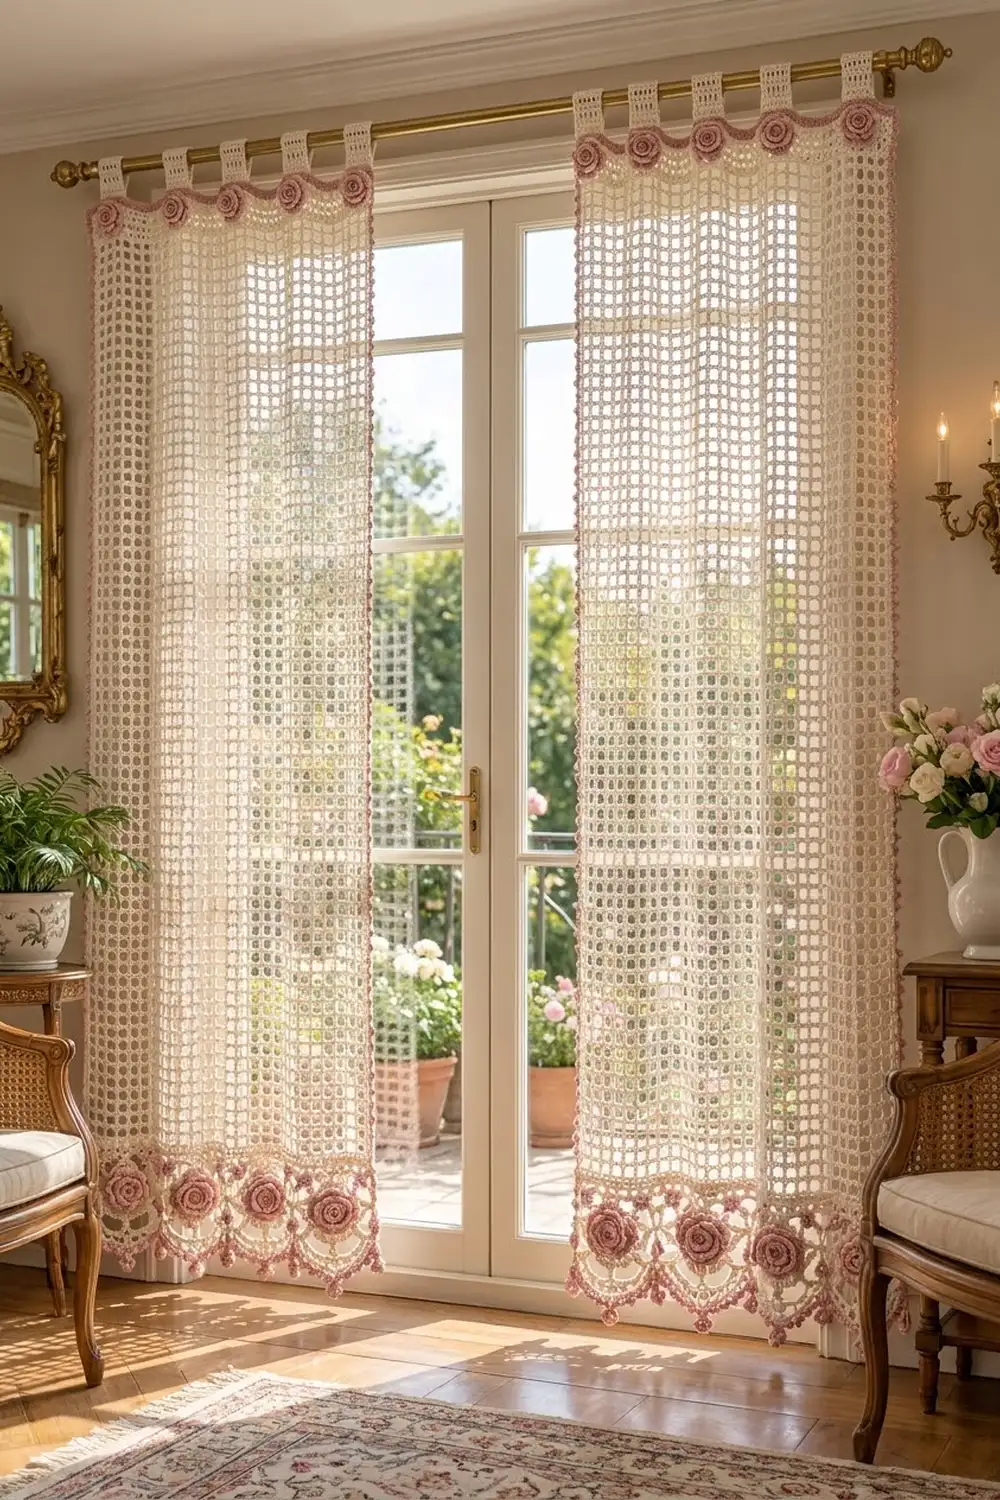
The Rose Arbor Curtain is a light, open filet mesh panel finished with a rose border. The body is a grid of cream squares that lets sunlight through. The hem is a band of lace arches, and each arch holds a soft pink rose.
The palette uses just two colors. Warm cream is used for the mesh, fans and arches. Dusty rose pink is used for the flowers, the scalloped hem with its little bobble drops, and a slim band along the top. Five cream tabs carry small pink roses, so the panel hangs straight from a rod without extra hardware.
The style is cottage romantic. It has the feel of vintage lace, but it’s worked in DK cotton, so it grows quickly. All instructions use US crochet terms. One finished panel measures about 29 in (73.7 cm) wide. It is 62.75 in (159.4 cm) long from the top band to the tips of the hem drops, and the tab loops add 3 in (7.6 cm) above.
The construction is simple:
- Work the mesh from the top down in one piece.
- Edge the sides.
- Add the lace border across the last row.
- Work the pink top band and tabs along the foundation chain.
- Crochet the roses separately and sew them on.
Make two panels for a pair, as shown.
Finished Size and Construction
- Finished size (one panel): about 29 in (73.7 cm) wide x 62.75 in (159.4 cm) long, plus 3 in (7.6 cm) tab loops
- Skill level: Intermediate
- Terminology: US crochet terms
- Yarn weight: DK (light #3) cotton
- Hook: 4.0 mm (US G-6)
- Number of pieces: one body per panel plus 11 sewn-on roses (6 large, 5 small); two identical panels for the pair, not joined
- Layout: 72 mesh squares across; 6 border arches of 12 mesh each; 5 tabs
- Piece size (mesh body): 28.8 in (73.2 cm) wide x 60 in (152.4 cm) long
- Size before border: 28.8 in (73.2 cm) x 60 in (152.4 cm)
- Border depth: 2.5 in (6.4 cm) at the bottom, including the drops
Materials
Choose a smooth mercerized or combed DK cotton. Cotton keeps the square mesh crisp, resists stretching on a rod and washes well. The quantities below assume a cotton with about 110 m per 50 g.
- Cream (main color): 650 g / 1,430 m per panel; 1,300 g / 2,860 m for the pair
- Dusty rose pink (contrast): 75 g / 165 m per panel; 150 g / 330 m for the pair
All quantities include a margin of roughly 10-15% for swatching and small differences in tension.
Tools:
- 4.0 mm (US G-6) crochet hook
- Tapestry needle
- Stitch markers (at least 10)
- Rust-proof pins and a large blocking surface (a bed covered with towels works)
- Measuring tape and scissors
Abbreviations (US Terms)
- ch – chain
- sl st – slip stitch
- sc – single crochet
- hdc – half double crochet
- dc – double crochet
- sk – skip
- sp – space
- RS / WS – right side / wrong side
- mesh – one open square: (ch 2, sk 2, dc in next st)
Special stitch – bobble picot (bp): Ch 3. Yarn over, insert hook in the 3rd ch from hook, pull up a loop, yarn over, pull through 2 loops. Repeat from * 2 more times in the same ch. Yarn over and pull through all 4 loops on the hook. This makes a small round bobble that hangs from the edge.
Gauge and Checkpoints
Gauge: 10 mesh and 8 rows = 4 in (10.2 cm) in filet mesh. That works out to 7.5 stitches per 1 in (2.5 cm). One mesh is 0.4 in (1.0 cm) wide, and one row is 0.5 in (1.3 cm) tall.
Test first. Work a swatch before you start a full panel. Ch 39, then work Row 1 followed by mesh rows as below, for 10 rows in total (12 mesh wide). The swatch should measure 4.8 in (12.2 cm) wide and 5 in (12.7 cm) tall. Also crochet one large rose; it should measure 2.5 in (6.4 cm) across.
Checkpoints:
- After Row 2: width 28.8 in (73.2 cm)
- After Row 20: length 10 in (25.4 cm)
- After Row 60: length 30 in (76.2 cm)
- After Row 120: length 60 in (152.4 cm)
- After the border: border depth 2.5 in (6.4 cm)
If your swatch is too big, go down 0.5 mm in hook size. If it’s too small, go up 0.5 mm. If only the length is off, you can add or remove mesh rows. Keep the count across at 217 stitches so the border repeat still fits.
Panel Body
The body is worked top down in rows, starting at the foundation chain.
Foundation: With cream, ch 219.
Row 1 (RS): Dc in 4th ch from hook and in each ch across. Turn. (217 dc; the skipped ch-3 counts as the first dc)
Row 2: Ch 5 (counts as dc + ch 2), sk next 2 dc, dc in next dc, ch 2, sk 2 dc, dc in next dc; repeat from * across, working the last dc in the top of the turning ch. Turn. (73 dc, 72 ch-2 sps = 72 mesh)
Rows 3-119: Ch 5 (counts as dc + ch 2), dc in next dc, ch 2, dc in next dc; repeat from * across, working the last dc in the 3rd ch of the turning ch-5. Turn. (72 mesh in every row)
Check your width now: 72 mesh should measure 28.8 in (73.2 cm).
Row 120: Ch 3 (counts as dc), 2 dc in next ch-2 sp, dc in next dc; repeat from * across. Fasten off. (217 dc: 73 dc worked into the dc below + 144 dc worked into the 72 spaces)
The body now measures 28.8 in (73.2 cm) x 60 in (152.4 cm).
Side edges: With RS facing, join cream at one side corner. Work 2 sc in each row-end along the side: 120 rows x 2 = 240 sc. Fasten off. Repeat on the other side (240 sc).
Large Roses (make 6 per panel)
With pink, ch 5 and sl st in the first ch to form a ring.
Rnd 1: Ch 1, 10 sc in ring, sl st to first sc. (10 sc)
Rnd 2: Ch 1, sc in first sc, ch 3, sk 1 sc, sc in next sc, ch 3; repeat from * 3 more times, sk last sc, sl st to first sc. (5 sc, 5 ch-3 loops)
Rnd 3: In each ch-3 loop work (sc, hdc, 3 dc, hdc, sc). Sl st to first sc. (5 petals, 35 sts)
Rnd 4: Working behind the petals, ch 5, sc around the post of the next Rnd 2 sc from the back; repeat from * 4 more times. (5 ch-5 loops)
Rnd 5: In each ch-5 loop work (sc, hdc, 5 dc, hdc, sc). Sl st to first sc. (5 petals, 45 sts)
Rnd 6: Working behind the petals, ch 6, sc around the post of the next Rnd 4 sc from the back; repeat from * 4 more times. (5 ch-6 loops)
Rnd 7: In each ch-6 loop work (sc, hdc, 7 dc, hdc, sc). Sl st to first sc. (5 petals, 55 sts)
Fasten off, leaving a 12 in (30.5 cm) tail for sewing. Each large rose has three stacked layers of 5 petals, and each layer is larger than the one in front of it. It measures 2.5 in (6.4 cm) across.
Small Roses (make 5 per panel)
Work Rnds 1-5 of the large rose. (5 petals, 45 sts in the outer layer)
Fasten off with a 12 in (30.5 cm) tail. Each small rose has two petal layers and measures 1.5 in (3.8 cm) across.
Make All Pieces
For one panel you need 1 body, 6 large roses and 5 small roses. For the pair, double everything: 2 bodies, 12 large roses and 10 small roses. All roses are pink. All bodies, tabs, fans and arches are cream.
Rose layout for one panel, seen from the front:
TOP:    TAB+ROSE  gap  TAB+ROSE  gap  TAB+ROSE  gap  TAB+ROSE  gap  TAB+ROSE
BOTTOM: ROSE  ROSE  ROSE  ROSE  ROSE  ROSE   (one large rose per arch)
The two panels are not joined to each other; each one hangs on its own tabs.
Border
Border gauge: The border keeps the body gauge of 7.5 stitches per 1 in (2.5 cm). One arch repeat uses 36 stitches of Row 120 and measures 4.8 in (12.2 cm), which is exactly 12 mesh.
Why the math works: Row 120 has 217 dc, and 217 = 6 x 36 + 1. Six 36-stitch repeats fit exactly, with 1 stitch left over to close the last repeat. Each repeat runs from one fan to the next, and the panel ends finish with half fans.
Bottom Border
Row B1 (RS, cream): With RS facing, join cream in the first dc of Row 120. Ch 3 (counts as dc), 4 dc in same st (half fan made). [Ch 5, sk 8 sts, sc in next st] 3 times, ch 5, sk 8 sts, 9 dc in next st (fan made); repeat from * 4 more times. [Ch 5, sk 8 sts, sc in next st] 3 times, ch 5, sk 8 sts, 5 dc in last st (half fan made). Turn.
(5 fans + 2 half fans = 55 dc; 18 sc; 24 ch-5 loops; each repeat uses 36 sts)
Row B2 (WS, cream): Ch 1, sc in first dc. [Ch 6, sc in next ch-5 loop] 4 times, ch 6, sc in 5th (center) dc of next fan; repeat from * 4 more times. [Ch 6, sc in next ch-5 loop] 4 times, ch 6, sc in top of turning ch. Turn.
(31 sc, 30 ch-6 loops; 5 loops per repeat)
Row B3 (RS, cream): Ch 1, sc in first sc. Ch 4, sc in next ch-6 loop, 7 dc in each of next 3 ch-6 loops, sc in next ch-6 loop, ch 4, sc in next sc; repeat from * 5 more times. Fasten off.
(126 dc, 19 sc, 12 ch-4 sps; each repeat forms one solid 21-dc arch under its rose)
Row B4 (WS, pink): With WS facing, join pink in the first sc. Ch 1, sc in same sc. 4 sc in next ch-4 sp, sc in next sc, sc in next 4 dc, bp, sc in next 4 dc, bp, sc in next 5 dc, bp, sc in next 4 dc, bp, sc in next 4 dc, sc in next sc, 4 sc in next ch-4 sp, sc in next sc, bp; repeat from * 5 more times, leaving out the bp after the last repeat. Fasten off.
(193 sc; 29 bp = 4 per arch + 5 at the points between arches)
Push every bobble picot to the RS so the drops hang in front.
Count check for B4: Each repeat has 4 + 1 + 21 + 1 + 4 + 1 = 32 sc. 6 x 32 = 192, plus the first sc = 193.
Top Band and Tabs
Row T1 (RS, pink): Turn the panel so the foundation chain is at the top. Join pink in the first foundation ch. Ch 1, then work 1 sc into the base of each Row 1 stitch across. Fasten off. (217 sc)
Tabs (cream): The tabs start in T1 sts 1, 52, 103, 154 and 205. Each tab is 13 sts wide, with 38 sts between tabs: 5 x 13 + 4 x 38 = 217.
Join cream in T1 st 1.
Tab Row 1: Ch 3 (counts as dc), dc in next 12 sts. Turn. (13 dc)
Tab Rows 2-12: Ch 3, dc in next 12 dc. Turn. (13 dc)
Fasten off with a 15 in (38.1 cm) tail. Each tab is 1.7 in (4.3 cm) wide and 6 in (15.2 cm) long. Fold it to the WS and sew the last row to the back of T1 to form a 3 in (7.6 cm) loop. Repeat for the other 4 tabs.
Attaching the Roses
Method: Whipstitch each rose on from the back of its outer petal layer, using the rose’s own tail.
Placement logic: Center each large rose over the middle ch-6 loop of its repeat in Row B2. It sits over the B1-B2 lattice, and its lower petals rest on the 21-dc arch. Sew each small rose to the front of a tab, 1 in (2.5 cm) above T1.
Tension advice: Catch only the back loops of the outer petals and the cream stitches beneath them. Pull each stitch snug but not tight, so the mesh doesn’t pucker.
Size checkpoint: The large rose centers should be 4.8 in (12.2 cm) apart, matching the arch repeat.
Final Blocking
- Weave in all ends securely, splitting the cotton plies as you go.
- Soak the panel in cool water with a little gentle wash for 15 minutes.
- Press the water out gently between towels; do not wring.
- Lay the panel flat on a large padded surface.
- Pin the sides straight to 29 in (73.7 cm) wide and the body to 60 in (152.4 cm) long.
- Pin each arch into a smooth curve, with each pink drop pointing straight down.
- Square the mesh with your fingers so every opening is 0.4 in (1.0 cm) wide.
- Fluff the rose petals forward and let everything dry completely.
Final Quality-Control Checklist
- 72 mesh across every body row, 120 rows in total
- Row 120 has 217 dc
- 240 sc along each side edge
- 6 arches, each with a 21-dc base and 4 drops
- 29 bobble picots along the hem
- 217 sc in the pink top band
- 5 tabs, each 13 sts wide and evenly spaced
- 6 large and 5 small roses sewn on securely
- Panel measures 29 in (73.7 cm) x 62.75 in (159.4 cm)
Troubleshooting
The mesh leans or skews. Always work each dc into the dc below, not into the chain space. Block firmly to square it.
The squares are taller than they are wide. Pull up shorter loops on the dc, or make your chains slightly looser.
The panel narrows toward the hem. Count 72 mesh every 10 rows. The usual cause is a missed last dc in the turning chain.
The border repeats don’t fit. Recount Row 120; it must have exactly 217 dc.
The arches ruffle. Your ch-6 loops are too loose. Work them tighter or use ch 5.
The roses curl backward. Steam them lightly from the front and pin the petals forward while they dry.
The tabs twist on the rod. Make sure each tab is folded straight to the back before you sew it.
Care
Hand wash, or machine wash on a gentle cool cycle in a mesh bag, then reshape and dry flat. Don’t hang the panel while it’s wet, because the weight can stretch the mesh.
Final Notes
The measurement chain is simple. 10 mesh = 4 in (10.2 cm), so 72 mesh gives a 28.8 in (73.2 cm) body. At 8 rows per 4 in (10.2 cm), 120 rows give 60 in (152.4 cm). The 217 stitches of Row 120 divide into six 36-stitch arches of 4.8 in (12.2 cm). The border adds 2.5 in (6.4 cm), for a finished panel of 29 in (73.7 cm) x 62.75 in (159.4 cm) that hangs on 3 in (7.6 cm) tab loops.
Check your gauge and count at every checkpoint, and the roses will land exactly in their arches. Make a second panel for the pair.
Happy crocheting!