

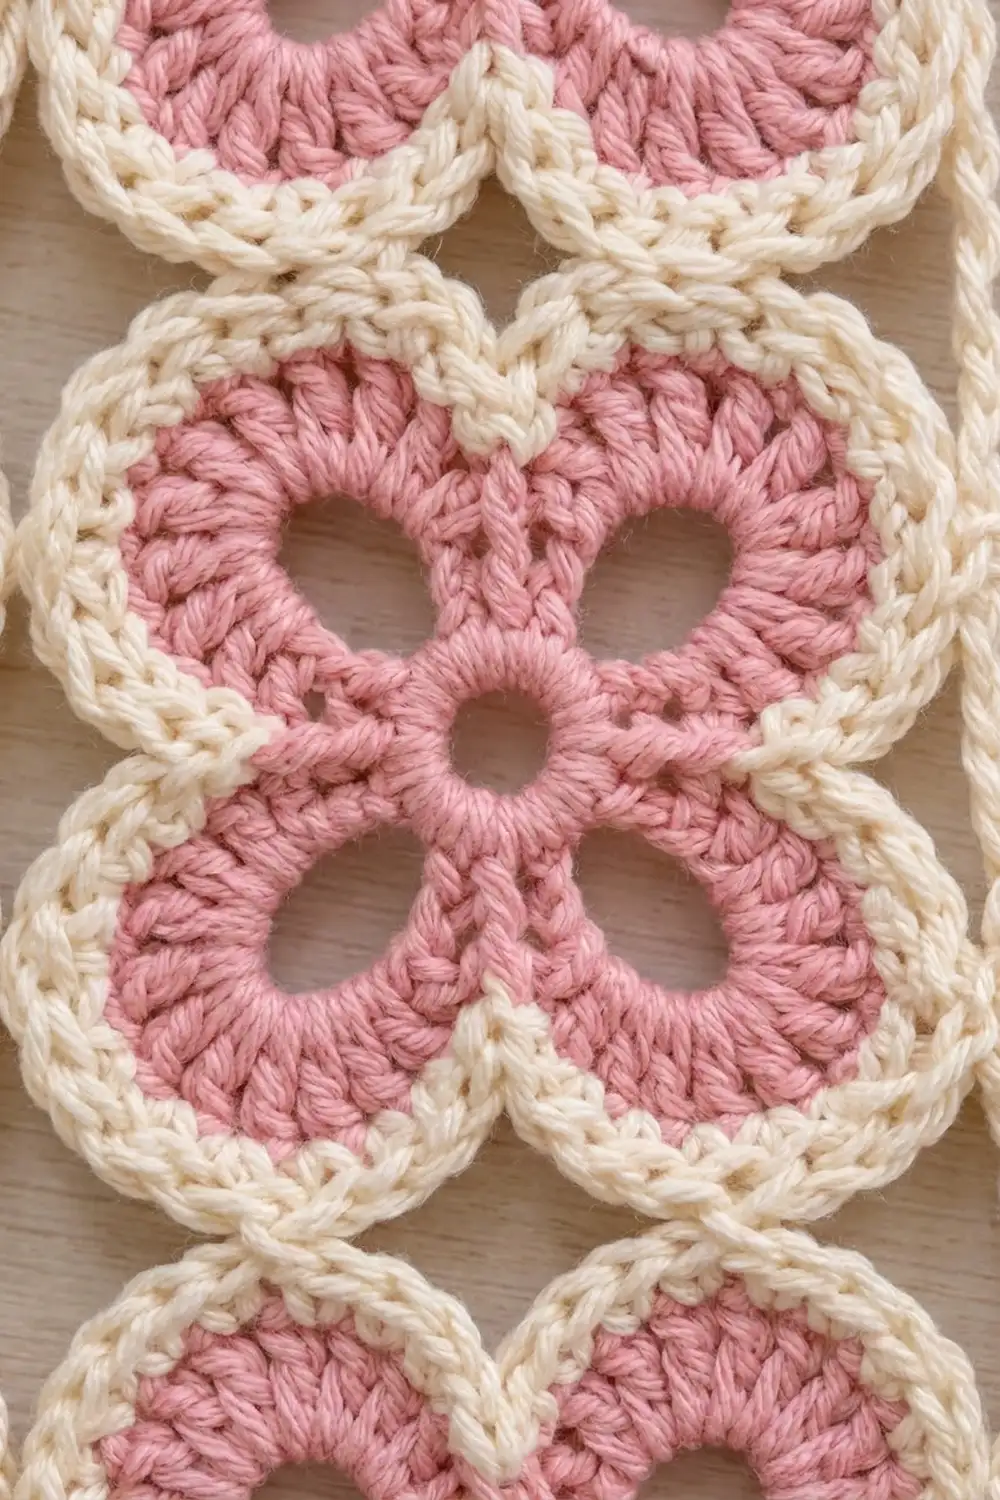
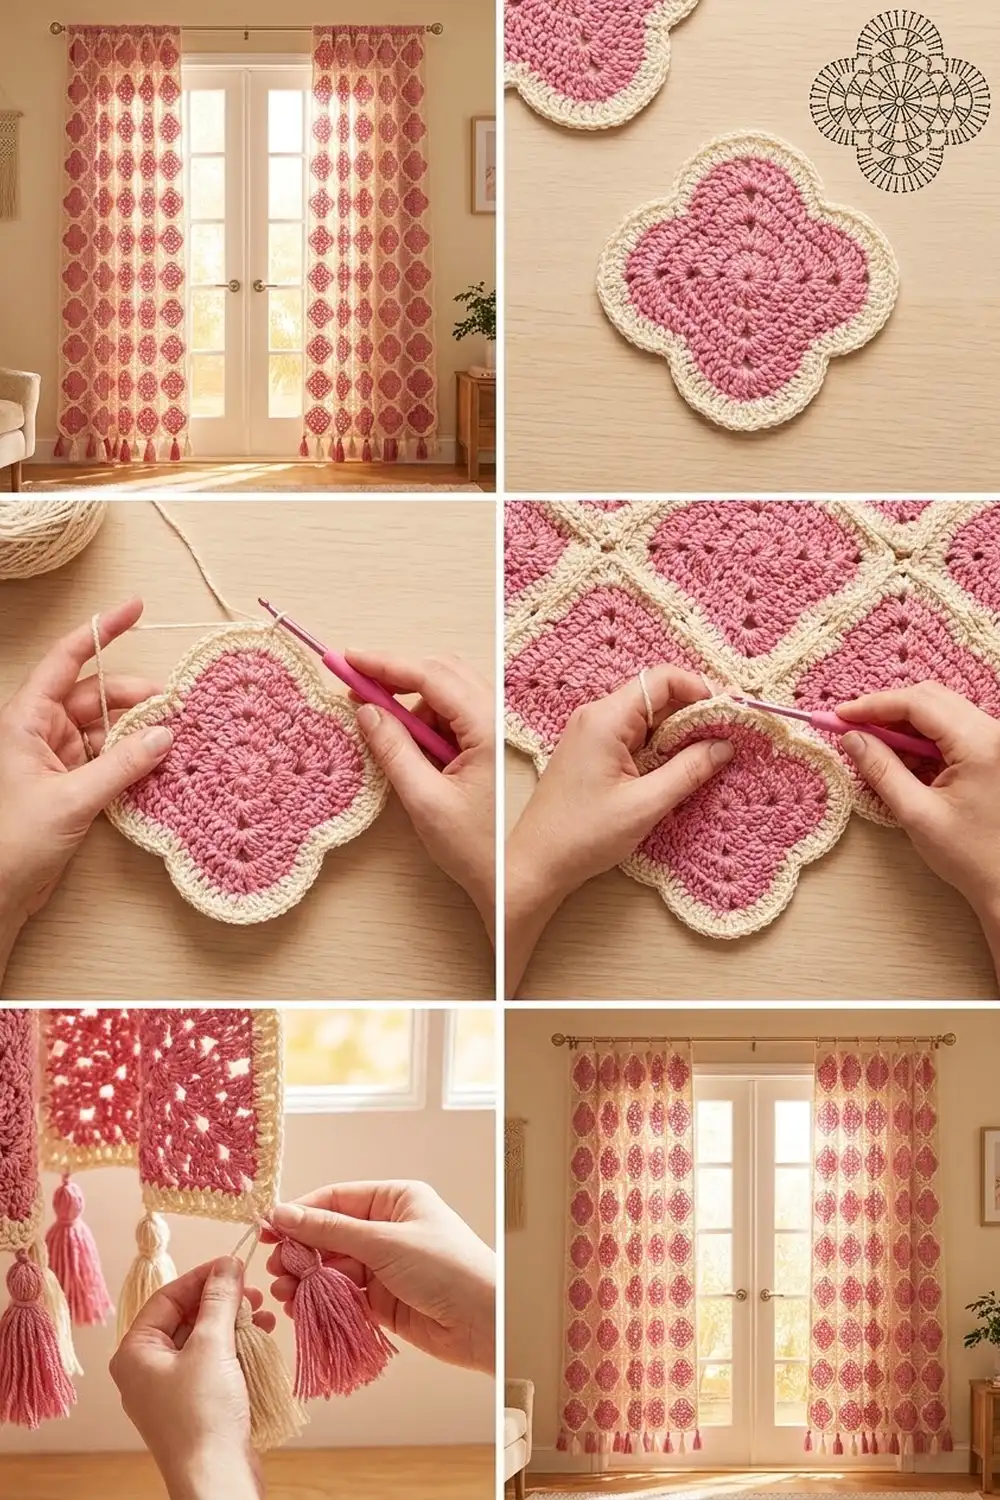
This curtain panel is built from soft pink four-lobed flower motifs. Each one is outlined in creamy white and joined into an airy lace grid. Every motif has a small round eye in the center and an oval window in each lobe, so light filters through in a pretty pattern of blush and cream.
The style is romantic cottage: two colors, one repeating motif, open notches between the lobes, and a straight cream border finished with chunky pink and cream tassels along the bottom. The pattern uses US crochet terms throughout.
One finished panel measures 26.5 x 61.5 inches (67.3 x 156.2 cm) before tassels, which add about 6 inches (15.2 cm). Make two panels for a matching pair, as shown hanging over French doors.
Construction is simple and repetitive. You make 60 motifs per panel and join them in a 5 x 12 grid with continuous cream seams. Then you work a three-round border that straightens the scalloped edges. Tassels go on last.
Finished Size and Construction
- Finished panel size: 26.5 x 61.5 in (67.3 x 156.2 cm), plus tassels
- Skill level: Intermediate
- Terminology: US crochet terms
- Yarn weight: Worsted (#4), cotton or cotton blend
- Hook: 5.0 mm (H-8)
- Number of pieces: 60 motifs per panel (120 for a pair)
- Layout: 5 motifs wide x 12 motifs tall
- Motif size: 5 x 5 in (12.7 x 12.7 cm), side to side
- Size before border: 25 x 60 in (63.5 x 152.4 cm)
- Border depth: 0.75 in (1.9 cm) on every side
Materials
Choose a smooth worsted cotton or cotton blend of about 170 m per 100 g. Cotton gives crisp stitch definition, hangs well, and holds the lobe shapes after blocking. Avoid fuzzy yarns, because they blur the open windows.
Per panel:
– Pink (Color A): 700 g, about 1,190 m (motif centers and 7 tassels)
– Cream (Color B): 750 g, about 1,275 m (motif outlines, seams, border, and 6 tassels)
For a pair: 1,400 g pink (2,380 m) and 1,500 g cream (2,550 m).
All quantities include a margin of about 10 percent for gauge differences, swatching, and tails.
Tools:
– 5.0 mm (H-8) crochet hook
– Tapestry needle and stitch markers
– Measuring tape and scissors
– Stiff card, 5 in (12.7 cm) long, for tassels
– Blocking mats, rust-proof pins, and a spray bottle or steamer
– Curtain clip rings for hanging
Abbreviations (US Terms)
- ch – chain
- sl st – slip stitch
- sc – single crochet
- hdc – half double crochet
- dc – double crochet
- tr – treble crochet
- sk – skip
- sp – space
- st(s) – stitch(es)
- RS / WS – right side / wrong side
- sc2tog / sc3tog – single crochet 2 / 3 together
Standing sc: With a slip knot on the hook, insert the hook in the stitch, yarn over, and pull up a loop. Yarn over again and pull through both loops. Counts as one sc.
Petal group: (2 sc, 3 hdc, 11 dc, 3 hdc, 2 sc) in the same ch-10 sp. That is 21 sts.
Gauge and Checkpoints
Make one complete motif first and block it lightly. Gauge is the motif size. Measure side to side across the widest points, with the lobes pointing to the corners.
Checkpoints:
– After Rnd 1: 1.25 in (3.2 cm) across
– After Rnd 3: 4.5 in (11.4 cm) side to side
– After Rnd 4: 5 in (12.7 cm) side to side
– Border gauge: 23 border sts = 5 in (12.7 cm)
If your motif is larger than 5.25 in (13.3 cm), go down to a 4.5 mm hook. If it is smaller than 4.75 in (12.1 cm), go up to a 5.5 mm hook. An error of 0.25 in (0.6 cm) per motif adds up to 1.25 in (3.2 cm) across the width and 3 in (7.6 cm) down the length, so fix gauge now.
Motif (Make 60 per Panel)
Each motif is one piece worked in the round, with the RS facing throughout. Rounds 1–3 are pink and Round 4 is the cream outline.
Rnd 1 (pink): Ch 6, sl st in first ch to form a ring. Ch 1, 12 sc in ring, sl st in first sc. (12 sc)
The chain ring keeps a round eye in the center, about 0.5 in (1.3 cm) wide.
Rnd 2: Ch 1, sc in each of next 2 sc, ch 10, sk next sc; rep from * 3 more times, sl st in first sc. (8 sc, 4 ch-10 sps)*
Each ch-10 arches over one skipped sc. That arch becomes the oval window inside each lobe.
Rnd 3: Ch 1, sc2tog over first 2 sc, petal group in next ch-10 sp, sc2tog over next 2 sc, petal group in next ch-10 sp; rep from * 2 more times, sl st in first sc2tog. Fasten off pink. (88 sts: 4 petal groups of 21 + 4 sc2tog)*
The petal groups fan around the arches to form four rounded lobes, and each sc2tog pulls in to make a notch.
Rnd 4 (cream): Join cream with a standing sc in the 2nd sc of any petal group. Sc in next 3 hdc.
Tip sequence over the 11 dc: 2 sc in next dc, sc in next dc, 2 sc in next dc, sc in next dc, 2 sc in next dc, 3 sc in center dc, 2 sc in next dc, sc in next dc, 2 sc in next dc, sc in next dc, 2 sc in next dc. (19 sc)
Sc in next 3 hdc and next sc. Valley: sc3tog over the last sc of this petal, the sc2tog, and the first sc of the next petal.
Sc in next sc, sc in next 3 hdc, tip sequence, sc in next 3 hdc and next sc, valley; rep from * 2 more times. Sl st in standing sc. Fasten off. (112 sc)*
Each lobe has 4 + 19 + 4 = 27 sc, plus 1 valley = 28. Four repeats = 112.
Motif sides: Lay the motif with the lobes pointing to the corners and the valleys at the middle of each side. The center sc of each 3-sc group is a tip. Each side runs from tip to tip and holds 29 sts:
– St 1: tip
– Sts 2–14: lobe flank
– St 15: valley
– Sts 16–28: lobe flank
– St 29: tip
These counts include both corner tips: 4 sides x 29 – 4 shared tips = 112.
Make All Pieces
Per panel, make 60 identical motifs, with pink for Rnds 1–3 and cream for Rnd 4. For a pair, make 120.
All motifs are the same, so the layout is a plain grid (P = one pink-and-cream motif):
ROW 1:  P P P P P
ROW 2:  P P P P P
ROW 3:  P P P P P
...
ROW 12: P P P P P
Block all motifs to 5 x 5 in (12.7 x 12.7 cm) before joining so the seams line up stitch for stitch.
Joining
Method: Join with continuous sc seams in cream, worked from the RS with the motifs held WS together. The seams join only the lobe flanks. Chains bridge the open notches and corner gaps, which creates the lacy cream lattice.
Stitch-to-stitch logic: On any shared side, number both motifs’ sts 1–29 in the same direction. Join matching numbers only:
– Sc through both layers in sts 4–9 (6 sc).
– Ch 6, sk sts 10–20 (the notch).
– Sc through both layers in sts 21–26 (6 sc).
Between one motif pair and the next along the same seam, ch 4 to bridge the corner gap. This skips sts 27–29 of one pair and sts 1–3 of the next.
Horizontal seams first: Join Row 1 to Row 2 across all 5 motif pairs in one continuous seam: 60 sc, 5 ch-6, and 4 ch-4. Repeat for all 11 horizontal seams.
Vertical seams next: Join the columns with 4 continuous seams running the full height. Each one crosses 12 motif pairs: 144 sc, 12 ch-6, and 11 ch-4. Where two ch-4 bridges cross, lay the new one over the top.
Tension: Each bridging chain should match the gap it crosses. If a chain sags, use one fewer ch. If the motifs pucker, add one ch. Don’t pull the sc seams tight; they should lie flat when the panel is spread out.
Size checkpoint: The joined panel should measure 25 x 60 in (63.5 x 152.4 cm), measured across the middle.
Border
Border gauge: 23 sts per motif side = 5 in (12.7 cm).
Rnd 1 (cream, straightening round): This conversion round turns each 29-st motif side into 23 border sts. It skips 6 sts and uses taller sts in the low spots.
Motif side sequence (sts 1–29): Tr in st 1, sk st 2, dc in st 3, sk st 4, hdc in st 5, sc in sts 6–10, hdc in st 11, sk st 12, dc in st 13, tr in sts 14–16, dc in st 17, sk st 18, hdc in st 19, sc in sts 20–24, hdc in st 25, sk st 26, dc in st 27, sk st 28, tr in st 29. (23 sts per motif side: 29 – 6 skipped)
Join cream in the top-right corner tip. Ch 4 (counts as tr), ch 2, then tr in the same tip (st 1 of the top side). Work the sequence across all 5 motifs. Where two motifs meet, the tr in st 29 of one and the tr in st 1 of the next sit side by side.
At each panel corner, work (tr, ch 2, tr) in the corner tip. The first tr is st 29 of the side you just finished, and the second is st 1 of the new side. On the last side, the beginning ch-4 is the final st 29. Sl st in top of ch-4.
- Top and bottom: 5 motifs x 23 = 115 sts each
- Left and right: 12 motifs x 23 = 276 sts each
- Plus 4 corner ch-2 sps
Rnd 2: Sl st in corner ch-2 sp, ch 1, (sc, ch 2, sc) in same sp. Sc in each st around, working (sc, ch 2, sc) in each corner sp. Sl st in first sc.
- Top and bottom: 115 worked 1-per-st + 2 corner sc = 117 sc each
- Left and right: 276 worked 1-per-st + 2 corner sc = 278 sc each
Rnd 3: Work as for Rnd 2, adding tassel loops on the bottom side only.
Bottom side: After the corner sc, sc in next 4 sc, *sc in next sc, ch 8, sc in next 8 sc; rep from * 11 more times, sc in next sc, ch 8, sc in next 4 sc, then work the corner. The ch-8 loops don’t count as sts.
Check: 4 + 13 + (12 x 8) + 4 = 117. The 13 loops sit on Rnd 2 sts 5, 14, 23, and so on up to 113. Sts 5 and 113 are mirror positions, so the tassels are centered.
- Top and bottom: 117 worked 1-per-st + 2 corner sc = 119 sc each (the bottom also has 13 ch-8 loops)
- Left and right: 278 worked 1-per-st + 2 corner sc = 280 sc each
Fasten off and weave in ends.
Why the math works: Every motif side has exactly 29 sts including both tips, so the straightening sequence always gives 23 sts per motif. Panel corner tips are shared, and the (tr, ch 2, tr) split gives one tr to each side, so nothing is counted twice. Each sc round then adds exactly 2 sts per side, one from each corner. At 23 sts per 5 in (12.7 cm), 115 sts match the 25 in (63.5 cm) width and 276 sts match the 60 in (152.4 cm) length. The border lies flat without ruffling or cupping.
Tassels (13 per panel: 7 pink, 6 cream):
1. Wrap yarn 30 times around the 5 in (12.7 cm) card.
2. Slide a 12 in (30.5 cm) tie strand under the top, knot it tightly, and cut the bottom loops.
3. Wrap a second strand around the bundle 0.75 in (1.9 cm) below the top to form the head. Knot it and bury the ends inside.
4. Trim evenly.
Tie one tassel to each ch-8 loop. Alternate pink and cream, starting and ending with pink.
Final Blocking
- Weave in all remaining ends along the seams or border sts.
- Lay the panel flat on blocking mats, RS up.
- Pin the four corners to 26.5 x 61.5 in (67.3 x 156.2 cm).
- Pin the straight edges every 2 in (5.1 cm), keeping the border straight.
- Pin out each lobe, and open each oval window and center eye with a fingertip.
- Mist evenly until damp, or hold a steamer just above the surface without pressing.
- Leave pinned until completely dry, at least 24 hours.
- Unpin, comb out the tassels with your fingers, and trim any uneven ends.
Final Quality-Control Checklist
- 60 motifs per panel, each 5 in (12.7 cm) side to side
- Motif counts: 12 / 8 sc + 4 ch-10 / 88 / 112
- Center eye and four oval windows open on every motif
- Seams join sts 4–9 and 21–26 only, with ch-6 and ch-4 bridges
- Joined panel 25 x 60 in (63.5 x 152.4 cm)
- Border Rnd 1: 115 / 276 / 115 / 276 sts
- Border Rnd 3: 119 / 280 / 119 / 280 sc, plus 13 tassel loops
- Tassels alternate pink and cream, with pink at both ends
- Blocked panel 26.5 x 61.5 in (67.3 x 156.2 cm)
Troubleshooting
Lobes cup or curl: Rnd 3 is too tight. Loosen the dc or go up half a hook size.
Oval windows look closed: The ch-10 is too tight. Chain loosely, or use ch 11 and keep the petal group the same.
Rnd 4 ruffles: Your sc are loose. Use a 4.5 mm hook for the cream round only.
Seams don’t line up: Recount the 29 sts per side and confirm that each tip is the center sc of a 3-sc group.
Bridging chains sag: Remove one ch from each bridge.
Border waves: Check that you skipped all 6 sts per motif side in Rnd 1.
Panel slants after hanging: Re-block and pin the corners square against a long ruler.
Care
Hand wash in cool water or machine wash on a gentle cycle in a mesh bag, then lay flat to dry and reshape the lobes. Never hang the panel while wet, because its weight will stretch the length.
Final Notes
The measurement chain is short and reliable. Rnd 1 measures 1.25 in (3.2 cm), Rnd 3 measures 4.5 in (11.4 cm), and the finished motif is 5 in (12.7 cm). Sixty motifs joined 5 x 12 give 25 x 60 in (63.5 x 152.4 cm). A 0.75 in (1.9 cm) border brings the panel to 26.5 x 61.5 in (67.3 x 156.2 cm), and the tassels add about 6 in (15.2 cm) more.
Check the first motif, trust the 29-stitch sides, and the rest falls into place. Make two panels for a soft, light-filled pair.
Happy crocheting!