

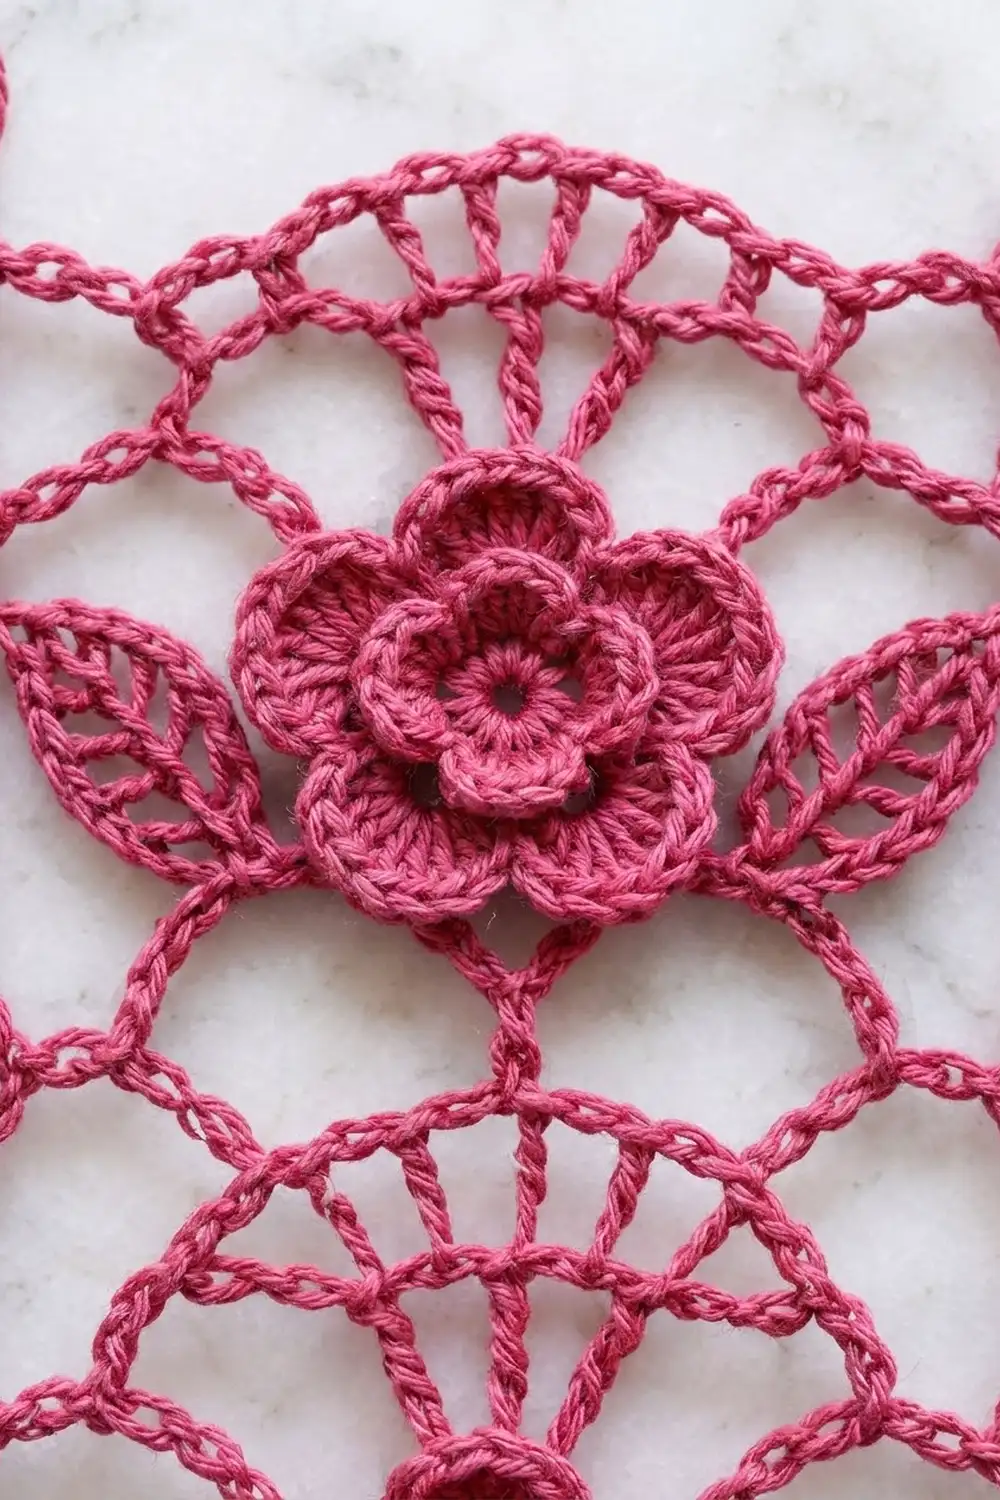
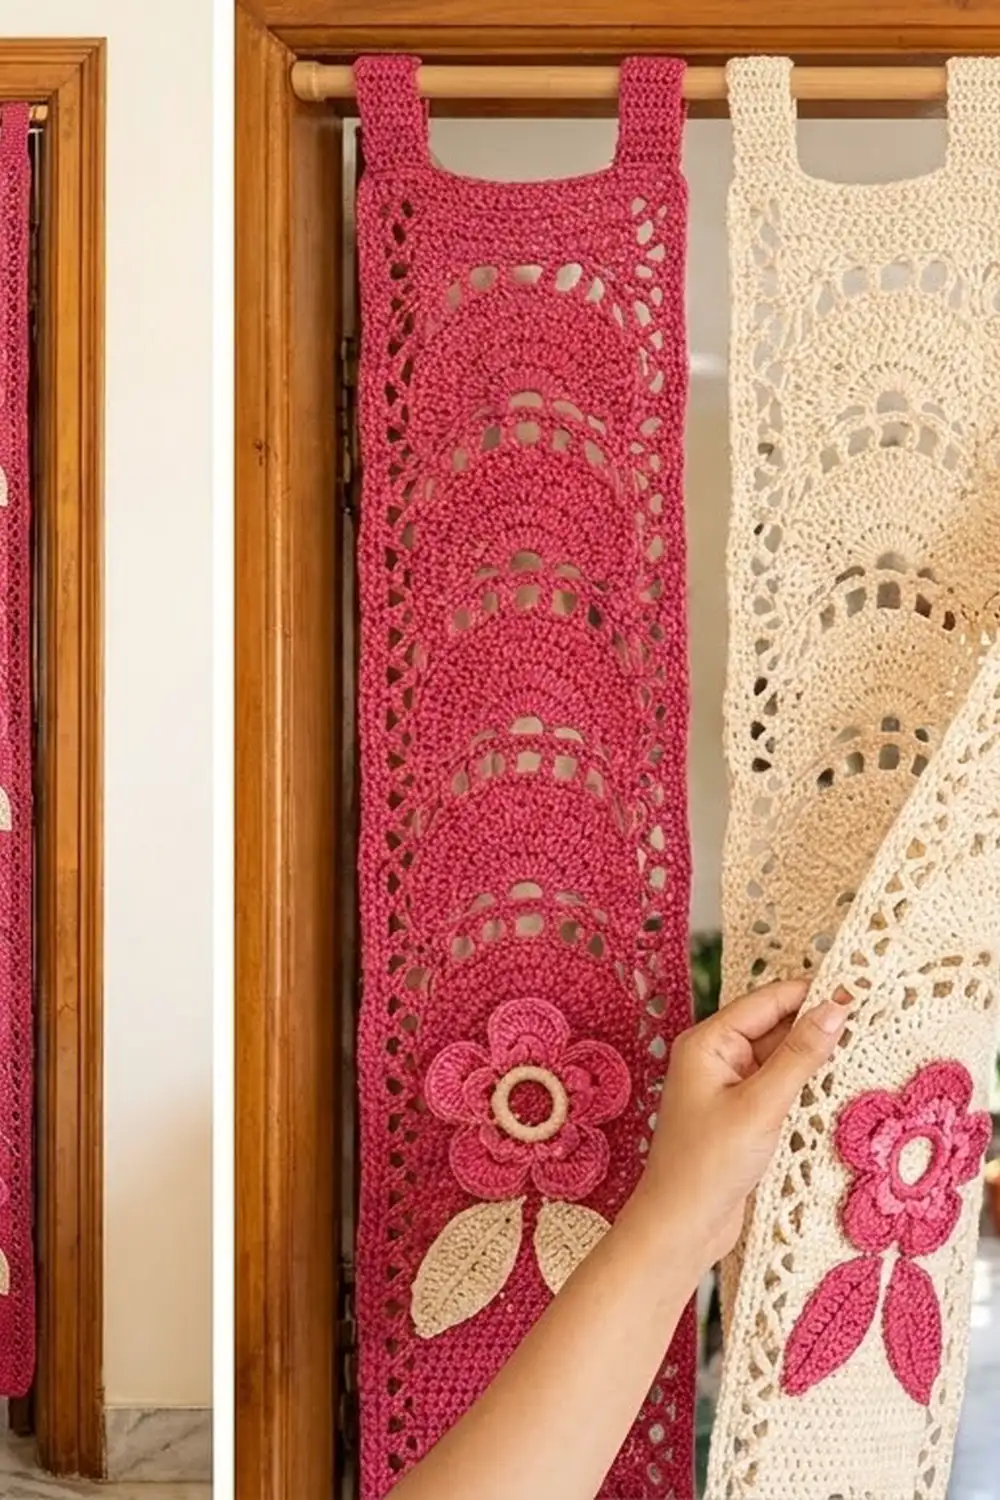
This airy door curtain is made of seven long lace strips that hang side by side from a rod. Each strip has a column of open fans, and a small two-layer rose with two pointed leaves sits at the base of every fan. Light passes between the strips, and they part easily when you walk through.
The sample alternates four raspberry strips with three cream strips. The finished look is romantic and a little vintage, with a clean structure that suits most rooms. You could also make every strip in one color, or use any two colors you like.
This pattern uses US crochet terms. Each finished strip measures 3.9 in (9.9 cm) wide and 72.6 in (184.4 cm) long, not counting the tab loop. Hung 1.75 in (4.4 cm) apart, the seven strips span 37.8 in (96.0 cm).
Construction is simple. You work each strip flat from the bottom up in a 6-row repeat, then add a two-round border. The roses, leaves and tabs are made separately and sewn on. The strips are never joined to each other.
Finished Size and Construction
- Finished strip size: 3.9 x 72.6 in (9.9 x 184.4 cm)
- Skill level: Intermediate
- Terminology: US
- Yarn weight: Sport (#2) mercerized cotton
- Hook: 3.5 mm (E-4)
- Number of pieces: 7 strips, plus 126 roses, 252 leaves and 7 tabs
- Layout: 7 strips in one row: raspberry, cream, raspberry, cream, raspberry, cream, raspberry
- One repeat: 3.5 in (8.9 cm) wide x 4 in (10.2 cm) tall
- Size before border: 3.5 x 72.2 in (8.9 x 183.4 cm)
- Border depth: 0.2 in (0.5 cm) on each edge
Materials
Use a smooth, mercerized sport-weight cotton. It gives crisp stitch definition, holds the fan shape and doesn’t stretch much as it hangs. Avoid acrylic, which droops, and fuzzy yarns, which blur the lace.
- Raspberry: 400 g, about 1,240 m (1,356 yd). This covers 4 strips, 72 roses, 144 leaves and 4 tabs.
- Cream: 300 g, about 930 m (1,017 yd). This covers 3 strips, 54 roses, 108 leaves and 3 tabs.
These amounts include a margin of about 15 percent for swatching and weaving in ends.
Tools:
– 3.5 mm (E-4) crochet hook
– Tapestry needle
– Locking stitch markers
– Rust-proof pins
– Blocking mats or a long towel
– Tape measure
– Scissors
– Curtain rod no more than 1.25 in (3.2 cm) in diameter
Abbreviations (US Terms)
- ch – chain
- sl st – slip stitch
- sc – single crochet
- hdc – half double crochet
- dc – double crochet
- tr – treble crochet
- sp – space
- tch – turning chain
- FL / BL – front loop / back loop
- RS / WS – right side / wrong side
Special stitch: Fan. Work (dc, [ch 2, dc] 3 times) all in the same space. This makes 4 dc and 3 ch-2 spaces.
Turning chain: At the start of Rows 1–5, ch 7. This counts as 1 tr plus a ch-3 space.
Gauge and Checkpoints
Make one test repeat before you start a full strip.
Gauge: 21 sc = 3.5 in (8.9 cm). One 6-row repeat = 4 in (10.2 cm) tall.
Test swatch: Ch 22. Work Row 0 and Rows 1–6 once. It should measure 3.5 in (8.9 cm) wide and 4.2 in (10.7 cm) tall.
Checkpoints for each strip:
– After 6 repeats: 24.2 in (61.5 cm)
– After 12 repeats: 48.2 in (122.4 cm)
– After 18 repeats: 72.2 in (183.4 cm)
If your swatch is too big, go down a hook size. If it is too small, go up a hook size. If only the height is off, look at your tr stitches. Pull them up evenly and don’t stretch the turning chains. To change the curtain length, add or remove repeats: each one changes the length by 4 in (10.2 cm).
Strip (Make 7: 4 Raspberry, 3 Cream)
Foundation: Ch 22.
Row 0: Sc in the 2nd ch from the hook and in each ch across. Turn. (21 sc)
Number the stitches 1–21 across. They are your reference points for Row 1.
The 6-Row Repeat
Row 1 (side lattice): Ch 7. Skip sts 2–4 and sc in st 5. Ch 5, skip 5 sts, and sc in st 11. Ch 5, skip 5 sts, and sc in st 17. Ch 3, skip 3 sts, and tr in st 21. Turn.
(2 tr, 3 sc, 2 ch-3 sps, 2 ch-5 loops)
Row 2 (rose window): Ch 7. Sc in the first ch-5 loop. Ch 7, then sc in the next ch-5 loop. Ch 3, then tr in the 4th ch of the tch. Turn.
(2 tr, 2 sc, 2 ch-3 sps, 1 ch-7 loop)
The center ch-7 loop forms the open window where the rose will sit.
Row 3 (fan base): Ch 7. Sc in the next sc, then ch 3. Work a Fan into the ch-7 loop. Ch 3, sc in the next sc, ch 3, and tr in the 4th ch of the tch. Turn.
(2 tr, 2 sc, 4 dc, 4 ch-3 sps, 3 ch-2 sps)
All 4 spokes of the Fan come out of one point. This is what gives the fan its radiating look.
Row 4 (fan widens): Ch 7. Sc in the next ch-3 sp. Ch 3, skip the next sc and ch-3 sp, and dc in the first dc of the fan. Then work (ch 2, dc in the next ch-2 sp, ch 2, dc in the next dc) 3 times. Ch 3, skip the next ch-3 sp and sc, and sc in the last ch-3 sp. Ch 3, then tr in the 4th ch of the tch. Turn.
(2 tr, 2 sc, 7 dc, 6 ch-2 sps, 4 ch-3 sps)
Row 5 (fan arches): Ch 7. Sc in the next ch-3 sp. Ch 3, skip the next sc and ch-3 sp, and sc in the first dc. Then work (ch 3, sc in the next dc) 6 times. Ch 3, skip the next ch-3 sp and sc, and sc in the last ch-3 sp. Ch 3, then tr in the 4th ch of the tch. Turn.
(11 stitches: 2 tr and 9 sc. 10 ch-3 sps, 6 of which are the fan arches.)
Row 6 (divider band): Ch 1. Sc in each stitch and in each ch-3 sp across, ending with a sc in the 4th ch of the tch. Turn.
(11 sc worked into stitches + 10 sc worked into spaces = 21 sc)
Row 6 brings the strip back to exactly 21 sc. Each repeat starts from the same base, so the edges stay straight over the full length.
Repeat Rows 1–6 a total of 18 times. Do not fasten off; go straight to the border.
Strip totals: Row 0 plus 108 rows. It should measure 3.5 x 72.2 in (8.9 x 183.4 cm).
Rose (Make 18 Per Strip)
Make the roses in the same color as their strip.
Rnd 1: Make a magic ring. Ch 1, then work 10 sc into the ring. Pull the ring snug but leave a small open center, and sl st to the first sc. (10 sc)
Rnd 2 (inner petals, in front loops only): Work (sl st in the next st, then [hdc, dc, hdc] in the next st) 5 times. Sl st to the first sl st. (5 small petals)
Rnd 3 (petal base, in the back loops of Rnd 1): Work (sc in the BL of the next st, ch 3, skip the next st) 5 times. Sl st to the first sc. (5 ch-3 loops)
Rnd 4 (outer petals): In each ch-3 loop, work (sc, hdc, 3 dc, hdc, sc). Sl st to the first sc. (5 petals, 35 sts)
Fasten off and leave a 10 in (25.4 cm) tail. The rose measures 1.75 in (4.4 cm) across, with the small petals sitting on top of the larger ones.
Leaf (Make 36 Per Strip)
Ch 9.
Side 1: Sc in the 2nd ch from the hook, hdc in the next ch, dc in the next 3 ch, hdc in the next ch, and sc in the next ch. (7 sts)
Tip: Work (sc, ch 2, sc) in the last ch.
Side 2: Working along the other side of the foundation ch, sc in the next ch, hdc in the next ch, dc in the next 3 ch, hdc in the next ch, and sc in the next ch. Sl st to the first sc. (16 sts and a ch-2 tip)
The foundation chain stays visible as the center spine. Fasten off and leave an 8 in (20.3 cm) tail. The leaf is 1.6 in (4.1 cm) long.
Tab (Make 1 Per Strip)
Ch 10.
Row 1: Sc in the 2nd ch from the hook and in each ch across. Turn. (9 sc)
Rows 2–30: Ch 1, then sc in each sc. Turn. (9 sc)
The tab measures 1.5 x 6 in (3.8 x 15.2 cm). Leave a 12 in (30.5 cm) tail.
Make All Pieces
| Color | Strips | Roses | Leaves | Tabs |
|---|---|---|---|---|
| Raspberry | 4 | 72 | 144 | 4 |
| Cream | 3 | 54 | 108 | 3 |
| Total | 7 | 126 | 252 | 7 |
Layout along the rod (R = raspberry, C = cream):
=========== ROD ===========
 R    C    R    C    R    C    R
 |    |    |    |    |    |    |
 1    2    3    4    5    6    7
The strips sit 1.75 in (4.4 cm) apart.
Total span: (7 x 3.9 in) + (6 x 1.75 in) = 27.3 in + 10.5 in = 37.8 in (96.0 cm).
Joining: Appliqués, Tabs and Hanging
The strips are not joined to each other. In this pattern, “joining” means sewing the roses, leaves and tabs onto each strip.
Roses: Center one rose over each ch-7 window (Row 2). Its top edge should overlap the base of the Fan (Row 3). With the tail, whipstitch the back loops of Rnd 3 to the ch-7 loop and to the Row 3 sc on both sides. Only these points connect, so the rose stays raised.
Leaves: Tuck the stem end of each leaf 0.25 in (0.6 cm) under the rose. Angle the tip up and out toward the side lattice. Stitch the stem end down, then tack the tip to the nearest ch-3 sp of Row 3. Use two leaves per repeat, one on each side.
Tension: Sew with small, loose stitches that sit on the WS. Stitches that are too tight will pucker the lace. Lay the strip flat after every few repeats to check.
Tabs: Wait until the strip is bordered and blocked. Then center one short end of the tab on the WS of the strip’s top edge, with 0.6 in (1.5 cm) overlapping the strip. Sew the tab down across all 9 sts. Fold the tab over the rod and sew the other end down the same way. This leaves a 4.8 in (12.2 cm) loop that rises 2.4 in (6.1 cm) above the strip.
Size checkpoint: A finished strip with all its pieces attached should still lie flat at 3.9 in (9.9 cm) wide.
Border
Border gauge: Along the top and bottom, 21 sc = 3.5 in (8.9 cm), the same as the body. Along the long sides, 21 sc cover each 4 in (10.2 cm) repeat.
Corner rule: Each corner gets 3 sc in one stitch. The middle sc of those 3 is the corner stitch. Every per-side count below includes both of that side’s corner stitches.
Round 1: Ch 1 and turn.
- Top edge: Work 3 sc in st 1, sc in sts 2–20, and 3 sc in st 21.
- First long side: Working down the row ends, put 4 sc around each tr or tch edge (Rows 1–5 of each repeat) and 1 sc in the end of each Row 6. Skip the last Row 6 (it is the top corner row) and Row 0 (it is the bottom corner row). That makes (90 tr rows x 4) + (17 sc rows x 1) = 377 sc.
- Bottom edge: Working into the remaining loops of the foundation chain, work 3 sc in the first ch, sc in the next 19 ch, and 3 sc in the last ch.
- Second long side: Work 377 sc as on the first long side.
- Sl st to the first sc.
Round 1 count, per side including corners:
– Top and bottom: 1 + 1 + 19 + 1 + 1 = 23 sts
– Long sides: 1 + 1 + 377 + 1 + 1 = 381 sts
– Round total: (2 x 23) + (2 x 381) − 4 shared corners = 804 sc
Round 2: Sl st loosely in the BL of each sc around, working 1 sl st in each corner sc. Join and fasten off. (804 sl sts)
Why the math works: The top and bottom get 1 sc per body stitch, so the 21 body stitches plus the corner increases stay flat. On the long sides, each repeat gets 21 sc: 5 tr rows x 4 sc, plus 1 sc for Row 6. That is 21 sc per 4 in, about 5.25 sc per inch. This matches the height of the lace, so the edges don’t ruffle or pull in.
The border adds 0.2 in (0.5 cm) on every edge. Finished size: 3.9 x 72.6 in (9.9 x 184.4 cm).
Final Blocking
- Block each strip before sewing on its tab.
- Soak the strip in cool water for 10 minutes, then press the water out gently. Do not wring it.
- Roll it in a towel to remove excess water.
- Lay it out to 3.9 x 72.6 in (9.9 x 184.4 cm).
- Pin each repeat: the side columns straight, the fan opened into a half-circle, and the Row 6 band level.
- Puff out the rose petals and smooth the leaves into points with your fingers.
- Let it dry completely, then attach the tab.
Final Quality-Control Checklist
- Each strip has 18 repeats and 18 roses.
- Every repeat has 2 leaves, angled the same way as the others.
- Row 6 has 21 sc in every repeat.
- Every fan has 7 spokes and 6 arches.
- Border Round 1 has 23 sts on the top and bottom and 381 on each long side.
- Each strip measures 3.9 in (9.9 cm) wide.
- All strips are the same length to within 0.5 in (1.3 cm).
- Tabs are centered and securely sewn.
- All ends are woven in on the WS.
Troubleshooting
- Strip narrows over time: Count Row 6. It must have 21 sc, with one sc in each ch-3 sp.
- Fan looks lopsided: Work all 4 Fan dc into the center of the ch-7 loop, not off to one side.
- Edges ruffle: Use 3 sc per tr row in Border Round 1 instead of 4, and change the side counts to match. If you change the long-side count, every side count in the border changes with it.
- Edges cup: Loosen Round 2, or go up a hook size for the slip stitches.
- Rose petals droop: Tighten the magic ring so Rnd 3 sits firmly behind Rnd 2.
- Strips hang at different lengths: Block them together on the same surface and match the repeat count.
Care
Hand wash in cool water with a mild detergent. Reshape the strips and dry them flat. A cool iron through a cloth will refresh the fans.
Final Notes
The measurement chain works like this:
- 21 sc = 3.5 in (8.9 cm).
- Each 6-row repeat adds 4 in (10.2 cm).
- 18 repeats plus Row 0 = 72.2 in (183.4 cm).
- The 0.2 in (0.5 cm) border brings each strip to 3.9 x 72.6 in (9.9 x 184.4 cm).
- Seven strips hung 1.75 in (4.4 cm) apart span 37.8 in (96.0 cm).
If your gauge is right at each checkpoint, the finished curtain will be the right size. Happy crocheting!