

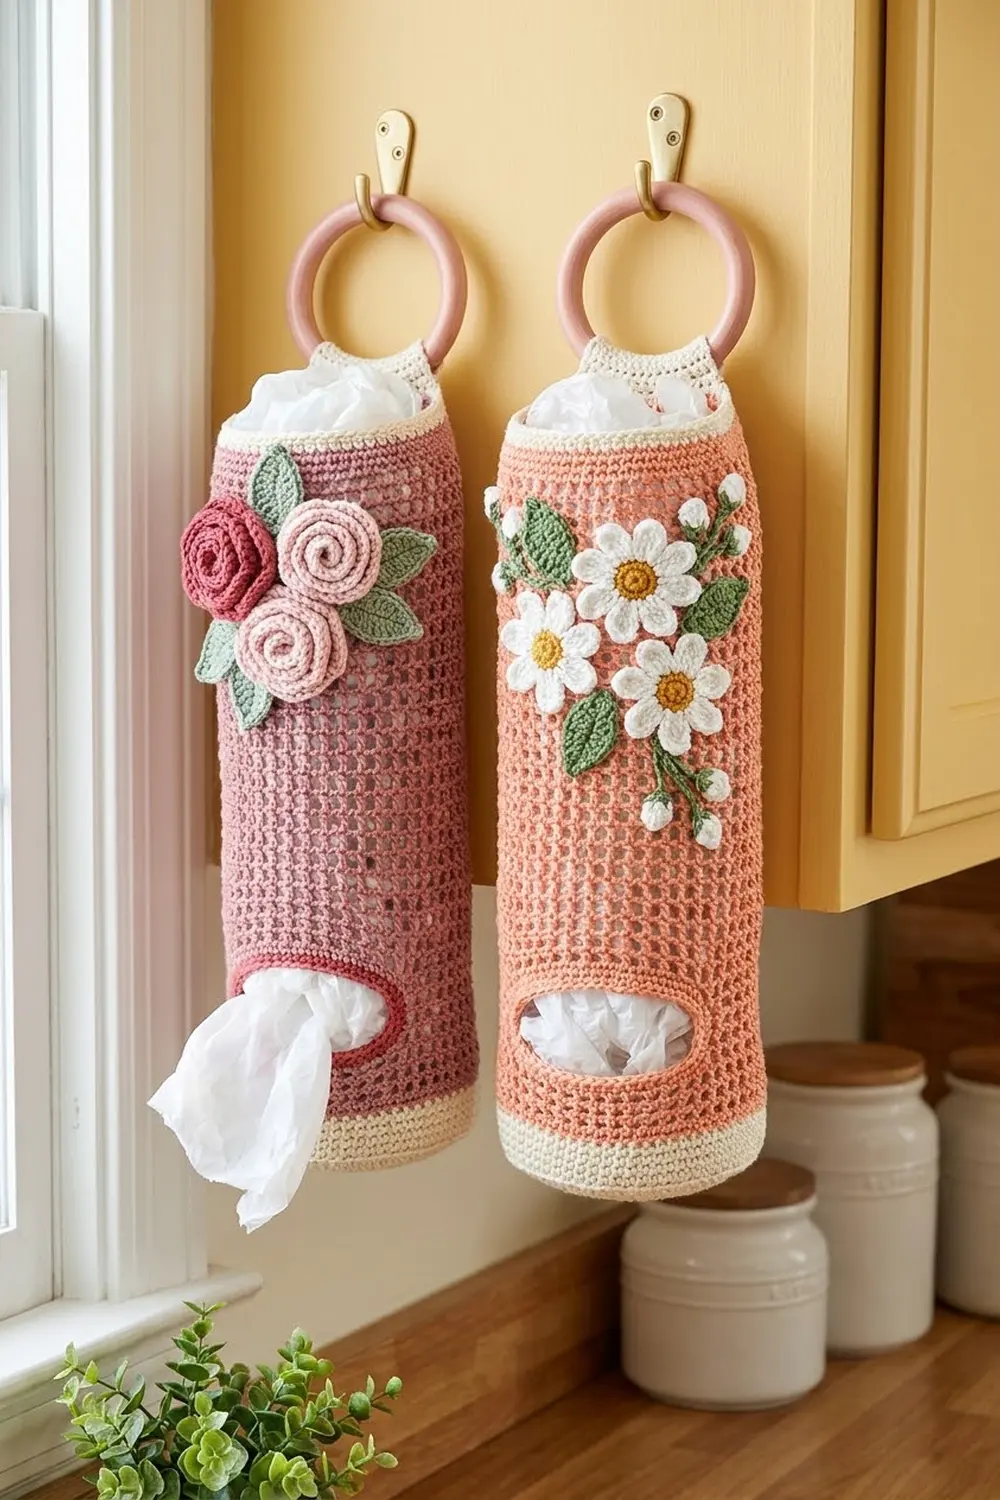
This hanging bag holder turns a messy pile of grocery bags into something you’ll be happy to leave on display. A cream base and rim frame an open grid of square mesh. Near the top, a cluster of rolled roses with sage leaves climbs the side like a small trellis.
The main colorway is dusty rose with cream, pale pink, deep rose, and sage green. A daisy variation in salmon-peach uses the same body, so you can make a matching pair. The pattern uses US crochet terms.
The finished tube measures 4.75 in (12.1 cm) across and 14.5 in (36.8 cm) tall, or about 19 in (48.3 cm) to the top of the ring. You stuff bags in through the open top and pull them out one at a time through the oval opening.
Here’s how it’s built:
– A flat single-crochet circle forms the base.
– The walls rise in rounds.
– The mesh body is worked in rounds, with three flat rows that leave the opening.
– A cream band finishes the rim.
– A tapered tab folds over a wooden ring, and you sew the appliqués on last.
Finished Size and Construction
- Finished size: 4.75 in (12.1 cm) diameter, 15 in (38.1 cm) circumference, 14.5 in (36.8 cm) tall
- Skill level: Easy-intermediate
- Terminology: US
- Yarn weight: Worsted (Category 4) cotton
- Hook: 5.0 mm (H-8)
- Number of pieces: 1 tube body, plus sewn-on appliqués (3 roses and 3 leaves)
- Layout: A single vertical tube, with the opening centered at the front and the tab at the back
- Body height before the rim: 12.75 in (32.4 cm)
- Rim band depth: 1.75 in (4.4 cm)
Materials
Use a smooth cotton or cotton blend. Cotton keeps the mesh square and holds its shape under the weight of the bags. Acrylic also works, but it stretches more lengthwise.
- Color A, dusty rose (body and tab): 70 g / 119 m
- Color B, cream (base and rim): 45 g / 77 m
- Color C, pale pink (2 small roses): 10 g / 17 m
- Color D, deep rose (1 large rose): 6 g / 10 m
- Color E, sage green (leaves): 5 g / 9 m
Daisy variation: Replace Color A with salmon-peach (70 g / 119 m). For the appliqués, use white (12 g / 20 m), golden yellow (3 g / 5 m), and sage green (6 g / 10 m).
Tools:
– 5.0 mm (H-8) hook
– One 2.75 in (7.0 cm) wooden ring
– Tapestry needle
– 4 stitch markers
– Scissors and a measuring tape
– Pins
All quantities include a margin of about 15 percent for swatching and weaving in ends.
Abbreviations (US Terms)
- ch – chain
- sl st – slip stitch
- sc – single crochet
- hdc – half double crochet
- dc – double crochet
- sc2tog – single crochet 2 together
- BLO – back loop only
- MR – magic ring
- sp – space
- st(s) – stitch(es)
- RS / WS – right side / wrong side
Mesh unit: 1 dc plus 1 ch-1 sp, which is 2 sts. Every mesh round has 30 mesh units, or 60 sts.
Gauge and Checkpoints
- Sc gauge: 16 sts and 18 rounds = 4 in (10.2 cm)
- Mesh gauge: 2 mesh units (4 sts) = 1 in (2.5 cm). 8 mesh rounds = 4 in (10.2 cm), so each mesh round is 0.5 in (1.3 cm) tall.
Make the base first and use it as your gauge swatch.
Checkpoints:
– After base Round 5: 2.25 in (5.7 cm) diameter
– After base Round 10: 4.75 in (12.1 cm) diameter
– After the cream wall: 2.25 in (5.7 cm) tall
– After Mesh Round 5: 4.75 in (12.1 cm) tall
– After Mesh Round 21: 12.75 in (32.4 cm) tall
– After the rim: 14.5 in (36.8 cm) tall
If your base is too big, go down one hook size to 4.5 mm. If it’s too small, go up one size to 5.5 mm. If only the mesh height is off, change hooks for the mesh rounds only. You can also add or remove plain mesh rounds between Rounds 5 and 21. Each one changes the height by 0.5 in (1.3 cm).

Base (Color B)
Work in joined rounds. At the end of each round, sl st to the first sc and ch 1. The ch 1 does not count as a stitch.
- Rnd 1: MR, 6 sc in ring. (6 sts)
- Rnd 2: 2 sc in each st. (12 sts)
- Rnd 3: Sc in next st, 2 sc in next st; repeat 6 times. (18 sts)
- Rnd 4: Sc in next 2 sts, 2 sc in next st; repeat 6 times. (24 sts)
- Rnd 5: Sc in next 3 sts, 2 sc in next st; repeat 6 times. (30 sts)
- Rnd 6: Sc in next 4 sts, 2 sc in next st; repeat 6 times. (36 sts)
- Rnd 7: Sc in next 5 sts, 2 sc in next st; repeat 6 times. (42 sts)
- Rnd 8: Sc in next 6 sts, 2 sc in next st; repeat 6 times. (48 sts)
- Rnd 9: Sc in next 7 sts, 2 sc in next st; repeat 6 times. (54 sts)
- Rnd 10: Sc in next 8 sts, 2 sc in next st; repeat 6 times. (60 sts)
The base should lie flat and measure 4.75 in (12.1 cm) across.
Cream Wall (Color B)
- Rnd 11: Sc in BLO of each st. (60 sts) This makes a crisp fold line where the base turns up.
- Rnds 12–20: Sc in each st. (60 sts)
The wall is 10 rounds and 2.25 in (5.7 cm) tall. Fasten off B.
Mesh Body with Opening (Color A)
Join A in any st. This join becomes the left side of the opening, so it marks the front of the holder.
Mesh Rnd 1: Ch 4 (counts as dc + ch 1), skip next st. Dc in next st, ch 1, skip next st; repeat 29 times. Sl st to the 3rd ch of the beginning ch-4. (30 dc + 30 ch = 60 sts; 30 mesh units)
Number the dc posts from 1 to 30. The beginning ch-4 is post 1. Place a marker in post 25.
Opening Rows 2–4 (worked flat over posts 1–25):
- Row 2 (RS): Ch 4 (counts as dc + ch 1), dc in next dc (post 2). Ch 1, dc in next dc; repeat through post 25. Turn. (25 dc + 24 ch = 49 sts)
- Row 3 (WS): Ch 4, dc in next dc. Ch 1, dc in next dc; repeat across, ending with dc in the 3rd ch of the turning ch. Turn. (49 sts)
- Row 4 (RS): Repeat Row 3, but don’t turn at the end. (49 sts)
Spaces 25–30 are left unworked, which leaves a gap 3 rows tall.
Bridge: Ch 11, then sl st to the 3rd ch of the beginning ch-4 of Row 4 (post 1).
Mesh Rnd 5: Ch 4. Dc in next dc, ch 1; repeat until you’ve worked into post 25. Then work over the bridge chain: ch 1, skip 1 ch, dc in next ch; repeat 5 times. Ch 1, skip the last ch, and sl st to the 3rd ch of the ch-4. (24 units over the posts + 6 units over the chain = 30 mesh units; 60 sts)
The 11 bridge chains replace the 5 dc and 6 ch-1 that used to sit between post 25 and post 1. That’s why the count goes back to exactly 60.
Mesh Rnds 6–21: Ch 4. Dc in next dc, ch 1; repeat around. Sl st to the 3rd ch of the ch-4. (60 sts; 30 mesh units)
Always work each dc into the dc below and each ch-1 over the ch-1 below. That keeps the squares stacked in straight columns. Fasten off A.
The opening measures 2.75 in (7.0 cm) wide and 1.5 in (3.8 cm) tall.
Appliqués
Large Rose (make 1 in Color D):
– Ch 26.
– Row 1: Sc in 2nd ch from hook and in each ch across. Turn. (25 sts)
– Row 2: Sl st in first st. Skip 1 st, 5 dc in next st, skip 1 st, sl st in next st; repeat 6 times. (6 petals; 1 + 24 = 25 sts used)
– Fasten off, leaving a 10 in (25.4 cm) tail. Starting with the first petal, roll the strip up while keeping the base level. Stitch through all the layers to secure it. The finished rose is 1.75 in (4.4 cm) across.
Small Rose (make 2 in Color C):
– Ch 18. Row 1: 17 sc. Row 2: Sl st in first st, then work the petal repeat 4 times. (4 petals; 1 + 16 = 17 sts used)
– Roll and stitch as for the large rose. The finished rose is 1.25 in (3.2 cm) across.
Leaf (make 3 in Color E):
– Ch 7. Working along the chain: sc in 2nd ch from hook, then hdc, dc, dc, hdc, and sc in the last ch. (6 sts)
– Ch 2 for the tip.
– Working along the other side of the chain: sc, hdc, dc, dc, hdc, sc. Sl st to the first sc and fasten off. The leaf is 1.5 in (3.8 cm) long.
Daisy Variation (salmon holder):
– Daisy (make 6): With yellow, MR, 5 sc, join, and fasten off. Join white in any st. (Ch 2, 3 dc, ch 2, sl st) in same st, sl st in next st; repeat around. (5 petals) Each daisy is 1.25 in (3.2 cm) across.
– Bud (make 3): With white, MR, 6 sc, join, and pull the ring closed.
– Leaf (make 6): Work as for the rose leaves, in sage green.
Border: Top Rim, Hanging Tab, and Opening Edge
Border gauge: All the border work is sc at 4 sts per in (2.5 cm), the same as the cream wall.
Top Rim (Color B)
Join B at the top of Mesh Rnd 21.
- Rnd 1 (conversion): Ch 1, then sc in each dc and each ch-1 sp around. Join. (30 sc in dc + 30 sc in sp = 60 sts; 0 added)
- Rnds 2–8: Sc in each st. (60 sts)
The rim is 8 rounds and 1.75 in (4.4 cm) deep, which brings the tube to 14.5 in (36.8 cm) tall. Fasten off.
Why the math works: Each mesh unit is 2 sts and becomes 2 sc, so 30 units turn into 60 sc. The rim stays at 15 in (38.1 cm) around, the same as the base, so the tube hangs straight without flaring or pulling in.
Hanging Tab (Color A, worked in rows)
Flatten the tube so the opening is centered at the front. On the back, mark the 24 rim sts centered directly opposite the opening. Join A in the first marked st.
- Row 1: Ch 1, sc in each of the 24 sts. Turn. (24 sts; 6 in / 15.2 cm wide)
- Row 2: Ch 1, sc2tog, sc to the last 2 sts, sc2tog. Turn. (22 sts)
- Rows 3–10: Repeat Row 2. (20, 18, 16, 14, 12, 10, 8, 6 sts)
- Rows 11–16: Ch 1, sc in each st. Turn. (6 sts; 1.5 in / 3.8 cm wide)
Rows 1–10 form the taper, about 2.25 in (5.7 cm) tall. Slide the ring onto the strap. Fold Rows 11–16 to the WS and whipstitch Row 16 to Row 10 across all 6 sts.
Opening Edge (Color A)
Join A at the lower right corner of the opening.
- Rnd 1: Ch 1, then work around the opening:
- Bottom edge: sc in each ch-1 sp and each dc between post 25 and post 1. (6 + 5 = 11 sts)
- Left side: 2 sc in each of the 3 dc row ends. (6 sts)
- Top edge: sc into the underside of each of the 11 bridge chains. (11 sts)
- Right side: 2 sc in each row end. (6 sts)
- Join. (11 + 6 + 11 + 6 = 34 sts)
- Rnd 2: Ch 1, sc in each st, working an sc2tog over the 2 sts at each of the 4 corners. Join. (26 sc + 4 sc2tog = 30 sts)
Why the math works: At 4 sts per in, 11 sc covers the 2.75 in (7.0 cm) gap and 6 sc covers its 1.5 in (3.8 cm) height, so the edge lies flat. Rounding off the corners in Rnd 2 gives the opening its oval shape. The finished inner opening is about 2.25 in by 1 in (5.7 cm by 2.5 cm).
Final Blocking
- Weave in all the ends along the dc posts or inside the sc bands.
- Mist the tube until it’s damp but not soaked.
- Slide a rolled towel or a 4.75 in (12.1 cm) cardboard tube inside.
- Straighten the mesh so the columns run straight from base to rim.
- Check that the height is 14.5 in (36.8 cm), and pat the opening into an oval.
- Mist the roses and leaves, pat them flat, and let everything dry completely.
- Pin the large rose about 2 in (5.1 cm) below the rim, left of center. Place the small roses below it and to the right, and tuck the leaves behind the outer edges.
- Sew each appliqué through its base onto the mesh posts, not across open spaces.
For the daisy holder, make three clusters: 2 daisies near the top right, 2 daisies with the buds at mid-height, and 2 daisies lower down. Add 2 leaves to each cluster.
Final Quality-Control Checklist
- The base lies flat at 4.75 in (12.1 cm).
- Every mesh round has 30 units (60 sts).
- The mesh columns run straight.
- The opening is centered at the front and measures about 2.25 in by 1 in (5.7 cm by 2.5 cm) inside.
- The rim has 60 sc and is 1.75 in (4.4 cm) deep.
- The tab is centered at the back and ends at 6 sts.
- The ring is sewn in securely on the WS.
- The appliqués are firmly attached and lie flat.
Troubleshooting
- Mesh twists into a spiral: You’re joining into the wrong chain. Always sl st into the 3rd ch of the ch-4.
- Base cups or ruffles: If it cups, it’s too tight, so go up a hook size. If it ruffles, it’s too loose, so go down a size.
- Opening gapes: Work Rnd 2 of the opening edge more firmly, or add a round of sl st.
- Rim flares: Check that Rim Rnd 1 has exactly 60 sts.
- Tube sags when full: Use cotton yarn, and keep it to about 15 to 20 bags.
- Rose comes loose: Tack the layers through the base every quarter turn as you roll.
Care
Hand wash in cool water. Reshape the holder over a rolled towel and let it dry flat, and remove the ring first if you can.
Final Notes
Everything starts from the base. The 60-st base at 4.75 in (12.1 cm) across sets the 15 in (38.1 cm) circumference, and every round after it keeps those 60 sts. The tube’s height adds up like this:
– The cream wall adds 2.25 in (5.7 cm).
– The 21 mesh rounds add 10.5 in (26.7 cm).
– The rim adds 1.75 in (4.4 cm).
That makes 14.5 in (36.8 cm) in total. Get the base to size and the rest of the holder will follow.
Happy crocheting!