

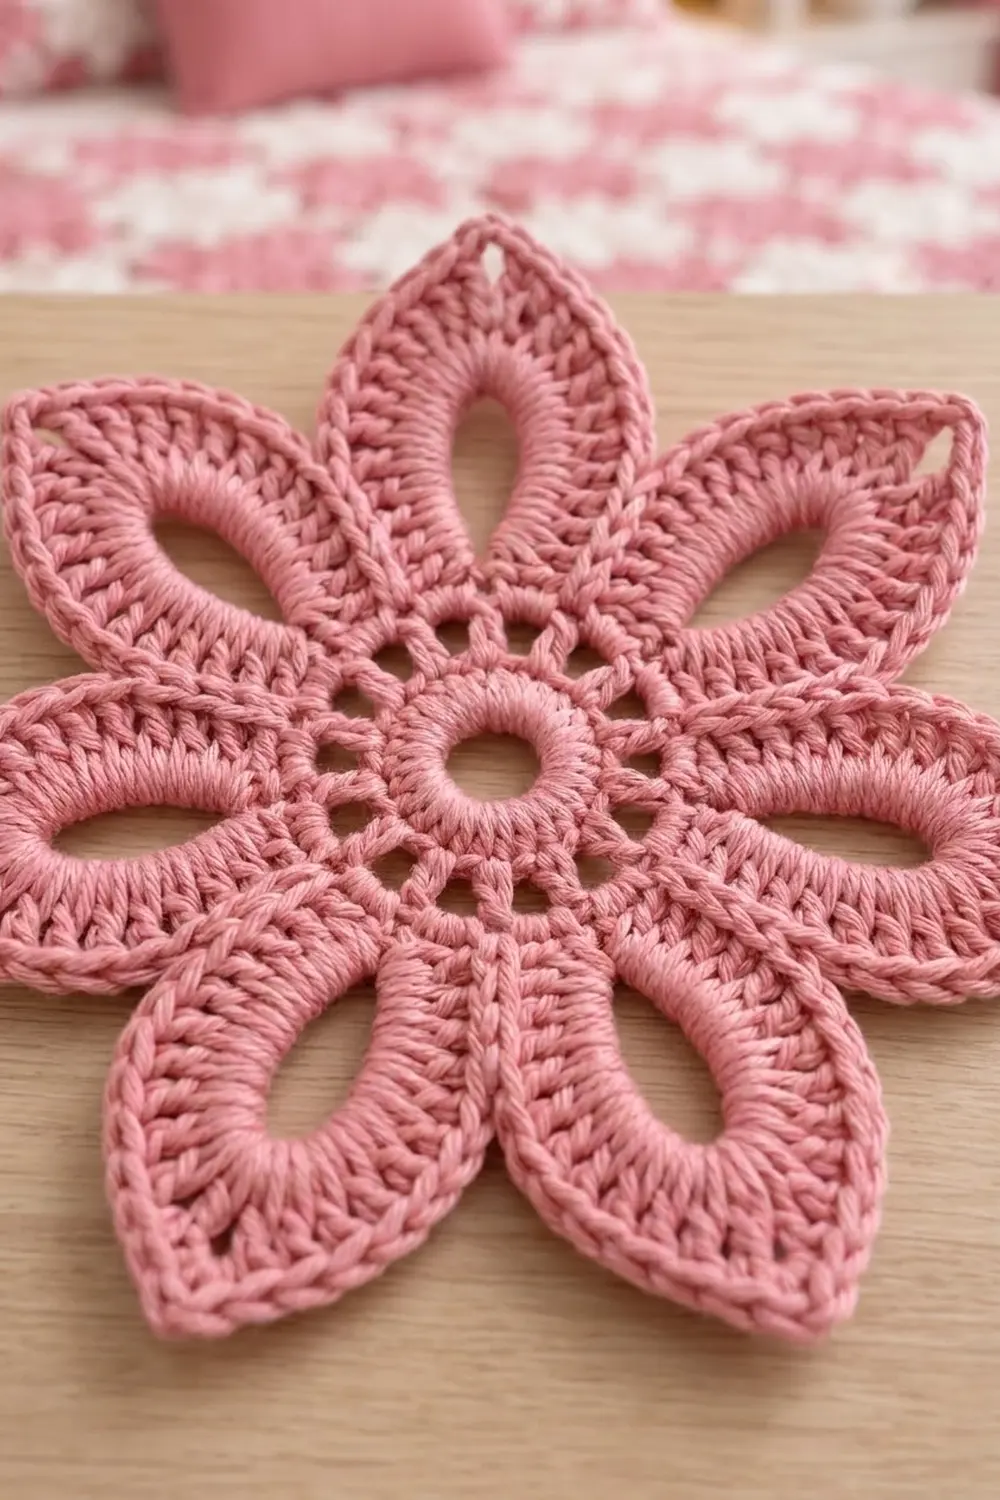
The Rose Window Flower Motif is a six-petal crochet flower with a bold, graphic look. Each long, pointed petal has an open almond-shaped “window” in its middle. Radiating double crochet stitches frame the window, and a crisp, braid-like slip-stitch rim outlines the petal.
The sample is worked in a soft dusty rose cotton. The same motif looks just as striking in cream white. Solid cotton shows off the stitch texture best, so you can see the radiating stitches and the raised rim clearly from across a room.
This pattern uses US crochet terms. After blocking, the finished motif measures 6.5 in (16.5 cm) from one petal tip to the opposite petal tip.
The construction is simple: you work the whole motif in the round as one single piece. You make a small ring center, add six chain loops, fill each loop with a petal of hdc and dc, then finish with a round of single crochet and a slip-stitch rim. There is no sewing and no joining.
Finished Size and Construction
- Finished size: 6.5 in (16.5 cm) tip to opposite tip
- Skill level: Easy to Intermediate
- Terminology: US crochet terms
- Yarn weight: DK (light worsted, #3) cotton or cotton blend
- Hook: 3.5 mm (E-4)
- Number of pieces: 1 motif
- Layout: Single six-petal flower, worked in rounds from the center
- Center size after Round 2: 1.75 in (4.4 cm) across
- Size before edging (after Round 4): 6.25 in (15.9 cm) tip to tip
- Edging depth (Rounds 5–6): 0.125 in (0.3 cm) added at each tip
- Petal size: 2.25 in (5.7 cm) long, 1.5 in (3.8 cm) wide at the widest point
- Petal window: about 1.25 in (3.2 cm) long and 0.5 in (1.3 cm) wide
Materials
Choose a smooth, mercerized or combed cotton in DK weight. Cotton holds the petal points sharply and keeps the open windows crisp after blocking. Avoid fuzzy or highly textured yarns, because they hide the radiating stitches and the slip-stitch rim.
Yarn (one motif):
- Dusty Rose (main color): 15 g, about 34 m (37 yd)
- Optional Cream White (alternate colorway): 15 g, about 34 m (37 yd), if you want a second motif in white
These amounts assume a DK cotton of about 225 m per 100 g (246 yd per 3.5 oz). They include a small margin for your gauge check and for weaving in ends.
Tools:
- 3.5 mm (E-4) crochet hook
- Tapestry needle
- Scissors
- Stitch marker
- Rustproof pins and a blocking mat or folded towel
- Spray bottle with clean water
- Ruler or tape measure
Abbreviations (US Terms)
- ch – chain
- sl st – slip stitch
- sc – single crochet
- hdc – half double crochet
- dc – double crochet
- st(s) – stitch(es)
- sk – skip
- sp – space
- rep – repeat
Special technique – working into a chain loop: In Round 4, do not work into the individual chains. Insert the hook into the open space inside the ch-14 loop and work every stitch around the whole chain. This keeps the loop open and creates the petal window.
Gauge and Checkpoints
Make one complete test motif before you make any more. Rounds 1 and 2 are your gauge test, and they take only a few minutes.
Gauge: After Round 2, the center measures 1.75 in (4.4 cm) across.
Measurement checkpoints:
- After Round 1: 1 in (2.5 cm) across, with a 0.375 in (1.0 cm) open center hole
- After Round 2: 1.75 in (4.4 cm) across
- After Round 4: 6.25 in (15.9 cm) from tip to opposite tip, lightly pressed flat
- After Round 6 and blocking: 6.5 in (16.5 cm) from tip to opposite tip
If your motif is too big: Change to a 3.25 mm (D-3) hook, or check that you are not pulling your dc stitches too tall. Loose petals also tend to curl at the tips.
If your motif is too small: Change to a 3.75 mm (F-5) hook. A tight motif often cups in the middle and closes up the petal windows.
Always re-check the Round 2 measurement after changing hooks. If the center is the right size, the petals will almost always come out to size too.
Pattern
Center
Foundation: Ch 6, sl st in first ch to form a ring.
Round 1: Ch 1, work 18 sc into the ring. Sl st in first sc to join. (18 sc)
Pull the starting tail gently so the ring stays open at about 0.375 in (1.0 cm). Do not close it fully, because the open hole is part of the design.
Round 2: Ch 3 (counts as first dc), dc in next st, 2 dc in next st, dc in each of next 2 sts, 2 dc in next st; rep from * 4 more times. Sl st in top of beginning ch-3 to join. (24 dc)*
Check: the center should now measure 1.75 in (4.4 cm) across and lie flat.
Petal Loops
Round 3: Ch 1. (Sc, ch 14, sc) in next st, sc in each of next 3 sts; rep from * 5 more times. Sl st in first sc to join. (6 ch-14 loops and 30 sc)*
Each repeat sits on 4 dc from Round 2 and makes 5 sc: 2 sc that anchor the loop in the same st, plus 3 sc after it. That gives 6 × 5 = 30 sc in total.
There are now 5 sc between each pair of loops: the second anchor sc, 3 plain sc, and the first anchor sc of the next loop. Let each loop hang freely. It will look floppy until Round 4.
Petals
Round 4: Work into the next ch-14 loop (into the space, around the chain) as follows: 2 hdc, 8 dc, (2 dc, ch 2, 2 dc), 8 dc, 2 hdc. Sk next 2 sc, sl st in next sc, sk next 2 sc; rep from * 5 more times. Join with sl st in first hdc. (6 petals, each with 24 sts and a ch-2 tip; plus 6 sl sts between petals)*
Count per petal: 2 hdc + 8 dc + 2 dc + 2 dc + 8 dc + 2 hdc = 24 sts. Each side of the petal has 12 sts, and the ch-2 sp sits exactly at the tip.
Push the stitches together as you go so they fan out around the chain loop. The 14 chains stay inside the stitches as an open almond-shaped window. The 2 hdc at each end keep the petal base narrow, and the dc in the middle give the petal its widest point.
The sl st between petals goes in the middle sc of the 5 sc between loops. Skipping 2 sc on each side pulls the petal bases close together, so the petals meet in a narrow V at the center.
Check: the motif should now measure 6.25 in (15.9 cm) from tip to opposite tip when you press it flat with your hand.
Edging (Border)
The edging is the motif’s border. You work one stitch into each stitch of Round 4 and add extra stitches only at the petal tips. This keeps the petal sides flat and the points sharp.
Round 5: Ch 1. Sc in each of next 12 sts up the petal side (begin in the same hdc as the join), (sc, ch 2, sc) in ch-2 tip sp, sc in each of next 12 sts down the other side, sk sl st between petals; rep from * 5 more times. Sl st in first sc to join. (26 sc and a ch-2 tip per petal; 156 sc in total)*
Count per petal: 12 sc worked 1-per-existing-stitch + 12 sc worked 1-per-existing-stitch + 2 sc added at the tip = 26 sc.
Skip the sl st between petals to keep the V-shaped dips tight. If you work into it, the dips will gape.
Round 6 (slip-stitch rim): Working in back loops only, sl st in each of next 13 sc, (sl st, ch 1, sl st) in ch-2 tip sp, sl st in each of next 13 sc; rep from * 5 more times. Join with sl st in first sl st. Fasten off. (28 sl sts and a ch-1 tip per petal; 168 sl sts in total)*
Count per petal: 26 sl sts worked 1-per-existing-stitch + 2 sl sts added at the tip = 28 sl sts.
Working into the back loops leaves the front loops of Round 5 showing as a raised chain. Together with the slip stitches, this makes the braid-like rim around each petal.
Keep the slip stitches relaxed. If they are tight, the petal edges will pucker and the motif will cup.
Why the math works: Each petal side has 12 sts in Round 4, 12 sc in Round 5, and 13 sl sts in Round 6 (12 plus the tip sc). Every side stitch is worked 1-to-1, so the sides cannot ruffle or tighten. Only the tips gain stitches (2 in Round 5 and 2 in Round 6), and those extra stitches go around the point, not along the side. That is why the edging adds only about 0.125 in (0.3 cm) at each tip, taking the motif from 6.25 in (15.9 cm) to 6.5 in (16.5 cm).
Weave in all ends along the back of the rim or through the center ring stitches.
Final Blocking
- Wet the motif. Spray it evenly with clean water until it is damp all the way through. You can also soak it briefly and roll it in a towel to remove excess water.
- Lay it flat. Place the motif right side up on a blocking mat or folded towel.
- Pin the center. Place a pin at the edge of the center ring between each pair of petals so the center sits round and flat.
- Pin the tips. Pin each petal tip through the ch-1 space so the motif measures 6.5 in (16.5 cm) from tip to opposite tip. Space the six tips evenly, about 60 degrees apart.
- Shape the windows. Use your fingers to gently open each petal window into a smooth almond shape about 1.25 in (3.2 cm) long.
- Straighten the petal sides. Smooth each side so it curves gently from base to tip without ripples. If needed, add a pin at the widest point of each side.
- Let it dry fully. Leave the motif pinned until it is completely dry, which usually takes several hours. Remove the pins only when both sides feel dry to the touch.
Final Quality-Control Checklist
- Round 1 has 18 sc and an open center hole of about 0.375 in (1.0 cm).
- Round 2 has 24 dc and measures 1.75 in (4.4 cm) across.
- Round 3 has 6 ch-14 loops and 30 sc.
- Each petal in Round 4 has 24 sts and a ch-2 tip.
- Each petal in Round 5 has 26 sc and a ch-2 tip (156 sc total).
- Each petal in Round 6 has 28 sl sts and a ch-1 tip (168 sl sts total).
- All six petal windows are open and about the same size.
- The petal points are sharp and the dips between petals are tight.
- The motif lies flat and measures 6.5 in (16.5 cm) tip to tip after blocking.
- All ends are woven in securely and invisibly.
Troubleshooting
The center ring closed up. You pulled the starting tail too tight. Loosen it before weaving it in, or restart and keep the ring open at 0.375 in (1.0 cm).
Round 2 ruffles. Your dc are too loose or your hook is too big. Go down one hook size.
The petals are different lengths. Count your chains in Round 3. Every loop must have exactly 14 ch.
A petal window is crowded or closed. You worked into the chains instead of around them. Work all Round 4 stitches into the loop space.
The petal tips are rounded. Check that you worked (2 dc, ch 2, 2 dc) at the tip in Round 4 and (sc, ch 2, sc) in Round 5. Pin the tips firmly when blocking.
There are gaps between the petals. Make sure you skipped 2 sc on each side of the sl st in Round 4, and skipped the sl st in Round 5.
The motif cups or curls. Your slip-stitch rim is too tight. Redo Round 6 with more relaxed tension, or use a hook 0.5 mm larger for that round only.
The motif is too small or too large. Re-check the Round 2 checkpoint and adjust your hook size before making another motif.
Care
Hand wash in cool water with a mild detergent. Press out the water in a towel, lay the motif flat to dry, and re-pin the tips while damp if the points need sharpening.

Final Notes
The Rose Window Flower Motif is built on a clear chain of measurements. Round 1 gives a 1 in (2.5 cm) ring with an open 0.375 in (1.0 cm) center. Round 2 brings the center to 1.75 in (4.4 cm). Rounds 3 and 4 add six 2.25 in (5.7 cm) petals, making the motif 6.25 in (15.9 cm) tip to tip. Rounds 5 and 6 add a 0.125 in (0.3 cm) edging at each tip, for a final blocked size of 6.5 in (16.5 cm).
Check each stage as you go, keep your slip stitches relaxed, and pin the points sharply when you block. The result is a crisp, open flower with six bright windows and a neat braided rim.
Happy crocheting!