

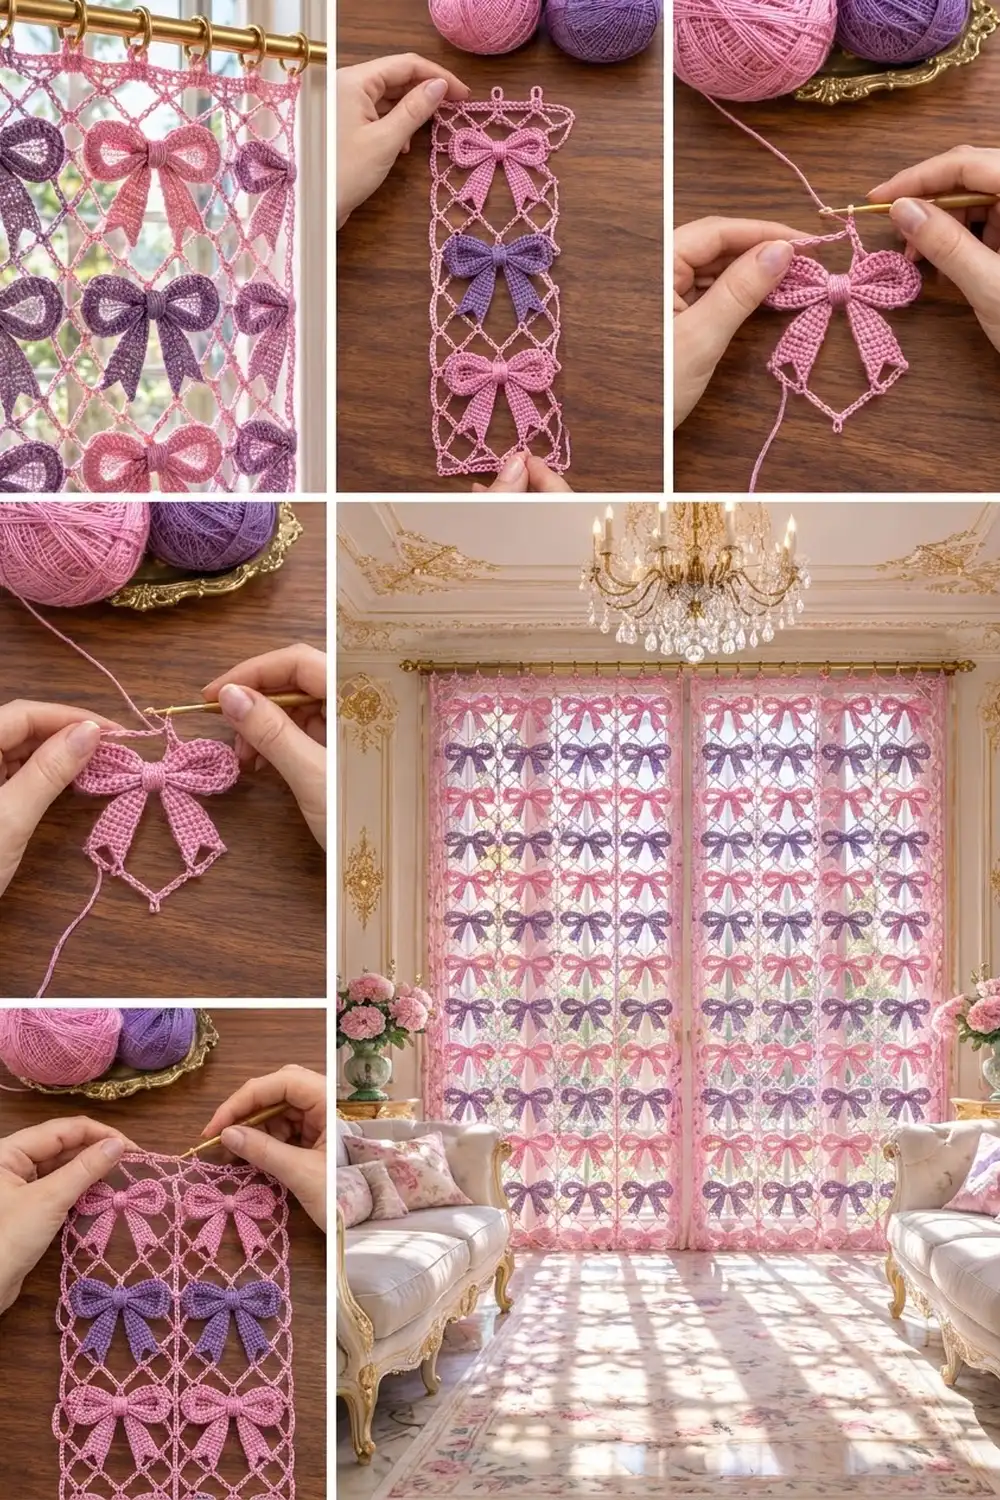
This lace strip stacks three crochet bows in a single column. Each bow sits in an airy diamond lattice of chain loops, so the strip looks light and open even though the bows are dense and textured. It works as a window panel, a door hanging or a wall accent, and it looks best with light shining through it.
The colorway alternates medium pink and soft purple: a pink bow at the top, a purple bow in the middle and a pink bow at the bottom. All the lattice work and the outer edge are pink, which keeps the strip looking unified. The style is romantic and vintage-inspired, close to Irish crochet but much simpler to work.
This pattern uses US crochet terms. The finished strip measures 4.5 in (11.4 cm) wide by 12.5 in (31.8 cm) tall, not counting the hanging loops. The loops add about 1 in (2.5 cm) at the top.
Construction is modular. You make each bow from five small parts and assemble it. Then you work the lattice frame in rounds directly around the bow to make a square block. Three blocks are slip-stitched together in a column, and a two-round border finishes the strip with picots and hanging loops.
Finished Size and Construction
- Finished size: 4.5 in x 12.5 in (11.4 cm x 31.8 cm), plus 1 in (2.5 cm) hanging loops
- Skill level: Intermediate
- Terminology: US crochet terms
- Yarn weight: Size 3 mercerized cotton crochet thread (Category 1, super fine)
- Hook: 2.25 mm (US B-1)
- Number of pieces: 3 blocks (each block is one bow plus its lattice frame)
- Layout: 1 block wide x 3 blocks tall
- Block size: 4 in x 4 in (10.2 cm x 10.2 cm)
- Strip size before border: 4 in x 12 in (10.2 cm x 30.5 cm)
- Border depth: 0.25 in (0.6 cm) per side
Materials
Choose a smooth, mercerized cotton thread. The sheen sharpens the bow texture and makes the lattice chains crisp, and cotton holds its shape when blocked. Avoid fuzzy or acrylic blends, because they blur the open diamonds.
- Pink (Color A): 35 g, about 150 m (2 bows, 3 lattice frames, joining and border)
- Purple (Color B): 10 g, about 43 m (1 bow)
These amounts assume about 4.3 m per gram and include roughly a 15% margin.
Tools:
- 2.25 mm (US B-1) crochet hook
- Fine tapestry needle
- Sharp scissors
- Rustproof pins and a blocking mat
- Spray starch or a fabric-stiffening spray
- Removable stitch markers (at least 8)
- Ruler or measuring tape
Abbreviations (US Terms)
- ch – chain
- sl st – slip stitch
- sc – single crochet
- hdc – half double crochet
- dc – double crochet
- sc2tog – single crochet 2 together
- sp – space
- st(s) – stitch(es)
- Rnd – round
Special stitch – Picot: ch 3, then sl st in the top of the sc you just made.
Gauge and Checkpoints
Gauge: 7 sc and 8 sc rows = 1 in (2.5 cm).
Test one complete block before you commit to all three. A correct block gives you these checkpoints:
- Bow tail (after Row 17): about 2.1 in (5.3 cm) long
- Assembled bow: about 3 in (7.6 cm) wide x 3.25 in (8.3 cm) tall
- Block after Rnd 3: about 3.75 in (9.5 cm) square when pinned flat
- Block after Rnd 4: 4 in (10.2 cm) square
If your block is too big, go down to a 2 mm hook. If you crochet chains loosely, you can also shorten the ch-9 spaces in Rnd 3 to ch 8. Shortening the chains changes the total stitch count, so don’t do it unless you use the same chain length in every block.
If your block is too small, go up to a 2.5 mm hook.
Always change the hook before changing any counts. The border math depends on every block having exactly 29 sts per side.
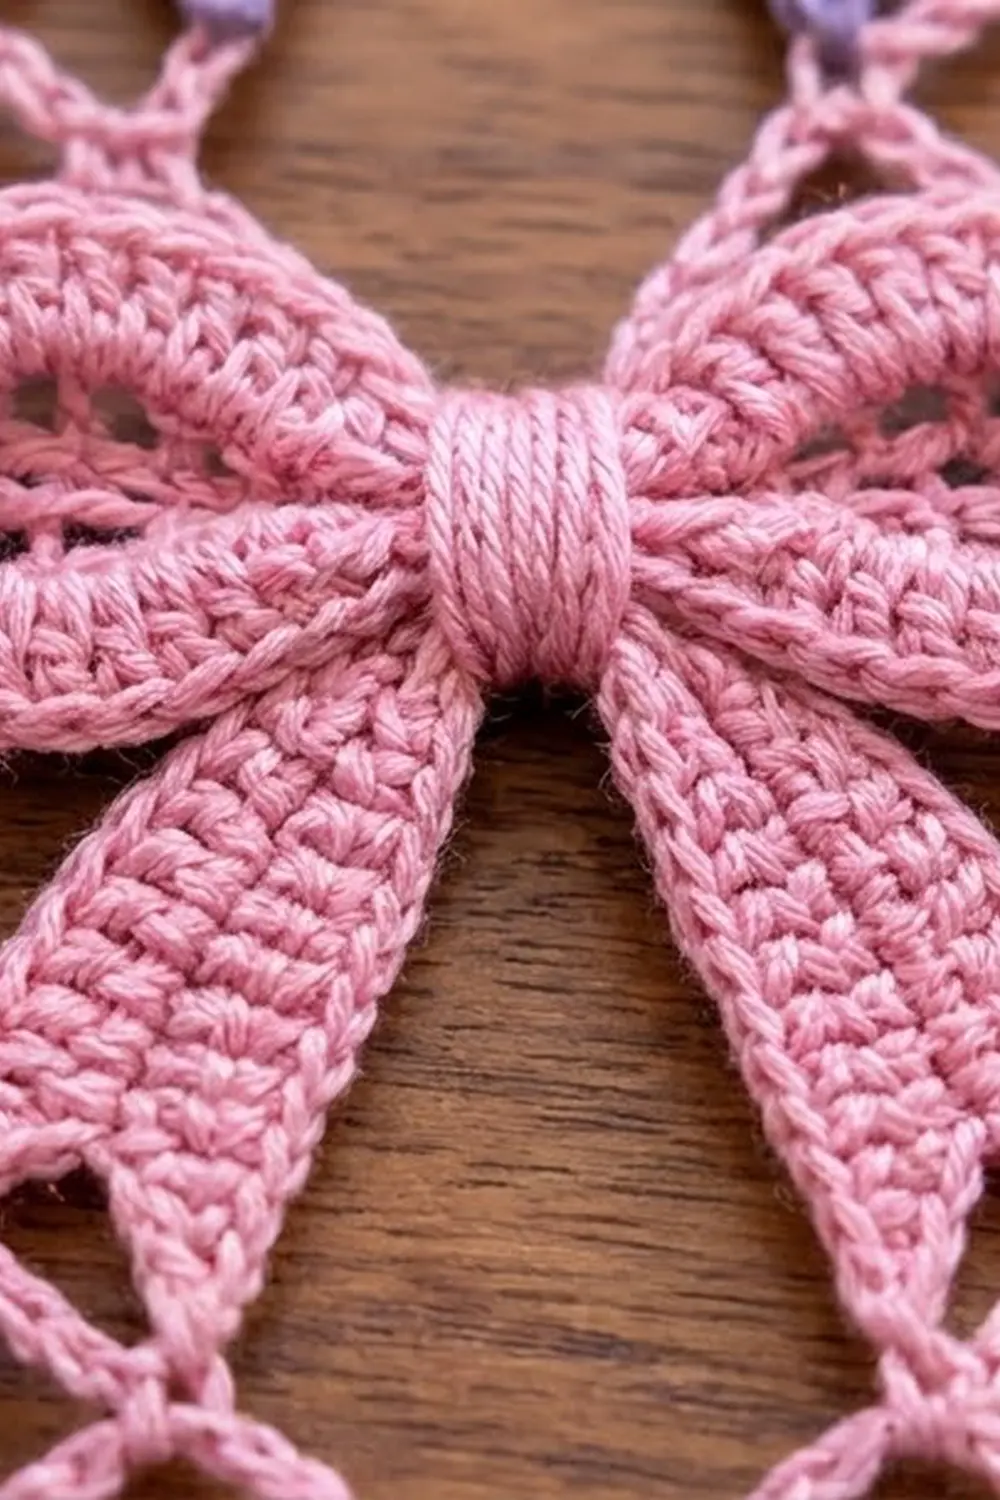
Bow Motif
Make each bow entirely in one color: pink for the top and bottom blocks, purple for the middle block.
Bow Loops (make 2 per bow)
Ch 18 and sl st to the first ch to form a ring.
Rnd 1: Ch 1, work 30 sc into the ring, then sl st to the first sc. (30 sts)
Rnd 2: Ch 1, sc in the next 5 sts, hdc in the next 5 sts, dc in the next 10 sts, hdc in the next 5 sts, sc in the next 5 sts, then sl st to the first sc. (30 sts)
The dc section makes the wide, rounded outer end of the loop, and the sc sections make the narrow inner end. Fasten off and leave a 6 in (15.2 cm) tail.
The ring stays open and gives the loop its hollow center. Pinch the sc end flat to make a teardrop about 1.25 in (3.2 cm) long.
Bow Tails (make 2 per bow)
Ch 5.
Row 1: Sc in the 2nd ch from the hook and in each ch across. (4 sts)
Rows 2–10: Ch 1, turn, sc in each st across. (4 sts)
Row 11: Ch 1, turn, work 2 sc in the first st, sc in the next 2 sts, work 2 sc in the last st. (6 sts)
Rows 12–14: Ch 1, turn, sc in each st across. (6 sts)
First point:
- Row 15: Ch 1, turn, sc in the next 3 sts. Leave the remaining sts unworked. (3 sts)
- Row 16: Ch 1, turn, sc2tog, sc in the last st. (2 sts)
- Row 17: Ch 1, turn, sc2tog. (1 st) Fasten off.
Second point: Join the thread in the next unworked st of Row 14 and repeat Rows 15–17 over the remaining 3 sts. Fasten off.
The two points form the forked fishtail end. Each tail is about 2.1 in (5.3 cm) long.
Center Wrap (make 1 per bow)
Ch 8.
Row 1: Sc in the 2nd ch from the hook and in each ch across. (7 sts)
Rows 2–4: Ch 1, turn, sc in each st across. (7 sts)
Fasten off and leave an 8 in (20.3 cm) tail.
Assemble the Bow
- Lay the two loops side by side with their narrow sc ends touching at the center.
- Place the tops of both tails behind the center. Angle the tails down and outward so they form an inverted V.
- Wrap the center piece around all four parts and sew its short ends together at the back.
- Use the remaining tails to tack the loops and tails in place from behind. Weave in all ends.
The assembled bow should measure about 3 in (7.6 cm) wide and 3.25 in (8.3 cm) tall.
Lattice Frame
Work the lattice frame in pink around every bow, including the purple one.
Before you start, place 8 stitch markers on the bow’s outer edge. These are your anchors, and they go clockwise from the top:
- Top edge of the center wrap (top middle)
- Highest point of the right loop (top-right corner)
- Outer tip of the right loop (right middle)
- Outer point of the right tail (bottom-right corner)
- Bottom edge of the center wrap, between the tails (bottom middle)
- Outer point of the left tail (bottom-left corner)
- Outer tip of the left loop (left middle)
- Highest point of the left loop (top-left corner)
Rnd 1: Join pink at anchor 1. Ch 1 and sc at the same spot. Ch 8, sc at the next anchor. Repeat from * 6 more times. Ch 8 and sl st to the first sc. (8 sc, 8 ch-8 sps)
These chains form the inner points of the diamonds.
Rnd 2: Sl st in the next 4 ch to reach the middle of the first ch-8 sp. Ch 1 and sc in the same sp. Ch 6, sc in the next ch-8 sp. Repeat from * 6 more times. Ch 6 and sl st to the first sc. (8 sc, 8 ch-6 sps)
Each ch-6 sp now sits over one anchor, and together the two rounds form the closed diamonds. The first ch-6 sp sits over anchor 2.
Rnd 3 (squaring): Sl st in the next 3 ch. Ch 1 and work (sc, ch 5, sc) in the same sp. This is a corner. Then ch 9, sc in the next sp (side), ch 9.
(Sc, ch 5, sc) in the next sp, ch 9, sc in the next sp, ch 9. Repeat from * 2 more times, then sl st to the first sc. (12 sc + 92 ch = 104 sts)
Each side repeat holds 26 sts: 2 sc + 5 ch + 9 ch + 1 sc + 9 ch.
Checkpoint: pinned flat, the block measures about 3.75 in (9.5 cm) square.
Rnd 4 (edge): Ch 1. Sc in each sc and in each ch around, working 3 sc in the 3rd ch of each corner ch-5. Sl st to the first sc. (104 sts worked once + 8 extra corner sts = 112 sts)
The middle sc of each 3-sc group is the corner st. That gives 29 sts per side, including both corner sts: 4 corners + (4 x 27) = 112.
Fasten off. The finished block measures 4 in (10.2 cm) square.
Make All Pieces
- Bows: 2 pink, 1 purple
- Lattice frames: 3, all pink
- Blocks: 3 in total
Layout (top to bottom):
[ Pink bow   ]   Block 1
[ Purple bow ]   Block 2
[ Pink bow   ]   Block 3
Before you join, block each piece lightly to 4 in (10.2 cm) square so all three match.
Joining
Join the blocks with a flat slip-stitch seam.
- Hold Blocks 1 and 2 with right sides facing up and the bottom edge of Block 1 against the top edge of Block 2.
- Join pink at the corner. Sl st through the inside loop of each matching st pair from corner to corner: 29 sl sts.
- Fasten off and repeat to join Block 3 to Block 2.
Each seam matches the blocks st for st: 29 sts on each block, 29 sl sts in the seam. No stitches are added or skipped, so the blocks line up exactly.
Tension: keep your sl sts as loose as your Rnd 4 sc. A tight seam makes the strip pucker and pulls the side edges in. If needed, go up one hook size for the seam only.
Checkpoint: the joined strip measures 4 in x 12 in (10.2 cm x 30.5 cm).
Border
The border is worked in pink and uses the same gauge as the blocks: 7 sc = 1 in (2.5 cm).
Starting counts:
- Long sides: 3 blocks x 29 sts = 87 sts per long side, including the strip’s 2 corner sts. At each seam, the two block corners count as their own stitches inside the 29 per block, so no stitches are added.
- Top and bottom: 29 sts each, including corners.
- Total unique perimeter sts: (2 x 87) + (2 x 29) – 4 shared corners = 228
Rnd 1: Join pink at the top-right corner st. Ch 1, then work 3 sc in the corner st. Sc in each st around, working 3 sc in each of the other 3 corner sts. Sl st to the first sc. (228 sts worked once + 8 extra corner sts = 236 sts)
Per side, counting the new middle corner sc as the corner sts:
- Long sides: 89 sts each
- Top and bottom: 31 sts each
Check: (2 x 89) + (2 x 31) – 4 = 236.
Rnd 2: Work this round over the 87 non-corner sts on each long side and the 29 non-corner sts on the top and bottom. Work (sc, ch 3, sc) in each corner st.
- Top edge (hanging loops): Sc in the next 4 sts, ch 12, sc in the next 7 sts 3 times, ch 12, sc in the next 4 sts. That is 4 + 7 + 7 + 7 + 4 = 29 sc and 4 hanging loops.
- Right side: Sc in the next 3 sts, picot 29 times. That is 87 sc and 29 picots.
- Bottom edge: Sc in the next st, sc in the next 3 sts, picot 9 times, sc in the next st. That is 1 + 27 + 1 = 29 sc and 9 picots.
- Left side: Work as for the right side: 87 sc and 29 picots.
Sl st to the first sc and fasten off.
Why the math works:
- 87 divides evenly by 3, so the long-side picots stay evenly spaced with nothing left over.
- On the top, 29 sts split symmetrically (4 + 7 + 7 + 7 + 4), so the hanging loops sit evenly.
- On the bottom, the 1-st margins center the 9 picots.
Each border round adds about 0.125 in (0.3 cm) per side. The final size is 4.5 in x 12.5 in (11.4 cm x 31.8 cm).
Final Blocking
- Weave in all remaining ends along the sc edges, never through the open chains.
- Soak the strip in cool water for 10 minutes, then press out the water in a towel without wringing.
- Pin the outer corners to exactly 4.5 in x 12.5 in (11.4 cm x 31.8 cm).
- Pin the seam corners so each block section measures 4.25 in (10.8 cm) tall, border included.
- Pin out the diamond points and the picots one by one.
- Shape the bow loops round with your fingertip. Pin the tail points so the forks open slightly.
- Mist with starch and let the strip dry completely, then unpin.
Final Quality-Control Checklist
- Each block has 29 sts per side, including both corners.
- All three bows are the same size, with loops and tails angled the same way.
- The colors run pink, purple, pink from top to bottom.
- Each seam has exactly 29 sl sts and lies flat.
- Border Rnd 1 has 236 sts in total.
- The long sides have 29 picots each, the bottom has 9 and the top has 4 hanging loops.
- The strip measures 4.5 in x 12.5 in (11.4 cm x 31.8 cm).
- All ends are hidden in solid stitches.
Troubleshooting
- The bow loops curl or cup: your Rnd 1 sts are too tight in the ring. Work Rnd 1 more loosely or with a 2.5 mm hook.
- The lattice pulls the bow out of shape: your anchor chains are too short for your tension. Go up a hook size for Rnd 1 only.
- The diamonds look lopsided: an anchor is off position. Check the marker placement against the clockwise list before you work Rnd 1.
- The block corners won’t square up: the 3-sc corner groups in Rnd 4 are missing or misplaced. Count to 112 sts.
- The seam puckers: the sl sts are too tight. Redo the seam with a larger hook.
- The border ruffles: extra sts were added at a seam. Recount to 87 sts per long side.
- The hanging loops are uneven: count exactly 12 ch for every loop.
Care
Hand wash in cool water with mild soap and dry flat, pinned to shape. Re-starch lightly if the lattice starts to soften over time.
Final Notes
The measurement chain runs like this:
- A gauge of 7 sc = 1 in (2.5 cm) gives a 3 in (7.6 cm) bow.
- The lattice frame turns that bow into a 4 in (10.2 cm) block with 29 sts per side.
- Three blocks joined st for st make a 4 in x 12 in (10.2 cm x 30.5 cm) strip with 87 sts per long side.
- Two border rounds bring the strip to 4.5 in x 12.5 in (11.4 cm x 31.8 cm).
If one link in the chain holds, the next one will too. Check your counts at each stage and the strip will lie flat and hang straight.
Happy crocheting!