

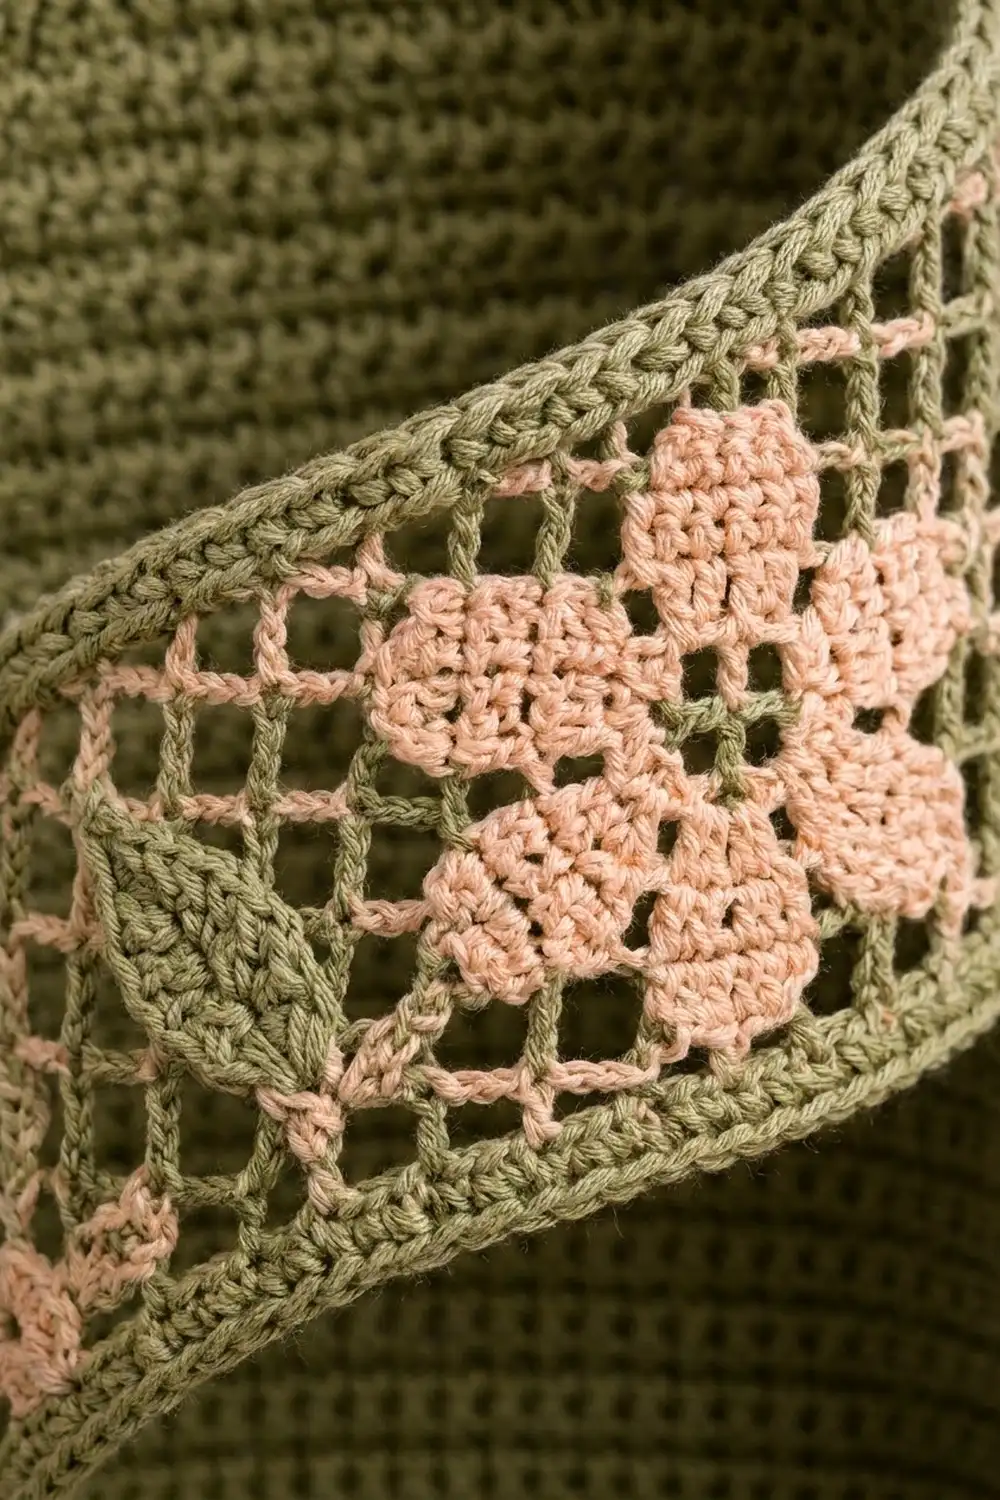
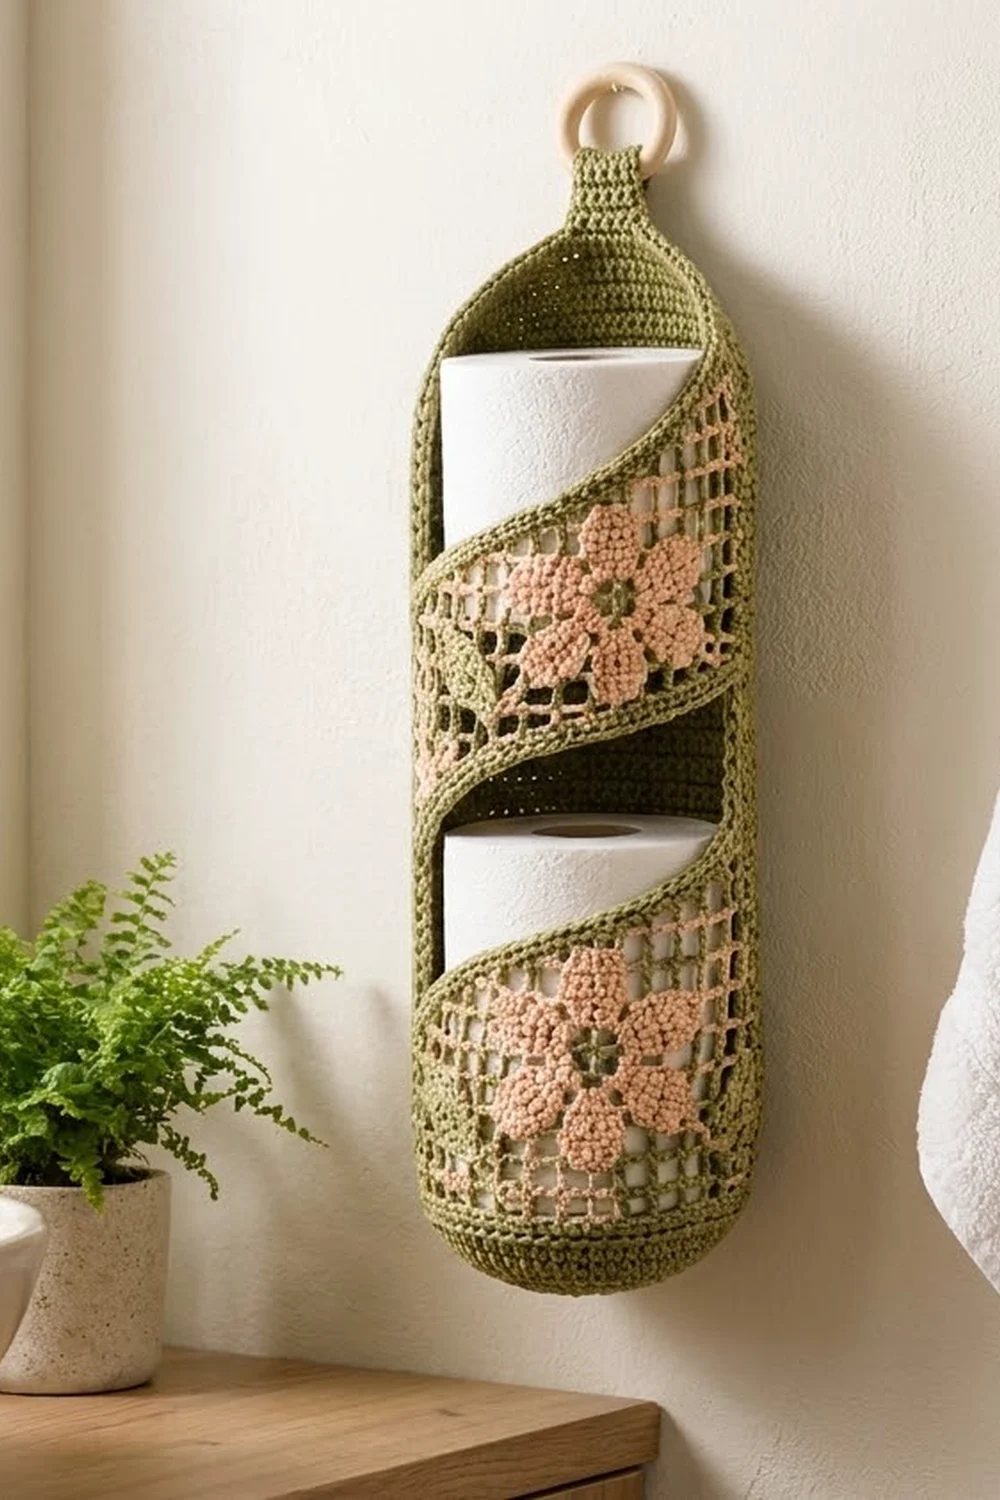
The Sage Blossom Spiral is a slim wall holder for two toilet rolls. A solid olive back curves around the rolls. Across the front, two slanted filet bands with peach blossoms create a soft spiral look.
The palette is calm: olive green for the structure and pale peach for the flowers. A natural wooden ring at the top completes the spa-bathroom style.
This pattern uses US crochet terms. The finished holder is about 16.2 in (41.1 cm) tall including the tab, with a body circumference of 15 in (38.1 cm) and a base about 4.75 in (12.1 cm) across.
You make three pieces: a back shell (base, back panel and tab), a lower band and an upper band. The bands are worked flat in filet mesh with stepped edges, edged, then sewn to the base and to the back’s side edges. The flowers are darned in last.
Finished Size and Construction
- Finished size: 16.2 in (41.1 cm) tall with the tab; body 14.4 in (36.6 cm); circumference 15 in (38.1 cm)
- Skill level: Intermediate
- Terminology: US
- Yarn weight: Worsted (#4) cotton
- Hook: 5.0 mm (H-8)
- Number of pieces: 3 (back shell, lower band, upper band)
- Layout: back shell behind; lower band at the bottom front; upper band above it, sloping the same way
- Piece sizes: back panel 7.5 x 14.4 in (19.1 x 36.6 cm); each band 7.5 in (19.1 cm) wide after edging
- Band size before border: 7 in (17.8 cm) wide
- Border depth: about 0.25 in (0.6 cm)
Materials
Use a smooth worsted cotton or cotton blend. Cotton holds its shape and shows filet mesh clearly. The amounts below assume about 190 m per 100 g.
- Olive green: 150 g / 285 m
- Pale peach: 20 g / 38 m
Tools:
– 5.0 mm (H-8) hook
– Tapestry needle
– 4 stitch markers
– 2 in (5.1 cm) wooden ring
– Blocking mat, pins and spray bottle
– Tape measure and scissors
The quantities include a margin of about 20% for gauge swatches and differences in tension.
Abbreviations (US Terms)
- ch – chain
- sl st – slip stitch
- sc – single crochet
- dc – double crochet
- sc2tog – single crochet 2 together
- BLO – back loop only
- MR – magic ring
- rev sc – reverse single crochet (crab stitch)
- sk – skip
- st(s) – stitch(es)
Filet squares: Each square is 2 stitches wide, sitting on a shared post. A row of n squares has 2n + 1 stitches. Start every row with ch 3, which counts as the first dc (the first post).
– Open square: ch 1, sk next st, dc in next st.
– Filled square: dc in next st (dc or ch-1 space), dc in next st.
Stepping in (decreasing squares):
– At the start of a row: sl st in each of the next 6 sts (3 squares), then ch 3.
– At the end of a row: leave the stated squares unworked.
Squares are numbered 1–14 from left to right as seen from the right side (RS).
Gauge and Checkpoints
- Single crochet: 16 sts x 18 rows = 4 in (10.2 cm). That is 4 sts and 4.5 rows per inch.
- Filet: 8 squares x 8 rows = 4 in (10.2 cm). One square or one row = 0.5 in (1.3 cm).
Make the lower band first; it works as your swatch. Before edging it should be 7 in (17.8 cm) wide, 1.5 in (3.8 cm) tall at the left edge and 3.5 in (8.9 cm) tall at the right.
Checkpoints:
– Base after Round 10: 4.75 in (12.1 cm) across
– Back panel after Row 54: 7.5 x 12 in (19.1 x 30.5 cm)
– Each band after its border: 7.5 in (19.1 cm) wide
If your pieces come out too big, go down 0.5 mm in hook size. If they are too small, go up 0.5 mm. Mesh that is too tall usually means your dc are loose; snug the yarn before each yarn-over.
Back Shell (Olive)
Base
- Rnd 1: MR, 6 sc. Join with sl st to first sc. (6)
- Rnd 2: Ch 1, 2 sc in each st. (12)
- Rnd 3: Ch 1, (sc, 2 sc in next) 6 times. (18)
- Rnds 4–10: Increase 6 sts evenly each round, adding 1 more sc between increases each time. Counts: 24, 30, 36, 42, 48, 54, 60.
- Rnd 11: Ch 1, sc in BLO of each st around. Join. (60)
Rnd 11 makes the fold ridge where the walls begin. Place a marker in st 1 and in st 30.
Back panel
- Row 1: Ch 1, sc in each of sts 1–30 of Rnd 11. Turn. (30)
- Rows 2–54: Ch 1, sc across. Turn. (30)
Check: 7.5 x 12 in (19.1 x 30.5 cm).
Arched top
- Row 55: Ch 1, sc2tog, sc to last 2 sts, sc2tog. (28)
- Rows 56–65: Repeat Row 55. Counts: 26, 24, 22, 20, 18, 16, 14, 12, 10, 8.
Check: the body now measures 14.4 in (36.6 cm).
Tab
- Rows 66–81: Ch 1, sc across. Turn. (8)
The tab is 2 in (5.1 cm) wide and about 3.5 in (8.9 cm) long. Leave a 12 in (30.5 cm) tail. Do not attach the ring yet.
Lower Band (Olive)
- Foundation: Ch 33.
- Row 1 (RS): Dc in 7th ch from hook (the skipped ch count as the first dc and ch-1 space). Ch 1, sk 1 ch, dc in next ch; repeat across. You now have 14 open squares. (29)
- Row 2: Squares 1–2 open, 3–4 filled (leaf), 5–14 open. (29)
- Row 3: Squares 14–6 open, 5–4 filled (leaf), 3–1 open. (29)
- Row 4: Step in 3 squares at the start, then work squares 4–14 open. (23)
- Row 5: Work squares 14–7 open; leave squares 4–6 unworked. (17)
- Row 6: Step in 3 squares, then work squares 10–14 open. (11)
- Row 7: Work squares 14–13 open; leave squares 10–12 unworked. (5)
Fasten off. The top edge now rises in even steps from left to right.
Upper Band (Olive)
You work this band from a middle foundation row upward (A rows), then downward into the foundation chain (B rows).
- Foundation and Row A1 (RS): Work exactly as Lower Band Row 1. (29)
- Row A2: Open across. (29)
- Row A3: Squares 14–4 open; leave squares 1–3 unworked. (23)
- Row A4: Step in 3 squares. Squares 7–9 open, 10–11 filled (leaf), 12–14 open. (17)
- Row A5: Square 14 open, 13–12 filled (leaf), 11–10 open; leave squares 7–9 unworked. (11)
- Row A6: Step in 3 squares, then work squares 13–14 open. (5) Fasten off.
Rotate the band so the foundation chain is on top, with the RS facing.
- Row B1: Join olive in the free loop at square 1’s outer edge. Ch 3, then work squares 1–11 open into the free loops; leave squares 12–14 unworked. (23)
- Row B2: Step in 3 squares. Squares 8–4 open, 3–2 filled (leaf), 1 open. (17)
- Row B3: Squares 1–2 filled (leaf), 3–5 open; leave squares 6–8 unworked. (11)
- Row B4: Step in 3 squares, then work squares 2–1 open. (5) Fasten off.
Check: 7 in (17.8 cm) wide, each side edge 3 in (7.6 cm), and 5 in (12.7 cm) tall from the lowest point to the highest.
Darned Blossoms (Peach)
Thread peach on the tapestry needle. Fill each listed square with 4 vertical wraps laid side by side around its top and bottom bars. Leave the center square open.
Lower band (Row 2 to Row 6):
– Row 2: squares 10, 11, 13, 14
– Row 3: squares 10–14
– Row 4: squares 11 and 13
– Row 5: squares 10–14
– Row 6: squares 10, 11, 13, 14
Upper band (Row B2 to Row A3):
– B2: squares 4, 5, 7, 8
– B1: squares 4–8
– A1: squares 5 and 7
– A2: squares 4–8
– A3: squares 4, 5, 7, 8
Each blossom uses 20 squares. Weave in the ends on the wrong side (WS).
Make All Pieces
- Back shell: 1, olive (base, panel and tab)
- Lower band: 1, olive with peach darning
- Upper band: 1, olive with peach darning
Work Border Part A on both bands before you join anything.
Layout, front view, with positions given as back-panel rows:
                  [ tab + wooden ring ]
LEFT SIDE                                RIGHT SIDE
rows 37-65  WINDOW 2       rows 46-65  WINDOW 2
rows 21-36  upper band     rows 30-45  upper band
rows 10-20  WINDOW 1       rows 19-29  WINDOW 1
rows 1-9    lower band     rows 1-18   lower band
     base Rnd 11: sts 1-30 back panel | sts 31-60 lower band
Joining
Use olive and a whipstitch through the inner loops, so the crab ridge stays on the outside. “Left” and “right” are as seen from the front of the holder.
- Lower band, bottom edge: Sew its 30 bottom border sts to base Rnd 11 sts 31–60, one to one.
- Lower band, right side: Sew its 18 side sts to back rows 1–18, one to one.
- Lower band, left side: Sew its 10 side sts to back rows 1–9, easing in 1 extra band st.
- Upper band: Sew its left 16 sts to back rows 21–36, and its right 16 sts to back rows 30–45, one to one.
Keep the stitches snug but not puckered. Each seam should lie as long as the edge it joins.
Size check: with two rolls inside, the circumference is 15 in (38.1 cm).
Border
Border gauge: 2 sc per square or per dc row-end, which is 4 sc per inch. This matches the 16 sc per 4 in (10.2 cm) gauge, so the edges lie flat. A corner is 3 sc worked in the corner stitch. “Side count” below means the stitches between corner groups.
Part A – Lower band (before joining)
Rnd 1: With RS facing, join olive in the last st of Row 7 and work:
– 3 sc in that st (corner)
– Stepped top edge: 4 sc across Row 7, 2 sc down its row-end, then (6 sc across the exposed squares, 2 sc down the row-end) 3 times, then 5 sc across the exposed part of Row 3 (35)
– 3 sc in the first st of Row 3 (corner)
– Left side: 2 sc in each of 3 row-ends (6)
– 3 sc in foundation loop 1 (corner)
– Bottom edge: sc in next 12 loops, sc2tog, sc in next 13 loops (26)
– 3 sc in loop 29 (corner)
– Right side: 2 sc in each of 7 row-ends (14)
– Join to the first sc. (93)
Rnd 2: Ch 1, rev sc in each st around. Join and fasten off. (93)
From corner center to corner center, counting both corner centers, the band has 30 sts on the bottom, 10 on the left and 18 on the right. The sc2tog brings the bottom to exactly 30, matching the 30 base stitches.
Part A – Upper band (before joining)
Rnd 1: Work the same way:
– Corner in the last st of A6
– Stepped top edge: 35 sts, ending at the start of A2
– Corner
– Left side: 2 sc in each of 6 row-ends (12)
– Corner in the end st of B4
– Stepped bottom edge: 4 sc, 2, then (6, 2) 3 times, then 5 sc in the free foundation loops of squares 12–14 (35)
– Corner
– Right side: 12 sc
– Join. (106)
Rnd 2: Rev sc around. (106)
Each side edge, counting both corner centers, is 16 sts. That matches 16 back rows (3.5 in / 8.9 cm).
Part B – Back-panel trim (after joining)
On each exposed back edge, work Row 1 as 1 sc per row-end, then Row 2 as rev sc back along the same stitches without turning:
– Left side, rows 10–20: 11 sts
– Left side, rows 37–65: 29 sts
– Right side, rows 19–29: 11 sts
– Right side, rows 46–65: 20 sts
One sc per sc row matches the 4.5-rows-per-inch gauge.
Final Blocking
- Mist the whole holder until it is damp.
- Slide in two rolls and press the bands into smooth diagonals.
- Pull the stepped edges gently into straight slopes.
- Pin the base round and flat at 4.75 in (12.1 cm).
- Let it dry completely with the rolls inside.
- Thread the tab through the ring, fold it to the WS and sew Row 81 to Row 65.
Final Quality-Control Checklist
- Base is 4.75 in (12.1 cm) across; body is 14.4 in (36.6 cm) tall
- Both bands are 7.5 in (19.1 cm) wide and slope the same way
- Windows are about 2.4 in (6.1 cm) tall and parallel
- Each blossom has 20 filled squares and an open center
- Seams are flat, with no gaps at the corners
- The tab is secure and the ring turns freely
Troubleshooting
- Steps look jagged: Block them firmly, and check that you used 2 sc per row-end in Rnd 1.
- Band too wide: Your dc are loose; go down a hook size.
- Holder twists: Re-pin the seams so they match the listed back rows.
- Darning shows through the back: Use fewer wraps per square, and weave the ends inside the filled squares.
- Crab edge flares: Work the rev sc more tightly or with a smaller hook.
Care
Hand wash in cool water and lay flat to dry, reshaping around a roll. Do not tumble dry.
Final Notes
The measurement chain is:
– Gauge: 4 sc and 4.5 rows per inch; filet squares and rows of 0.5 in (1.3 cm)
– Base: 60 sts, 15 in (38.1 cm) around
– Back panel: 30 sts, 7.5 in (19.1 cm)
– Bands: 14 squares, 7 in (17.8 cm), growing to 7.5 in (19.1 cm) with the border
– Back panel plus band: 15 in (38.1 cm), matching the base
If every link in that chain checks out, the holder will hang straight and fit two rolls snugly.
Happy crocheting!