

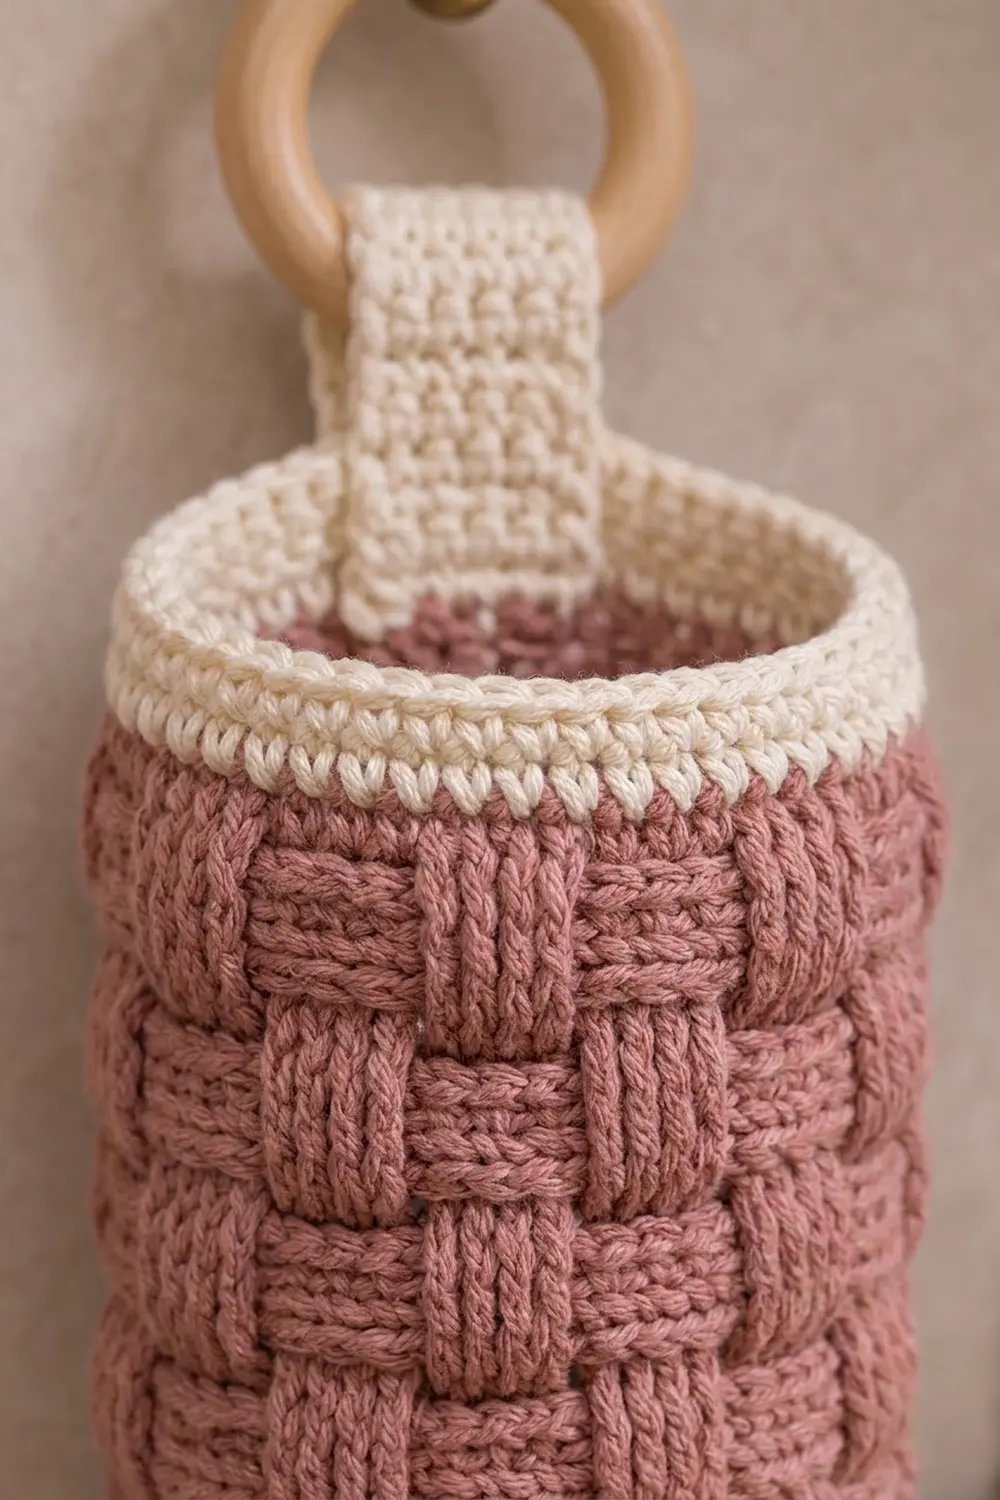
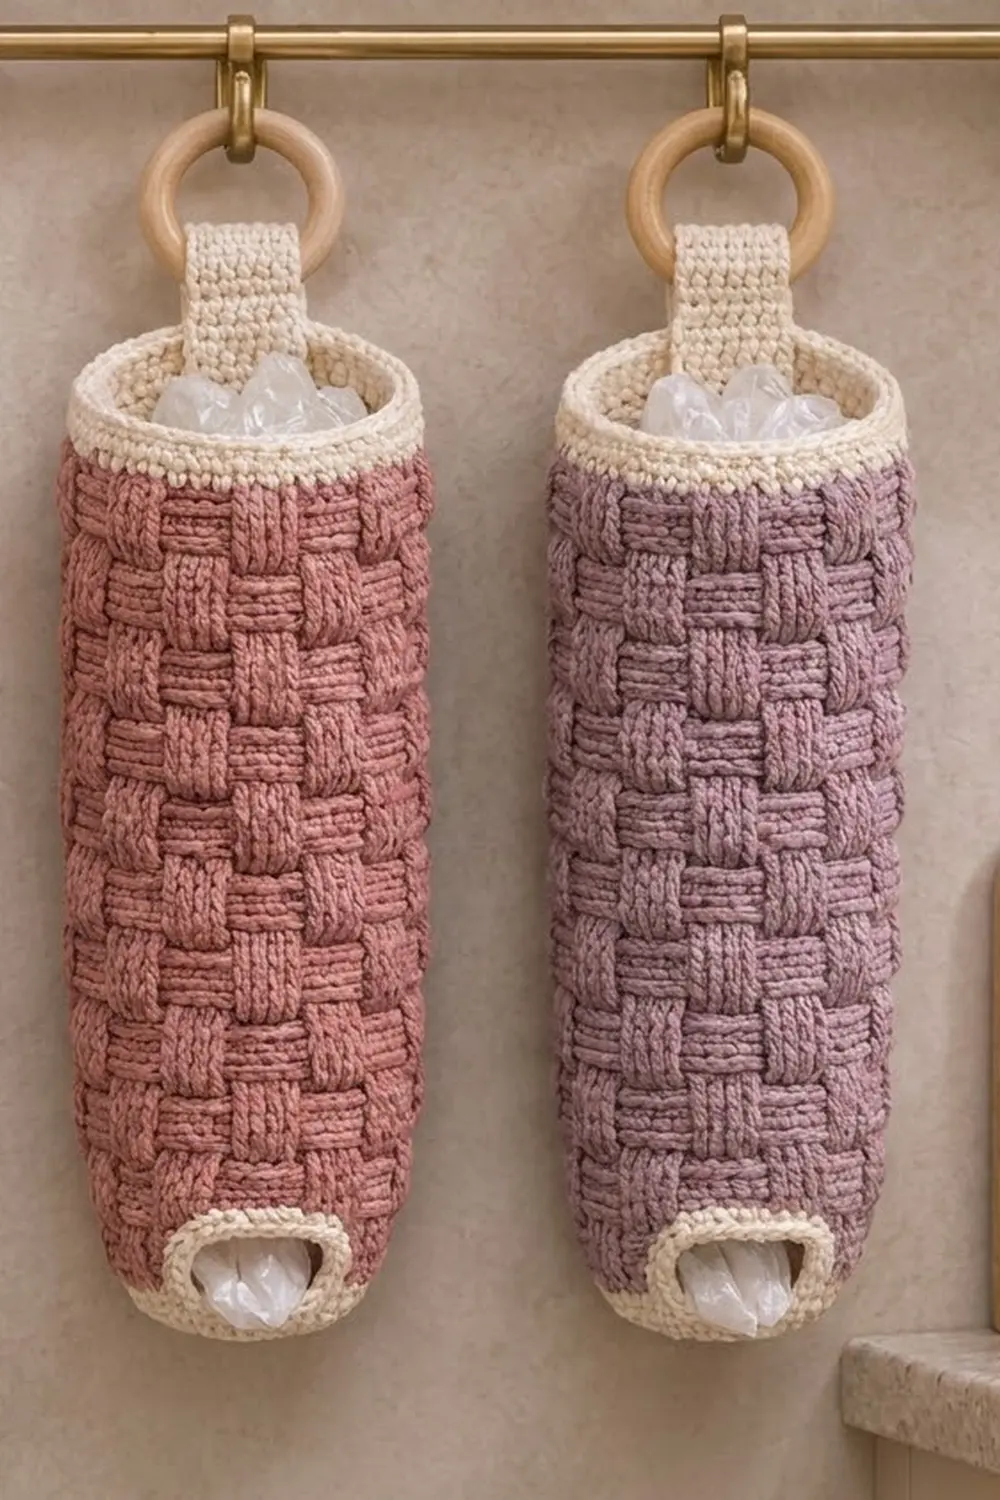
This bag holder is a tall, slim tube with a deep basketweave texture. It hangs from a natural wooden ring and keeps plastic grocery bags tidy and easy to reach. You push bags in at the top and pull them out one at a time through a small oval opening near the bottom.
The body is dusty rose. The base, bottom band, top rim, opening edging and hanging tab are soft cream. The woven-look blocks are made with front post and back post double crochet, so the fabric is firm and solid, not lacy. The holder suits a farmhouse or soft-neutral kitchen, and it works just as well in lavender or any other muted shade.
The pattern uses US crochet terms. The finished holder is 15.75 in (40.0 cm) tall from base to rim, 5 in (12.7 cm) wide laid flat and 10 in (25.4 cm) around. The tab adds a 2.5 in (6.4 cm) loop above the rim.
You make it in one piece from the bottom up:
1. Crochet a flat cream circle for the base, then a short cream band.
2. Work three rose rows back and forth to leave the opening, then join into rounds of basketweave.
3. Add the cream rim, then work the tab straight off it.
4. Finish the opening with a round of cream edging.
Finished Size and Construction
- Finished size: 15.75 in (40.0 cm) tall x 5 in (12.7 cm) wide laid flat; 10 in (25.4 cm) around
- Skill level: Intermediate (post stitches, changing from rows to rounds)
- Terminology: US
- Yarn weight: Worsted (#4), cotton or cotton blend
- Hook: 5.0 mm (H-8)
- Number of pieces: 1 (the tab is worked onto the rim)
- Layout: single vertical tube, with the opening at the front bottom and the tab at the center back
- Piece size: 40 stitches around; base 3.25 in (8.3 cm) across
- Size before border: 15 in (38.1 cm) tall (bottom band plus basketweave body)
- Border depth: 0.75 in (1.9 cm) top rim, plus one round of edging around the opening
Materials
Use a smooth worsted cotton or cotton blend. Cotton shows the basketweave crisply and helps the tube keep its shape. Acrylic works too, but it gives a softer, slouchier holder. Avoid fuzzy or very splitty yarns, because post stitches need clear, visible posts.
- Color A, Dusty Rose: 100 g / 170 m (body)
- Color B, Cream: 30 g / 50 m (base, band, rim, tab and opening edging)
These amounts include a margin of about 20 percent for your gauge swatch and differences in tension.
Tools:
- 5.0 mm (H-8) crochet hook
- Wooden ring, 2 in (5.1 cm) outer diameter
- 4 locking stitch markers
- Tapestry needle
- Scissors
- Measuring tape
Abbreviations (US Terms)
- ch – chain
- sl st – slip stitch
- sc – single crochet
- dc – double crochet
- BLO – back loop only
- FPdc – front post double crochet
- BPdc – back post double crochet
- st(s) – stitch(es)
- rnd – round
- RS / WS – right side / wrong side
FPdc: Yarn over. Insert the hook from front to back to front around the post (the stem) of the stitch below. Yarn over and pull up a loop, then [yarn over, pull through 2 loops] twice. The post moves toward you.
BPdc: Yarn over. Insert the hook from back to front to back around the post, then finish like a dc. The post moves away from you.
Starting chains: The ch 2 at the start of each dc row or round does not count as a stitch. Work the first stitch into the same stitch, and join each round to the top of that first real stitch.
Gauge and Checkpoints
- Basketweave: 16 sts and 8 rows = 4 in (10.2 cm)
- Single crochet: 16 sts and 16 rows = 4 in (10.2 cm)
Make a gauge swatch before you start the holder:
1. Ch 26. Dc in the 3rd ch from the hook and in each ch across (24 dc).
2. Work 8 rows of 4-stitch basketweave blocks, using Rows 2–3 below as your guide.
3. Measure the center of the swatch, not the edges. Post stitches pull the fabric in, so measure only after all the rows are done.
Checkpoints:
- After Rnd 5: the base lies flat and measures 3.25 in (8.3 cm) across.
- After Rnd 7: the band is 0.5 in (1.3 cm) tall and stands up cleanly from the ridge.
- After Rose Rnd 5: the rose section is 2.5 in (6.4 cm) tall, and the tube is 5 in (12.7 cm) wide laid flat.
- After Rose Rnd 15: the rose section is 7.5 in (19.1 cm) tall.
- After Rose Rnd 29: the holder is 15 in (38.1 cm) from the base fold to the top edge.
- After the rim: the holder is 15.75 in (40.0 cm) tall in total.
Too big? Switch to a 4.5 mm hook. Too small? Switch to a 5.5 mm hook. Change the hook, not the stitch count. The basketweave needs a multiple of 8 stitches, and 40 is the right count at this size.
Base (Color B, Cream)
Join each round with a sl st to the first sc. Start each round with ch 1, which does not count as a stitch.
Rnd 1: In a magic ring, ch 1, 8 sc. Join. (8 sts)
Rnd 2: 2 sc in each st around. Join. (16 sts)
Rnd 3: Sc in next st, 2 sc in next st; repeat from * around. Join. (24 sts)
Rnd 4: Sc in next 2 sts, 2 sc in next st; repeat from * around. Join. (32 sts)
Rnd 5: Sc in next 3 sts, 2 sc in next st; repeat from * around. Join. (40 sts)
Bottom Band (Color B)
Rnd 6: Ch 1, sc in BLO of each st around. Join. (40 sts) The unused front loops form a ridge, and the wall starts to turn upward.
Rnd 7: Ch 1, sc in each st around. Join. (40 sts) Fasten off.
Number the stitches of Rnd 7, starting at the join. Place markers in st 33 and st 40. Stitches 33–40 form the bottom edge of the opening. Leave them unworked for now.
Opening Rows (Color A, Dusty Rose)
You work these three rows back and forth over sts 1–32 only. This leaves an 8-stitch gap for the opening.
Row 1 (RS): Join Color A in st 1 of Rnd 7. Ch 2, dc in the same st and in the next 31 sts. Stop at the marker. Turn. (32 dc)
Row 2 (WS): Ch 2, FPdc in next 4 sts, BPdc in next 4 sts; repeat from * 3 more times. Turn. (32 sts)
Row 3 (RS): Ch 2, FPdc in next 4 sts, BPdc in next 4 sts; repeat from * 3 more times. Do not turn. (32 sts)
An FPdc worked from the WS sinks on the RS. That means Rows 2 and 3 stack into one block row, with raised blocks over sts 1–4, 9–12, 17–20 and 25–28 on the RS.
Close the opening: Ch 8. Join with a sl st to the top of the first FPdc of Row 3. The opening now measures 2 in (5.1 cm) wide and 1.5 in (3.8 cm) tall.
Body Rounds (Color A)
From here on, keep the RS facing you and do not turn.
- Pattern A: FPdc in next 4 sts, BPdc in next 4 sts; repeat from * around.
- Pattern B: BPdc in next 4 sts, FPdc in next 4 sts; repeat from * around.
Rnd 4: Ch 2, BPdc in next 4 sts, FPdc in next 4 sts; repeat from * 3 more times. Then dc in each of the 8 ch. Join. (32 post sts + 8 dc = 40 sts)
Rnd 5: Ch 2, work Pattern B around (5 repeats). Join. (40 sts) The 8 dc above the chain now get post stitches and line up with the blocks around them.
Rnds 6–7: Ch 2, work Pattern A. Join. (40 sts each round)
Rnds 8–9: Ch 2, work Pattern B. Join. (40 sts each round)
Rnds 10–29: Keep alternating the patterns every 2 rounds. (40 sts each round)
– Pattern A: Rnds 10–11, 14–15, 18–19, 22–23 and 26–27
– Pattern B: Rnds 12–13, 16–17, 20–21, 24–25 and 28–29
Fasten off.
Row 1 is the dc foundation. Above it are 14 block rows, each 2 rows tall, for 29 rows in all. At 8 rows per 4 in, that gives 14.5 in (36.8 cm) of rose. With the 0.5 in (1.3 cm) band, the holder now measures 15 in (38.1 cm).
Border: Top Rim, Tab and Opening Edging (Color B)
Border gauge: 16 sc = 4 in (10.2 cm). This matches the basketweave gauge, so working 1 sc into each stitch keeps the rim at exactly 10 in (25.4 cm) around. It won’t flare or pull in.
Top Rim
Rnd 1: Join Color B in the first st of Rnd 29. Ch 1, sc in each st around. Join. (40 sc: 20 across the front and 20 across the back when laid flat)
Rnds 2–3: Ch 1, sc in each st around. Join. (40 sc each round) Fasten off.
Three rounds at 0.25 in each make a 0.75 in (1.9 cm) rim.
Hanging Tab
The opening is centered between sts 36 and 37. The point directly opposite is between sts 16 and 17, so the tab goes over sts 14–19.
Row 1: Join Color B in st 14 of rim Rnd 3. Ch 1, sc in the same st and in the next 5 sts. Turn. (6 sc)
Rows 2–20: Ch 1, sc in each st across. Turn. (6 sc each row)
The tab measures 1.5 in (3.8 cm) wide and 5 in (12.7 cm) long. To attach the ring:
1. Slip the wooden ring onto the tab.
2. Fold the tab toward the inside of the holder.
3. Whipstitch Row 20 to the inside of the rim, directly behind Row 1.
This makes a doubled loop 2.5 in (6.4 cm) tall. The total height to the fold is 18.25 in (46.4 cm).
Opening Edging
Rnd 1: Join Color B in st 33 of Rnd 7. Ch 1, then work around the opening:
– Bottom edge: sc in each of the 8 unworked sts (8 sc)
– First side: 2 sc in each of the 3 row ends (6 sc)
– Top edge: sc in each of the 8 free loops of the ch-8 (8 sc)
– Second side: 2 sc in each of the 3 row ends (6 sc)
Join. (8 + 6 + 8 + 6 = 28 sc) Fasten off and remove the markers.
Why the math works: Each dc row is 0.5 in (1.3 cm) tall and each sc is 0.25 in (0.6 cm). Two sc per row end therefore matches the height of each side exactly. The top and bottom edges have 8 stitches each, so 1 sc per stitch keeps them flat. The edging fills in the opening slightly, leaving about 1.75 in (4.4 cm) x 1.25 in (3.2 cm). That’s wide enough to pull out one bag but small enough to hold the rest in.
Final Blocking
- Weave in all ends on the WS, running them along the post stitches so they stay hidden.
- Soak the holder in cool water. Press out the water gently; don’t wring it.
- Roll a hand towel into a cylinder about 10 in (25.4 cm) around and slide it into the tube.
- Lay the holder on a dry towel. Line up the block columns so they run straight up and down.
- Pin the tab flat and square, and shape the opening into a neat oval.
- Let it dry completely, which takes 24–48 hours. If you used acrylic, steam it lightly instead and don’t press the posts flat.
Final Quality-Control Checklist
- Every body round has 40 sts, and every rim round has 40 sc.
- Each block is 4 sts wide and 2 rows tall, and the blocks alternate cleanly.
- The holder is 5 in (12.7 cm) wide laid flat and 15.75 in (40.0 cm) tall.
- The opening edging has 28 sc, with no gaps at the corners.
- The tab sits at the center back, directly opposite the opening.
- The ring is secure, and the tab seam can’t be seen from the outside.
- All ends are woven in and trimmed.
Troubleshooting
Blocks lean or spiral: Join each round to the first real post stitch, not to the ch 2.
Tube is too wide: Your post stitches are too loose. Go down a hook size, or snug each post stitch before you finish it.
Base cups or ruffles: If it cups, use a hook one size larger. If it ruffles, use one size smaller. Keep the count at 40 either way.
Gaps at the opening corners: Work the first and last sc of each side into the corner row end, and keep the edging snug.
Rim flares: Work the rim with a hook one size smaller.
Rnd 4 looks uneven above the opening: This is normal. Rnd 5 and blocking will even it out.
Care
Hand wash in cool water, reshape the holder, and dry it over a rolled towel. Take the wooden ring off before any machine washing.
Final Notes
Each measurement builds on the last one:
– The 40-stitch base, 3.25 in (8.3 cm) across, sets the 10 in (25.4 cm) circumference.
– Twenty-nine rows at 0.5 in each give 14.5 in (36.8 cm) of basketweave.
– The 0.5 in (1.3 cm) band and the 0.75 in (1.9 cm) rim bring the total height to 15.75 in (40.0 cm).
– The tab adds a 2.5 in (6.4 cm) loop for hanging.
Happy crocheting!