

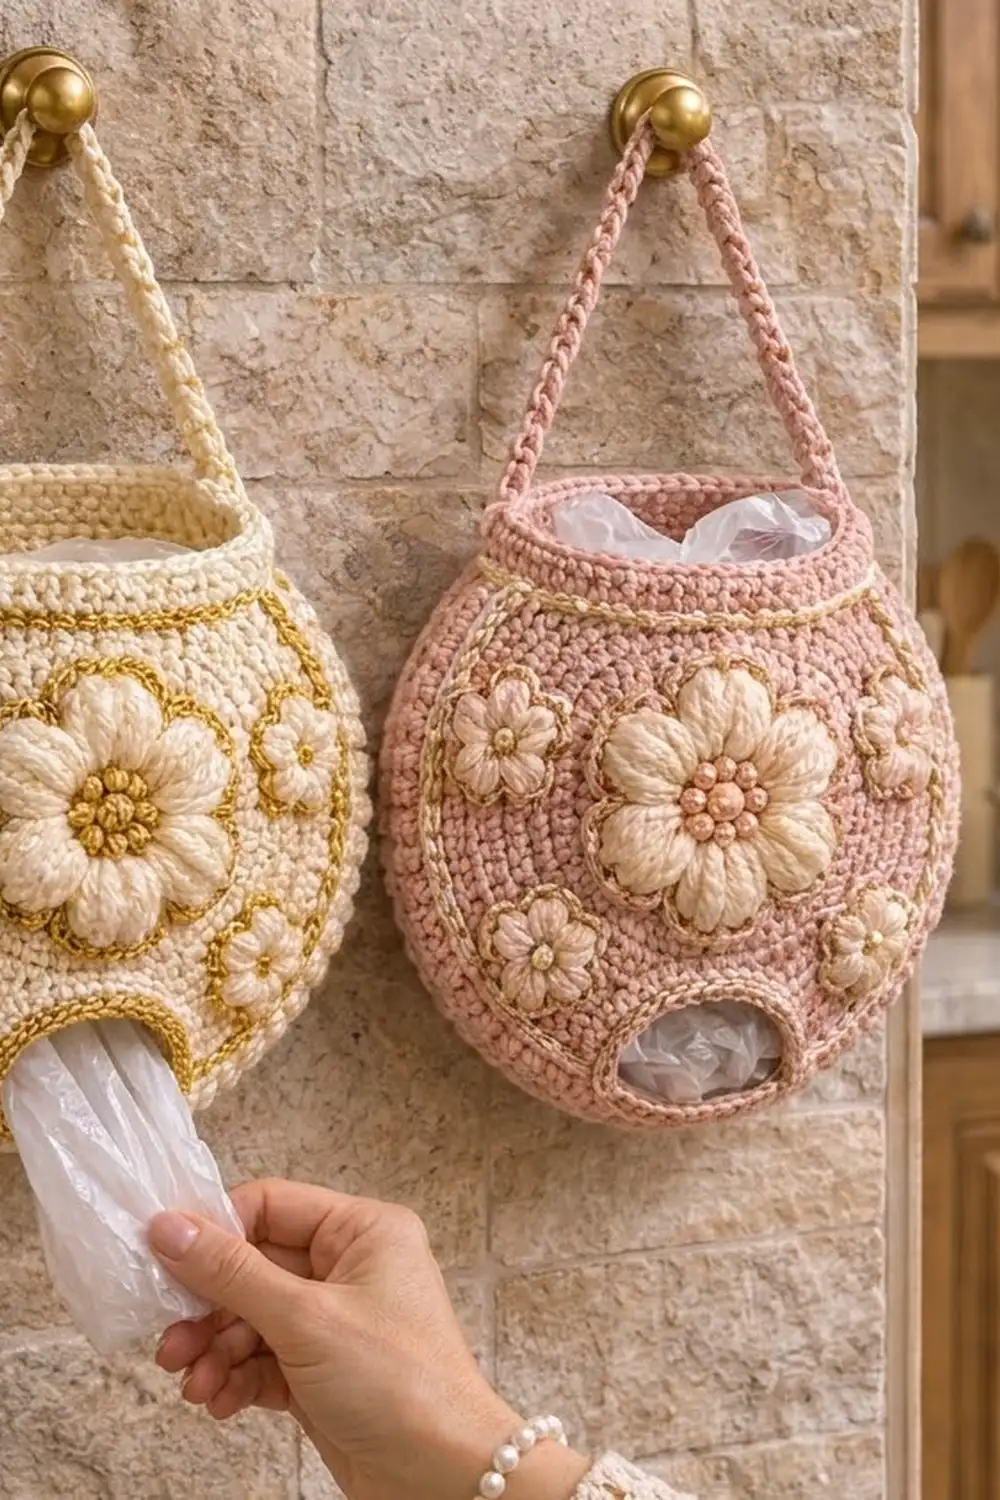
The Golden Bloom Bag Holder is a round, puffy hanging dispenser for plastic grocery bags. You stuff bags in through the wide collar at the top and pull them out one at a time through the gold-edged opening at the base. It hangs from a hook by a slim strap.
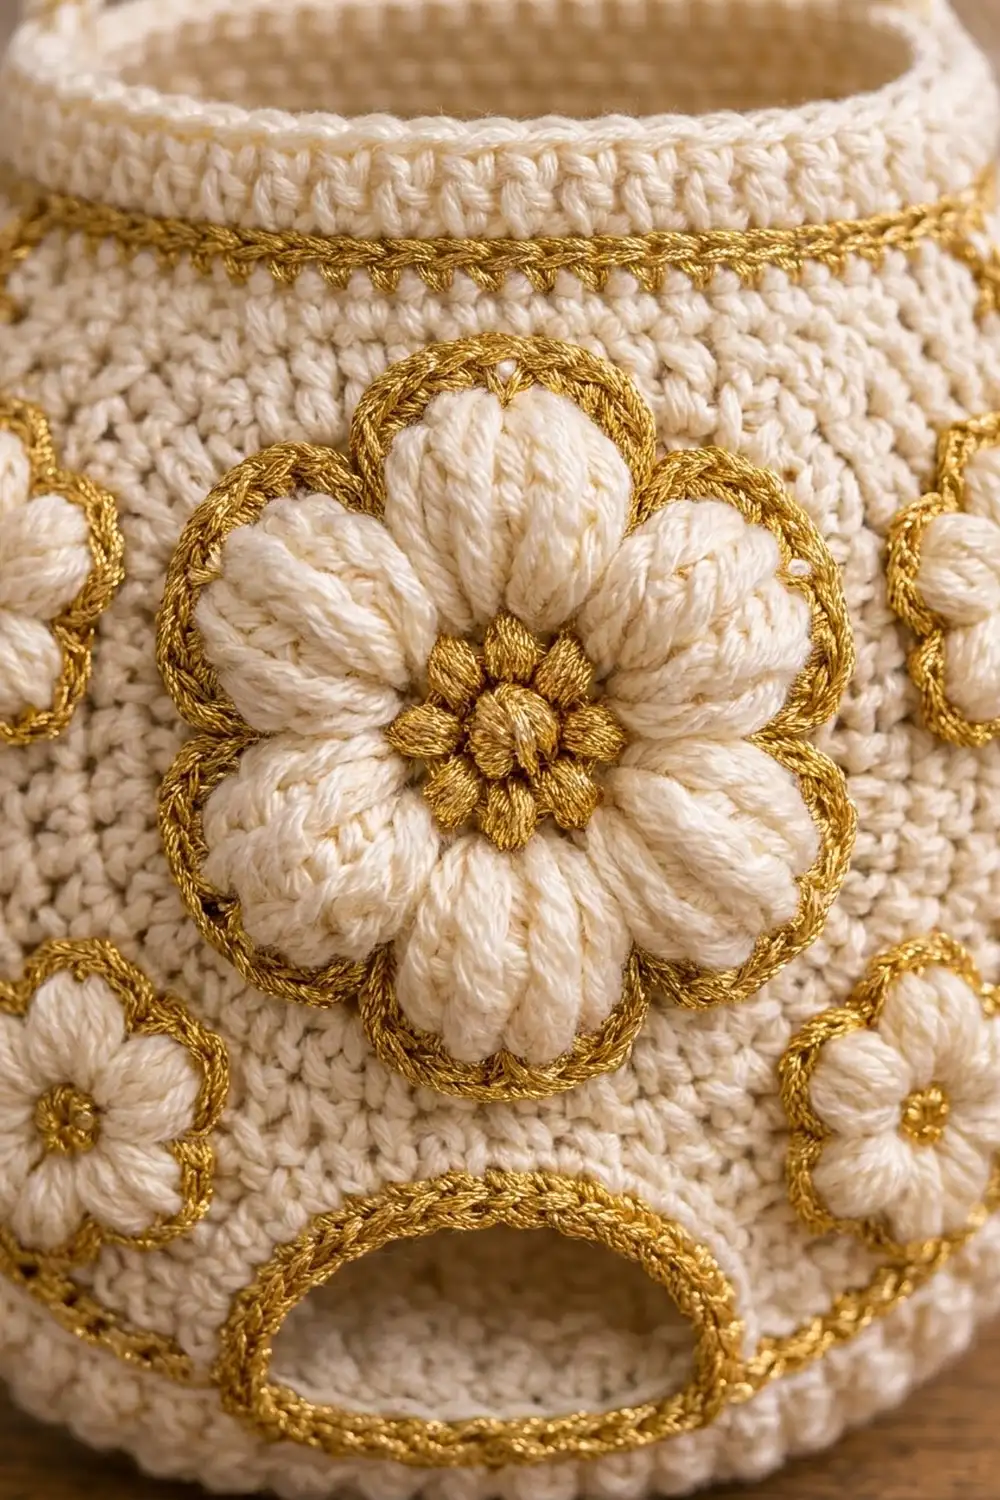
The body is soft cream with a crisp gold accent stitched over it. The front has a large puff-stitch flower with a beaded gold center, six smaller five-petal flowers circling it, and a gold ring framing the whole design. Gold also outlines every petal, edges the dispensing hole, and runs as a stripe under the collar.
This pattern uses US crochet terms. The finished holder is about 9.5 in (24.1 cm) wide and about 9 in (22.9 cm) tall from the base opening to the rim, plus a 10 in (25.4 cm) strap.
Construction is simple. You work the body in continuous sc rounds, starting from a chain ring that becomes the dispensing hole, shape a squat ball with increases and decreases, and finish with a collar. The flowers are made separately and sewn on, and the gold ring is added with surface slip stitch.
Finished Size and Construction
- Finished size: about 9.5 in (24.1 cm) wide x 9 in (22.9 cm) tall, strap 10 in (25.4 cm)
- Skill level: Intermediate (easy shaping, plus puff stitches and surface slip stitch)
- Terminology: US
- Yarn weight: Worsted (#4)
- Hook: 5.0 mm (H-8)
- Number of pieces: 1 body, 1 large flower, 6 small flowers, 1 strap
- Layout: large flower centered on the front, small flowers at 1, 3, 5, 7, 9, and 11 o’clock, gold ring around them
- Piece sizes: large flower 3.5 in (8.9 cm), small flowers 1.75 in (4.4 cm), gold ring 7.5 in (19.1 cm) across
- Size before border: top opening about 5.7 in (14.5 cm) across, base opening about 2.9 in (7.4 cm) across
- Border depth: 1 rim round at the top and 2 edging rounds at the base hole, about 0.5 in (1.3 cm) combined depth at the base
Materials
Use a worsted cotton or cotton-blend yarn. Cotton holds the round shape well and keeps stitch definition sharp. Acrylic works too, but the ball will be softer and may sag a little when it’s full.
- Cream (main color): 180 g / 330 m
- Gold (accent): 30 g / 55 m. A mustard worsted or a metallic gold worsted both work. If your metallic is thinner, hold it double.
The quantities include a margin of about 15 percent for your gauge swatch and a little extra.
Tools:
- 5.0 mm (H-8) crochet hook
- Stitch markers (at least 8)
- Tapestry needle
- Scissors
- Rustproof pins
- Measuring tape
- A dinner plate or cardboard circle 7.5 in (19.1 cm) across, for marking the ring
- A ball or balloon about 9.5 in (24.1 cm) across, for blocking
Abbreviations (US Terms)
- ch – chain
- sl st – slip stitch
- sc – single crochet
- dc – double crochet
- sc2tog – single crochet 2 together
- BLO – back loop only
- MR – magic ring
- rnd(s) – round(s)
- st(s) – stitch(es)
- sp – space
- rev sc – reverse single crochet (crab stitch), worked left to right
Special stitches:
- Bobble: (yo, insert hook in st, yo, pull up a loop, yo, draw through 2 loops) 3 times in the same st, yo, draw through all 4 loops.
- Puff: (yo, insert hook in st, yo, pull up a loop to about 0.5 in / 1.3 cm) 4 times in the same st, yo, draw through all 9 loops.
Gauge and Checkpoints
Gauge: 16 sc and 18 rnds = 4 in (10.2 cm) in sc worked in the round.
Make one small flower first and use it as your test piece. With the correct hook and tension, it should measure 1.75 in (4.4 cm) across, including the gold outline.
Body checkpoints:
- After Rnd 1: the ring of 36 sc measures 9 in (22.9 cm) around, and the opening is about 2.9 in (7.4 cm) across.
- After Rnd 9: 84 sts, 21 in (53.3 cm) around the outer edge.
- After Rnd 20: 120 sts, 30 in (76.2 cm) around. This is the widest point, about 9.5 in (24.1 cm) across.
- After Rnd 44: 72 sts, 18 in (45.7 cm) around. The top opening is about 5.7 in (14.5 cm) across.
If you measure larger, go down one hook size. If you measure smaller, go up one hook size. A difference of 1 in (2.5 cm) at Rnd 20 is fine. Anything more will change the shape and how much yarn you need.
Body
Work in continuous rounds without joining. Place a marker in the first st of each round and move it up as you go.
Increase rnd formula: sc in each of the next (N ÷ 6 − 1) sts, 2 sc in next st 6 times, where N is the previous round’s count.
Decrease rnd formula: sc in each of the next (N ÷ 6 − 2) sts, sc2tog 6 times.
Base and Dispensing Ring
With cream, ch 36. Join with sl st to the first ch, taking care not to twist.
Rnd 1: Ch 1, sc in each ch around. Do not join. (36 sts)
The leftover loops of this foundation chain will hold the gold edging later.
Rnd 2: Sc 5, 2 sc in next st 6 times. (42 sts)
Rnd 3: Sc 6, 2 sc in next 6 times. (48 sts)
Rnd 4: Sc 7, 2 sc in next 6 times. (54 sts)
Rnd 5: Sc 8, 2 sc in next 6 times. (60 sts)
Rnd 6: Sc 9, 2 sc in next 6 times. (66 sts)
Rnd 7: Sc 10, 2 sc in next 6 times. (72 sts)
Rnd 8: Sc 11, 2 sc in next 6 times. (78 sts)
Rnd 9: Sc 12, 2 sc in next 6 times. (84 sts)
Rnd 10: Sc 13, 2 sc in next 6 times. (90 sts)
The piece is a flat ring now, with the dispensing hole at the center.
Lower Curve
Now you increase on every other round, so the flat ring starts to cup upward.
Rnd 11: Sc in each st. (90 sts)
Rnd 12: Sc 14, 2 sc in next 6 times. (96 sts)
Rnd 13: Sc in each st. (96 sts)
Rnd 14: Sc 15, 2 sc in next 6 times. (102 sts)
Rnd 15: Sc in each st. (102 sts)
Rnd 16: Sc 16, 2 sc in next 6 times. (108 sts)
Rnd 17: Sc in each st. (108 sts)
Rnd 18: Sc 17, 2 sc in next 6 times. (114 sts)
Rnd 19: Sc in each st. (114 sts)
Rnd 20: Sc 18, 2 sc in next 6 times. (120 sts)
Sides
Rnds 21–32: Sc in each st. (120 sts each rnd)
These 12 rounds add about 2.7 in (6.9 cm) of straight wall at the widest part.
Upper Curve
Rnd 33: Sc 18, sc2tog 6 times. (114 sts)
Rnd 34: Sc in each st. (114 sts)
Rnd 35: Sc 17, sc2tog 6 times. (108 sts)
Rnd 36: Sc in each st. (108 sts)
Rnd 37: Sc 16, sc2tog 6 times. (102 sts)
Rnd 38: Sc in each st. (102 sts)
Rnd 39: Sc 15, sc2tog 6 times. (96 sts)
Rnd 40: Sc in each st. (96 sts)
Rnd 41: Sc 14, sc2tog 6 times. (90 sts)
Rnd 42: Sc 13, sc2tog 6 times. (84 sts)
Rnd 43: Sc 12, sc2tog 6 times. (78 sts)
Rnd 44: Sc 11, sc2tog 6 times. (72 sts)
Collar
Rnd 45: Change to gold. Sc in BLO of each st. (72 sts)
The unused front loops form a fold line, and the gold makes the stripe under the collar.
Rnds 46–50: Change to cream. Sc in each st. (72 sts each rnd)
Do not fasten off. The rim round is in the Border section.
Large Flower (make 1)
Rnd 1: With gold, 6 sc in MR. (6 sts)
Rnd 2: (Bobble, sc) in each st around. Sl st to the first bobble. (12 sts: 6 bobbles, 6 sc)
The bobbles form the beaded gold center.
Rnd 3: Join cream. Ch 1, 2 sc in each st around, then sl st to the first sc. (24 sts)
Rnd 4: Sl st in next st, skip 1 st, (puff, ch 1, puff, ch 1, puff) in next st 8 times. (8 petals, each using 3 sts of Rnd 3)
Rnd 5: Join gold in the first sl st. Sc in sl st, sc in first puff, 2 sc in ch-1 sp, sc in middle puff, 2 sc in ch-1 sp, sc in last puff 8 times. Sl st to the first sc. (64 sts, 8 per petal)
Fasten off and leave a long gold tail. The flower measures 3.5 in (8.9 cm) across.
Small Flowers (make 6)
Rnd 1: With gold, 5 sc in MR. Sl st to the first sc. (5 sts)
Rnd 2: Join cream. Ch 1, 2 sc in each st, then sl st to the first sc. (10 sts)
Rnd 3: (Puff, ch 1, puff) in next st, sl st in next st 5 times. (5 petals, each using 2 sts of Rnd 2)
Rnd 4: Join gold. Sc in sl st, sc in first puff, 2 sc in ch-1 sp, sc in second puff 5 times. Sl st to the first sc. (25 sts, 5 per petal)
Fasten off and leave a long tail. Each flower measures 1.75 in (4.4 cm) across.
Strap (make 1)
With cream, ch 41.
Row 1: Sc in 2nd ch from hook and each ch across. Turn. (40 sts)
Row 2: Ch 1, sc in each st across. (40 sts)
Fasten off and leave a long tail. The strap is 10 in (25.4 cm) long and about 0.5 in (1.3 cm) wide.
Assembly and Gold Ring
- Choose the front of the body. It’s the side where the base hole sits just below center when the holder hangs.
- Center the plate on the front, with its lower edge just above the base edging. Trace around it with pins.
- With gold, surface slip stitch along the pinned line to make the ring, 7.5 in (19.1 cm) across.
- Pin the large flower in the center of the ring.
- Pin the small flowers at 1, 3, 5, 7, 9, and 11 o’clock, with each center 2.75 in (7.0 cm) from the large flower’s center. This leaves a small gap between each small flower and the large one, and between the small flowers and the ring.
- Whipstitch each flower down through the back loops of its gold outline, so the puffs stay raised.
- Sew the strap ends inside the collar on opposite sides, at st 1 and st 37 of Rnd 50, overlapping 0.5 in (1.3 cm).
Border
The border has two parts: a rim round at the top and an edging around the dispensing hole. Both are worked one st per st with no increases. That way the openings keep their measured size and don’t ruffle or pull in.
Border gauge: the rim and the base edging should keep the same 4 sts per in (2.5 cm) as the body.
Top Rim
Rnd 51: With cream, rev sc in each st around. Sl st to the first st and fasten off. (72 sts: 36 on the front half and 36 on the back half)
Base Opening Edging
Rnd A: Hold the body with the base facing you. Join gold in any free loop of the foundation chain. Ch 1, sc in each free loop around, then sl st to the first sc. (36 sts: 18 on the front half and 18 on the back half)
Rnd B: Ch 1, rev sc in each st around, then sl st to join. (36 sts)
Why the math works: the foundation ring has exactly 36 chains, so 1 sc per chain gives 36. Rev sc in each st keeps 36. The opening stays at 9 in (22.9 cm) around, which is snug enough to hold bags in and loose enough to pull one out. The top rim keeps the 72 sts of Rnd 50, so the collar stays at 18 in (45.7 cm) around.
Final Blocking
- Weave in all ends inside the body.
- Push a ball or a balloon about 9.5 in (24.1 cm) across into the body through the collar.
- Smooth the stitches so the rounds sit level, and center the gold ring on the front.
- Mist the piece lightly, or steam gently from above without touching it. Use steam only on cotton or blends.
- Fluff each puff petal with your fingers so it stands up.
- Let it dry completely, then remove the ball.
- Flatten the strap and let it dry flat.
Final Quality-Control Checklist
- The body measures about 9.5 in (24.1 cm) wide at Rnd 20.
- The base opening has 36 sts and is about 2.9 in (7.4 cm) across.
- The collar has 72 sts, and the gold stripe sits evenly under it.
- The large flower has 8 petals and 6 gold bobbles.
- Each small flower has 5 petals, and all 6 are evenly spaced.
- The gold ring is a smooth circle with an even surface stitch.
- The strap is sewn securely on opposite sides and doesn’t twist.
- All ends are woven in and none show on the front.
Troubleshooting
- The base ring twisted: frog Rnd 1, then rejoin the chain and check it lies flat.
- The body is cone-shaped instead of round: you probably skipped the plain rounds in Rnds 11–19. Recount against the stitch totals.
- The body is too wide: your gauge is loose. Use a smaller hook.
- The puffs look flat: pull each loop up taller, to 0.5 in (1.3 cm).
- The flowers cup: block them flat before sewing, or loosen Rnd 5 (large) or Rnd 4 (small).
- The surface ring is puckering: your slip stitches are too tight. Use a larger hook for this step only.
- The bags fall out: work Rnd B more tightly, or add a sl st round before it.
Care
Hand wash in cool water and lay flat to dry, reshaping it over a ball. Don’t tumble dry, because the puffs will felt and lose their shape.
Final Notes
Everything depends on your gauge of 16 sc and 18 rnds to 4 in (10.2 cm). A 36-st base ring gives a 2.9 in (7.4 cm) opening. Growing to 120 sts gives a 9.5 in (24.1 cm) wide body. Decreasing to 72 sts gives a 5.7 in (14.5 cm) collar. Measure at each checkpoint and the flowers will fit inside the 7.5 in (19.1 cm) gold ring exactly as planned.
Happy crocheting!