

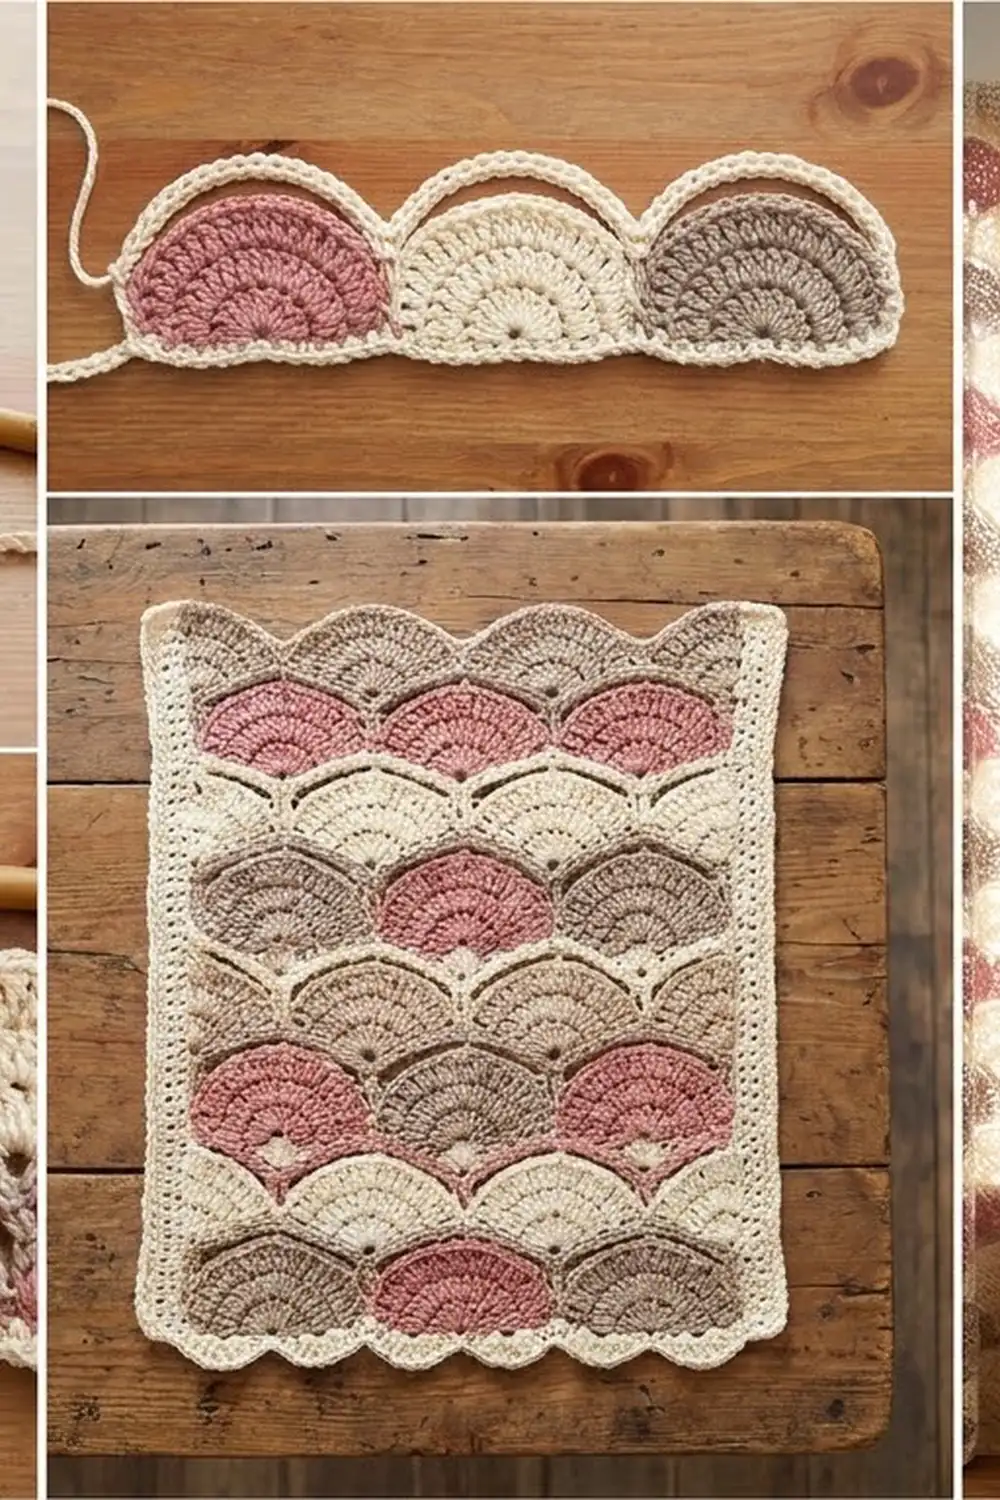
The Rosewood Fan Lace Panel is a rectangle of plump fan shells. Each fan is framed by a soft cream chain arch. The fans sit in offset tiers like roof tiles, so every new tier nests between the fans below it.
The colors are dusty rose, warm cream and mushroom taupe. Full tiers run rose, cream, taupe from right to left. The tiers in between run cream half fan, taupe, rose, cream half fan, so the colors form gentle diagonals across the panel. The cream frame ties everything together, and small cream scallops finish the bottom edge.
This pattern uses US crochet terms. The finished panel measures 12.5 in wide x 15.5 in long (31.8 cm x 39.4 cm) after blocking.
The panel is one single piece, worked flat in rows from the bottom up. First you work a cream foundation row. After that, each tier has two rows. In the first row you add the colored fans one at a time from the right side. In the second row, cream yarn caps the fans and builds the tall posts for the next tier. A two-round cream border with scallops along the bottom finishes the piece.
Finished Size and Construction
- Finished size: 12.5 in x 15.5 in (31.8 cm x 39.4 cm)
- Skill level: Intermediate
- Terminology: US
- Yarn weight: Worsted (#4)
- Hook: 5.5 mm (I-9)
- Number of pieces: 1 (no joining)
- Layout: 3 fan repeats wide x 7 tiers tall
- Piece size before border: 12 in x 14.5 in (30.5 cm x 36.8 cm)
- Border depth: 0.25 in (0.6 cm) on the sides and top; 0.75 in (1.9 cm) on the bottom, scallops included
Materials
Use a smooth worsted cotton or cotton blend so the fans stay crisp and the arches hold their shape. Buy all three colors from the same yarn line so they are the same thickness.
- Cream (frame, border, cream fans): 50 g, about 95 m
- Dusty rose (fans): 15 g, about 30 m
- Taupe (fans): 15 g, about 30 m
These amounts include a margin of about 20 percent. The margin also covers the tails you leave each time you join and fasten off a fan.
Tools:
- 5.5 mm (I-9) crochet hook
- Tapestry needle
- Scissors
- 1 removable stitch marker
- Blocking mat, rust-proof pins, spray bottle
- Measuring tape
Abbreviations (US Terms)
- ch: chain
- sl st: slip stitch
- sc: single crochet
- dc: double crochet
- tr: treble crochet
- dtr: double treble crochet
- sp(s): space(s)
- st(s): stitch(es)
- sk: skip
- RS / WS: right side / wrong side
Special stitches:
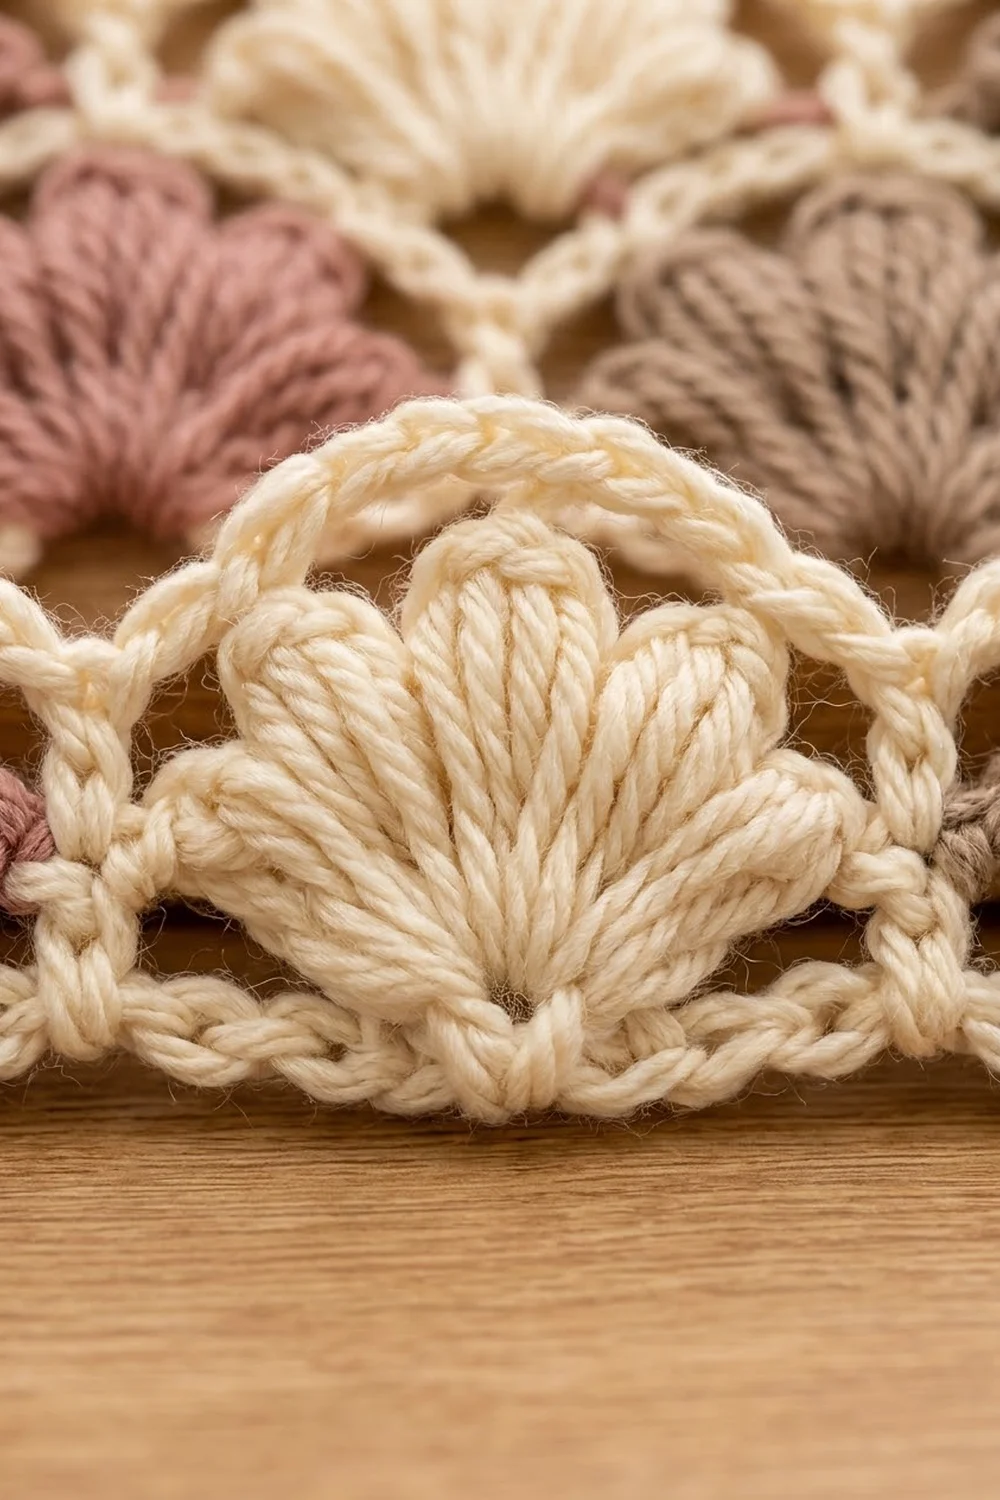
- Fan: Join the new color with a sl st in the stitch given. Ch 4 (counts as tr), then work 8 tr in the same stitch, for 9 tr in total. Fasten off.
- Half Fan: Join the new color with a sl st in the edge dtr. Ch 4 (counts as tr), then work 4 tr in the same stitch, for 5 tr in total. Fasten off. The stitch at the outer edge is the “edge-most” stitch. The stitch facing the center is the “innermost” stitch.
- Cap: Sc in the 1st tr of the fan, ch 4, sk 3 tr, sc in the 5th (center) tr, ch 4, sk 3 tr, sc in the 9th tr. Each Cap has 3 sc and 2 ch-4 sps.
- Half Cap: Sc in the stitch at one end of the Half Fan, ch 4, sc in the stitch at the other end. Each Half Cap has 2 sc and 1 ch-4 sp.
Gauge and Checkpoints
- Foundation gauge: 37 sc = 12 in (30.5 cm), or about 3 sc per inch.
- Tier gauge: 1 tier (fan row + frame row) is 2 in (5.1 cm) tall. 1 fan repeat (dtr to dtr) is 4 in (10.2 cm) wide.
Make a test piece before you start. Ch 14 and work 1 row of sc (13 sc). Work 1 Fan in the 7th sc, then work a dtr post at each end with a Cap between them. The test piece should be 4 in (10.2 cm) wide. The Fan and its frame together should be 2 in (5.1 cm) tall.
Checkpoints:
- After Row 1: 12 in (30.5 cm) wide
- After Tier 2: 4.25 in (10.8 cm) tall
- After Tier 4: 8.25 in (21.0 cm) tall
- After Tier 7: 14.25 in (36.2 cm) tall
- After Row 16: 12 in x 14.5 in (30.5 cm x 36.8 cm)
If your piece is too big, go down one hook size to 5.0 mm. If it is too small, go up one size to 6.0 mm. If only the height is off, change how far you pull up your dtr loops and keep the same hook. Posts that are too tall make the arches sag. Posts that are too short make the fans cup.
Panel Pattern
Work the cream rows back and forth, and don’t cut the cream yarn. When you finish a cream row, put the live loop on the stitch marker. Then add the colored fans from the RS and pick the cream loop back up. The fan rows are always worked from the RS. The frame rows alternate between WS and RS. Hide the fan tails under the Cap stitches as you work.
Foundation
With cream, ch 38.
Row 1 (RS): Sc in the 2nd ch from the hook and in each ch across. (37 sc) Put the loop on the marker.
Number the sc 1 to 37 from right to left. The Fans go in sc 7, 19 and 31. The posts go in sc 1, 13, 25 and 37.
Tier 1 (Full Tier)
Row 2 (RS, fans): Working from right to left, make a rose Fan in sc 7, a cream Fan in sc 19 and a taupe Fan in sc 31. (3 Fans of 9 tr each)
Row 3 (WS, cream frame): Pick up the cream loop and turn. Ch 5 (counts as dtr). Ch 3, Cap over the next Fan, ch 3, dtr in the next post sc (sc 25, then sc 13). Repeat from * once more. Ch 3, Cap over the last Fan, ch 3, dtr in the last sc.
(4 dtr, 9 sc, 6 ch-3 sps, 6 ch-4 sps)
The dtr posts stand between the Fans and reach the height of the Fan tips. The Caps form the cream arches over the Fans.
Tier 2 (Offset Tier)
Row 4 (RS, fans): Working from right to left, make a cream Half Fan in the edge dtr, a taupe Fan in the next dtr, a rose Fan in the next dtr and a cream Half Fan in the last dtr.
(2 Fans of 9 tr + 2 Half Fans of 5 tr)
Row 5 (RS, cream frame): Pick up the cream loop and turn. Ch 1, then work a Half Cap from the edge-most stitch to the innermost stitch. Ch 3, dtr in the center sc of the Tier 1 Cap below, ch 3, Cap over the next Fan. Repeat from * once more. Ch 3, dtr in the last center sc, ch 3, then work a Half Cap from the innermost stitch to the edge-most stitch.
(3 dtr, 10 sc, 6 ch-3 sps, 6 ch-4 sps)
Check: the 2 Caps give 6 sc and 4 ch-4 sps. The 2 Half Caps give 4 sc and 2 ch-4 sps. That makes 10 sc and 6 ch-4 sps.
Tier 3 (Full Tier)
Row 6 (RS, fans): Make a rose Fan in the first dtr, a cream Fan in the next dtr and a taupe Fan in the last dtr. (3 Fans)
Row 7 (WS, cream frame): Pick up the cream loop and turn. Ch 5 (counts as dtr) in the edge-most sc of the Half Cap below. Ch 3, Cap over the next Fan, ch 3, dtr in the center sc of the next Tier 2 Cap. Repeat from * once more. Ch 3, Cap over the last Fan, ch 3, dtr in the edge-most sc of the last Half Cap.
(4 dtr, 9 sc, 6 ch-3 sps, 6 ch-4 sps)
The Tier 2 Fans sit on the Tier 1 posts, so the center sc of each Tier 2 Cap sits right above a Tier 1 post. Working the new posts there keeps every column of posts straight.
Tiers 4 to 7
- Tier 4 (Rows 8 and 9): Repeat Tier 2. Colors: cream half, taupe, rose, cream half.
- Tier 5 (Rows 10 and 11): Repeat Tier 3. Colors: rose, cream, taupe.
- Tier 6 (Rows 12 and 13): Repeat Tier 2.
- Tier 7 (Rows 14 and 15): Repeat Tier 3.
You now have 4 full tiers and 3 offset tiers. That is 7 rose Fans, 7 taupe Fans, 4 cream Fans and 6 cream Half Fans. The piece should be 14.25 in (36.2 cm) tall.
Top Edge
Row 16 (RS, cream): Turn and ch 1. Sc in the dtr, 2 sc in the ch-3 sp, sc in the sc, 2 sc in the ch-4 sp, sc in the sc, 2 sc in the ch-4 sp, sc in the sc, 2 sc in the ch-3 sp. Repeat from * 2 more times, then sc in the last dtr.
(3 repeats x 11 sc + 4 sc in the dtr tops = 37 sc)
This matches the 37 sc of Row 1, so the top and bottom edges are the same width. Don’t fasten off.
Border
Border gauge: about 3 sc per inch (2.5 cm). The corners are ch-2 sps and don’t count as stitches. The side counts are sc only, worked between the corner sps.
Round 1 (cream): Ch 1 and turn the work so you can go down the side.
- Long sides: Work 44 sc down each side. That is 1 sc in the end of Row 16, 6 sc spaced evenly along each tier (7 x 6 = 42) and 1 sc in the end of Row 1.
- Bottom: Sc in the free loop of each of the 37 foundation ch. (37 sc)
- Top: Sc in each of the 37 sc of Row 16. (37 sc)
- Corners: Ch 2 at each corner.
Join with a sl st to the first sc.
(37 + 44 + 37 + 44 = 162 sc, plus 4 ch-2 corner sps)
Round 2 (cream):
- Top and long sides: Sl st in each sc. Work (sl st, ch 2, sl st) in each corner sp. That gives 37 sl st across the top and 44 down each side.
- Bottom: Number the 37 bottom sc. Sc in sc 1. Sk 2 sc, 5 dc in the next sc, sk 2 sc, sc in the next sc. Repeat from * 5 more times. The last sc lands in sc 37.
(6 scallops of 5 dc + 7 sc = 37 sts)
Join with a sl st to the first sl st and fasten off.
Why the math works: Each scallop uses 6 sc: 2 skipped, 1 for the dc group, 2 skipped and 1 for the sc. Six scallops use 36 sc, and the first sc uses 1 more, for 37 in total. That is exactly the bottom count. The 44 sc on each side matches the body height: 14.5 in x 3 sc per inch is about 44. The sl st round doesn’t add width. So the finished width is 12 in + 0.25 in + 0.25 in = 12.5 in (31.8 cm). The finished length is 14.5 in + 0.25 in at the top + 0.75 in at the bottom = 15.5 in (39.4 cm).
Final Blocking
- Weave in all the remaining tails. Run each fan tail back through its own Fan so no color shows through the lace.
- Soak the panel in cool water for 10 minutes. Squeeze out the water gently, without wringing.
- Roll the panel in a towel to remove most of the moisture.
- Lay it RS up on the blocking mat and pin it to 12.5 in x 15.5 in (31.8 cm x 39.4 cm).
- Pin the middle of each bottom scallop so it dries round.
- Gently spread each Fan so the tr are evenly spaced, and ease each Cap into a smooth arch.
- Let the panel dry completely, for at least 24 hours, before you remove the pins.
Final Quality-Control Checklist
- [ ] The panel is one piece and measures 12.5 in x 15.5 in (31.8 cm x 39.4 cm).
- [ ] There are 7 tiers: 4 full tiers of 3 Fans, and 3 offset tiers of 2 Fans plus 2 Half Fans.
- [ ] The full tiers read rose, cream, taupe. The offset tiers read cream half, taupe, rose, cream half.
- [ ] Every Fan has 9 tr and every Half Fan has 5 tr.
- [ ] The dtr posts line up in straight columns.
- [ ] The bottom edge has 6 even scallops.
- [ ] No colored tails show on the front.
Troubleshooting
- Fans cup or ripple: Your tr may be shorter than your dtr posts. Pull up the tr loops a little higher, or work the posts a little tighter.
- Arches sag: Chain the Caps more firmly. You can also change ch 4 to ch 3. Row 16 still gets 2 sc in each sp, so the counts stay the same.
- The panel narrows at the top: Count Row 16 again. It needs exactly 37 sc, with no skipped ch-3 sps.
- Edge Half Fans flare out: Work them more tightly, and pin the side edges straight during blocking, about every 1 in (2.5 cm).
- Scallops don’t fit: Count the bottom of Round 1 again. You need exactly 37 sc between the corner sps.
Care
Hand wash in cool water with mild soap. Dry flat and reshape the fans and scallops while the panel is still damp. Don’t tumble dry.
Final Notes
Here is how the measurements build. Row 1 sets the width: 37 sc = 12 in (30.5 cm). Each tier adds 2 in (5.1 cm), so 7 tiers make the body 14.25 in (36.2 cm) tall. Row 16 brings the top back to 37 sc and the height to 14.5 in (36.8 cm). Round 1 adds 0.25 in (0.6 cm) on every side, and the scallops add another 0.5 in (1.3 cm) at the bottom. The finished panel is 12.5 in x 15.5 in (31.8 cm x 39.4 cm). For a wider piece of the same fabric, add 12 ch to the foundation chain for each extra fan repeat. Each extra repeat adds 4 in (10.2 cm) of width.
Happy crocheting!