

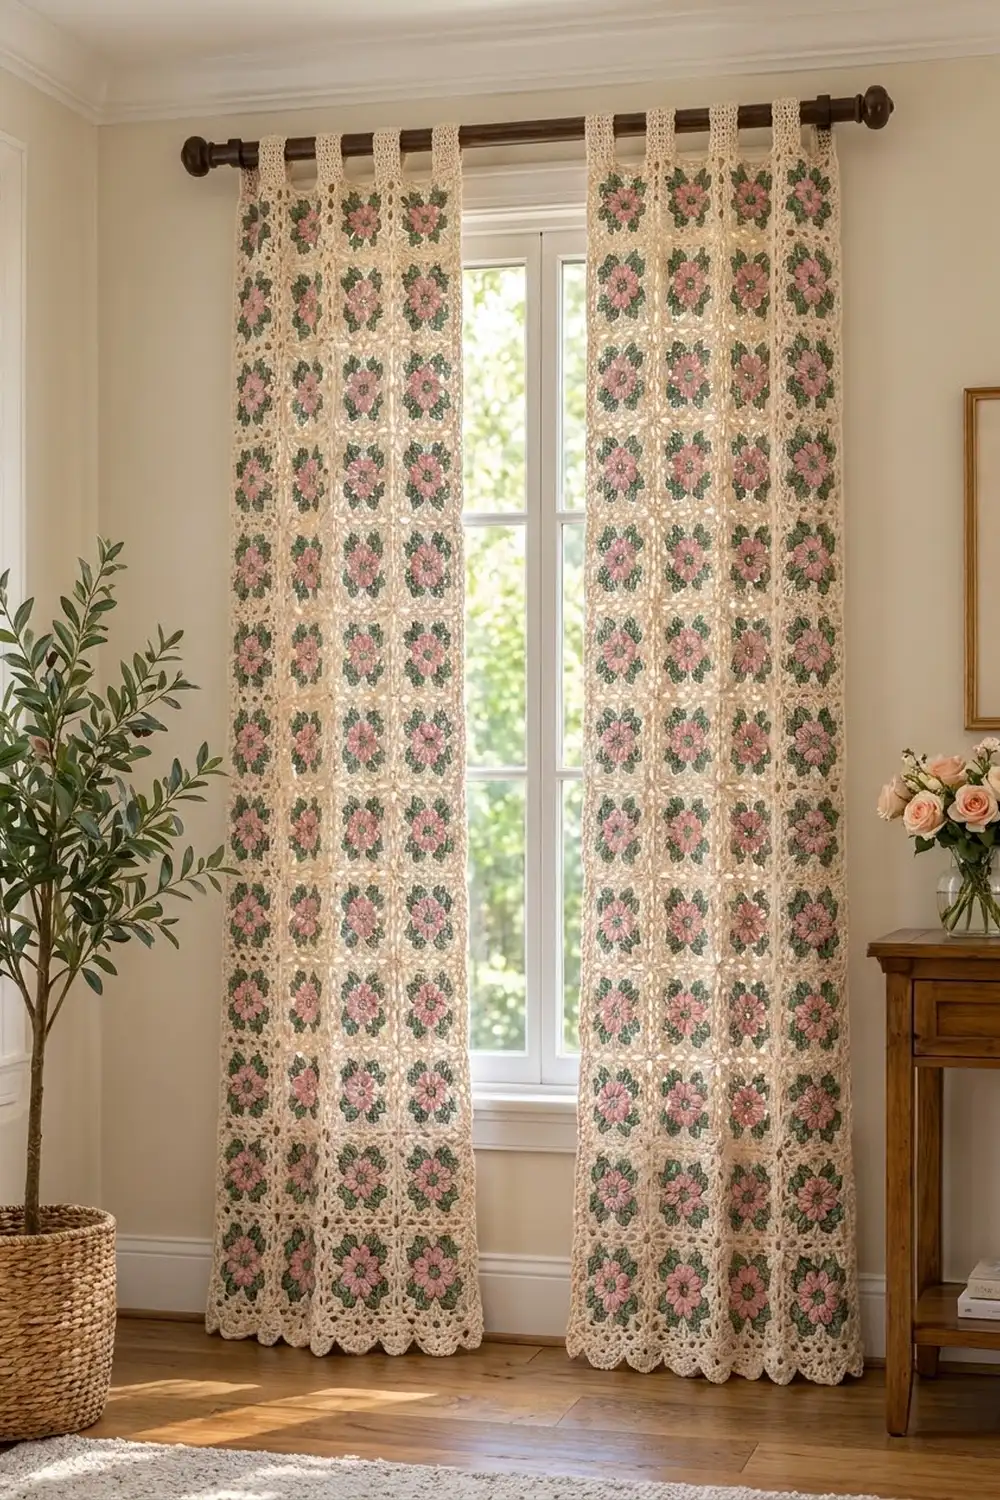
The Rosewood Garden Tab-Top Curtain is a soft, cottage-style window panel made from flower granny squares. Each square has a dusty pink eight-petal flower with a sage green center, sage green leaves at the corners, and a creamy openwork frame. Set in long columns, the squares let daylight filter through the lacy rounds.
The palette is just three colors: cream, dusty rose pink, and sage green. The look is vintage farmhouse, and because the construction is simple and repetitive, it works well as a long-term project.
This pattern uses US crochet terms. One finished panel measures about 20 in (50.8 cm) wide and 74.25 in (188.6 cm) long before the tabs. The tab loops add about 3.5 in (8.9 cm) above the top edge. For a pair of panels, as shown, make the panel twice.
Construction overview: crochet 36 identical 6 in (15.2 cm) squares per panel. Join them in a grid 3 squares wide and 12 squares tall. Add a three-round border with a shell scallop along the bottom. Finally, work five tabs from the top edge and fold them over to form rod loops.
Finished Size and Construction
- Finished panel size: 20 in x 74.25 in (50.8 cm x 188.6 cm), plus 3.5 in (8.9 cm) tab loops
- Skill level: Intermediate
- Terminology: US crochet terms
- Yarn weight: Worsted (#4), cotton or cotton blend
- Hook: 5.0 mm (H-8)
- Number of pieces: 36 squares + 5 tabs per panel (72 squares + 10 tabs for a pair)
- Layout: 3 squares wide x 12 squares tall
- Square size: 6 in x 6 in (15.2 cm x 15.2 cm)
- Size before border: 18 in x 72 in (45.7 cm x 182.9 cm)
- Border depth: about 1 in (2.5 cm) on the sides and top, about 1.25 in (3.2 cm) at the scalloped bottom
Materials
Choose a smooth worsted-weight cotton or cotton blend at roughly 170 m per 100 g. Cotton hangs straight, doesn’t stretch much under its own weight, and shows stitch definition well. Avoid very drapey acrylics for a full-length curtain, because they can grow longer over time.
Per panel:
- Cream (main color): 550 g, about 935 m
- Dusty rose pink: 160 g, about 272 m
- Sage green: 160 g, about 272 m
For a pair of panels:
- Cream: 1,100 g, about 1,870 m
- Dusty rose pink: 320 g, about 544 m
- Sage green: 320 g, about 544 m
Quantities include a margin of roughly 10 percent for gauge swatches, tails, and joining.
Tools:
- 5.0 mm (H-8) crochet hook
- Tapestry needle
- Scissors
- Stitch markers
- Measuring tape
- Blocking mats and rust-proof pins
- Spray bottle
Abbreviations (US Terms)
- ch – chain
- sl st – slip stitch
- sc – single crochet
- dc – double crochet
- sk – skip
- sp – space
- st(s) – stitch(es)
- RS / WS – right side / wrong side
- rep – repeat
- CL (3-dc cluster) – yarn over, insert hook in indicated sp, yarn over and pull up a loop, yarn over and pull through 2 loops 3 times, yarn over and pull through all 4 loops on hook.
- Beg CL (beginning cluster) – ch 2, then work a 2-dc cluster in the same sp. This is the same as CL, but repeat the bracketed steps only 2 times and pull through all 3 loops.
Gauge and Checkpoints
Make one complete square before anything else and measure it. Gauge matters here because any error in one square is multiplied 12 times down the length.
Gauge: one square through Round 9 = 6 in x 6 in (15.2 cm x 15.2 cm), with 25 sts per side, or about 4.17 sts per inch.
Checkpoints for one square:
- After Round 1: about 1.25 in (3.2 cm) across
- After Round 3: about 3 in (7.6 cm) across, petal tip to petal tip
- After Round 6: about 4.5 in (11.4 cm) square
- After Round 9: 6 in (15.2 cm) square
If your square is too big: go down to a 4.5 mm hook. If too small: go up to a 5.5 mm hook. An error of only 0.125 in (0.3 cm) per square adds up to 1.5 in (3.8 cm) over the 12-square length, so adjust before making the rest.
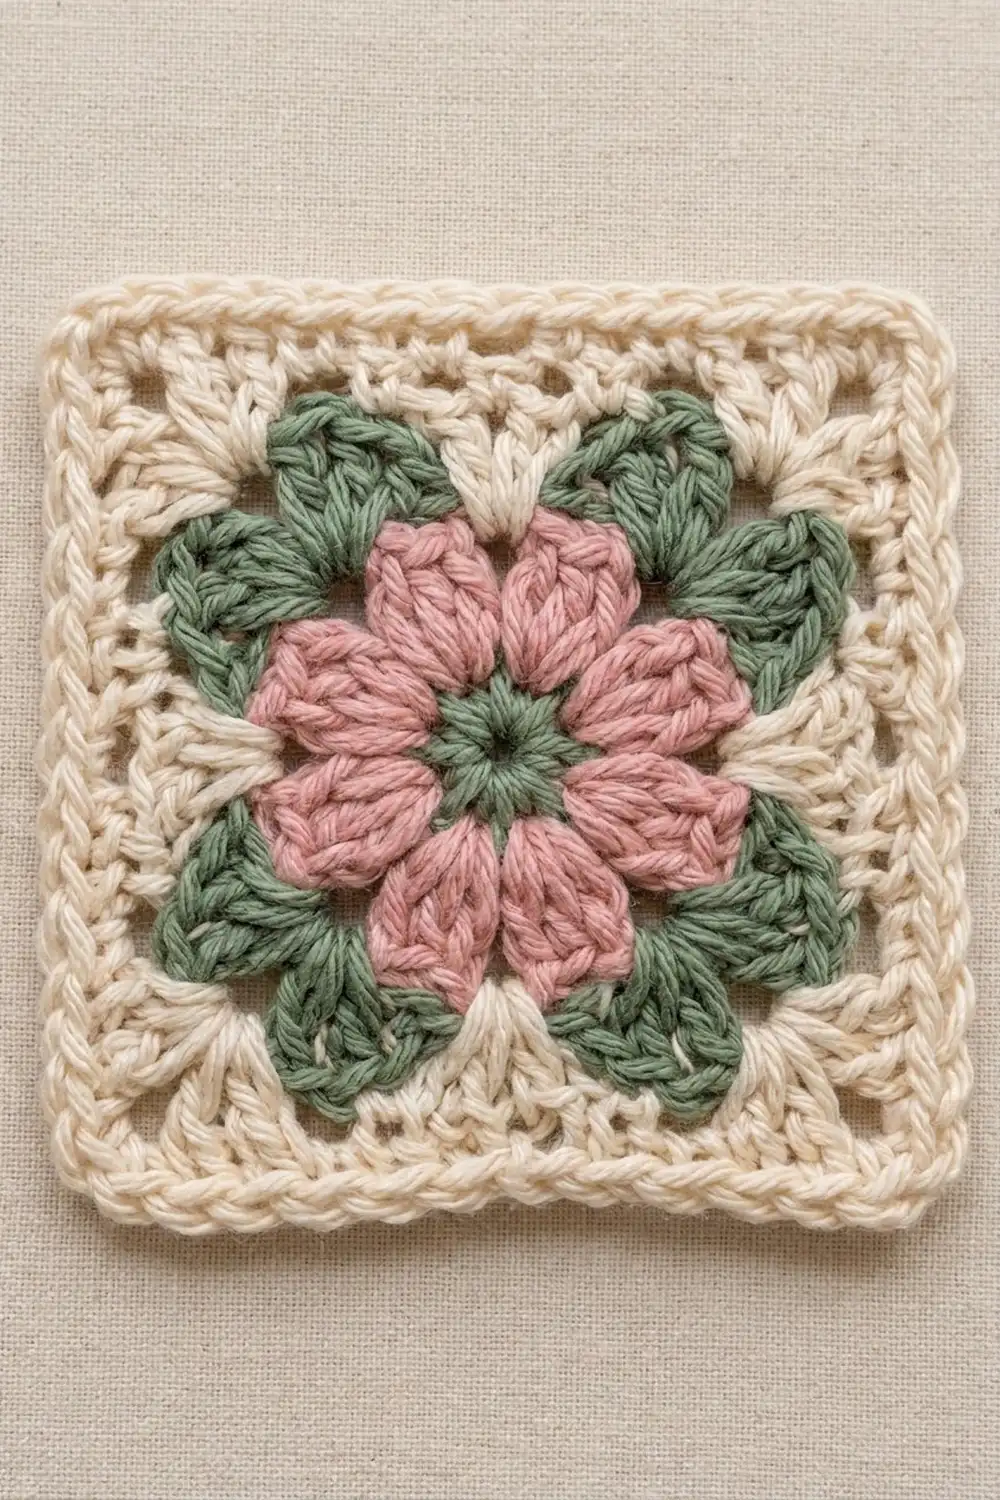
Flower Square (make 36 per panel)
Round 1 (green): Make a magic ring. Ch 3 (counts as first dc), then work 15 dc into the ring. Join with sl st to top of ch-3. Pull the ring closed. Fasten off. (16 dc)
Round 2 (pink): Join pink in any st. Ch 3 (counts as dc), dc in same st, 2 dc in each st around. Join to top of ch-3. (32 dc)
Round 3 (pink, petals): Do not fasten off. Sk next st, 5 dc in next st, sk next st, sl st in next st; rep from * 8 times total. The last sl st lands in the joining st of Round 2. (8 petals of 5 dc each, 8 sl sts) Fasten off.
The 5-dc shells cupped between slip stitches make the eight rounded petals.
Round 4 (green, behind petals): Join green with sl st in any sl st of Round 3. Ch 4, working behind the next petal, sl st in the next sl st; rep from * 8 times total, ending in the joining sl st. (8 ch-4 sps)
These chain loops sit behind the flower, so the petals stay in front.
Round 5 (green, leaves): Sl st into the next ch-4 sp. Beg CL in same sp, ch 3, CL in same sp (first corner made), ch 2, sc in next ch-4 sp, ch 2. (CL, ch 3, CL) in next ch-4 sp, ch 2, sc in next ch-4 sp, ch 2; rep from * 3 more times. Join to top of beg CL. Fasten off. (8 CL, 4 sc, 4 ch-3 corner sps, 8 ch-2 sps)
Each pair of clusters makes the V of sage leaves at one corner.
Round 6 (cream): Join cream in any ch-3 corner sp. Ch 3 (counts as dc), (2 dc, ch 2, 3 dc) in same sp. 3 dc in next ch-2 sp, dc in next sc, 3 dc in next ch-2 sp, (3 dc, ch 2, 3 dc) in next corner sp; rep from * around, leaving out the last corner. Join to top of ch-3. (13 dc per side between corner ch-2 sps; 52 dc total)
Side check: 3 + 3 + 1 + 3 + 3 = 13.
Round 7 (cream, openwork): Sl st into the corner ch-2 sp. Ch 3 (counts as dc), (dc, ch 2, 2 dc) in same sp. Ch 1, sk next dc, (dc in next dc, ch 1, sk next dc) 6 times, (2 dc, ch 2, 2 dc) in next corner sp; rep from * around, leaving out the last corner. Join. (per side: 10 dc and 7 ch-1 sps = 17 sts between corner ch-2 sps; 68 sts total)
This mesh round creates the lacy windows in the frame.
Round 8 (cream): Sl st into the corner sp. Ch 3, (dc, ch 2, 2 dc) in same sp. Dc in each dc and each ch-1 sp across, (2 dc, ch 2, 2 dc) in next corner sp; rep from * around, leaving out the last corner. Join. (21 dc per side between corner sps; 84 dc total)
Side check: 2 + 17 + 2 = 21.
Round 9 (cream): Ch 1, sc in each dc around, working 3 sc in each corner ch-2 sp. Join to first sc. Fasten off, leaving a short tail. (96 sc)
Per-side count: 25 sts, counting the middle corner sc at each end: 1 corner + 1 + 21 + 1 + 1 corner = 25. Four sides minus 4 shared corners: 4 x 25 − 4 = 96. ✓
Weave in all tails before joining.
Make All Pieces
Per panel: 36 flower squares. Every square uses all three colors.
- Green: Rounds 1, 4, and 5 (about 4 g per square)
- Pink: Rounds 2 and 3 (about 4 g per square)
- Cream: Rounds 6 to 9 (about 11 g per square)
For a pair of panels, make 72 squares.
Layout grid (one panel, 3 wide x 12 tall):
Top (tabs)
[S][S][S]   row 1
[S][S][S]   row 2
[S][S][S]   row 3
[S][S][S]   row 4
[S][S][S]   row 5
[S][S][S]   row 6
[S][S][S]   row 7
[S][S][S]   row 8
[S][S][S]   row 9
[S][S][S]   row 10
[S][S][S]   row 11
[S][S][S]   row 12
Bottom (scallops)
Lightly block all squares to 6 in (15.2 cm) before joining. Squares of the same size give straight seams.
Joining
Method: Flat slip stitch join from the RS, using cream, through the back loops only.
- Join the squares into 12 horizontal rows of 3. Lay two squares RS up with their edges side by side. Starting in the corner center sc, sl st through the back loop of the matching st on each square. Work 25 sl sts, corner to corner, so each of the 25 sts on one square pairs with one of the 25 sts on the other.
- Join the 12 rows to each other along the long horizontal seams. Each seam is 75 sts (3 squares x 25 sts). Work straight through the seam corners without adding chains.
Tension: keep the slip stitches loose enough that each seam is as long as the square edge. Tight seams pucker. If needed, use a 5.5 mm hook just for joining.
Checkpoint: the joined body measures 18 in x 72 in (45.7 cm x 182.9 cm). The front loops left on the RS form a fine raised ridge that frames each square.
Border
Border gauge: about 4.17 sts per inch, matching the squares. Dc rounds are about 0.5 in (1.3 cm) tall, and sc rounds are about 0.25 in (0.6 cm).
Starting counts: each short side is 3 squares x 25 sts = 75 sts. Each long side is 12 squares x 25 sts = 300 sts. At the seams, each square’s corner sc gets its own stitch, and no extra stitches are added.
Border Round 1 (cream): Join cream in the top-right outer corner st. Ch 1, (sc, ch 2, sc) in the same st. Sc in each st around, working (sc, ch 2, sc) in each of the remaining 3 outer corner sts. Join. (75 sc on each short side and 300 sc on each long side, between corner ch-2 sps; 750 sc total)
Why it works: two sides shared each outer corner st. Splitting it into 2 sc gives each side its own stitch, so the 75 and 300 counts hold exactly.
Border Round 2: Sl st into corner sp. Ch 3 (counts as dc), (dc, ch 2, 2 dc) in same sp. Dc in each sc around, working (2 dc, ch 2, 2 dc) in each corner sp. Join. (79 dc on each short side, 304 dc on each long side; 766 dc total)
Each side gains 2 dc at each end: 75 + 4 = 79, and 300 + 4 = 304.
Border Round 3: Sl st into corner sp. Ch 1, (sc, ch 2, sc) in same sp.
- Top edge and both long sides: sc in each dc, (sc, ch 2, sc) in each corner sp. (79 sc across the top, 304 sc on each long side)
- Bottom edge (scallops): sc in first dc, sk 2 dc, 5 dc in next dc, sk 2 dc, sc in next dc; rep from * 13 times. (13 shells)
Why it works: the scallop needs a multiple of 6 + 1. The bottom edge has 79 sts, and 79 = 6 x 13 + 1, so the last repeat ends exactly in the final dc before the corner. Join and fasten off.
Tabs (make 5 per panel)
Work the tabs directly into the 79 sc of the top edge, with the RS facing. Each tab is 7 sts wide with 11 sts between tabs: 5 x 7 + 4 x 11 = 79. ✓
The tabs start on sts 1, 19, 37, 55, and 73.
Row 1: Join cream in the first st of the tab. Ch 3 (counts as dc), dc in next 6 sts. (7 dc)
Rows 2–14: Ch 3, turn, dc in each st across. (7 dc)
Fasten off, leaving a 12 in (30.5 cm) tail. Each tab measures about 1.75 in (4.4 cm) wide and 7 in (17.8 cm) long.
Fold each tab to the WS and whipstitch the last row to the base of Border Round 2. This makes a loop about 3.5 in (8.9 cm) deep, which fits a rod up to about 1.5 in (3.8 cm) in diameter.
Final Blocking
- Weave in any remaining tails along cream stitches.
- Lay the panel flat on mats, RS up. Use the floor or a bed if needed.
- Pin the outer corners to 20 in x 74.25 in (50.8 cm x 188.6 cm).
- Pin each seam line straight, checking that each square measures 6 in (15.2 cm).
- Pin each bottom scallop into a rounded arch.
- Mist evenly with water until damp, not soaked.
- Let it dry completely, about 24 hours.
- Unpin, then lay the tabs flat to check that they hang straight.
Final Quality-Control Checklist
- 36 squares per panel, each 6 in (15.2 cm), with 96 sc in Round 9
- Every flower has 8 pink petals and 8 green leaves
- Body is 18 in x 72 in (45.7 cm x 182.9 cm) before the border
- Border Round 1: 75 / 300 sc per side
- Border Round 2: 79 / 304 dc per side
- 13 scallops across the bottom
- 5 evenly spaced tabs, each 7 dc wide and 14 rows long
- No puckered seams; all tails secured
Troubleshooting
- Square cups: Round 6 is too tight. Loosen your tension or go up a hook size for the cream rounds.
- Square ruffles: too many sts or loose tension. Recount Round 8 (21 dc per side).
- Petals lean or overlap: check that you skipped 1 st on each side of each 5-dc shell.
- Green loops show from the front: keep the Round 4 chains firmly behind the petals.
- Seams pucker: rejoin with a larger hook.
- Scallops don’t fit: recount the bottom edge. It must be exactly 79 dc.
- Panel grows longer when hung: use cotton, block flat, and don’t hang it wet.
Care
Hand wash cold, or machine wash on a gentle cycle in a laundry bag. Lay flat to dry and reshape, and don’t hang the panel while wet, because the weight will stretch it.
Final Notes
The measurement chain is simple. A 6 in (15.2 cm) square has 25 sts per side. Joined 3 x 12, the squares make an 18 in x 72 in (45.7 cm x 182.9 cm) body. The border brings it to 20 in x 74.25 in (50.8 cm x 188.6 cm), and five 3.5 in (8.9 cm) tab loops finish the top. Check your first square and keep your seams relaxed, and the rest will fall into place. Make a second panel the same way for a matching pair.
Happy crocheting!