

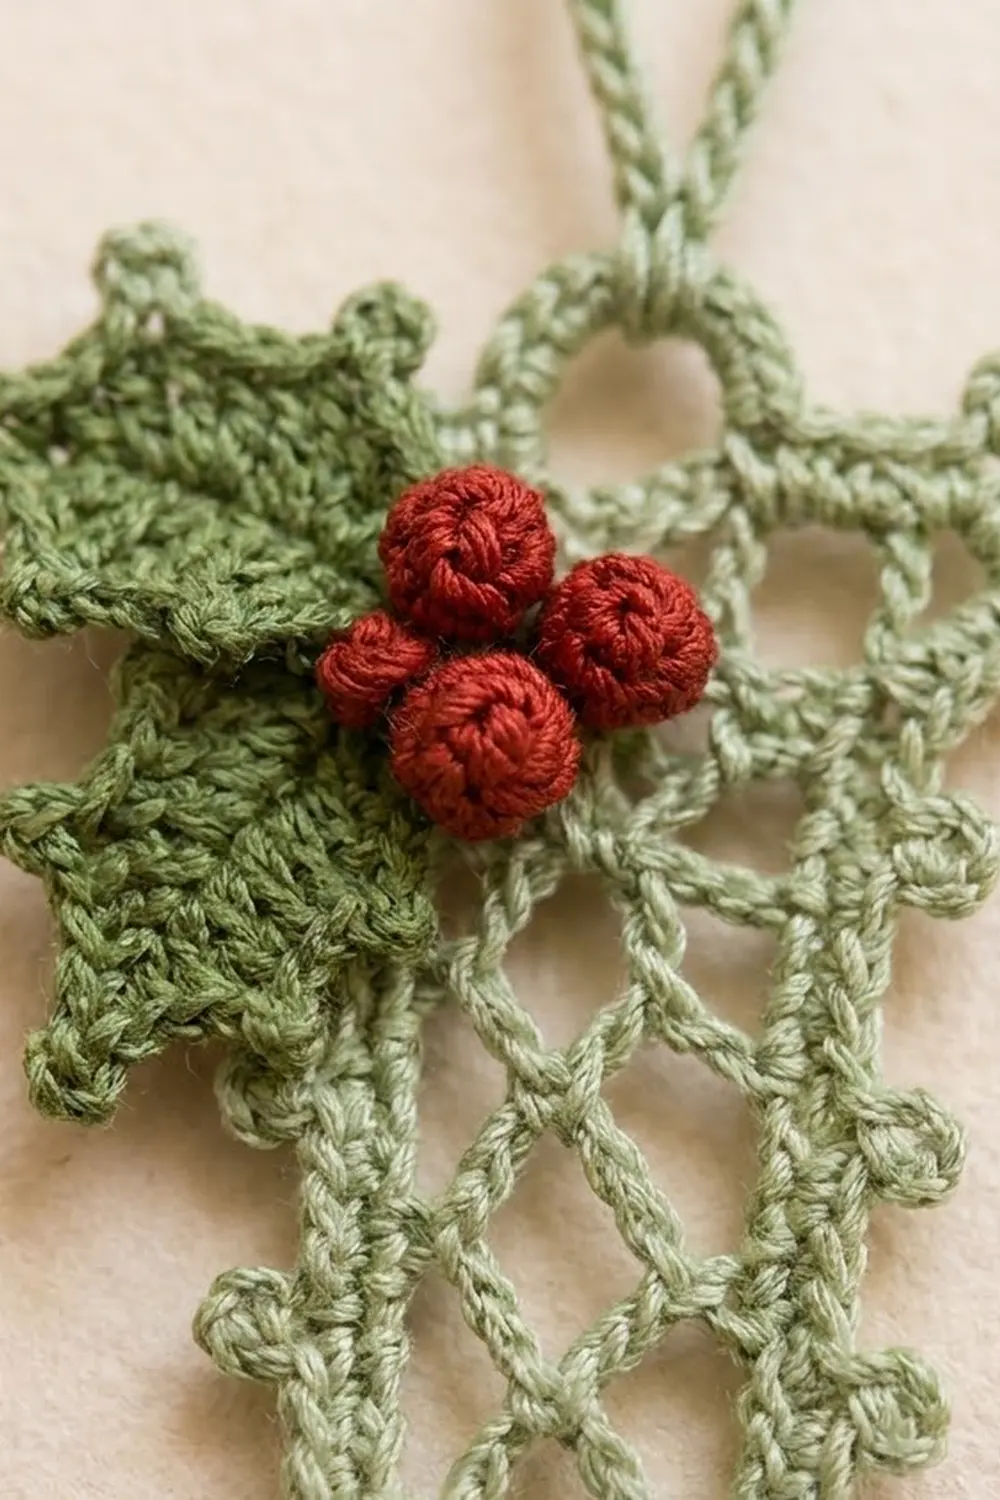
This lace ornament is a capital “L” made from an open diamond lattice inside a neat single-crochet frame. Small picots run around the whole outline, and a sprig of holly with three red berries sits on the top corner. It hangs from a firm crocheted loop.
The body is worked in soft sage-green cotton thread. The leaves are a deeper green and the berries are a warm red. The style is quiet and vintage, a bit like a monogram on old table linen.
This pattern uses US crochet terms. The finished ornament measures 3.5 in (8.9 cm) wide and 4.5 in (11.4 cm) tall, plus a 1.25 in (3.2 cm) hanging loop.
Construction is simple. First you work the foot of the L in rows of chain-5 mesh across the full width. Then you keep going over only the first four loops to build the stem. Next, a single-crochet frame round and a picot round go around the whole letter. Last, you add the hanging loop and sew on the holly.
Finished Size and Construction
- Finished size: 3.5 in x 4.5 in (8.9 cm x 11.4 cm), plus a 1.25 in (3.2 cm) loop
- Skill level: Intermediate
- Terminology: US
- Yarn weight: Size 10 crochet cotton thread (Lace, 0)
- Hook: 1.75 mm steel hook
- Number of pieces: 1 lace letter, plus 2 holly leaves and 3 berries for the appliqué
- Layout: One L shape, with no joining
- Letter size before border: 3 in (7.6 cm) wide x 4 in (10.2 cm) tall; stem 1.4 in (3.6 cm) wide
- Border depth: 1/4 in (0.6 cm) on every edge (frame round plus picot round)
Materials
Use a mercerized size 10 cotton thread. It makes crisp lace, blocks flat, and holds starch well. Avoid fuzzy or very soft thread, because the lattice will lose its shape.
- Sage green (letter and loop): 8 g, about 25 m
- Deep holly green (leaves): 2 g, about 6 m
- Berry red (berries): 1 g, about 3 m
Tools:
- 1.75 mm steel crochet hook
- Fine tapestry needle
- Small scissors
- Rustproof pins and a blocking board or folded towel
- Fabric stiffener or spray starch
- Ruler or tape measure
All quantities include a margin of about 30 percent for your gauge test and weaving in ends.
Abbreviations (US Terms)
- ch = chain
- sl st = slip stitch
- sc = single crochet
- hdc = half double crochet
- dc = double crochet
- sc2tog = single crochet 2 together
- sp = space
- st(s) = stitch(es)
- beg = beginning
- rep = repeat
- RS = right side
Picot: Ch 3, sl st in 3rd ch from hook.
Mesh loop: A ch-5 sp held by an sc at each end. Each loop spans 4 sts of the row below.
Row-end: The side edge of a row. Work into the post of the end dc or around the end sc.
Gauge and Checkpoints
Gauge is 12 sc = 1 in (2.5 cm). In the mesh, 3 ch-5 loops = 1 in (2.5 cm) wide and 4 mesh rows = 1 in (2.5 cm) tall. One sc row is about 1/8 in (0.3 cm) tall.
The foot is your gauge test. Work Rows 1 to 6 and measure before going on.
Checkpoints:
- After Row 1: 3 in (7.6 cm) wide
- After Row 6: 3 in (7.6 cm) wide x 1.375 in (3.5 cm) tall
- After Row 17: 4 in (10.2 cm) tall; stem 1.4 in (3.6 cm) wide
- After Round 18: 3.25 in (8.3 cm) x 4.25 in (10.8 cm)
- After Round 19: 3.5 in (8.9 cm) x 4.5 in (11.4 cm)
If your foot is too big, go down to a 1.5 mm hook. If it is too small, go up to a 2 mm hook. The height of the mesh also depends on how tightly you pull each ch-5. Keep the chains even, not tight.
Letter Body
The mesh rows switch between two types. Type A rows have 9 full loops on the foot and 4 on the stem. Type B rows have one less full loop, plus a half loop at each end made from a ch-2 and a dc. This keeps the side edges straight.
Foot
With sage green, ch 38.
Row 1: Sc in 2nd ch from hook and in each ch across. Turn. (37 sc)
Row 2 (A): Ch 1, sc in first sc, *ch 5, skip 3 sc, sc in next sc; rep from * across. Turn. (9 loops, 10 sc)
Row 3 (B): Ch 5 (counts as dc and ch 2), sc in first ch-5 sp, (ch 5, sc in next ch-5 sp) 8 times, ch 2, dc in last sc. Turn. (8 full loops, 2 half loops, 9 sc)
Row 4 (A): Ch 1, sc in dc, skip ch-2 sp, (ch 5, sc in next ch-5 sp) 8 times, ch 5, sc in 3rd ch of beg ch-5. Turn. (9 loops, 10 sc)
Rows 5 and 6: Rep Rows 3 and 4. Do not fasten off. (9 loops, 10 sc)
The end where Row 6 finishes is the outer edge of the L. The stem grows up from this end.
Stem
Row 7 (B): Ch 5, sc in first ch-5 sp, (ch 5, sc in next ch-5 sp) 3 times, ch 2, dc in next sc (the 5th sc of Row 6). Turn, leaving the other 5 loops unworked. (3 full loops, 2 half loops, 4 sc)
Row 8 (A): Ch 1, sc in dc, skip ch-2 sp, (ch 5, sc in next ch-5 sp) 3 times, ch 5, sc in 3rd ch of beg ch-5. Turn. (4 loops, 5 sc)
Row 9 (B): Ch 5, sc in first ch-5 sp, (ch 5, sc in next ch-5 sp) 3 times, ch 2, dc in last sc. Turn. (3 full loops, 2 half loops, 4 sc)
Row 10 (A): Work as Row 8. (4 loops, 5 sc)
Rows 11 to 16: Rep Rows 9 and 10 three more times. (4 loops, 5 sc)
Row 17: Ch 1, sc in first sc, (3 sc in next ch-5 sp, sc in next sc) 4 times. Do not turn. (17 sc)
You now have 15 mesh rows between two sc rows. The stem is 17 sc wide: 4 loops x 4 sts, plus 1. Row 17 ends at the top inner corner of the stem.
Border
The border has two rounds: a solid sc frame, then a picot round. The border gauge matches the body: 12 sc per inch. Each mesh row is 1/4 in (0.6 cm) tall, so 3 sc per mesh row-end gives the same 12 sc per inch as the top and bottom edges. That is why the frame lies flat.
Round 18 (frame): Ch 1, then turn the piece so you can work down the inner edge of the stem.
- Inner stem edge: 3 sc in each row-end of Rows 16 to 8 (27 sc), then 2 sc in the row-end of Row 7. (29 sc)
- Inner corner: Sc2tog, working the first leg in the row-end of Row 7 and the second leg in the first unworked ch-5 sp of Row 6. (1 st)
- Top of foot: 2 more sc in the same sp, sc in next sc, (3 sc in next ch-5 sp, sc in next sc) 3 times, 3 sc in last ch-5 sp. (18 sc)
- Foot corner: 3 sc in last sc of Row 6.
- Foot end: 3 sc in each row-end of Rows 6 to 2. (15 sc)
- Bottom corner: Working in the free loops of the foundation ch, 3 sc in first loop.
- Bottom: Sc in next 35 loops, then 3 sc in last loop (corner). (35 sc between corners)
- Outer edge: 3 sc in each row-end of Rows 2 to 16. (45 sc)
- Top: 3 sc in first sc of Row 17 (corner), sc in next 15 sc, 3 sc in last sc (corner).
- Sl st in first sc to join. (173 sc)
Check each side against the body. The bottom has 35 sc plus 2 corner centers, which equals the 37 foundation sts. The top has 15 sc plus 2 corner centers, which equals the 17 sts of Row 17. The outer edge has 45 sc for 15 mesh rows. Total: 29 + 1 + 18 + 3 + 15 + 3 + 35 + 3 + 45 + 3 + 15 + 3 = 173.
Round 19 (picot): Ch 1. Work 1 sc into every sc of Round 18. In this round, “corner” means the center sc of a 3-sc corner group.
- Inner stem edge: (Sc in next 4 sc, picot) 6 times, sc in next 5 sc. (29 sc)
- Inner corner: Sc in sc2tog. No picot here.
- Top of foot: (Sc in next 4 sc, picot) 4 times, sc in next 3 sc. (19 sc)
- Foot corner: Sc in corner, picot.
- Foot end: (Sc in next 4 sc, picot) 3 times, sc in next 5 sc. (17 sc)
- Bottom corner: Sc in corner, picot.
- Bottom: (Sc in next 4 sc, picot) 8 times, sc in next 5 sc. (37 sc)
- Outer bottom corner: Sc in corner, picot.
- Outer edge: (Sc in next 4 sc, picot) 11 times, sc in next 3 sc. (47 sc)
- Top outer corner: Sc in corner, picot.
- Top: (Sc in next 4 sc, picot) 3 times, sc in next 5 sc. (17 sc)
- Top inner corner: Sc in corner, picot, sc in last sc.
- Sl st in first sc to join. Fasten off. (173 sc, 40 picots)
The corner picots form the small serifs at the top of the stem and the end of the foot.
Hanging loop: With RS facing, join sage green with a sl st in the 9th sc after the top outer corner picot (just after the 2nd picot along the top). Ch 30, sl st in the same sc. Ch 1, work 40 sc over the ch-30 loop, sl st in the same sc. Fasten off. The loop stands 1.25 in (3.2 cm) tall.
Holly Appliqué
Leaf (make 2): With deep holly green, ch 11.
- First side: Sl st in 2nd ch from hook, sc in next ch, hdc in next ch, picot, dc in next 2 ch, picot, dc in next 2 ch, picot, hdc in next ch, sc in next ch, 3 sc in last ch (leaf tip).
- Second side: Working in the free loops on the other side of the ch, sc in next ch, hdc in next ch, picot, dc in next 2 ch, picot, dc in next 2 ch, picot, hdc in next ch, sc in next ch, sl st in last ch.
Fasten off, leaving a 6 in (15.2 cm) tail. Each leaf is about 7/8 in (2.2 cm) long and 1/2 in (1.3 cm) wide, with 3 picot points on each side.
Berry (make 3): With berry red, make a magic ring.
- Round 1: 6 sc in ring. (6 sc)
- Round 2: 2 sc in each sc. (12 sc)
- Round 3: Sc in each sc. (12 sc)
- Round 4: Sc2tog 6 times. (6 sts)
Push the starting tail inside as stuffing. Fasten off, leaving a 6 in (15.2 cm) tail, and weave it through the last 6 sts to close. Each berry is about 1/4 in (0.6 cm) across.
Placement: Put the 2 leaves at the top outer corner of the stem with their bases together, fanned in a V. One leaf points up and outward, and the other points down along the outer edge. Let the leaves overlap the frame. Sew each leaf down along its center line. Stack the 3 berries in a tight triangle over the leaf bases and sew each one on through its center.
Final Blocking
- Weave in all ends along the frame, not through the open mesh.
- Soak the ornament in cool water for a few minutes. Press out the water in a towel.
- Pin the L flat on your board. Put one pin at each outer corner. Check that the foot is 3.5 in (8.9 cm) across and the letter is 4.5 in (11.4 cm) from top to bottom.
- Pin the inner corner so the stem sits square to the foot.
- Pin each picot outward so it stays round and open.
- Open each diamond in the lattice with the tip of a pin.
- Apply stiffener or starch. Lift the holly slightly so it keeps some texture.
- Let it dry completely, at least 12 hours, then remove the pins.
Final Quality-Control Checklist
- Letter measures 3.5 in x 4.5 in (8.9 cm x 11.4 cm)
- Stem measures 1.9 in (4.8 cm) wide including the border
- Foot measures 1.875 in (4.8 cm) tall including the border
- Every mesh row has the right loop count: 9 on the foot, 4 on the stem
- Side edges are straight, not wavy
- Round 18 has 173 sc, and Round 19 has 40 picots
- Inner corner lies flat with no pucker
- Hanging loop is near the middle of the top edge
- Leaves and berries are sewn on firmly, with no loose loops on the back
Troubleshooting
Side edges lean or wave: Check that every B row ends with ch 2 and a dc, and every A row ends in the turning ch.
Lattice looks stretched or uneven: Your ch-5 loops are different sizes. Keep each chain the same size and block firmly.
Frame ruffles: Use 2 sc instead of 3 in the A-row row-ends, but keep the corner counts the same.
Frame pulls tight: Your sc stitches are tighter than your mesh. Go up one hook size for Round 18 only.
Inner corner puckers: Undo the sc2tog and work it more loosely, or pin it square when blocking.
Berries look flat: Push in a little extra red thread before closing.
Care
Hand wash in cool water with mild soap, press dry in a towel, and block flat again. Starch it again if the lace gets soft.

Final Notes
The measurements build step by step. The 37-st foundation sets the foot at 3 in (7.6 cm) wide. Five mesh rows bring the foot to 1.375 in (3.5 cm) tall, and ten more rows over 4 loops bring the letter to 4 in (10.2 cm). The 173-sc frame and the picot round add 1/4 in (0.6 cm) on every edge, for a finished size of 3.5 in x 4.5 in (8.9 cm x 11.4 cm). Hang it on the tree, tie it to a gift, or make a whole set of initials.
Happy crocheting!