

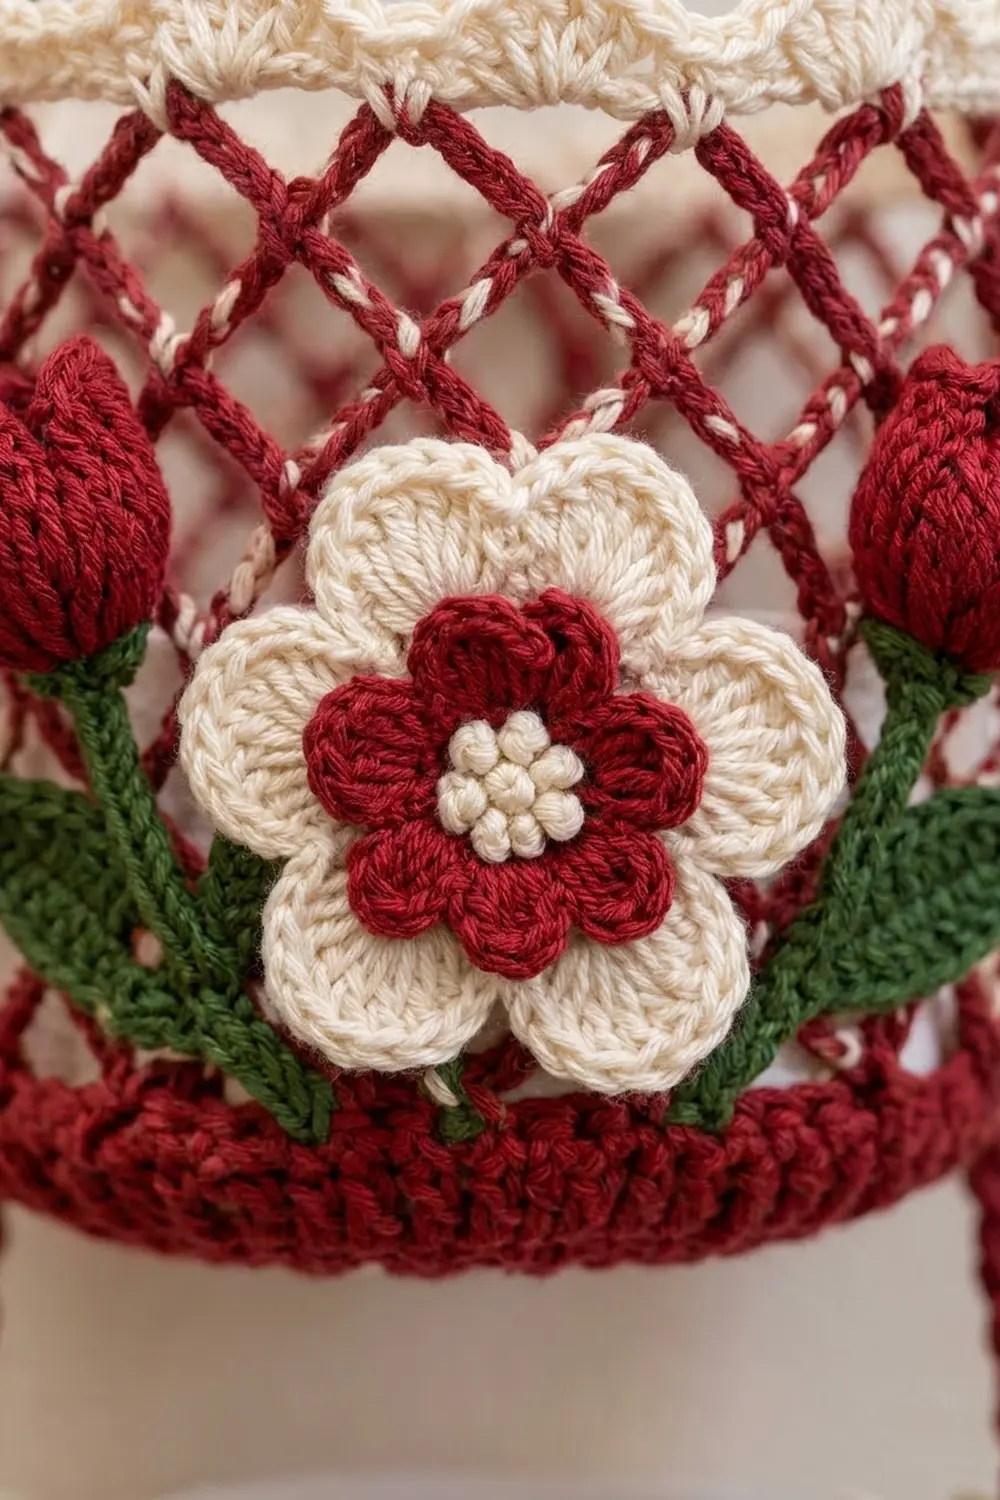
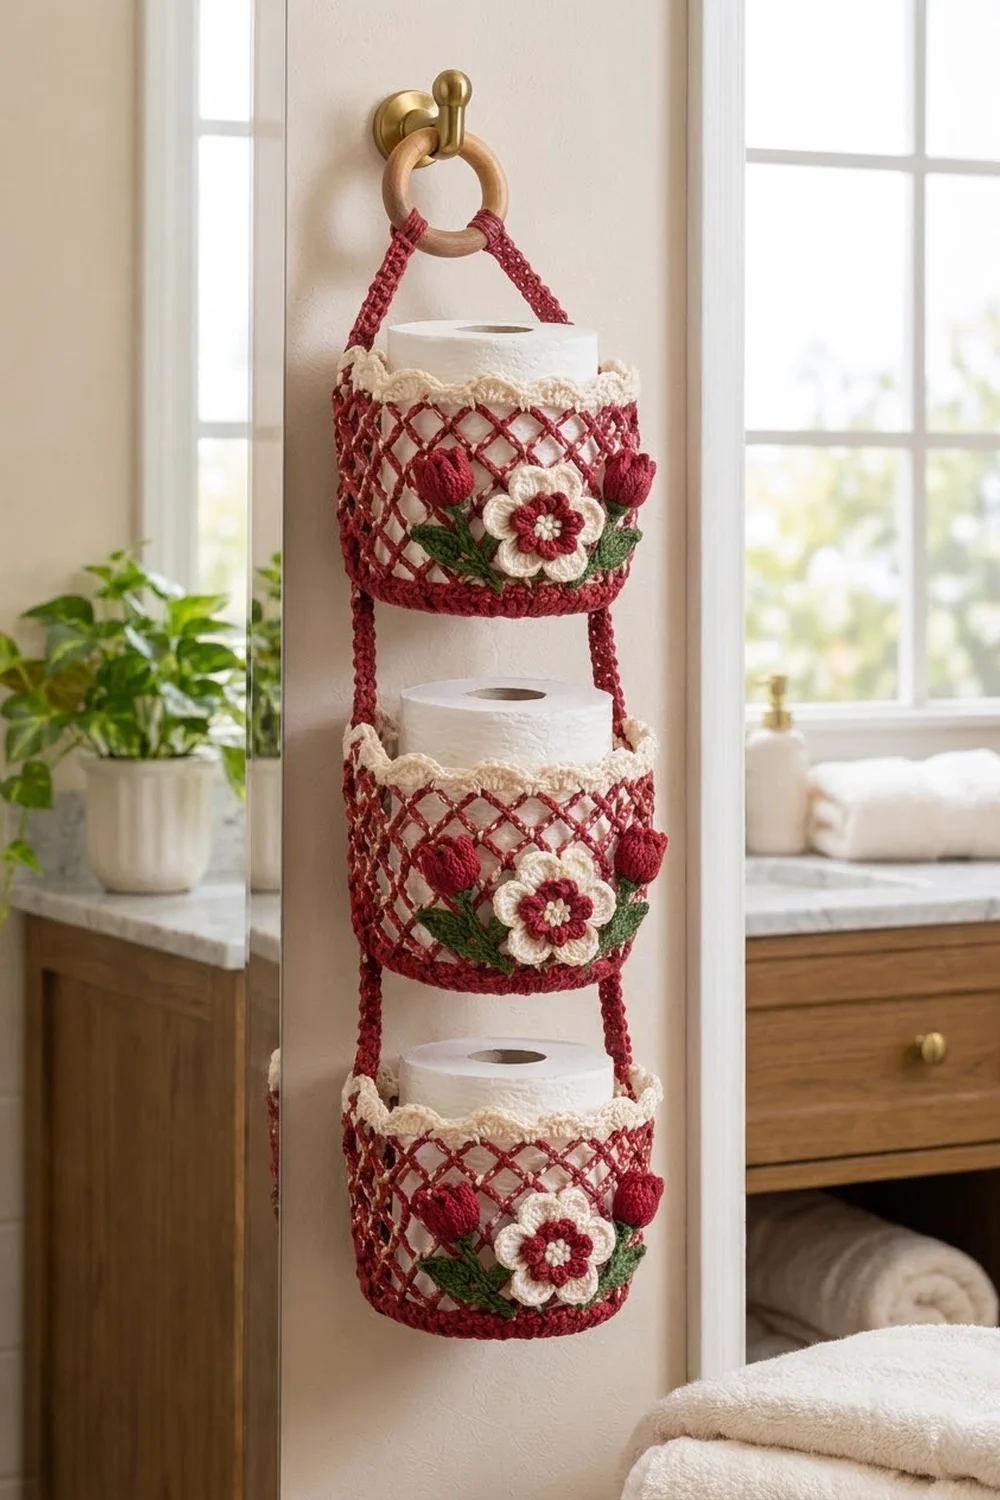
This hanging holder stores three spare rolls in a column of red lattice baskets. Each basket has a solid base, an open diamond mesh body, and a cream scalloped rim. A layered flower with two small tulips decorates the front.
The palette is deep red, cream, and leaf green, so the holder has a warm, cottage-style look. Cotton yarn keeps the baskets firm and easy to wash, and the mesh lets you see at a glance how many rolls are left.
The pattern uses US crochet terms. Each basket measures 5.75 in (14.6 cm) across and 4.5 in (11.4 cm) tall. From the top of the 3 in (7.6 cm) wooden ring to the bottom of the lowest basket, the holder measures about 25 in (63.5 cm).
Each basket is worked in the round from the center of the base up to the scalloped rim. You then make the flowers, tulips, and leaves and sew them on. Two long flat straps are sewn down the sides of all three baskets and wrapped around the wooden ring.
Finished Size and Construction
- Finished size: about 25 in (63.5 cm) long overall, including the ring
- Skill level: Intermediate
- Terminology: US
- Yarn weight: Worsted (#4) cotton
- Hook: 4.5 mm (US 7)
- Number of pieces: 3 baskets, 2 straps, and 24 appliqué pieces (8 per basket), plus a wooden ring
- Layout: 3 baskets stacked vertically with 2 in (5.1 cm) of strap between them
- Basket size: 5.75 in (14.6 cm) diameter × 4.5 in (11.4 cm) tall
- Size before border (rim): 5.75 in (14.6 cm) diameter × 4 in (10.2 cm) tall
- Border depth: 0.5 in (1.3 cm) scalloped rim
Materials
Use a smooth worsted-weight cotton or cotton blend. Cotton holds the basket shape and stands up to bathroom humidity. Acrylic also works, but the baskets will be softer. The quantities below assume about 80 m per 50 g:
- Deep red: 150 g (about 240 m)
- Cream: 50 g (about 80 m)
- Leaf green: 20 g (about 32 m)
Tools:
– 4.5 mm (US 7) crochet hook
– 1 wooden ring, 3 in (7.6 cm) diameter
– Tapestry needle
– 6 locking stitch markers
– Straight pins
– Measuring tape
– Scissors
All quantities include about a 20% margin for your gauge swatch and for tension differences.
Abbreviations (US Terms)
- ch: chain
- sl st: slip stitch
- sc: single crochet
- hdc: half double crochet
- dc: double crochet
- tr: treble crochet
- MR: magic ring
- BLO: back loop only
- inc: 2 sc in the same stitch
- sk: skip
- st(s): stitch(es)
- rep: repeat
- PM: place marker
Special stitch: scallop. Sk 2 sts, work 5 dc in the next st, sk 2 sts, then sc in the next st. Each scallop repeat uses 6 sts.
Gauge and Checkpoints
Gauge: 16 sc and 18 rounds = 4 in (10.2 cm) in sc worked in the round.
Make one complete basket before you start the others, and check it at each stage:
- After Round 6: 36 sts, about 2.9 in (7.4 cm) across
- After Round 12: 72 sts, 5.75 in (14.6 cm) across, and the base lies flat
- After Round 17: side wall about 1.1 in (2.8 cm) tall
- After Round 23: side wall about 3.6 in (9.1 cm) tall (each mesh round adds about 0.4 in / 1.0 cm)
- After Round 25: side wall 4 in (10.2 cm) tall
- After Round 26: 4.5 in (11.4 cm) tall
If your base is too big, go down to a 4 mm hook. If it is too small, or a roll won’t fit, go up to a 5 mm hook. Don’t change the stitch counts, because the 72-stitch total is what the mesh and rim repeats are built on. If your base ruffles, your increases are too loose for your tension, so go down a hook size. If it cups, go up a size.
Basket (Make 3)
Use deep red unless the pattern says otherwise. Work in joined rounds: sl st to the first st at the end of each round, then ch 1 to start the next round (the ch 1 does not count as a st).
Base
Round 1: MR, ch 1, 6 sc in the ring, join. (6)
Round 2: Inc in each st around. (12)
Round 3: Sc in next st, inc 6 times. (18)
Round 4: Sc in next 2 sts, inc 6 times. (24)
Round 5: Sc in next 3 sts, inc 6 times. (30)
Round 6: Sc in next 4 sts, inc 6 times. (36)
Rounds 7–12: Keep adding 1 more sc before each inc in every round. Round 7 makes 42 sts, Round 8 makes 48, Round 9 makes 54, Round 10 makes 60, Round 11 makes 66, and Round 12 (sc in next 10 sts, inc 6 times) makes 72.
Solid Lower Band
Round 13: Sc in the BLO of each st around. (72) This round forms a crisp fold between the base and the side wall.
Rounds 14–17: Sc in each st around. (72)
PM in the first st of Round 17. This marker shows where the round starts, and you’ll use it later to place the straps.
Lattice Body
Round 18: Ch 1, sc in the first st, ch 5, sk 3, sc in the next st 17 times, ch 2, sk the last 3 sts, then dc in the first sc to join. (18 loops) The ch 2 plus the dc make the 18th loop and leave your hook in the middle of that loop.
Rounds 19–22: Ch 1, sc around the post of the joining dc, ch 5, sc in the next ch-5 loop 17 times, ch 2, dc in the first sc. (18 loops)
Round 23: Ch 1, sc around the post of the joining dc, ch 5, sc in the next ch-5 loop 17 times, ch 5, sl st in the first sc. (18 loops) Ending with a full ch 5 this time leaves 18 full loops ready for the next round.
Because each round’s sc sits in the middle of the loop below, the loops shift by half a loop every round. That offset is what creates the diamond lattice.
Top Band
Round 24 (conversion round): Ch 1, work 4 sc in each ch-5 loop around, join. (18 loops × 4 sc = 72) You are working into loops rather than stitches, so 4 sc per loop brings the round back to the 72 sts of the solid band.
Round 25: Join cream. Sc in each st around. (72)
Border: Scalloped Rim
Round 26 is the cream rim on each basket.
Border gauge: each scallop is 6 sts wide, which is about 1.5 in (3.8 cm) at 4 sts per inch.
Round 26: Ch 1, sc in the first st, sk 2, 5 dc in the next st, sk 2, sc in the next st 11 times, sk 2, 5 dc in the next st, sk 2, sl st in the first sc. (12 scallops: 12 sc + 60 dc = 72 sts) Fasten off and weave in the ends.
Count per side: if you think of the front and back halves as two “sides,” each half has 36 sts, which is 6 scallops.
Why the math works: 72 divided by 6 is exactly 12, so the repeats meet without a partial scallop. Each half also holds a whole number of scallops, so both straps fall in matching spots on opposite sides.
Flower Appliqué (Make 3 Sets)
Cream back flower:
– Round 1: MR, ch 1, 10 sc in the ring, join. (10)
– Round 2: Ch 1, inc in each st around, join. (20)
– Round 3: Sl st in the next st, sk 1, (hdc, 2 dc, tr, 2 dc, hdc) in the next st, sk 1 5 times, sl st in the first sl st. (5 petals)
Fasten off. The flower measures about 2.75 in (7.0 cm) across.
Red top flower:
– Round 1: MR, ch 1, 10 sc in the ring, join. (10)
– Round 2: Sl st in the next st, (hdc, 2 dc, hdc) in the next st 5 times, sl st in the first sl st. (5 petals)
Fasten off. The flower measures about 1.5 in (3.8 cm) across.
Center: Center the red flower on the cream flower, turning it so its petals sit between the cream petals, and sew it down. With cream yarn, work 7 French knots close together in the middle.
Tulips (Make 6)
With red yarn, make an MR. Then work three petals into the ring:
1. (Ch 3, 3 dc, ch 3, sl st) into the ring
2. (Ch 3, 3 tr, ch 3, sl st) into the ring
3. (Ch 3, 3 dc, ch 3, sl st) into the ring
Pull the ring closed so the petals fan upward. The taller middle petal gives the bud its tulip shape. Each tulip is about 1 in (2.5 cm) tall.
Leaves (Make 12)
With green yarn, ch 8.
1. Starting in the 2nd ch from the hook, work sl st, sc, hdc, dc, dc, hdc, sc. (7 sts)
2. Ch 1, turn the piece, and work along the other side of the chain: sc, hdc, dc, dc, hdc, sc, sl st. (7 sts)
3. Sl st into the tip. (14 sts + ch-1 tip)
Each leaf is about 1.75 in (4.4 cm) long.
Attaching the Appliqués
Count 18 sts from your marker to find the front center of each basket. The flower’s center goes over that column, over Rounds 18–20. Sew one tulip on each side, about 1.5 in (3.8 cm) from the flower’s center. Tuck one leaf under each tulip, pointing outward, and two leaves under the lower petals of the flower. Sew through the solid rounds and wrap your stitches around the lattice strands so nothing pulls the mesh out of shape.
Make All Pieces
| Piece | Color | Quantity |
|---|---|---|
| Baskets | Red with cream rim | 3 |
| Straps | Red | 2 |
| Back flowers | Cream | 3 |
| Top flowers | Red | 3 |
| Tulips | Red | 6 |
| Leaves | Green | 12 |
Layout:
        [ RING ]
        /      \
   strap A    strap B
      |  BASKET 1 |
      |   (gap)   |
      |  BASKET 2 |
      |   (gap)   |
      |  BASKET 3 |
Straps (Make 2)
Row 1: With red, ch 4, sc in the 2nd ch from the hook and in the next 2 chs. (3)
Rows 2–108: Ch 1, turn, sc in each st across. (3)
Each strap is 0.75 in (1.9 cm) wide and 24 in (61.0 cm) long, because 108 rows at 4.5 rows per inch is 24 in. PM at the start of each section:
| Rows | Length | Purpose |
|---|---|---|
| 1–9 | 2 in (5.1 cm) | Wraps around the ring |
| 10–36 | 6 in (15.2 cm) | Free hanging length |
| 37–54 | 4 in (10.2 cm) | Sewn to Basket 1 |
| 55–63 | 2 in (5.1 cm) | Gap |
| 64–81 | 4 in (10.2 cm) | Sewn to Basket 2 |
| 82–90 | 2 in (5.1 cm) | Gap |
| 91–108 | 4 in (10.2 cm) | Sewn to Basket 3 |
Check: 9 + 27 + 18 + 9 + 18 + 9 + 18 = 108 rows.
Joining
Method: Whipstitch both long edges of each strap to the outside of the basket wall with red yarn.
Stitch-to-stitch logic:
1. Center Strap A over the marked column (sts 72, 1, and 2). Center Strap B on the opposite side (sts 36, 37, and 38). Both straps are 3 sts wide, so each one covers exactly 3 basket sts.
2. Each attached section is 18 rows, about 4 in (10.2 cm), and it runs from the base fold (Round 13) to the top of Round 25.
3. Pin the section in three zones: about 5 strap rows along Rounds 13–17, about 11 rows along the mesh (Rounds 18–23), and 2 rows along Rounds 24–25. That’s 5 + 11 + 2 = 18 rows.
4. In the mesh zone, wrap each stitch around a lattice strand instead of pulling it through open space.
Tension: Make your stitches snug but not tight. Pull too hard and the mesh puckers; sew too loosely and the basket sags away from the strap.
Ring: Fold rows 1–9 of each strap over the wooden ring and sew them flat to the back of rows 10–18.
Size checkpoint: Hang the holder empty. Make sure there is 2 in (5.1 cm) of strap between the baskets and that the overall length is about 25 in (63.5 cm).
Final Blocking
- Spray each basket lightly until it is damp. Don’t soak it.
- Slip a toilet roll (or a 5.5 in / 14.0 cm jar) inside each basket to support the walls.
- Square up the lattice diamonds with your fingers.
- Pin the scallops so they stand evenly upright.
- Flatten the appliqué petals and leaves.
- Lay the straps straight.
- Let everything dry completely before hanging.
Final Quality-Control Checklist
- Each base lies flat at 5.75 in (14.6 cm) across.
- Each lattice round has 18 loops.
- Each rim has 12 even scallops.
- The flowers are centered between the straps on every basket.
- All three baskets face the same direction.
- The gaps between baskets are an equal 2 in (5.1 cm).
- The ring wraps are secure, and all ends are woven in.
Troubleshooting
- The base ruffles: go down a hook size or recount your increases.
- The lattice twists into a spiral: make sure each round starts in the middle of a loop.
- The basket leans: check that both straps cover the same 18 rows of basket height.
- The scallops come out uneven: recount Round 25 and make sure it has exactly 72 sts.
- The baskets tip forward under the rolls: add a few tacking stitches to Round 25 at both straps.
Care
Hand wash in cool water with mild soap. Reshape the baskets and let them dry flat with the straps straightened.
Final Notes
The measurement chain works like this. A 72-stitch base gives a 5.75 in (14.6 cm) basket. Divided by 4, those 72 stitches make 18 lattice loops, and 4 sc per loop brings Round 24 back to 72. Divided by 6, they make 12 scallops for a 4.5 in (11.4 cm) basket. Two 108-row straps hang the three baskets from the ring at a total length of about 25 in (63.5 cm). If you hit your gauge on the first basket, the rest of the holder will come out to the right size.
Happy crocheting!