

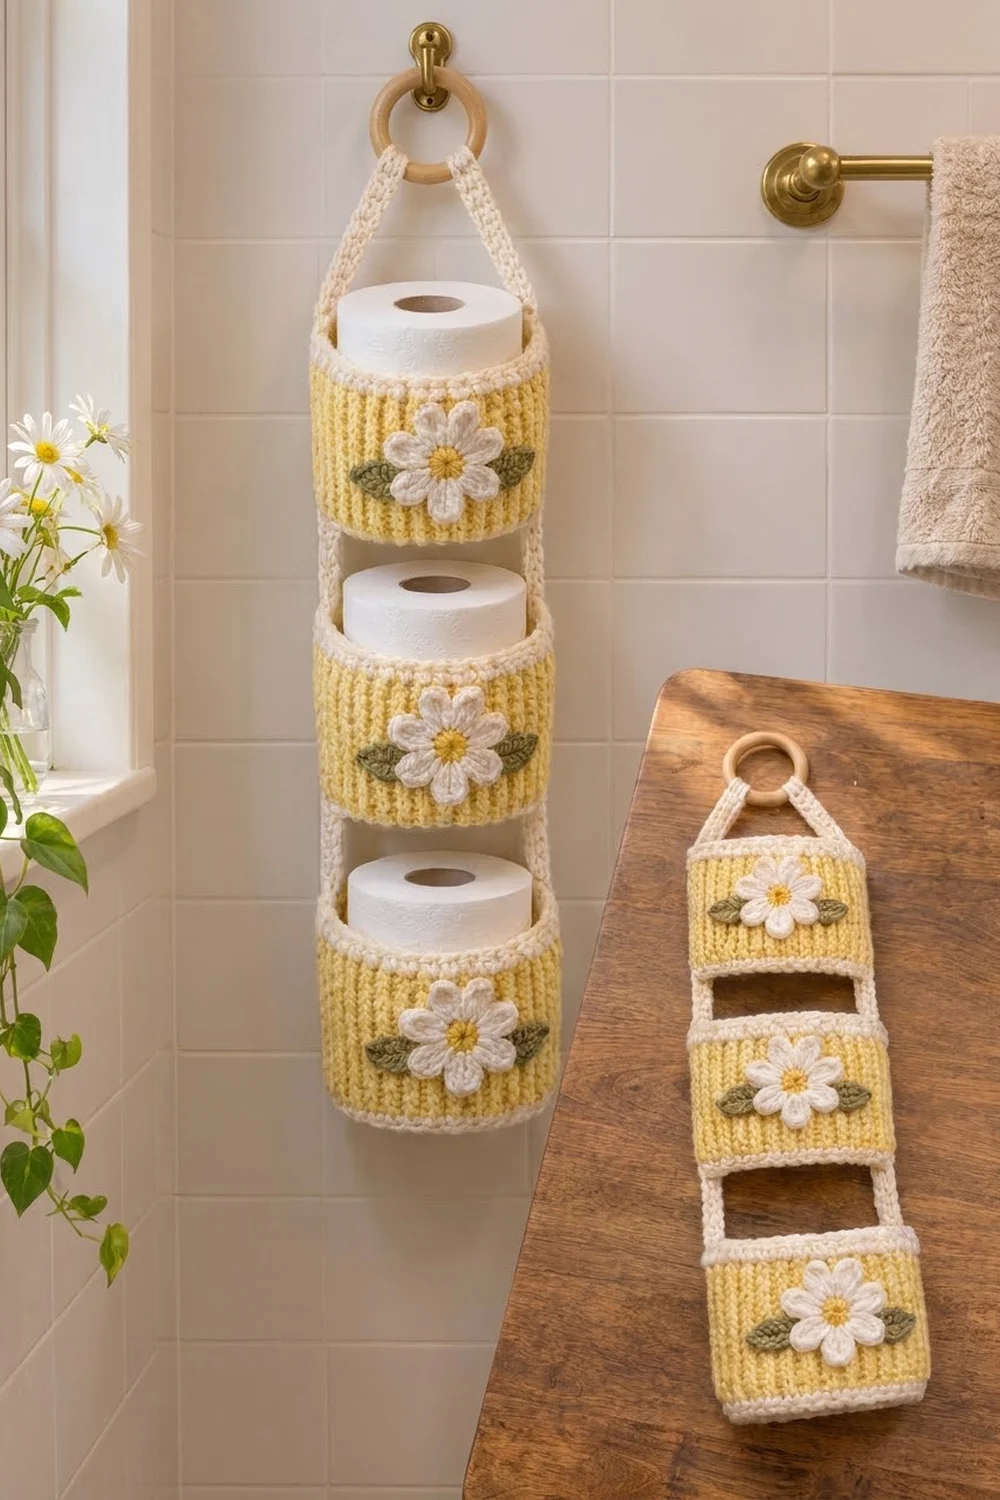
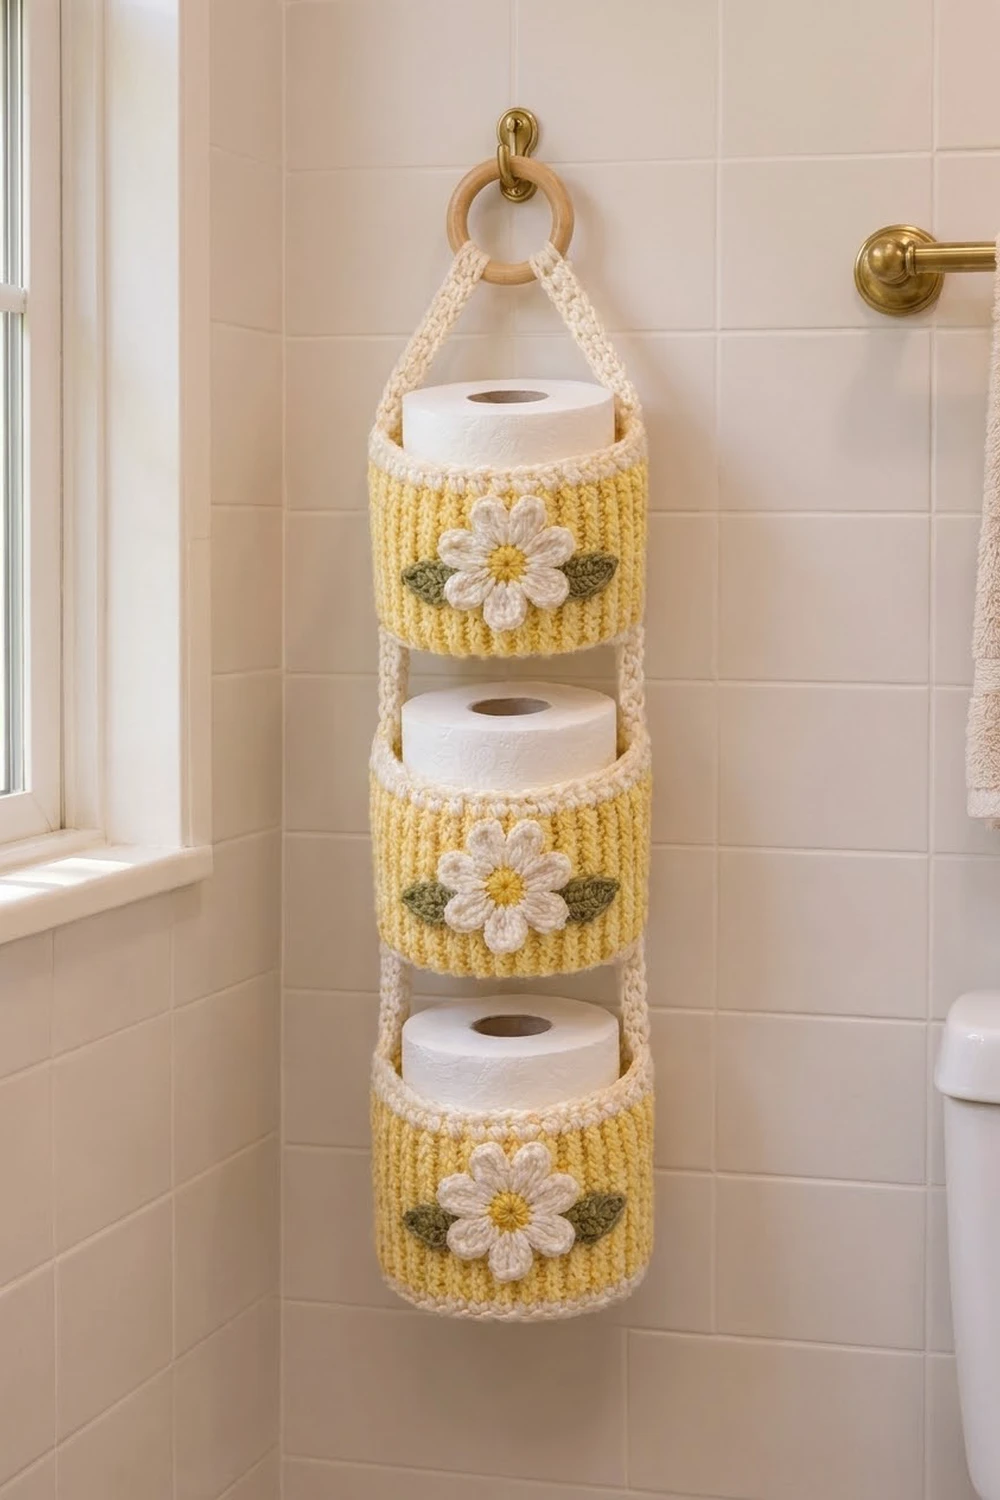
This hanging toilet paper holder adds a soft, sunny touch to a bathroom wall. Three ribbed butter-yellow baskets hang one above the other, and each holds one standard roll. Cream straps run down both sides and meet at a wooden ring that hangs from a hook.
Every basket has a cream ridge at the base and a cream crab-stitch rim at the top. The front of each one has a white eight-petal daisy with a golden center and two sage-green leaves. The ribbing is simple front-post and back-post double crochet, so the walls look knitted and stay firm.
This pattern uses US crochet terms. The finished holder measures about 23 in (58.4 cm) from the top of the ring to the bottom of the lowest basket, and about 5 in (12.7 cm) wide. Each basket is 4.75 in (12.1 cm) across and 4 in (10.2 cm) tall.
You work three baskets in joined rounds from the base up. Then you make three daisies and six leaves, crochet two straps and edge them with a border round. Finally, you sew the straps to the baskets and around the ring.
Finished Size and Construction
- Finished size: about 23 in (58.4 cm) tall x 5 in (12.7 cm) wide
- Skill level: Easy-intermediate (post stitches, crab stitch, sewing)
- Terminology: US crochet terms
- Yarn weight: Worsted (#4), cotton or cotton blend
- Hooks: 5.0 mm (H-8) for baskets and straps; 4.0 mm (G-6) for daisies and leaves
- Number of pieces: 3 baskets, 3 daisies, 6 leaves, 2 straps, 1 wooden ring
- Layout: 3 baskets stacked vertically, 2 in (5.1 cm) apart, hung from one ring
- Basket size: 4.75 in (12.1 cm) diameter x 4 in (10.2 cm) tall
- Strap size before border: 22.5 in (57.2 cm) x 0.22 in (0.6 cm)
- Border depth: 0.22 in (0.6 cm) per side, giving a strap 23 in (58.4 cm) x 0.67 in (1.7 cm)
Materials
Choose a smooth worsted cotton. It holds its shape in a humid room and shows the ribbing clearly.
- Butter yellow (main color): 170 g, about 290 m
- Cream (rims and straps): 90 g, about 155 m
- White (petals): 20 g, about 34 m
- Golden yellow (daisy centers): 5 g, about 9 m
- Sage green (leaves): 10 g, about 17 m
These amounts include a margin of about 15 percent to allow for gauge differences and a test swatch.
Tools:
- 5.0 mm (H-8) and 4.0 mm (G-6) crochet hooks
- Wooden ring, 2.5 in (6.4 cm) diameter
- Tapestry needle
- 8 locking stitch markers
- Scissors and measuring tape
- Blocking pins and a spray bottle
Abbreviations (US Terms)
- ch: chain
- sl st: slip stitch
- sc: single crochet
- hdc: half double crochet
- dc: double crochet
- inc: 2 sc in the same stitch
- BLO: back loop only
- MR: magic ring
- st(s): stitch(es)
- rnd(s): round(s)
Special stitches:
- FPdc (front post dc): Yarn over, insert the hook from front to back to front around the post of the stitch below, and complete a dc.
- BPdc (back post dc): Yarn over, insert the hook from back to front to back around the post, and complete a dc.
- Reverse sc (crab stitch): Work from left to right. Insert the hook in the next stitch to the right, pull up a loop, yarn over and pull through both loops.
Gauge and Checkpoints
With the 5.0 mm hook:
- Sc: 16 sts and 18 rnds = 4 in (10.2 cm)
- Post rib: 16 sts and 9 rnds = 4 in (10.2 cm)
Make one complete basket before the others. It is your real gauge test.
Checkpoints:
- After Rnd 10, the base measures 4.75 in (12.1 cm) across.
- After Rnd 12, the cream ridge adds 0.44 in (1.1 cm) of height.
- After Rnd 19, the yellow section measures 3.1 in (7.9 cm) tall.
- After Rnd 21, the basket is 4 in (10.2 cm) tall.
If the base comes out larger than 4.75 in (12.1 cm), switch to a 4.5 mm hook. If it is smaller than 4.5 in (11.4 cm), switch to a 5.5 mm hook. A standard 4.25 in (10.8 cm) roll should slide in easily.
Basket (Make 3)
Work in joined rnds with the right side facing. Join each rnd with a sl st to the first st. The beginning ch 1 or ch 2 never counts as a stitch.
Base
With butter yellow and the 5.0 mm hook:
Rnd 1: Make an MR, ch 1, 6 sc in the ring, join. (6 sts)
Rnd 2: Ch 1, inc in each st around, join. (12 sts)
Rnd 3: Ch 1, sc in next st, inc, repeat 6 times, join. (18 sts)
Rnd 4: Ch 1, sc in next 2 sts, inc, repeat 6 times, join. (24 sts)
Rnd 5: Ch 1, sc in next 3 sts, inc, repeat 6 times, join. (30 sts)
Rnd 6: Ch 1, sc in next 4 sts, inc, repeat 6 times, join. (36 sts)
Rnd 7: Ch 1, sc in next 5 sts, inc, repeat 6 times, join. (42 sts)
Rnd 8: Ch 1, sc in next 6 sts, inc, repeat 6 times, join. (48 sts)
Rnd 9: Ch 1, sc in next 7 sts, inc, repeat 6 times, join. (54 sts)
Rnd 10: Ch 1, sc in next 8 sts, inc, repeat 6 times, join. (60 sts)
Move the increases slightly each round so the base stays round. Fasten off yellow.
Bottom Ridge
Join cream in any st.
Rnd 11: Ch 1, sc BLO in each st around, join. (60 sts) The wall turns upward here.
Rnd 12: Ch 1, sc in each st around, join. (60 sts) Fasten off cream.
Ribbed Wall
Join butter yellow.
Rnd 13: Ch 2, dc in each st around, join. (60 sts)
Rnd 14: Ch 2, FPdc around next st, BPdc around next st, repeat 30 times, join. (60 sts: 30 FPdc, 30 BPdc)
Rnds 15–19: Repeat Rnd 14, working FPdc around each FPdc and BPdc around each BPdc. (60 sts each rnd) Fasten off yellow.
Top Rim
Join cream.
Rnd 20: Ch 1, sc in each st around, join. (60 sts)
Rnd 21: Ch 1, reverse sc in each st around, join. (60 sts) Fasten off and weave in ends.
Place a marker in Rnd 21, st 1, and another in st 31. These mark the two strap lines, directly opposite each other. The front center is st 16.
Daisy (Make 3)
Center: With golden yellow and the 4.0 mm hook, make an MR, ch 1, 8 sc in the ring, join. (8 sts) Fasten off.
Petals: Join white in any sc.
Rnd 2: Ch 5, sc in 2nd ch from hook, hdc in next ch, dc in next ch, hdc in next ch, sl st in the same sc where the petal began, sl st in next sc, repeat 7 more times. (8 petals, 4 sts each)
Each petal is about 1 in (2.5 cm) long, and the finished daisy is about 2.75 in (7.0 cm) across. Fasten off, leaving a 12 in (30.5 cm) tail.
Leaf (Make 6)
With sage green and the 4.0 mm hook:
Ch 7. Sl st in 2nd ch from hook, sc in next ch, hdc in next ch, dc in next ch, hdc in next ch, sc in last ch. (6 sts) Ch 1 for the tip. Turn the piece and work along the other side of the foundation chain: sc, hdc, dc, hdc, sc, sl st. (6 sts)
Each leaf is about 1.5 in (3.8 cm) long. Fasten off, leaving an 8 in (20.3 cm) tail.
Attach the Motifs
- Pin a daisy centered on st 16 and Rnd 16 of each basket.
- Tuck one leaf behind the left petals and one behind the right, angled slightly downward, overlapping the petals by 0.25 in (0.6 cm).
- Sew the leaves first, then sew the daisy around its center and at each petal tip.
Keep the whole daisy on the yellow section, between Rnd 12 and Rnd 20.
Make All Pieces
Before assembly you should have:
- 3 baskets, each with a daisy and 2 leaves sewn on
- 2 cream straps with the border finished
Layout (front view, top to bottom):
        [ RING ]
        /      \
   strap        strap     (free section, 5 in)
   [ BASKET 1 + daisy ]   (4 in)
   |  gap         gap |   (2 in)
   [ BASKET 2 + daisy ]   (4 in)
   |  gap         gap |   (2 in)
   [ BASKET 3 + daisy ]   (4 in)
Straps (Make 2)
With cream and the 5.0 mm hook:
Ch 91.
Row 1: Sc in 2nd ch from hook and in each ch across. (90 sts)
Don’t fasten off. The strap measures 22.5 in (57.2 cm). Mark these zones in Row 1, counting from the starting end:
| Strap stitches | Zone | Length |
|---|---|---|
| 1–6 | Ring wrap | 1.5 in (3.8 cm) |
| 7–26 | Free top section | 5 in (12.7 cm) |
| 27–42 | Basket 1 | 4 in (10.2 cm) |
| 43–50 | Gap | 2 in (5.1 cm) |
| 51–66 | Basket 2 | 4 in (10.2 cm) |
| 67–74 | Gap | 2 in (5.1 cm) |
| 75–90 | Basket 3 | 4 in (10.2 cm) |
Check: 6 + 20 + 16 + 8 + 16 + 8 + 16 = 90 sts. At 4 sts per inch, 16 strap sts match the 4 in (10.2 cm) basket height.
Border
Work one sc round around each strap. It gives the strap a rounded, braided-looking edge and keeps it from curling.
Border gauge: same as sc, 16 sts = 4 in (10.2 cm).
Corner rule: Each corner is 3 sc worked in one stitch. The middle sc is the corner stitch, and the two outer sc belong to the sides on either side of it.
Border Rnd: Ch 1, turn. Work 3 sc in the first st, sc in the next 88 sts, then 3 sc in the last st. Work 1 sc in the end of Row 1. Working into the foundation chain, work 3 sc in the first ch, sc in the next 88 ch, then 3 sc in the last ch. Work 1 sc in the other end of Row 1. Join.
Counts per side (each side includes its 2 corner stitches):
- Long side 1: 1 + 88 + 1 = 90 non-corner sts + 2 corners = 92 sts
- Long side 2: 92 sts
- Short end 1: 1 + 1 + 1 = 3 non-corner sts + 2 corners = 5 sts
- Short end 2: 5 sts
Total: 92 + 92 + 5 + 5 = 194, minus 4 corners counted twice = 190 sts.
Why the math works: Each long side starts from the 90 Row 1 stitches. The two end stitches become corner groups. That leaves 88 plain stitches, plus 2 outer sc and 2 corners, for 92 in total. The corner groups add 0.25 in (0.6 cm) at each end, so the strap grows to 23 in (58.4 cm). The extra length is hidden in the ring wrap and the tuck under Basket 3. The width grows from 0.22 in (0.6 cm) to 0.67 in (1.7 cm).
Fasten off, leaving a 36 in (91.4 cm) tail.
Joining
Method: Whipstitch with cream yarn through both edges of the strap and into the basket wall.
- Lay zone 27–42 of the first strap over the st 1 column of Basket 1, from the Rnd 11 ridge to the Rnd 21 rim.
- Stitch-to-stitch logic: The wall has 11 round levels (Rnds 11–21) in 4 in (10.2 cm). The strap has 16 stitches in the same 4 in (10.2 cm). Pin both ends of the zone first, then pin at Rnds 13 and 19. Tack the strap at every round level in between.
- Sew down both long edges, catching the post of the wall stitch underneath.
- Leave sts 43–50 free. Attach Basket 2 to zone 51–66 and Basket 3 to zone 75–90.
- Repeat with the second strap on the st 31 column.
- Fold zone 1–6 of both straps around the ring and sew each end flat to the back of its own strap.
Tension advice: Sew firmly but don’t pull. The straps should lie flat and not pucker the wall.
Size checkpoint: Hang the holder empty. Each gap should measure 2 in (5.1 cm), each basket 4 in (10.2 cm), and the whole holder about 23 in (58.4 cm).
Final Blocking
- Mist each basket until it is damp but not wet.
- Slide a roll into each basket and shape the walls around it.
- Straighten the rib columns and the crab-stitch rims.
- Pin the petals and leaves flat.
- Let everything dry fully, about 24 hours, before hanging.
Final Quality-Control Checklist
- All bases measure 4.75 in (12.1 cm) across.
- Every wall rnd has 60 sts, with 30 straight FPdc columns.
- Each basket is 4 in (10.2 cm) tall.
- Each daisy is centered on st 16 and sits entirely on yellow.
- The straps sit on opposite columns, st 1 and st 31.
- The gaps are all 2 in (5.1 cm) and the baskets hang level.
- All ends are woven in.
Troubleshooting
- Base cups upward: Your tension is tight. Go up one hook size for the base.
- Base ruffles: Go down one hook size.
- Ribs slant: Join into the first stitch, not into the ch 2.
- Roll doesn’t fit: Add one increase rnd (66 sts) and keep 66 sts for the whole wall. Mark the straps at st 1 and st 34.
- Baskets tilt: One strap is tacked higher than the other. Re-pin from the zone markers.
- Petals curl: Block them flat and tack down each petal tip.
Care
Hand wash in cool water with mild soap. Lay flat to dry, reshaping each basket around a roll, and avoid the dryer because it can shrink cotton.
Final Notes
A 60-stitch base at 16 sts per 4 in gives a 4.75 in (12.1 cm) basket. Eleven wall rounds make it 4 in (10.2 cm) tall, which matches 16 strap stitches. A 90-stitch strap covers three baskets, two 2 in (5.1 cm) gaps, a 5 in (12.7 cm) free section and a ring wrap. The border brings each strap to 23 in (58.4 cm). Check each stage as you go and the holder will hang straight.
Happy crocheting!