

This little tree is made of soft, rounded puff stitches stacked into three tiers. It’s worked flat in one piece and outlined with a crisp edging. A small square trunk sits at the bottom, and a covered loop at the top makes it ready to hang.
The sample is in a dusty rose worsted yarn, which looks warm and a little vintage against green branches and pearl baubles. Classic green, cream or soft gold also suit this design. Because the whole ornament uses one color, you only change yarn when you start a new tree.
The pattern uses US crochet terms. The finished tree body measures about 5.1 in (13.0 cm) wide and 4.6 in (11.7 cm) tall. With the trunk, the tree is 5.4 in (13.7 cm) tall, and the loop adds another 1.0 in (2.5 cm).
You’ll work the body in rows from the bottom edge up to the point. The tiers alternate rows of puff stitches with plain single crochet rows and two openwork dc bars. Next you add a single crochet border, then work the trunk off the bottom edge. A slip stitch round tidies the whole outline and makes the hanging loop on the way.
Finished Size and Construction
- Finished size: 5.1 in (13.0 cm) wide × 5.4 in (13.7 cm) tall including trunk; 6.4 in (16.3 cm) including loop
- Skill level: Easy-intermediate
- Terminology: US
- Yarn weight: Worsted (#4)
- Hook: 4.0 mm (G-6)
- Number of pieces: 1
- Layout: Single flat ornament, no joining
- Body size after border: 5.1 in (13.0 cm) × 4.6 in (11.7 cm)
- Body size before border: 4.7 in (11.9 cm) × 4.2 in (10.7 cm)
- Border depth: about 0.2 in (0.5 cm) per edge
- Trunk: 1.1 in (2.8 cm) wide × 0.8 in (2.0 cm) tall
Materials
Yarn: A smooth worsted yarn in cotton or a cotton-acrylic blend shows puff stitches best. Very fuzzy yarn hides the separate strands of each puff, and splitty yarn makes the multi-loop pull-through hard work.
- Dusty rose: 15 g, about 30 m (33 yd) per ornament
Puff stitches use more yarn than flat stitches. The quantity above includes a margin, so leftovers from a standard ball are enough for several trees.
Tools:
– 4.0 mm (G-6) crochet hook
– Tapestry needle
– Scissors
– 2 stitch markers
– Blocking mat, rust-proof pins and a spray bottle
– Optional: fabric stiffener for a firmer ornament
Abbreviations (US Terms)
- ch – chain
- sl st – slip stitch
- sc – single crochet
- sc2tog – single crochet 2 together
- dc – double crochet
- sk – skip
- sp – space
- st(s) – stitch(es)
- RS / WS – right side / wrong side
Puff stitch (puff): Yarn over, insert hook into the stitch, yarn over and pull up a loop to about 0.5 in (1.3 cm). Repeat from * to * 3 more times (9 loops on hook). Yarn over and pull through all 9 loops, then ch 1 to close. The closing ch 1 does not count as a stitch.
Gauge and Checkpoints
Gauge: 9 sc and 10 sc rows = 2 in (5.1 cm). Each puff row and each dc row is about 0.4 in (1.0 cm) tall, the same as 2 sc rows.
Make one test tree before a batch. It’s small, and it is the most reliable gauge check.
Checkpoints:
– After Row 1: 21 sc measure 4.7 in (11.9 cm).
– After Row 5: The piece is 1.6 in (4.1 cm) tall and 3.8 in (9.7 cm) across the top.
– After Row 9: The piece is 3.0 in (7.6 cm) tall and 2.0 in (5.1 cm) across the top.
– After Row 13: The piece is 4.2 in (10.7 cm) tall.
– After Border Round 1: The body is 5.1 in (13.0 cm) wide × 4.6 in (11.7 cm) tall.
If your tree is too big, go down to a 3.75 mm hook. Also pull up shorter puff loops, because tall loops make tall rows. If it’s too small, go up to a 4.5 mm hook. Keep the puff loops even: uneven loops make lumpy puffs and wavy rows.
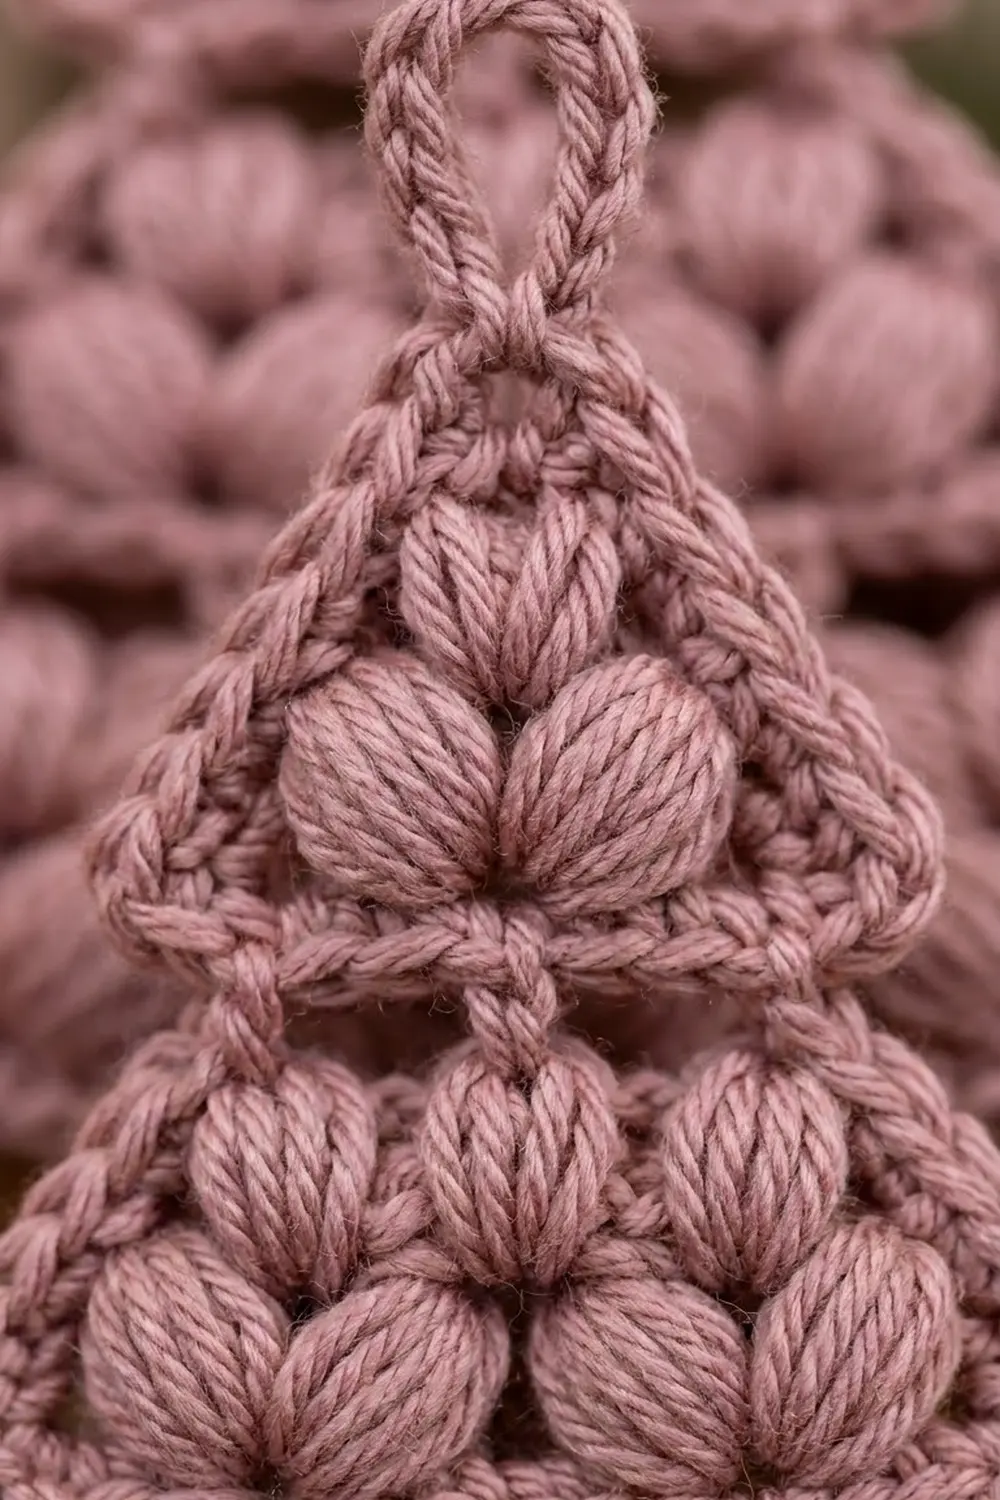
Tree Body
The body is worked in rows. All puff rows are RS rows, so the puffs face the same way.
To shape the sides, some rows start with 2 sl sts and leave 2 stitches unworked at the end. The ch 1 at the start of a row never counts as a stitch. The ch 3 at the start of a dc row counts as the first dc.
Row 1 (WS): Ch 22. Sc in 2nd ch from hook and in each ch across. Turn. (21 sc)
Row 2 (RS, 5 puffs): Ch 1, sc in first st. Ch 1, sk 1, puff in next st, ch 1, sk 1, sc in next st. Repeat from * 4 more times. Turn. (5 puffs, 6 sc, 10 ch-1 sps = 21 sts)
Row 3 (WS): Ch 1, sc in first sc. Sc in ch-1 sp, sc in top of puff, sc in ch-1 sp, sc in sc. Repeat from * 4 more times. Turn. (21 sc)
Row 4 (RS, 4 puffs): Sl st in first 2 sts, ch 1, sc in next st (the 3rd st). Ch 1, sk 1, puff in next st, ch 1, sk 1, sc in next st. Repeat from * 3 more times. Leave the last 2 sts unworked. Turn. (4 puffs, 5 sc, 8 ch-1 sps = 17 sts)
These puffs land between the Row 2 puffs, which gives the staggered look.
Row 5 (WS, openwork bar): Ch 3 (counts as dc). Ch 1, sk next ch-1 sp, dc in next st. Repeat from * 7 more times. Turn. (9 dc, 8 ch-1 sps = 17 sts)
Every dc goes into an sc or a puff, and every ch-1 skips a ch-1 sp. The result is a clean row of small windows.
Row 6 (RS, 3 puffs): Sl st in first dc and in next ch-1 sp, ch 1, sc in next dc. Ch 1, sk next ch-1 sp, puff in next dc, ch 1, sk next ch-1 sp, sc in next dc. Repeat from * 2 more times. Leave the last ch-1 sp and dc unworked. Turn. (3 puffs, 4 sc, 6 ch-1 sps = 13 sts)
Row 7 (WS): Ch 1, sc in first sc. Sc in ch-1 sp, sc in puff, sc in ch-1 sp, sc in sc. Repeat from * 2 more times. Turn. (13 sc)
Row 8 (RS, 2 puffs): Sl st in first 2 sts, ch 1, sc in next st. Ch 1, sk 1, puff in next st, ch 1, sk 1, sc in next st. Repeat from * once more. Leave the last 2 sts unworked. Turn. (2 puffs, 3 sc, 4 ch-1 sps = 9 sts)
Row 9 (WS, openwork bar): Ch 3 (counts as dc). Ch 1, sk next ch-1 sp, dc in next st. Repeat from * 3 more times. Turn. (5 dc, 4 ch-1 sps = 9 sts)
Row 10 (RS, 2 puffs): Ch 1, sc in first dc. Ch 1, sk next ch-1 sp, puff in next dc, ch 1, sk next ch-1 sp, sc in next dc. Repeat from * once more. Turn. (2 puffs, 3 sc, 4 ch-1 sps = 9 sts)
This row is not inset. Because the top tier starts at the same width as the bar below it, the side edge shows a small step between tiers 2 and 3.
Row 11 (WS): Ch 1, sc in first sc. Sc in ch-1 sp, sc in puff, sc in ch-1 sp, sc in sc. Repeat from * once more. Turn. (9 sc)
Row 12 (RS, 1 puff): Sl st in first 2 sts, ch 1, sc in next st. Ch 1, sk 1, puff in next st, ch 1, sk 1, sc in next st. Leave the last 2 sts unworked. Turn. (1 puff, 2 sc, 2 ch-1 sps = 5 sts)
Row 13 (WS): Ch 1, sc2tog over the first sc and ch-1 sp, sc in puff, sc2tog over the ch-1 sp and last sc. (3 sts)
Do not fasten off. Check your measurements against the Row 13 checkpoint.
Puff total: Tier 1 has 5 + 4 puffs, tier 2 has 3 + 2 and tier 3 has 2 + 1, for 17 puffs in all.
Border
Border gauge: Along the side edges, work 1 sc for each sc row end and 2 sc for each puff or dc row end. Puff and dc rows are about twice as tall as sc rows, so this keeps the edge flat. Each step (2 stitches skipped or sl-stitched over) gets 1 sc per stitch.
Round 1 (sc outline)
Ch 1 and turn so the RS faces you. Work as follows.
Top point: Sc in first st of Row 13, 3 sc in next st (place a marker in the center sc), sc in last st. (5 sc)
First side (from top down to the bottom corner):
| Row end / step | Sc |
|---|---|
| Row 13 | 1 |
| Row 12 | 2 |
| Step (Row 12) | 2 |
| Row 11 | 1 |
| Row 10 | 2 |
| Row 9 | 2 |
| Row 8 | 2 |
| Step (Row 8) | 2 |
| Row 7 | 1 |
| Row 6 | 2 |
| Step (Row 6) | 2 |
| Row 5 | 2 |
| Row 4 | 2 |
| Step (Row 4) | 2 |
| Row 3 | 1 |
| Row 2 | 2 |
| Row 1 | 1 |
That makes 29 sc per side: 5 sc rows × 1 = 5, plus 8 tall rows × 2 = 16, plus 4 steps × 2 = 8.
Bottom edge: Work into the remaining loops of the foundation chain. Make 2 sc in the first ch, 1 sc in each of the next 19 ch, and 2 sc in the last ch. (23 sc)
Second side: Work the same 29 sc in reverse order, from Row 1 up to Row 13.
Join with a sl st to the first sc. Fasten off.
Round 1 total: 5 + 29 + 23 + 29 = 86 sc
Why the math works: The bottom has one sc per foundation chain (21) plus 1 extra at each corner (2), which gives 23. Both sides follow the same row sequence, so each gets 29. The top point is the 3 stitches of Row 13 plus 2 extra in the center, which gives 5. No stitch is counted in two places.
Trunk
Find the 23 bottom sc. Place markers so 9 sts are left free on each side, which leaves the center 5 sts (sts 10–14) for the trunk.
Row 1 (RS): Join yarn in st 10, ch 1, sc in same st and next 4 sts. Turn. (5 sc)
Rows 2–4: Ch 1, sc in each st across. Turn. (5 sc)
The trunk measures 1.1 in (2.8 cm) wide × 0.8 in (2.0 cm) tall. Do not fasten off.
Round 2 (slip stitch finish and hanging loop)
Ch 1. Work loosely so the edge doesn’t pucker. Make 1 sl st in each st or row end in this order:
- 4 up the trunk side (1 per row end)
- 9 bottom sc
- 29 side sc
- 5 top sc
- 29 side sc
- 9 bottom sc
- 4 down the other trunk side
- 5 across the top of trunk Row 4
Hanging loop: When you reach the marked center sc at the top point, sl st in it, then ch 14 and sl st into the same sc. Work 20 sc into the ch-14 loop, sl st into the center sc again, and carry on with the round.
Join to the first sl st. (94 sl sts, not counting the loop)
The round has 86 sts, minus the 5 used by the trunk, plus 13 trunk-edge sts, for 94. Fasten off and weave in all ends along the border.
Final Blocking
- Lightly spray the ornament until it is damp but not dripping.
- Lay it RS up on a blocking mat.
- Pin the bottom edge straight at 5.1 in (13.0 cm) wide.
- Pin the top point so the body measures 4.6 in (11.7 cm) tall.
- Pin each step on the sides lightly, so the three tiers line up symmetrically.
- Square the trunk to 1.1 in (2.8 cm) × 0.8 in (2.0 cm).
- Don’t press the puffs flat. Nudge each one round with your fingertip instead.
- If you’re using stiffener, brush it on lightly now.
- Let the ornament dry completely before you unpin it.
Final Quality-Control Checklist
- 17 puffs in total, arranged 5/4, 3/2, 2/1
- Two clear openwork bars between the tiers
- Both sides have 29 border sc and look like mirror images
- The trunk is exactly centered, with 9 sts free on each side
- The body measures 5.1 in (13.0 cm) × 4.6 in (11.7 cm)
- The hanging loop is fully covered and sits straight up from the point
- All ends are woven into the border with no tails showing
Troubleshooting
Puffs look flat or uneven: Pull every loop to the same height and close each puff firmly with the ch 1.
Sides are wavy: You’ve put too many sc along the side. Check the 1-or-2 rule against each row end.
Sides pull inward: You’ve used too few sc, or Round 2 is too tight. Go up a hook size for Round 2.
Tree leans to one side: An inset row probably started or ended 1 st off. Count the 17, 13, 9 and 5 checkpoints.
Trunk is off-center: Recount the 9 free stitches on each side before joining the yarn.
Loop twists: Make sure the ch-14 isn’t twisted before you sl st it closed.
Care
Hand wash in cool water and lay flat to dry. If you used stiffener, gently re-block it after washing.
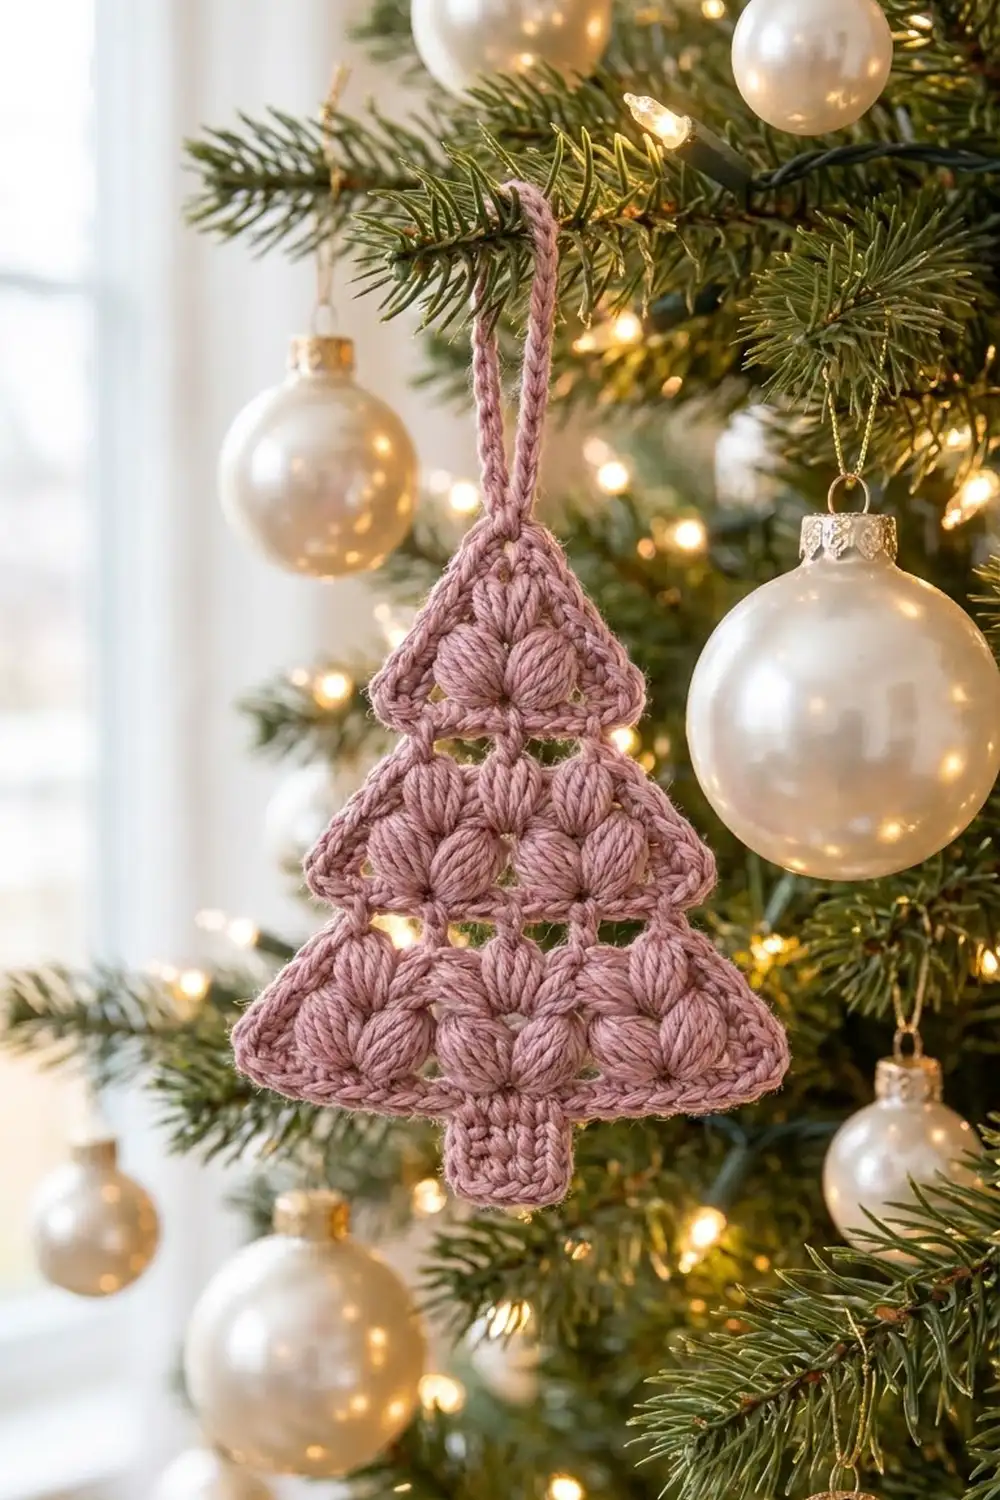
Final Notes
Here’s how the measurements build. 21 sts at gauge gives a 4.7 in (11.9 cm) base. Thirteen rows bring the body to 4.2 in (10.7 cm) tall. Round 1 adds 0.2 in (0.5 cm) on each edge, for a 5.1 in × 4.6 in (13.0 cm × 11.7 cm) body. The trunk adds 0.8 in (2.0 cm), and the loop finishes the ornament at 6.4 in (16.3 cm). If your checkpoints match, every tree in your batch will hang in a matching row.
Happy crocheting!