

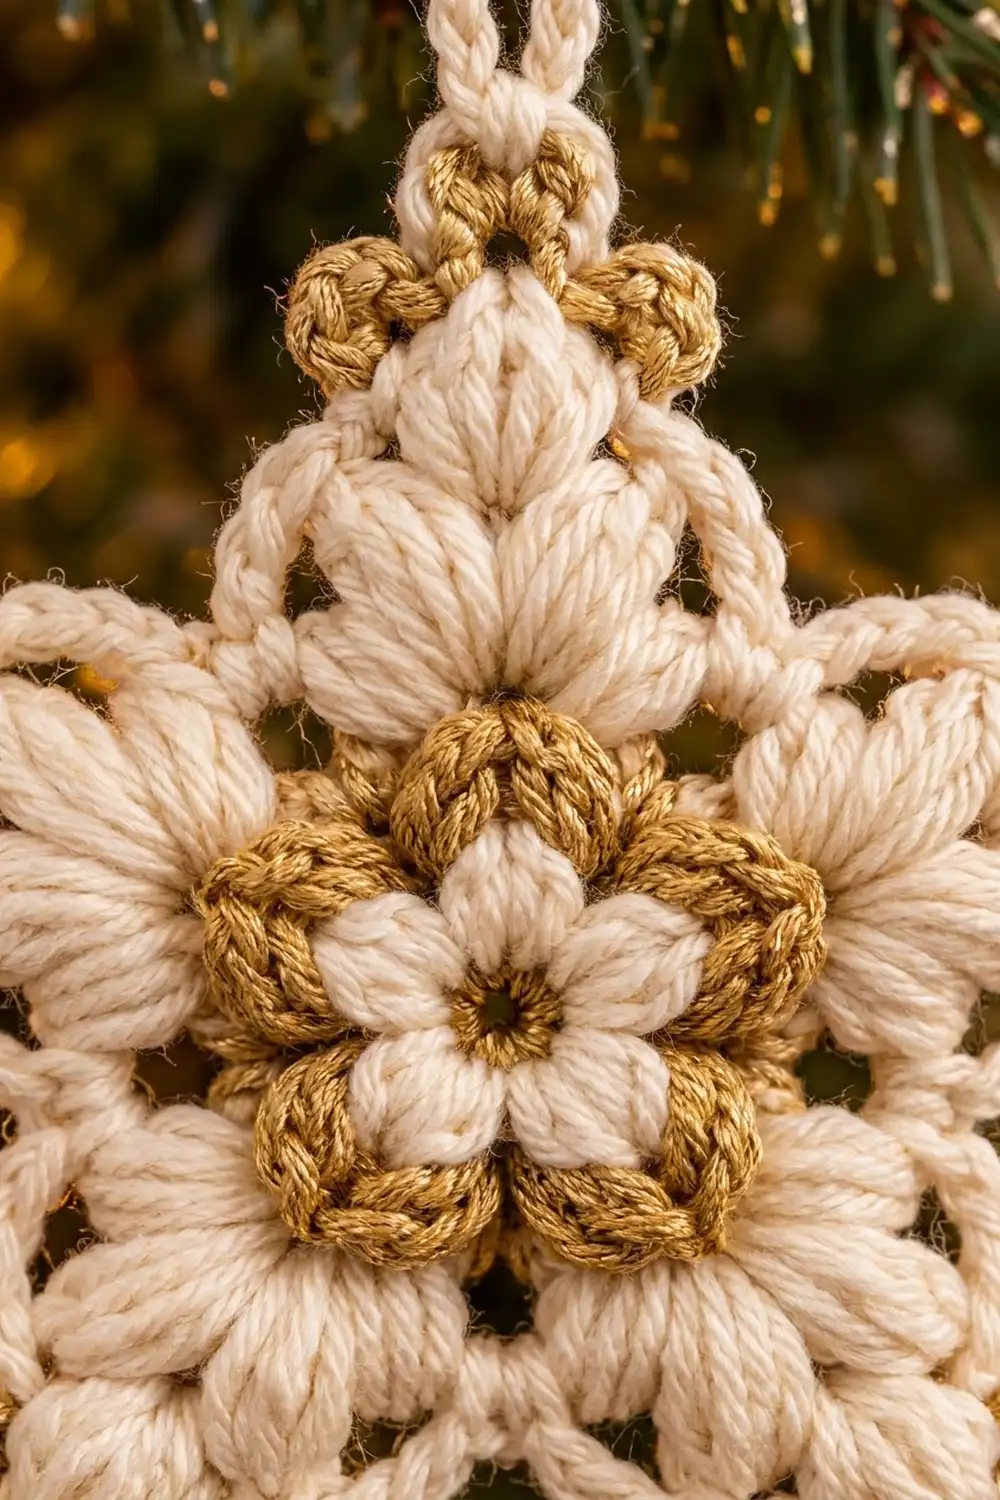
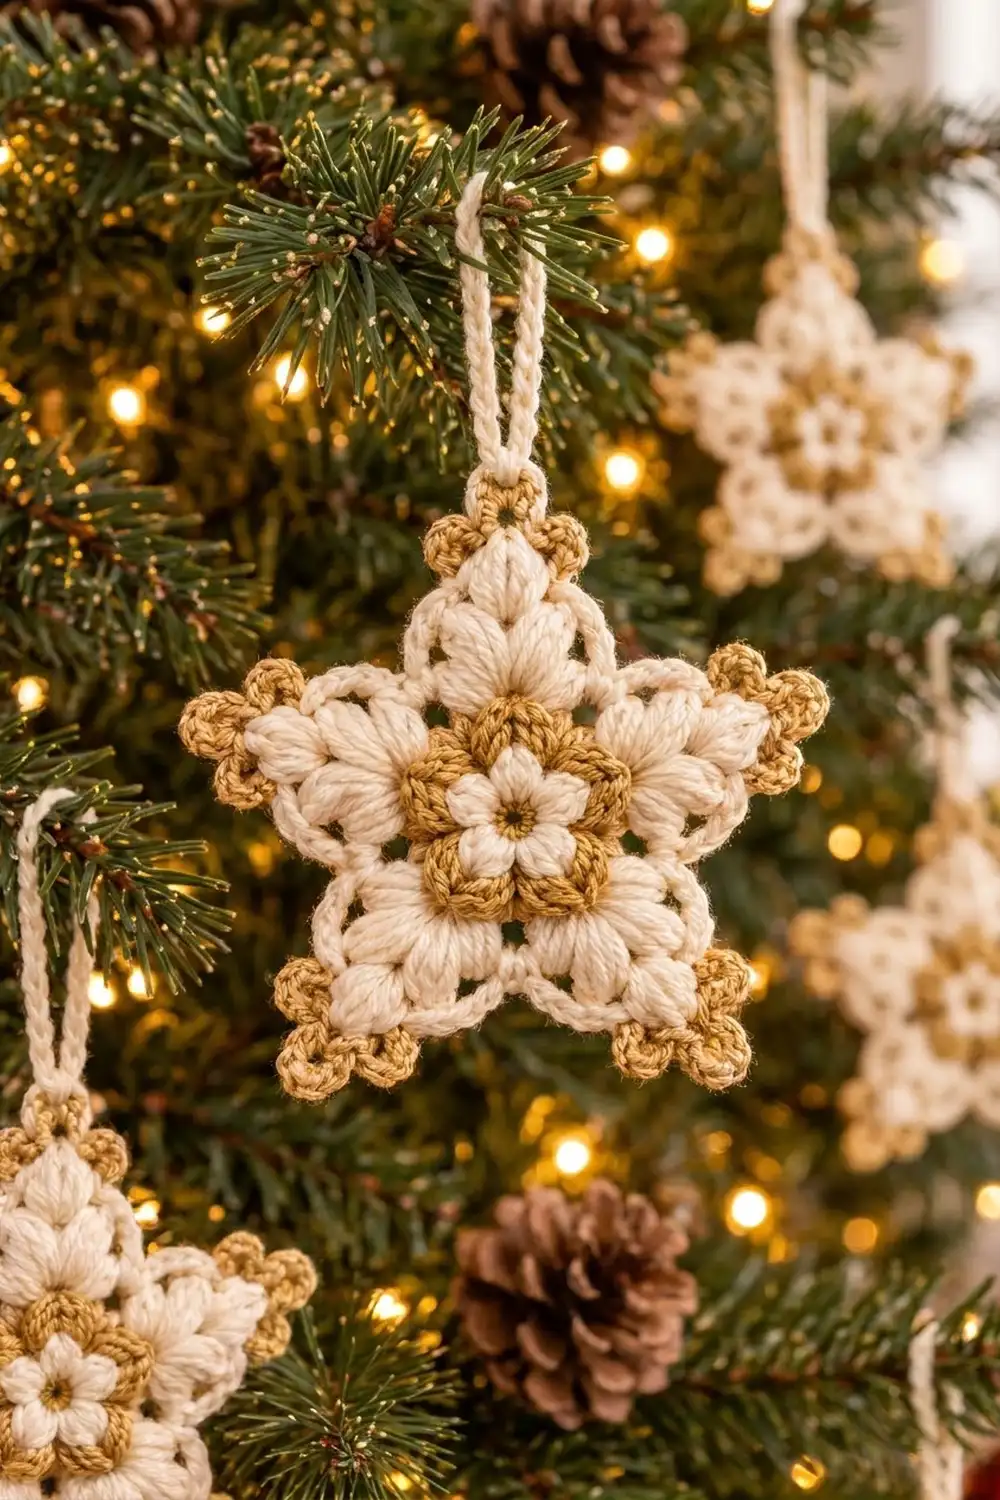
The Golden Glow Star is a plump, textured five-pointed ornament made for hanging on the tree. It starts with a tiny cream flower around a gold center. A chunky ring of gold puff clusters comes next, and then soft cream puff stitches fan out into five arms. An open chain-loop outline gives the star a lacy edge, and gold picot clusters finish each tip.
The color scheme is classic and cozy: warm cream with golden mustard or metallic-look gold. It goes well with white-and-gold trees, rustic decor, or a neutral gift tag.
This pattern uses US crochet terms throughout. The finished star measures about 5 in (12.7 cm) from tip to tip, with a hanging loop about 2 in (5.1 cm) tall.
Construction is simple. You work in joined rounds from the center out, changing colors between rounds. Then you add the gold tip clusters one at a time and finish with a slip-stitched hanging loop. It is one single piece, so there is no seaming.
Finished Size and Construction
- Finished size: 5 in (12.7 cm) tip to tip
- Hanging loop: about 2 in (5.1 cm) tall
- Skill level: Easy-intermediate (puff stitches, color changes)
- Terminology: US crochet terms
- Yarn weight: Worsted (#4), cotton or cotton blend
- Hook: US G-6 (4.0 mm)
- Number of pieces: 1
- Layout: Single star worked in the round from the center
- Piece size before border: 4 in (10.2 cm) tip to tip after Round 5
- Border depth: 0.5 in (1.3 cm) added at each tip by the outline and gold tip clusters
Materials
Yarn: Use a smooth worsted-weight cotton or cotton blend. Cotton makes the puff stitches look crisp and helps the points hold their shape. Acrylic will work, but the star will be softer and need firmer blocking. For extra sparkle, use a gold yarn with a metallic strand. Avoid very fuzzy yarns, which hide the puff texture.
- Cream (Color A): 12 g, about 20 m
- Gold (Color B): 5 g, about 9 m
These quantities include a margin of about 20% for swatching and weaving in ends.
Tools:
– 4.0 mm (US G-6) crochet hook
– Tapestry needle
– Scissors
– Stitch marker
– Blocking mat or folded towel, plus rust-proof pins
– Spray bottle of water or light spray starch (optional)
Abbreviations (US Terms)
- ch – chain
- sl st – slip stitch
- sc – single crochet
- hdc – half double crochet
- dc – double crochet
- sp – space
- MR – magic ring
- st(s) – stitch(es)
Special stitches:
- Puff stitch (puff): (Yarn over, insert hook in the stitch or space, yarn over and pull up a loop to about 0.5 in / 1.3 cm tall) 3 times, so you have 7 loops on the hook. Yarn over and pull through all 7 loops, then ch 1 to close. The closing ch 1 is not counted as a stitch or a space.
- Picot: Ch 3, sl st in the 3rd ch from the hook.
Gauge and Checkpoints
Gauge isn’t critical for an ornament, but matching it keeps the yarn amounts and finished size accurate. Work Rounds 1–3 as a test piece before committing.
Gauge: Rounds 1–3 = 2 in (5.1 cm) in diameter.
Measurement checkpoints (laid flat, not stretched):
– After Round 1: 0.75 in (1.9 cm) across
– After Round 2: 1.5 in (3.8 cm) across
– After Round 3: 2 in (5.1 cm) across
– After Round 4: 3 in (7.6 cm) tip to tip
– After Round 5: 4 in (10.2 cm) tip to tip
– After Round 6: 4.5 in (11.4 cm) tip to tip
– After the gold tips: 5 in (12.7 cm) tip to tip
If your piece is too big: go down to a 3.75 mm (F-5) hook. Also check your puff loops; pulling them taller than 0.5 in (1.3 cm) makes the arms grow fast.
If your piece is too small: go up to a 4.5 mm (US 7) hook, or pull the puff loops up slightly taller.
If the center cups: your Round 3 chains are probably tight. Work them a little looser instead of changing hooks.
Pattern
Round 1 – Gold Center
With Color B (gold), make an MR.
Ch 1, work 10 sc in the ring. Pull the ring closed and sl st to the first sc to join. (10 sc)
Fasten off gold, leaving a 4 in (10.2 cm) tail.
Round 2 – Cream Flower
Join Color A (cream) with a sl st in any sc.
Ch 1, sc in the same st, (hdc, dc, hdc) in the next st. Sc in the next st, (hdc, dc, hdc) in the next st. Repeat from * to * 3 more times. Sl st to the first sc to join.
Round 2 total: 20 sts (5 sc + 5 petals of 3 sts each = 5 sc, 10 hdc, 5 dc).
You now have 5 small petals. Fasten off cream.
Round 3 – Gold Puff Ring
Join Color B with a sl st in the center dc of any petal.
(Puff, ch 1, puff) in the center dc of the petal, ch 2, skip the hdc, sc in the next sc between petals, ch 2, skip the hdc. Repeat from * to * 4 more times. Sl st to the top of the first puff to join.
Round 3 total: 10 puffs + 5 sc (plus 5 ch-1 sps and 10 ch-2 sps).
The pairs of puffs sit on top of each petal, giving the chunky gold ring around the cream flower. Each ch-1 sp between a puff pair marks where a star arm will grow. Fasten off gold.
Round 4 – First Puff Tier
Join Color A with a sl st in any gold sc. This is a valley between arms.
Ch 1, sc in the same st. Ch 1, puff in the next ch-2 sp, ch 1, (puff, ch 3, puff) in the next ch-1 sp, ch 1, puff in the next ch-2 sp, ch 1, sc in the next sc. Repeat from * to * 4 more times, but skip the final sc on the last repeat. Sl st to the first sc to join.
Round 4 total: 20 puffs + 5 sc (plus 20 ch-1 sps and 5 ch-3 tip sps).
Each arm now has 4 puffs, separated by ch-1, ch-3, ch-1. Each valley reads: puff, ch 1, sc, ch 1, puff. Place a marker in any ch-3 tip sp to help you find the top point later.
Round 5 – Second Puff Tier
Do not fasten off. Continue with cream.
Ch 1, sc in the same st as the join. Ch 1, skip the next ch-1 sp and puff, puff in the next ch-1 sp, ch 1, (puff, ch 3, puff) in the ch-3 tip sp, ch 1, puff in the next ch-1 sp, ch 1, skip the next puff and ch-1 sp, sc in the next sc. Repeat from * to * 4 more times, skipping the final sc on the last repeat. Sl st to the first sc to join.
Round 5 total: 20 puffs + 5 sc (plus 20 ch-1 sps and 5 ch-3 tip sps).
The puffs in this round sit on the upper part of each arm. This makes the arms stack and narrow to a point, while the valleys stay deep. The star measures 4 in (10.2 cm) tip to tip.
Border
The border has three parts: a cream chain-loop outline (Round 6), gold picot clusters on the five tips (Round 7), and the hanging loop.
Border gauge: a ch-5 loop spans about 0.5 in (1.3 cm) along the arm edge. Round 6 adds about 0.25 in (0.6 cm) at each tip, and the gold clusters add another 0.25 in (0.6 cm).
Round 6 – Cream Chain-Loop Outline
Continue with cream. Ch 1, sc in the same st as the join (valley sc).
Ch 5, skip the first ch-1 sp, sc in the ch-1 sp between the 1st and 2nd puffs of the arm. Ch 4, (sc, ch 3, sc) in the ch-3 tip sp. Ch 4, sc in the ch-1 sp between the 3rd and 4th puffs. Ch 5, skip the last ch-1 sp, sc in the valley sc. Repeat from * to * 4 more times, skipping the final sc on the last repeat. Sl st to the first sc to join.
Round 6 total: 25 sc (5 per repeat), plus 10 ch-5 loops, 10 ch-4 loops, and 5 ch-3 tip loops.
Per side of each arm: 1 valley sc + ch-5 + 1 sc + ch-4 + 1 tip sc. The two sides of an arm share the ch-3 tip loop, and each valley sc is shared by two neighboring arms. That’s why the total is 5 sc per repeat and not 6.
Fasten off cream.
Round 7 – Gold Tip Clusters (Work 5)
You work each tip separately with Color B.
Join gold with a sl st in the ch-4 loop just before any tip.
(Sc, picot, sc) in the ch-4 loop. Sc in the next sc. (Sc, picot, sc, picot, sc) in the ch-3 tip loop. Sc in the next sc. (Sc, picot, sc) in the next ch-4 loop.
Per tip: 9 sc + 4 picots (2 + 1 + 3 + 1 + 2 = 9 sc).
Fasten off and repeat on the remaining 4 tips. Round 7 total: 45 sc + 20 picots.
The ch-5 loops are left in cream, so the gold sits only on the points, as in the finished ornament.
Hanging Loop
At the marked top tip, join cream with a sl st in the center sc of the gold tip cluster (the 2nd of the 3 sc in the ch-3 loop).
Ch 25, sl st in the same st to form a loop. Sl st in each of the 25 ch around the loop, then sl st in the starting st. (25 ch + 25 sl st)
Fasten off. The slip-stitch layer firms up the chain into a cord, and the loop hangs about 2 in (5.1 cm) tall.
Why the Math Works
Each round stays at 5 identical repeats, so the star stays balanced.
- Round 3 doubles the 5 petals into 10 puffs, which gives 5 arm starting points.
- Rounds 4 and 5 each keep 4 puffs per arm, with no extra growth in the valleys. The extra height goes only into the tips (ch-3), so the arms lengthen while the valleys stay deep.
- Round 6 uses a ch-5 next to the valleys and a ch-4 next to the tips. This follows the curve of each arm: longer loops where the edge curves, shorter ones where it tightens toward the point.
- The size chain adds up: 4 in (10.2 cm) + 0.5 in (1.3 cm) at one tip + 0.5 in (1.3 cm) at the opposite side = 5 in (12.7 cm).
Final Blocking
- Weave in all ends along same-color stitches. Hide gold tails behind the gold puffs and cream tails inside the cream puffs.
- Mist the star lightly with water, or with diluted spray starch for a firmer ornament.
- Lay it face up on a blocking mat or folded towel.
- Pin the top tip and the two bottom tips first, making an even triangle.
- Pin the two side tips so all five points are about the same distance from the center.
- Pin each valley gently inward to sharpen the star shape.
- Open each ch-5 and ch-4 loop with your fingertip so the outline lies flat.
- Check that it measures 5 in (12.7 cm) tip to tip, then let it dry completely, usually 4–8 hours.
- Unpin and fluff each puff with a fingertip.
Final Quality-Control Checklist
- Center: gold ring of 10 sc, tightly closed
- 5 even cream petals
- 10 gold puffs in 5 pairs
- 4 puffs per arm in both Round 4 and Round 5
- 25 sc in Round 6, with even chain loops
- 5 gold tip clusters, each with 9 sc and 4 picots
- Hanging loop centered on the top tip, about 2 in (5.1 cm) tall
- Finished size: 5 in (12.7 cm) tip to tip
- All ends woven in securely, no tails showing on the front
Troubleshooting
Puffs look flat or uneven: pull every loop to the same height before closing the puff. Hold the loops on the hook with your index finger.
Center hole won’t close: tighten the magic ring before joining Round 1, and weave the gold tail around the ring once more when finishing.
Arms are lopsided: count the puffs on each arm. Missing one ch-1 skip in Round 5 moves the whole arm sideways.
Tips are rounded instead of pointed: check that the ch-3 tip spaces aren’t worked as ch-1, and block firmly with a pin right at each point.
Outline ruffles: your chains are too loose. Try ch 4 and ch 3 instead of ch 5 and ch 4, or tighten your chain tension.
Outline pulls the star into a cup: your chains are too tight. Loosen them, or go up a hook size for Round 6 only.
Gold picots flop: make the sl st closing each picot firmly, and use a little starch when blocking.
Care
Spot clean or gently hand wash in cool water, press out the water in a towel, and dry flat, re-pinning the points if needed. Store flat or loosely wrapped in tissue so the puffs and picots don’t get crushed.
Final Notes
The measurement chain:
- Gold center: 0.75 in (1.9 cm)
- Cream flower: 1.5 in (3.8 cm)
- Gold puff ring: 2 in (5.1 cm)
- First puff tier: 3 in (7.6 cm)
- Second puff tier: 4 in (10.2 cm)
- Chain-loop outline: 4.5 in (11.4 cm)
- Gold tip clusters: 5 in (12.7 cm) tip to tip
Check each stage as you go and the star will finish true and symmetrical. A single star takes under an hour once you know the puff stitch, so it’s an easy one to make several of.
Happy crocheting!