

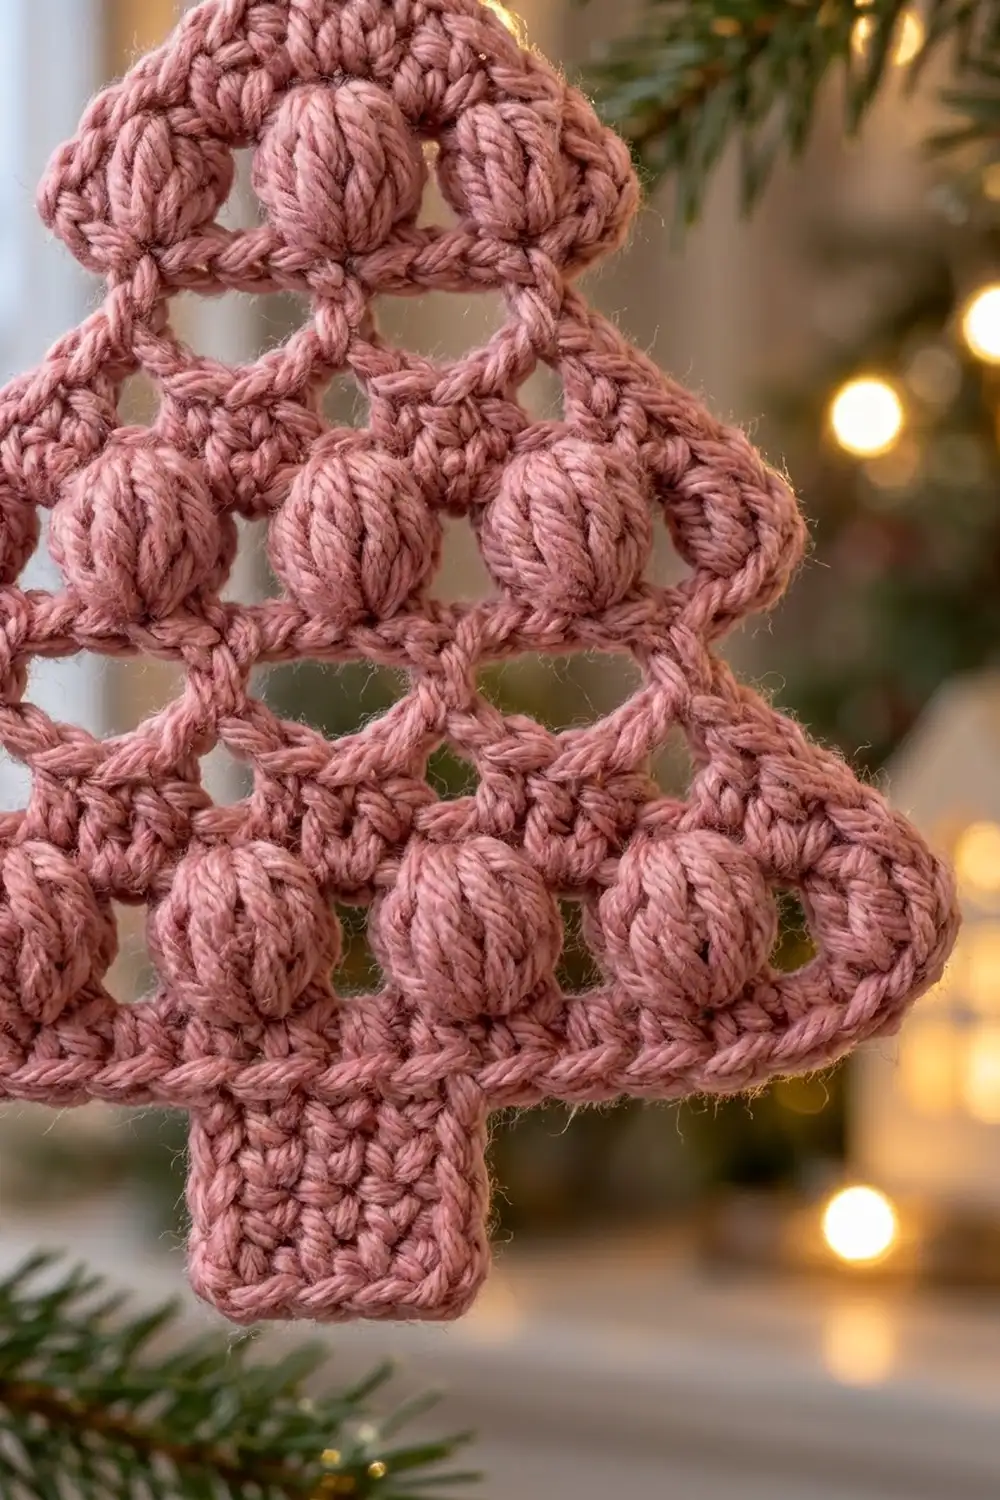
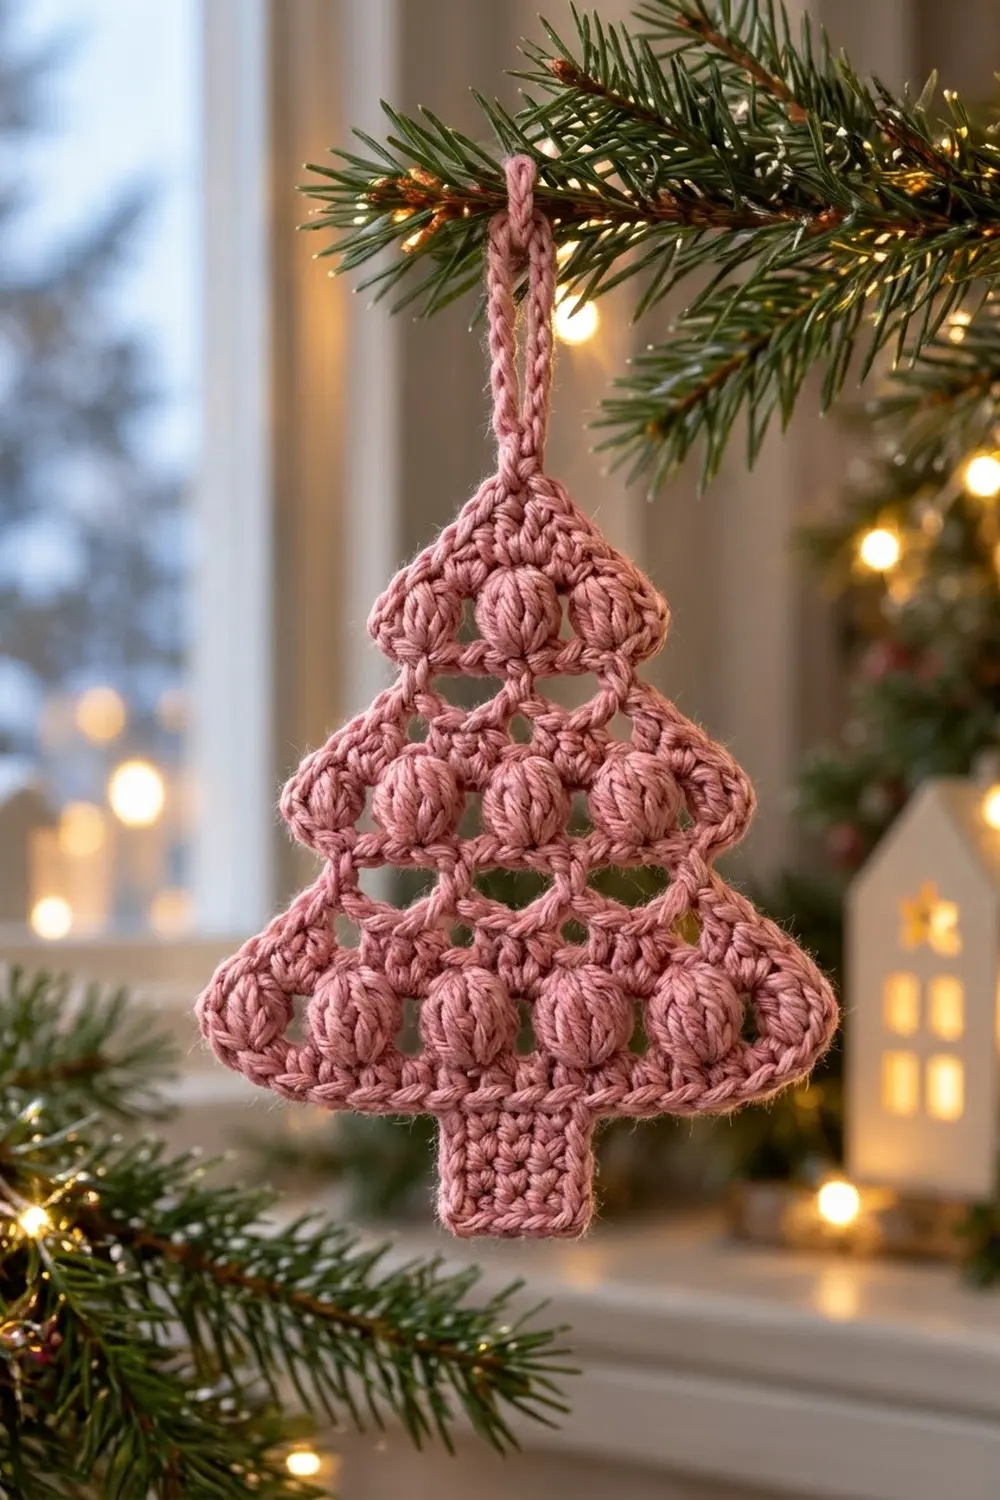
This little tree is a flat ornament made in one dusty rose shade. It has three stacked tiers, and each one ends in a row of round puff stitches. Open chain arches sit between the tiers, and a solid single crochet trunk sits at the base. A thin chain loop at the tip lets you hang it on a branch, a gift tag or a window hook.
The look is soft and vintage rather than bright and traditional. Using one muted pink lets the texture stand out. The puffs look like baubles and the arches add a lacy band between tiers. A single crochet border with small flared points gives each tier a crisp tip.
The pattern uses US crochet terms. The finished ornament measures 4 in (10.2 cm) wide at the bottom tier points and 5 in (12.7 cm) tall, not counting the hanging loop. The loop adds about 1.5 in (3.8 cm). It works up in under an hour, so you can make several from one small skein.
You work the tree flat in rows from the top point down. Each tier gets wider with simple single crochet increases and ends with a puff row. A short chain-arch row starts the next tier. After the last tier, you work the trunk over the center stitches. Then one border round outlines the whole shape and adds the tier flares. The hanging loop finishes the tip.
Finished Size and Construction
- Finished size: 4 in (10.2 cm) wide x 5 in (12.7 cm) tall, plus a 1.5 in (3.8 cm) loop
- Skill level: Easy-intermediate (puff stitches, working into chain arches)
- Terminology: US crochet terms
- Yarn weight: Medium / worsted (#4)
- Hook: 4.0 mm (US G-6)
- Number of pieces: 1
- Layout: One flat tree motif with three tiers and a trunk
- Piece size before border: 3.25 in (8.3 cm) wide at Row 14 x 4.5 in (11.4 cm) tall
- Border depth: 0.25 in (0.6 cm) on each edge, with flared points at each tier
Materials
Choose a smooth, tightly plied worsted yarn. Cotton or a cotton blend gives the clearest puffs and the crispest arches. Soft acrylic also works, but fuzzy or brushed yarns blur the texture. A matte, slightly heathered dusty rose matches the look shown. If you make a set, any medium-weight shade at the same gauge will give the same size.
- Dusty rose worsted yarn: 12 g, about 22 m (24 yds)
This amount includes a margin for gauge checks, the border and weaving in ends. The ornament itself uses closer to 8 g.
Tools:
- 4.0 mm (US G-6) crochet hook
- Tapestry needle
- Scissors
- Stitch markers (2)
- Ruler or tape measure
- Blocking mat and rust-proof pins
- Spray bottle or steamer
Abbreviations (US Terms)
- ch – chain
- sc – single crochet
- hdc – half double crochet
- dc – double crochet
- sl st – slip stitch
- sk – skip
- st(s) – stitch(es)
- sp – space
- tch – turning chain
- RS – right side
Special stitch – Puff: (Yarn over, insert hook in indicated st, yarn over and pull up a loop to about 0.5 in / 1.3 cm tall) 4 times. You now have 9 loops on the hook. Yarn over and pull through all 9 loops, then ch 1 to close. The closing ch 1 does not count as a stitch.
Flare: (sc, hdc, dc, hdc, sc) all worked into the same row end. You only use it in the border.
Notes: The ch 1 at the start of a sc row does not count as a stitch. The ch 2 at the start of a puff row counts as 1 hdc. Count every ch-1 sp in a puff row as a position, because the next row works into it.
Gauge and Checkpoints
Gauge: 16 sc and 18 rows = 4 in (10.2 cm) in sc.
The piece is small, so the tree itself is your swatch. Work Rows 1–4 and measure before you go on.
- After Row 4: 9 sts measure 2.25 in (5.7 cm) wide, and the piece is 0.9 in (2.3 cm) tall.
- After Row 5: the piece is 1.2 in (3.0 cm) tall.
- After Row 9: 11 positions measure 2.75 in (7.0 cm) wide, and the piece is 2.3 in (5.8 cm) tall.
- After Row 13: 13 positions measure 3.25 in (8.3 cm) wide, and the piece is 3.4 in (8.6 cm) tall.
- After Row 14: the piece is 3.6 in (9.1 cm) tall.
- After Row 18 (trunk): the piece is 4.5 in (11.4 cm) tall, and the trunk is 1.25 in (3.2 cm) wide.
If Row 4 is wider than 2.25 in (5.7 cm): go down to a 3.75 mm hook. If it is narrower: go up to a 4.5 mm hook. A 0.25 in (0.6 cm) difference at Row 4 grows to about 0.4 in (1.0 cm) at the bottom tier, so it is worth starting over.
Puffs change the height more than the width. If your tiers look squat, pull the puff loops up a little taller.
Tier 1 (Top)
Row 1: Ch 2, 3 sc in 2nd ch from hook. Turn. (3 sc)
Place a marker in the foundation ch. This is the tip of the tree, and the loop attaches here later.
Row 2 (RS): Ch 1, 2 sc in first st, sc in next st, 2 sc in last st. Turn. (5 sc)
Row 3: Ch 1, 2 sc in first st, sc in next 3 sts, 2 sc in last st. Turn. (7 sc)
Row 4: Ch 1, 2 sc in first st, sc in next 5 sts, 2 sc in last st. Turn. (9 sc)
Row 5 (puff row): Ch 2 (counts as hdc), [ch 1, sk 1 st, puff in next st] 3 times, ch 1, sk 1 st, hdc in last st. Turn. (2 hdc + 3 puffs + 4 ch-1 sps = 9 positions)
The puffs land on sts 3, 5 and 7, so the middle puff sits directly below the tip.
Tier 2 (Middle)
Row 6 (arch row): Ch 1, sc in first hdc, [ch 3, sk ch-1 sp, sc in top of next puff] 3 times, ch 3, sc in top of tch. Turn. (5 sc + 4 ch-3 arches)
This row makes the open lace band. It also pulls the edge in a little, which forms the step between tiers.
Row 7: Ch 1, sc in first sc, [sc in next ch-3 arch, sc in next sc] 4 times. Turn. (9 sc)
Work the sc into each arch loosely so the chains stay round and visible.
Row 8: Ch 1, 2 sc in first st, sc in next 7 sts, 2 sc in last st. Turn. (11 sc)
Row 9 (puff row): Ch 2 (counts as hdc), [ch 1, sk 1 st, puff in next st] 4 times, ch 1, sk 1 st, hdc in last st. Turn. (2 hdc + 4 puffs + 5 ch-1 sps = 11 positions)
The puffs sit on sts 3, 5, 7 and 9. Check: 1 tch + (4 x 2) + 2 = 11 sts used.
Tier 3 (Bottom)
Row 10 (arch row): Ch 1, sc in first hdc, [ch 3, sk ch-1 sp, sc in top of next puff] 4 times, ch 3, sc in top of tch. Turn. (6 sc + 5 ch-3 arches)
Row 11: Ch 1, sc in first sc, [sc in next ch-3 arch, sc in next sc] 5 times. Turn. (11 sc)
Row 12: Ch 1, 2 sc in first st, sc in next 9 sts, 2 sc in last st. Turn. (13 sc)
Row 13 (puff row): Ch 2 (counts as hdc), [ch 1, sk 1 st, puff in next st] 5 times, ch 1, sk 1 st, hdc in last st. Turn. (2 hdc + 5 puffs + 6 ch-1 sps = 13 positions)
Check: 1 tch + (5 x 2) + 2 = 13 sts used.
Row 14 (base band): Ch 1, sc in first hdc, sc in each ch-1 sp and each puff across, sc in top of tch. (13 sc)
This is a conversion row: 13 positions worked 1 per position + 0 extra = 13 sc. It gives the bottom tier a flat, solid lower edge. Fasten off.
Trunk
Row 15: With the last row facing you, sk the first 4 sc of Row 14. Join yarn in the 5th sc. Ch 1, sc in the same st and in the next 4 sts. Turn. (5 sc)
Four sts stay unworked on each side: 4 + 5 + 4 = 13.
Rows 16–18: Ch 1, sc in each st across. Turn. (5 sc)
At the end of Row 18, do not fasten off. Ch 1 and turn so you are ready to work along the bottom of the trunk. The trunk should be 1.25 in (3.2 cm) wide and 0.9 in (2.3 cm) tall.
Border
Border gauge: 1 sc per sc row end, 3 sc in each outer corner st, and one 5-st flare per puff-row end. The corner groups and flares are listed separately below. They are not included in the plain side counts.
Border round: Work in this order:
- Trunk bottom: 3 sc in first st of Row 18, sc in next 3 sts, 3 sc in last st. (9 sts)
- Trunk side: 1 sc in each row end of Rows 17, 16 and 15. (3 sc)
- Tier bottom: sc in each of the next 3 unworked sts of Row 14, 3 sc in the outer st. (6 sts) The outer corner covers the end of Row 14.
- Side edge, Rows 13 up to 1: Flare in the end of Row 13; 1 sc in each end of Rows 12, 11 and 10; Flare in the end of Row 9; 1 sc in each end of Rows 8, 7 and 6; Flare in the end of Row 5; 1 sc in each end of Rows 4, 3, 2 and 1. (3 flares x 5 sts + 10 sc = 25 sts)
- Tip: 3 sc in the marked foundation ch. (3 sc) Move the marker to the center sc.
- Side edge, Rows 1 down to 13: Work step 4 in reverse order. (25 sts)
- Tier bottom: 3 sc in the outer st of Row 14, sc in the next 3 unworked sts. (6 sts)
- Trunk side: 1 sc in each row end of Rows 15, 16 and 17. (3 sc)
Join with a sl st to the first sc. Round total: 9 + 3 + 6 + 25 + 3 + 25 + 6 + 3 = 80 sts.
Keep your tension even and slightly relaxed through the flares. Tight flares pull the tier points inward and flatten the stepped outline.
Hanging loop: Sl st along to the marked center sc at the tip. Ch 16, then sl st in the same st. Fasten off and weave in the ends.
Why the math works: A sc row end is one sc tall, so 1 sc per row end keeps the sides flat. A puff row end is about two sc rows tall. The 5-st flare fills that height and pushes its center dc outward to make the tier point. The arch rows sit one stitch in from the puff row edge, so the flares stand out past the notches. The 3-sc corners turn the square trunk and tier corners without cupping.
Size check: The border adds 0.25 in (0.6 cm) on each edge. The width at Row 14 grows from 3.25 in (8.3 cm) to 3.75 in (9.5 cm), and the flare points reach 4 in (10.2 cm). The height grows from 4.5 in (11.4 cm) to 5 in (12.7 cm).
Final Blocking
- Weave in all ends before blocking. Hide them in the trunk or along the border.
- Lightly mist the ornament with water, or hold a steamer about 1 in (2.5 cm) above it. Never press an iron down on the puffs.
- Lay it RS up on the blocking mat.
- Pin the tip and the bottom corners of the trunk so the total height is 5 in (12.7 cm).
- Pin the two bottom-tier flare points 4 in (10.2 cm) apart.
- Pin the middle and top flare points so both sides match.
- Gently open each chain arch with a fingertip and round out each puff.
- Let it dry completely, at least 4 hours, before you remove the pins.
Final Quality-Control Checklist
- The tiers have 3, 4 and 5 puffs from top to bottom, each row centered.
- Each arch row shows open, rounded chain arches.
- The trunk is 5 sts wide, with 4 unworked sts on each side of Row 14.
- The border round totals 80 sts.
- Both sides have 3 matching flare points.
- The finished size is 4 in (10.2 cm) x 5 in (12.7 cm).
- The hanging loop is centered and about 1.5 in (3.8 cm) tall.
- All ends are woven in securely.
Troubleshooting
Puffs look flat or lopsided: Pull every loop to the same height before the final yarn over. Hold the loops on the hook with your index finger.
Arches disappear: The sc in Rows 7 and 11 are too tight. Work them more loosely, or change to ch-4 arches if needed.
Tree leans to one side: Make sure each puff row starts with the ch-2 tch and ends with an hdc in the very last st.
Edges ripple: You added extra border sts. Recount to 25 sts on each side edge.
Edges pull in: The border is too tight. Go up 0.5 mm for the border round only.
Flares curl forward: Steam them and pin each center dc flat until dry.
Trunk is off-center: Recount Row 14 to 13 sc and join exactly in the 5th st.
Care
Hand wash in cool water with mild soap, roll in a towel to remove water, and lay flat to dry. Reshape the puffs and flares while the ornament is still damp.
Final Notes
Here is the measurement chain in short. Row 4 sets the gauge at 9 sts = 2.25 in (5.7 cm). The tiers grow to 13 positions = 3.25 in (8.3 cm) at Row 13. The trunk brings the height to 4.5 in (11.4 cm). The 80-st border adds 0.25 in (0.6 cm) on each edge, for a finished tree of 4 in (10.2 cm) x 5 in (12.7 cm).
Make one in dusty rose, or try sage, cream or soft gold for a matching set of ornaments. Happy crocheting!