

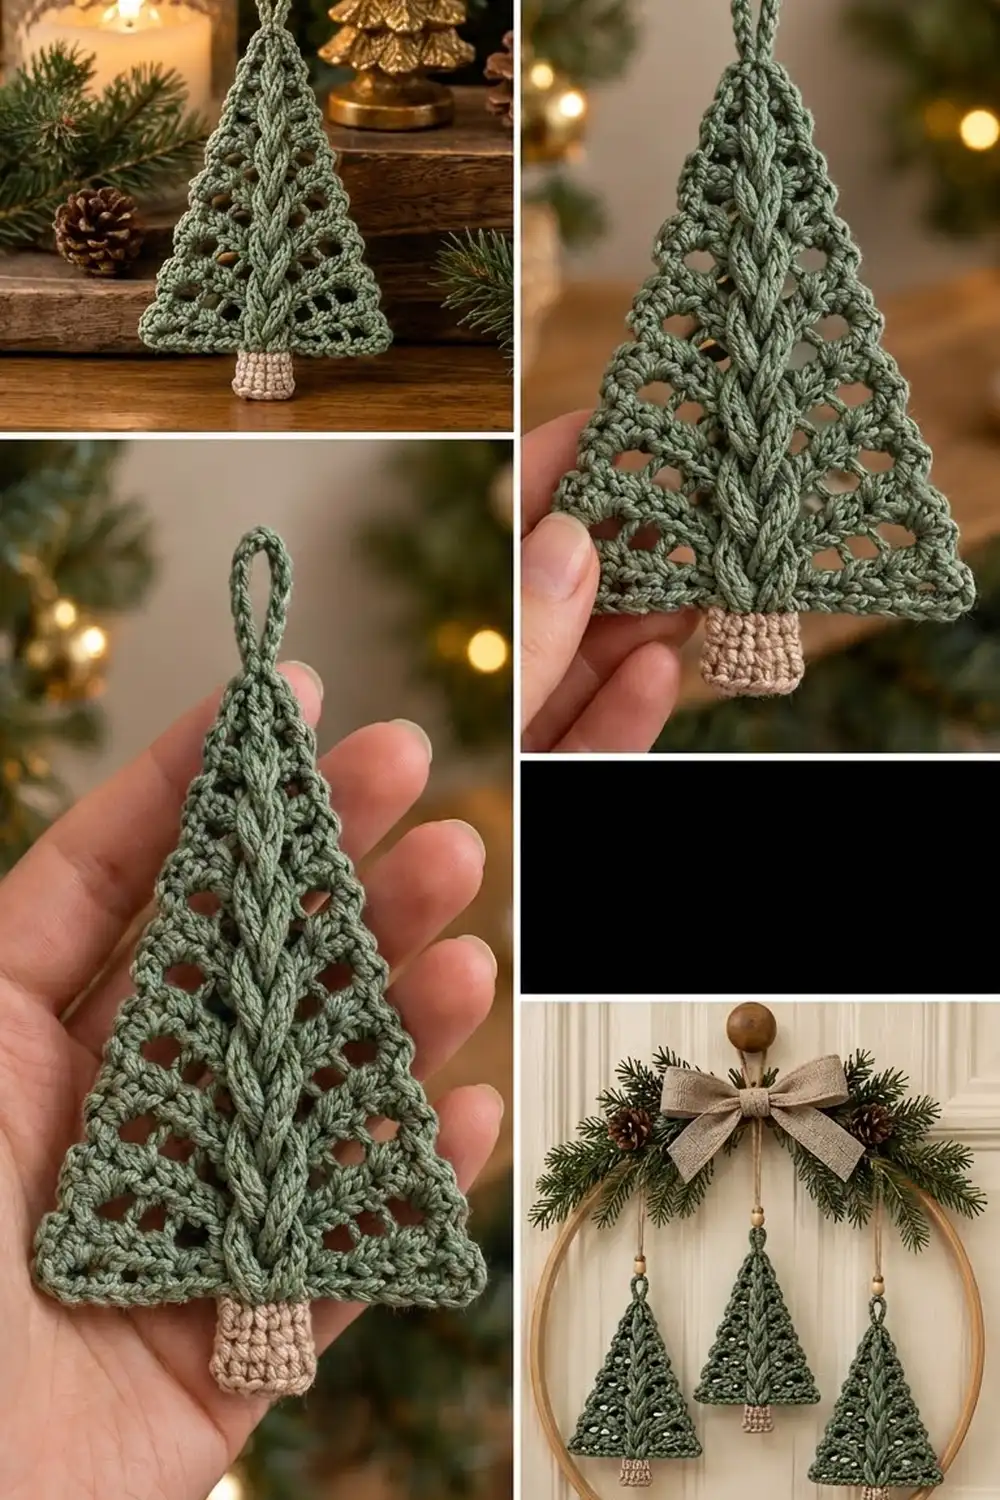
The Sage Braid Christmas Tree is a small flat ornament with a raised cable running up its center. That cable looks a lot like a braided trunk inside the tree. Each side has bands of small open eyelets, and a neat single-crochet edge finishes the triangle.
The palette is soft and rustic: sage green for the tree and natural beige for the little trunk. It looks right on a tree branch, on a gift tag or package, or hung from a wooden hoop wreath with a few others.
This pattern uses US crochet terms. The finished ornament measures about 4.0 in (10.2 cm) wide and 5.8 in (14.7 cm) tall including the trunk. The hanging loop adds about 1 in (2.5 cm).
Construction is simple to follow. You work the tree flat in rows from the base up to the tip, decreasing at both edges on every row. A 4-stitch post-stitch cable runs up the center. Then a single-crochet border goes around the whole triangle and forms the hanging loop at the tip. Finally you work the beige trunk downward from the center of the base edge.
Finished Size and Construction
- Finished size: 4.0 in (10.2 cm) wide x 5.8 in (14.7 cm) tall, plus a 1 in (2.5 cm) loop
- Skill level: Intermediate (post stitches and a simple cable cross)
- Terminology: US crochet terms
- Yarn weight: DK / light (#3), cotton or cotton blend
- Hook: 3.5 mm (E-4)
- Number of pieces: 1 (the trunk and loop are worked onto the tree)
- Layout: single standing triangle with the trunk centered below
- Tree body before border: 3.6 in (9.1 cm) wide x 4.5 in (11.4 cm) tall
- Border depth: about 0.2 in (0.5 cm) on each edge
- Body with border: 4.0 in (10.2 cm) wide x 4.9 in (12.4 cm) tall
- Trunk: 0.8 in (2.0 cm) wide x 0.9 in (2.3 cm) tall
Materials
Yarn: Use a smooth DK cotton or cotton blend. Cotton shows the cable clearly and blocks to a crisp triangle. Fuzzy or very splitty yarns hide the cable and eyelets. The amounts below assume roughly 2.4 m per gram, which is typical for DK cotton.
- Sage green (tree, border, loop): 10 g, about 24 m
- Natural beige (trunk): 3 g, about 7 m
The quantities include a safety margin. One ornament uses a little less than listed.
Tools:
- 3.5 mm (E-4) crochet hook
- Tapestry needle
- Scissors
- Stitch markers (2)
- Ruler or tape measure
- Blocking mat and rust-proof pins
- Spray bottle with water
Abbreviations (US Terms)
- ch: chain
- sl st: slip stitch
- sc: single crochet
- dc: double crochet
- sk: skip
- sp: space
- st(s): stitch(es)
- RS / WS: right side / wrong side
- dc2tog: double crochet 2 together. (Yarn over, insert in next st, pull up a loop, yarn over, pull through 2 loops) twice, yarn over, pull through all 3 loops.
- dc3tog: double crochet 3 together. Same as dc2tog, but over 3 sts, then pull through all 4 loops.
- BPdc: back post double crochet, worked around the post of the st from the back.
- BPdc2tog: back post dc2tog, worked around the posts of the next 2 sts.
- FPtr: front post treble crochet, worked around the post of the st from the front.
Special stitch: C4F (4-stitch front cable cross). Skip the next 2 sts. FPtr around each of the next 2 sts. Then, working in front of the 2 sts you just made, FPtr around each of the 2 skipped sts. That makes 4 sts. You cross the same direction on every RS row, so the cable twists like a rope and reads as a braid.
Turning chain: Ch 2 at the start of every row. It does not count as a stitch.
Gauge and Checkpoints
Gauge: 20 sts and 8 rows = 4 in (10.2 cm) in dc. In sc, 20 sts = 4 in (10.2 cm).
Because the ornament is small, the first tree is your gauge test. Make one, check it at each checkpoint below, and only then make more.
- After Row 1: 18 dc measure 3.6 in (9.1 cm) across.
- After Row 2: the piece is 1.0 in (2.5 cm) tall.
- After Row 4: the piece is 2.0 in (5.1 cm) tall and the top edge is 2.4 in (6.1 cm) wide.
- After Row 6: the piece is 3.0 in (7.6 cm) tall.
- After Row 9: the body is 4.5 in (11.4 cm) tall.
- After the border: 4.0 in (10.2 cm) x 4.9 in (12.4 cm).
Too big? Go down a half size to 3.25 mm, or crochet with a slightly firmer hold.
Too small? Go up to 3.75 mm (F-5).
Rows too short but width correct? Pull the first loop of each dc up a little taller. Row height is what gives the tree its slim shape.
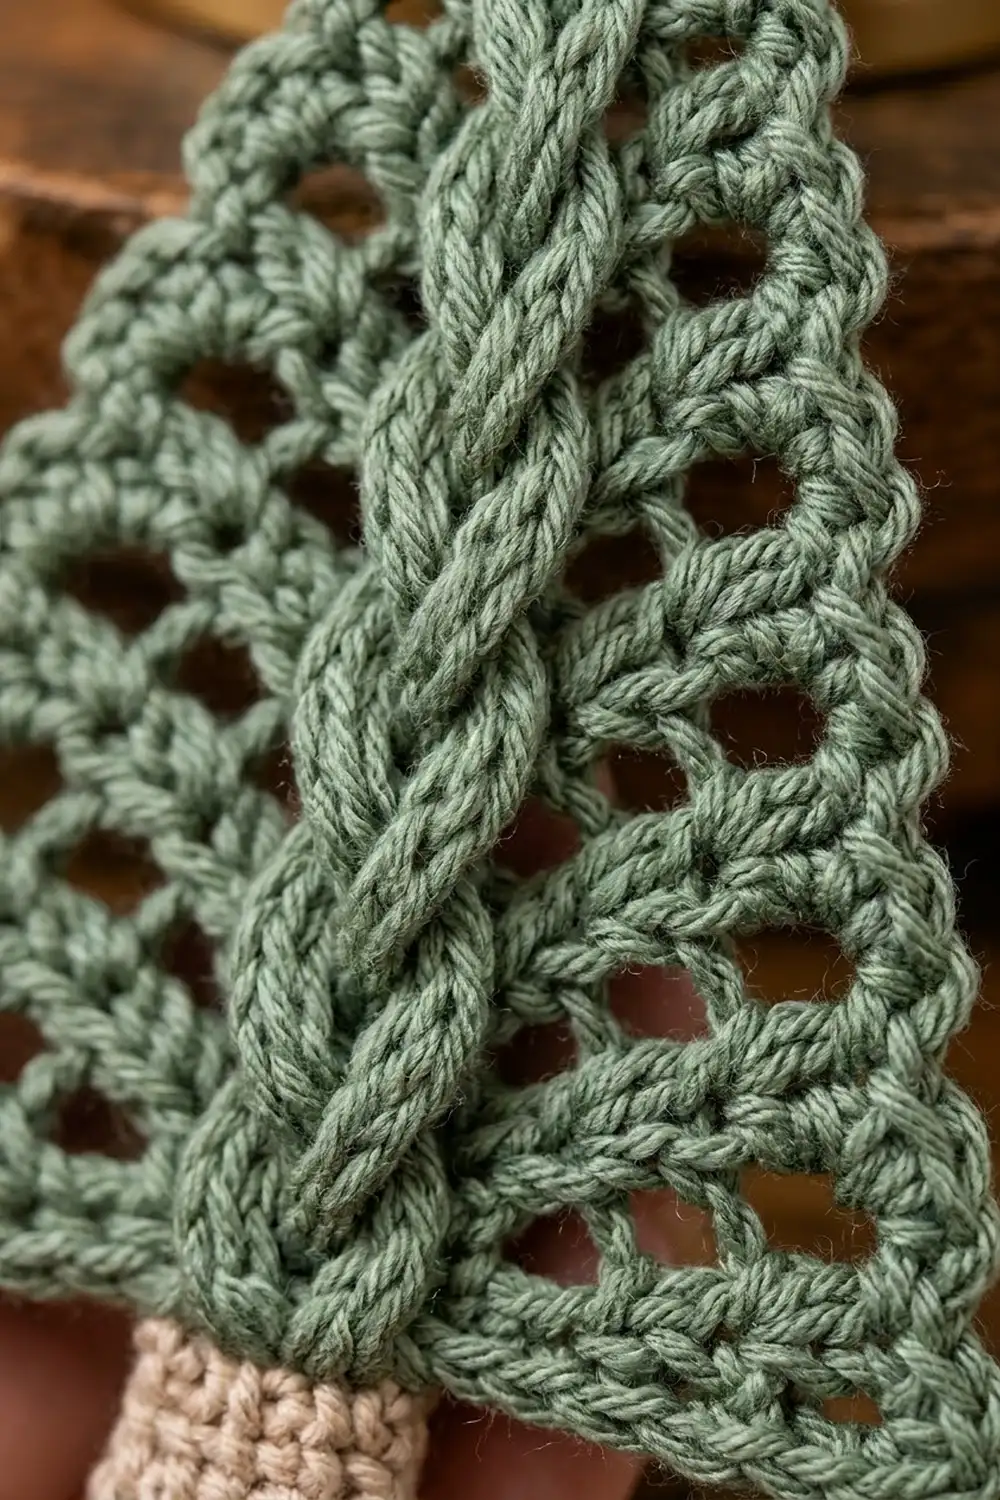
Tree Body
Work in sage green. In every row except Row 1, each “side” is the group of stitches between the edge and the 4 center cable stitches. A ch-1 sp counts as 1 stitch in all counts.
Foundation: Ch 20.
Row 1 (RS): Dc in 3rd ch from hook and in each ch across. Turn. (18 sts)
Place a marker in the 8th and 11th sts. The 4 sts from marker to marker are the cable sts (7 side sts + 4 cable sts + 7 side sts).
Row 2 (WS, eyelet row): Ch 2. Dc2tog, [ch 1, sk next st, dc in next st] twice, dc in next st (6 sts made from 7). BPdc around each of the next 4 sts. Dc in next st, [dc in next st, ch 1, sk next st] twice, dc2tog. Turn. (16 sts: 6 + 4 + 6)
Row 3 (RS, solid row): Ch 2. Dc2tog, dc in next 4 sts, working into each ch-1 sp as a st (5 sts made from 6). C4F over the next 4 sts. Dc in next 4 sts, dc2tog. Turn. (14 sts: 5 + 4 + 5)
Row 4 (WS, eyelet row): Ch 2. Dc2tog, ch 1, sk next st, dc in next 2 sts (4 sts made from 5). BPdc around each of the next 4 sts. Dc in next 2 sts, ch 1, sk next st, dc2tog. Turn. (12 sts: 4 + 4 + 4)
Row 5 (RS, solid row): Ch 2. Dc2tog, dc in next 2 sts (3 sts made from 4). C4F. Dc in next 2 sts, dc2tog. Turn. (10 sts: 3 + 4 + 3)
Row 6 (WS, eyelet row): Ch 2. Dc2tog, ch 1, sk next st (2 sts made from 3). BPdc around each of the next 4 sts. Ch 1, sk next st, dc2tog. Turn. (8 sts: 2 + 4 + 2)
Row 7 (RS, solid row): Ch 2. Dc2tog over the next st and the ch-1 sp (1 st made from 2). C4F. Dc2tog over the ch-1 sp and the last st. Turn. (6 sts: 1 + 4 + 1)
Row 8 (WS): Ch 2. Dc2tog over the side st and the first cable st, BPdc2tog over the 2 middle cable sts, dc2tog over the last cable st and the side st. Turn. (3 sts)
Row 9 (RS, tip): Ch 2. Dc3tog. (1 st)
Do not fasten off. Remove the markers.
Body checkpoint: 3.6 in (9.1 cm) at the base and 4.5 in (11.4 cm) from base to tip. Every row loses exactly 1 st at each end, which gives straight, even slanted sides. The rope cable sits raised on the RS, crossed on Rows 3, 5, and 7, and kept to the front on the WS rows by the BPdc stitches.
Border and Hanging Loop
Border gauge: 5 sc per inch (2.54 cm).
Each slanted side measures about 4.85 in (12.3 cm). That is the diagonal of a 1.8 in (4.6 cm) half-base and a 4.5 in (11.4 cm) height. At 5 sc per inch, the side needs about 24 sc.
Keep the RS facing and continue with the sage green yarn.
Border Round:
- Tip: Ch 1. Work (sc, ch 14, sc) in the top of the dc3tog. (2 sc + ch-14 loop)
- First slanted side: Work 1 sc in the row end of Row 9. Then work 3 sc in each row end of Rows 8 down to 1. (1 + 24 = 25 sc)
- Base: Work along the free loops of the foundation chain. 2 sc in the first loop, sc in each of the next 16 loops, 2 sc in the last loop. (20 sc, corner sts included)
- Second slanted side: Work 3 sc in each row end of Rows 1 up to 8, then 1 sc in the row end of Row 9. (24 + 1 = 25 sc)
- Sl st to the first sc. Fasten off and weave in the end.
Round total: 2 + 25 + 20 + 25 = 72 sc, plus the ch-14 loop.
Why the math works: Each dc row end is a slanted edge about 0.54 in (1.4 cm) long. Three sc there gives about 5.6 sc per inch, which blocking relaxes to gauge. Across all 9 rows, that is 25 sc over 4.85 in (12.3 cm), or 5.15 sc per inch. That is close enough to the 5-per-inch gauge to lie flat with no ruffle or pull.
The base has 18 foundation loops and 18 dc above them, so 1 sc per loop matches exactly. The 2 extra sc (1 extra at each end) turn the bottom corners. The base count of 20 already includes those corner stitches, so nothing is added twice.
Border checkpoint: The edged triangle measures 4.0 in (10.2 cm) wide x 4.9 in (12.4 cm) tall. The loop lies about 1 in (2.5 cm) above the tip when folded flat.
Trunk
Work in natural beige, with the WS of the tree facing you and the base edge at the top.
The base edge has 20 sc. The center 4 are sts 9 through 12, so 8 sts sit on either side of the trunk. Those 4 sc sit directly under the 4-stitch cable.
Row 1: Join beige with sc in the back loop only of the 9th base sc. Sc in the back loop of the next 3 sts. Turn. (4 sc)
Working in back loops leaves the green front loops showing as a tidy line where the trunk meets the tree.
Rows 2–5: Ch 1, sc in each st across. Turn. (4 sc)
Fasten off after Row 5, leaving a 4 in (10.2 cm) tail. Weave the tail down one trunk side and back up through the stitches to firm up the edge.
Trunk checkpoint: 0.8 in (2.0 cm) wide x 0.9 in (2.3 cm) tall. The total ornament height, base of trunk to tip of border, is 5.8 in (14.7 cm).
Final Blocking
- Weave in all remaining ends through same-color stitches, away from the eyelets.
- Lay the ornament RS up on a blocking mat.
- Pin the 2 bottom corners 4.0 in (10.2 cm) apart.
- Pin the tip 4.9 in (12.4 cm) above the center of the base line.
- Pin along each slanted side so it is straight, not curved.
- Pin the trunk square, 0.8 in (2.0 cm) wide.
- Lay the hanging loop straight up from the tip.
- Mist evenly with water until damp, not soaked.
- Gently press the cable with a fingertip so it stands up, and open each eyelet with a pin tip.
- Let it dry completely, about 6 hours, before unpinning.
Final Quality-Control Checklist
- Body has 9 rows. The stitch counts read 18, 16, 14, 12, 10, 8, 6, 3, 1.
- Cable crosses 3 times (Rows 3, 5, 7), always in the same direction.
- The cable is raised on the RS along its full length.
- Eyelet bands sit on Rows 2, 4, and 6 and are symmetrical on both sides.
- Border is 72 sc: 25 per slanted side, 20 across the base, and 2 at the tip.
- Slanted sides are straight and lie flat.
- Trunk is 4 sc wide, 5 rows tall, and centered under the cable.
- Size is 4.0 in (10.2 cm) x 5.8 in (14.7 cm), plus the loop.
- Loop is secure and untwisted.
- All ends are woven in invisibly.
Troubleshooting
Cable looks flat. Make sure every cable st on the WS rows is a BPdc, not a regular dc.
Cable crosses look different from each other. Always skip 2 and work the second pair in front of the first pair.
Tree is wider than 4.0 in (10.2 cm). Check that each row starts and ends with a dc2tog. Then check your hook size against gauge.
Tree looks short and squat. Your dc rows are too short. Pull up taller loops or go up a hook size.
Border ruffles. Work 2 sc instead of 3 in Rows 1, 4, and 7 only, then re-block.
Border pulls the sides into a curve. Your sc are too tight. Use a larger hook for the border only.
Trunk is off center. Recount the base sc. Start at the 9th of 20.
Ch-14 loop twists. Block it flat, or add a sl st row along the loop for stiffness.
Care
Hand wash in cool water with mild soap, press out the water in a towel, and dry flat, reshaping as needed. Don’t tumble dry or hang the ornament to dry while wet.
Final Notes
Each measurement depends on the one before it. A foundation of 18 dc at 20 sts per 4 in (10.2 cm) gives a 3.6 in (9.1 cm) base. Nine dc rows at 8 rows per 4 in (10.2 cm), losing 1 stitch at each end per row, give a 4.5 in (11.4 cm) triangle. A 72-sc border adds about 0.2 in (0.5 cm) per edge, which brings the body to 4.0 in (10.2 cm) x 4.9 in (12.4 cm). A 4-sc, 5-row trunk adds 0.9 in (2.3 cm), for a total of 5.8 in (14.7 cm) plus the loop.
If Row 1 and Row 9 match their checkpoints, the rest will fall into place.
Happy crocheting!