
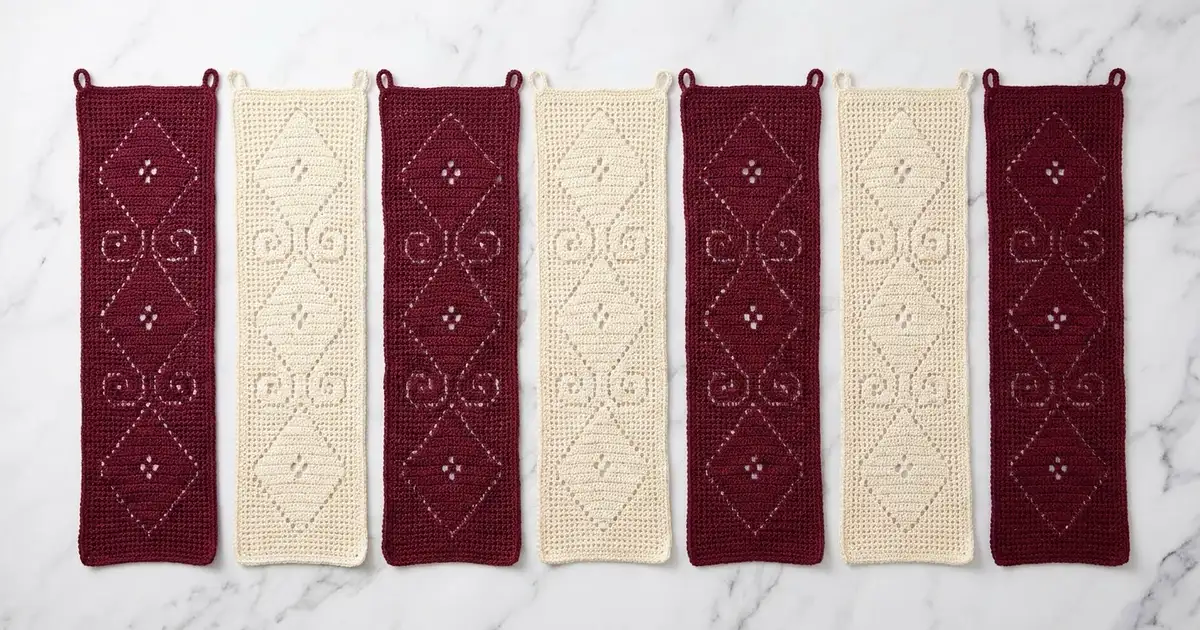
This curtain is made of seven narrow filet crochet strips that hang side by side from a rod. Each strip is an open mesh grid. Solid blocks in the grid form a column of diamonds framed by mirrored S-curl scrolls, with a small cross-shaped diamond between each motif. The strips are not sewn together, so you can walk through the curtain easily and light still comes in.
The color scheme is deep burgundy and soft cream, in alternating strips. The style is traditional filet lace in a smooth cotton that keeps its shape. All instructions use US crochet terms.
Each finished strip measures 6.0 in (15.2 cm) wide by 75.6 in (192.0 cm) long, not counting the hanging loops. Hung with 0.5 in (1.3 cm) gaps, the seven strips cover about 45 in (114.3 cm) of rod.
Each strip is worked flat in rows from the bottom edge up. It has 13 filet squares per row and an 18-row motif that repeats ten times. Next you add two rounds of single crochet edging and two hanging loops. Finally you block each strip.
Finished Size and Construction
- Finished strip size: 6.0 in x 75.6 in (15.2 cm x 192.0 cm)
- Skill level: Intermediate
- Terminology: US
- Yarn weight: DK / light (3), cotton or cotton blend
- Hook: 3.5 mm (US E-4)
- Number of pieces: 7 separate strips (4 burgundy, 3 cream)
- Layout: 7 strips in one row, hung independently (not joined)
- Mesh size before border: 5.2 in x 74.8 in (13.2 cm x 190.0 cm)
- Border depth: 0.4 in (1.0 cm) on each side
- Hanging loops: 2 per strip, about 1.5 in (3.8 cm) tall
Materials
Yarn: Use a smooth, mercerized or combed DK cotton with about 115 m per 50 g. Cotton gives crisp mesh squares that don’t stretch much under their own weight, which matters for a long hanging piece. Avoid fuzzy yarns, because they hide the filet pattern.
- Burgundy: 800 g (1,840 m), enough for 4 strips
- Cream: 600 g (1,380 m), enough for 3 strips
Each strip uses about 175 g (about 403 m). The quantities above include a margin of about 14% for gauge differences and swatching. Buy all of each color from the same dye lot.
Tools:
- 3.5 mm (US E-4) crochet hook
- Tapestry needle
- Stitch markers
- Rust-proof pins and a long blocking surface
- Tape measure
- Spray bottle
- Curtain rod up to 1.25 in (3.2 cm) in diameter
Abbreviations (US Terms)
- ch = chain
- sl st = slip stitch
- sc = single crochet
- dc = double crochet
- sk = skip
- st(s) = stitch(es)
- sp = space
- rnd = round
Special filet terms
- Space (sp): ch 1, sk next st, dc in next dc.
- Block (bl): dc in next ch-1 sp (or next dc), dc in next dc.
- Beginning of filet rows: ch 3 at the start of every filet row. It counts as the first dc, which forms the left edge of the first square.
Every filet row has 13 squares and 27 sts: the beginning ch-3 plus 2 sts per square. A ch-1 counts as a stitch. Blocks and spaces never change the stitch count.
Gauge and Checkpoints
Gauge: 10 filet squares = 4 in (10.2 cm) wide, and 10 rows = 4 in (10.2 cm) tall. Each square is 0.4 in (1.0 cm) on each side.
Border gauge: 5 sc = 1 in (2.5 cm).
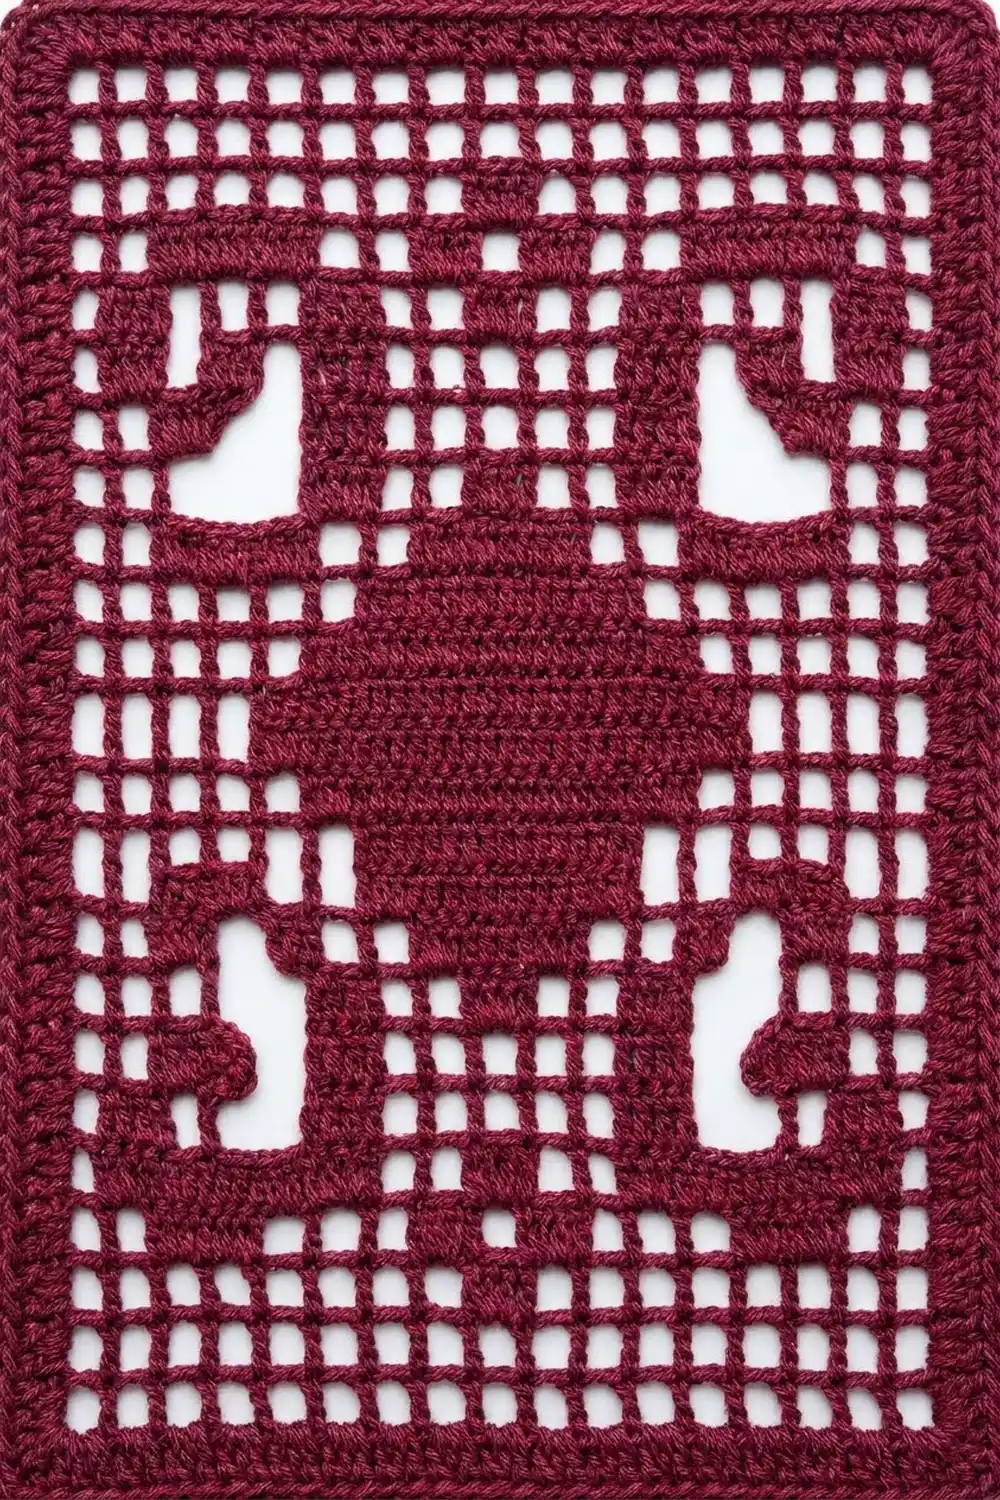
Test piece first: Use the first 20 rows of a burgundy strip as your gauge swatch (Row 1, Row 2, and the first full motif). Lay it flat without stretching it and measure:
- Width: 5.2 in (13.2 cm)
- Height after Row 20: 8.0 in (20.3 cm)
Later checkpoints:
- After Row 92 (5 motifs): 36.8 in (93.5 cm)
- After Row 187 (mesh complete): 74.8 in (190.0 cm)
- After the border: 6.0 in x 75.6 in (15.2 cm x 192.0 cm)
If your piece is too big, go down to a 3.25 mm hook. If it’s too small, go up to a 3.75 mm hook. If only the height is off, check your dc height. Pull each dc up to the full height of the beginning ch-3 instead of changing hooks. Small height errors add up over 187 rows: 0.02 in (0.1 cm) extra per row becomes almost 4 in (10.2 cm) over the full strip.
Strip Pattern (Make 7)
Foundation and Row 1 (setup row): Ch 29. Dc in 4th ch from hook and in each ch across. The skipped ch count as the first dc. Turn. (27 sts)
Row 2: Ch 3, ch 1, sk next st, dc in next st; rep from * across. Turn. (13 sp, 27 sts)*
Motif Rows
Work each row from the beginning ch-3, following the counts in order. Every row equals 13 squares. Because the motif is symmetrical, right-side and wrong-side rows read the same.
- M1: 6 sp, 1 bl, 6 sp
- M2: 5 sp, 3 bl, 5 sp
- M3: 6 sp, 1 bl, 6 sp
- M4: 13 sp
- M5: 2 sp, 2 bl, 5 sp, 2 bl, 2 sp
- M6: 1 sp, 1 bl, 2 sp, 1 bl, 3 sp, 1 bl, 2 sp, 1 bl, 1 sp
- M7: 1 sp, 1 bl, 1 sp, 1 bl, 5 sp, 1 bl, 1 sp, 1 bl, 1 sp
- M8: 2 sp, 1 bl, 3 sp, 1 bl, 3 sp, 1 bl, 2 sp
- M9: 2 sp, 1 bl, 2 sp, 3 bl, 2 sp, 1 bl, 2 sp
- M10: 1 sp, 1 bl, 2 sp, 5 bl, 2 sp, 1 bl, 1 sp
- M11: 1 sp, 1 bl, 1 sp, 7 bl, 1 sp, 1 bl, 1 sp
- M12: same as M10
- M13: same as M9
- M14: same as M8
- M15: same as M7
- M16: same as M6
- M17: same as M5
- M18: 13 sp
What the rows make:
- M1 to M3 form the small cross-shaped diamond.
- M5 to M17 form the motif:
- The central diamond grows from 1 block in M8 to 7 blocks in M11, then shrinks back to 1 block in M14.
- The diagonal block steps in columns 2 to 4 and 10 to 12 form the mirrored S-curl scrolls on each side of the diamond.
- M4 and M18 are open rows that separate the motifs.
Row Sequence
- Rows 3 to 20: Work M1 to M18 (motif 1).
- Rows 21 to 182: Repeat M1 to M18 nine more times, for 10 motifs total. Place a marker at the end of each completed motif.
- Rows 183 to 185: Work M1 to M3. This is the closing small diamond.
- Row 186: Work M4. (13 sp)
- Row 187: Ch 3, dc in each st across. Do not turn and do not fasten off. (27 sts)
Checkpoint: 187 rows at 0.4 in (1.0 cm) each = 74.8 in (190.0 cm). The 27-st width should still measure 5.2 in (13.2 cm) at both ends.
Make All Pieces
Make 4 strips in burgundy and 3 in cream, all exactly as written.
Hanging order (left to right):
[B] [C] [B] [C] [B] [C] [B]
B = burgundy (4)   C = cream (3)
Before you add the borders, lay all seven mesh strips next to each other. Every strip should be within 0.5 in (1.3 cm) of the others in length. If one is longer or shorter, block it to match now.
Joining: Not Required
The strips are not joined. Each strip gets its own border and loops and slides onto the rod separately. This keeps the curtain easy to walk through and lets each strip hang straight.
Because no strips are joined, no seam stitches are added. Every count in the border below is for one single strip. Space the strips about 0.5 in (1.3 cm) apart on the rod: 7 x 6.0 in + 6 x 0.5 in = 45 in (114.3 cm).
Border
Border gauge: 5 sc = 1 in (2.5 cm). One dc row is 0.4 in (1.0 cm) tall, so 2 sc per row-end matches the gauge exactly.
Rnd 1:
- Continue from the end of Row 187 without turning. Work 3 sc in the last dc of Row 187; this is the corner.
- Side edge: Work 2 sc in each row-end down the side. That is 187 row-ends, for 374 sc.
- Bottom corner: Work 3 sc in the first base st of Row 1.
- Bottom edge: Work 1 sc in the base of each of the next 25 sts.
- Bottom corner: Work 3 sc in the last base st.
- Second side edge: Work 2 sc in each of the 187 row-ends, for 374 sc.
- Top corner: Work 3 sc in the first st of Row 187.
- Top edge: Sc in each of the next 25 sts.
- Sl st to the first sc. (810 sc)
Rnd 1 count per side (corner sts included):
| Side | Stitches |
|---|---|
| Top | 29 |
| Bottom | 29 |
| Each long side | 378 |
Check: 29 + 29 + 378 + 378 − 4 shared corners = 810.
Rnd 2: Ch 1. Sc in each sc around, working 3 sc in each corner (center) sc. Sl st to the first sc. (818 sc)
Rnd 2 count per side (corner sts included):
| Side | Stitches |
|---|---|
| Top | 31 |
| Bottom | 31 |
| Each long side | 380 |
Check: 31 + 31 + 380 + 380 − 4 = 818. Fasten off.
Why the math works:
- Long sides: 2 sc per 0.4 in (1.0 cm) row equals 5 sc per inch, so 374 sc lie flat along 74.8 in (190.0 cm) of mesh.
- Top and bottom: The 27 stitches across measure 5.2 in (13.2 cm), which is also about 5 per inch.
- Corners: The 3-sc corners keep the corners square.
- Finished size: Each round adds 0.2 in (0.5 cm) per side, which gives 6.0 in x 75.6 in (15.2 cm x 192.0 cm).
Hanging Loops (Make 2 per Strip)
Count the 31 sc along the top edge, with the right corner sc as st 1.
- Right loop:
- Join yarn in st 3 and ch 15.
- Sl st in st 7.
- Turn and work 22 sc into the ch-15 loop.
- Sl st in st 3. Fasten off.
- Left loop: Make it the same way: join in st 25, ch 15, sl st in st 29, work 22 sc into the loop, and sl st in st 25.
The loops mirror each other, 2 stitches in from each corner. Each loop should stand about 1.5 in (3.8 cm) tall and fit a rod up to 1.25 in (3.2 cm) in diameter.
Final Blocking
- Weave in all ends along the solid border or through filled blocks, never across open mesh.
- Soak one strip in cool water for 15 minutes. Gently press out the water; do not wring.
- Roll the strip in a towel to remove extra moisture.
- Lay it out in sections if your blocking surface is short. Pin 20 in (50.8 cm) at a time, moving down the strip.
- Pin the long sides straight at 6.0 in (15.2 cm) wide, placing a pin every 3 in (7.6 cm).
- Check that the motifs are evenly spaced, 7.2 in (18.3 cm) per motif. Ease the mesh gently into square openings.
- Let each section dry completely before moving on.
- Pin the loops open around a pen or dowel so they dry rounded.
- Repeat for all seven strips and compare their lengths side by side.
Final Quality-Control Checklist
- Every filet row has 27 sts and 13 squares.
- Each strip has 10 full motifs plus a small closing diamond at the top.
- The diamonds are centered, and the scrolls mirror each other left to right.
- Each strip measures 6.0 in x 75.6 in (15.2 cm x 192.0 cm) after blocking.
- Border Rnd 2 has 818 sc, with 31 on the top and bottom sides and 380 on each long side.
- Both loops sit 2 sts in from the corners and are the same size.
- All strips match in length to within 0.5 in (1.3 cm).
- The color order is B C B C B C B.
Troubleshooting
- The strip is slanting or narrowing: You’re probably skipping the last dc into the beginning ch-3. Always finish each row in the top of the turning chain.
- The squares look tall and narrow: Your dc are too loose. Snug up the yarn on the final yarn-over, or try a 3.25 mm hook.
- A diamond is off-center: Recount that row’s square counts. Each row must total 13 squares. Frog back to the last correct row.
- The border ruffles: You worked more than 2 sc per row-end. Recount against 374 per long side.
- The border cups or pulls in: Make sure every corner has 3 sc. If your tension is tight, use a 3.75 mm hook for the border only.
- A strip has stretched after hanging: Wet-block it again at the target length and let it dry flat before rehanging.
Care
Hand wash in cool water with mild soap, then dry flat and pinned to size. Do not hang the strips to dry when wet, because the extra weight will stretch the mesh.

Final Notes
The measurements build on each other:
- Each square is 0.4 in (1.0 cm).
- Thirteen squares make a 5.2 in (13.2 cm) wide mesh.
- 187 rows make 74.8 in (190.0 cm) of length.
- Two border rounds bring each strip to 6.0 in x 75.6 in (15.2 cm x 192.0 cm).
- Seven strips with small gaps cover 45 in (114.3 cm) of rod.
Check your gauge on the first 20 rows, check again at each motif marker, and every strip will match. Happy crocheting!