

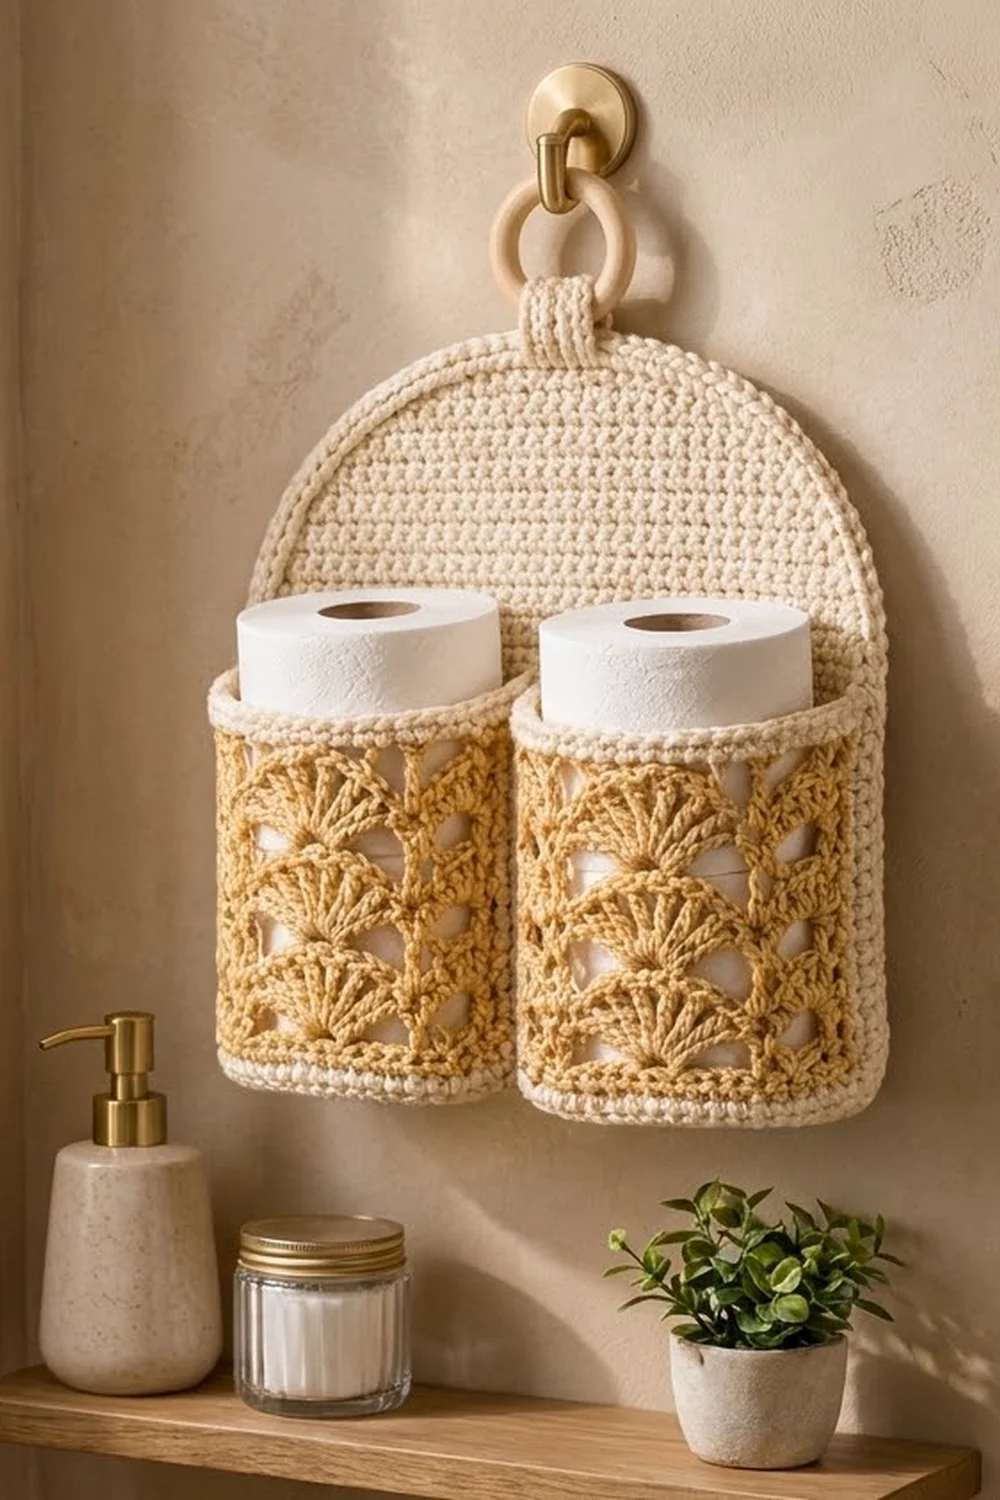
This hanging holder keeps two spare rolls in easy reach. It looks like a small piece of bathroom décor rather than plain storage. A cream single-crochet back panel ends in a soft dome at the top. Two honey-gold lace pockets sit side by side along the bottom, and a wooden ring holds the whole piece on a hook.
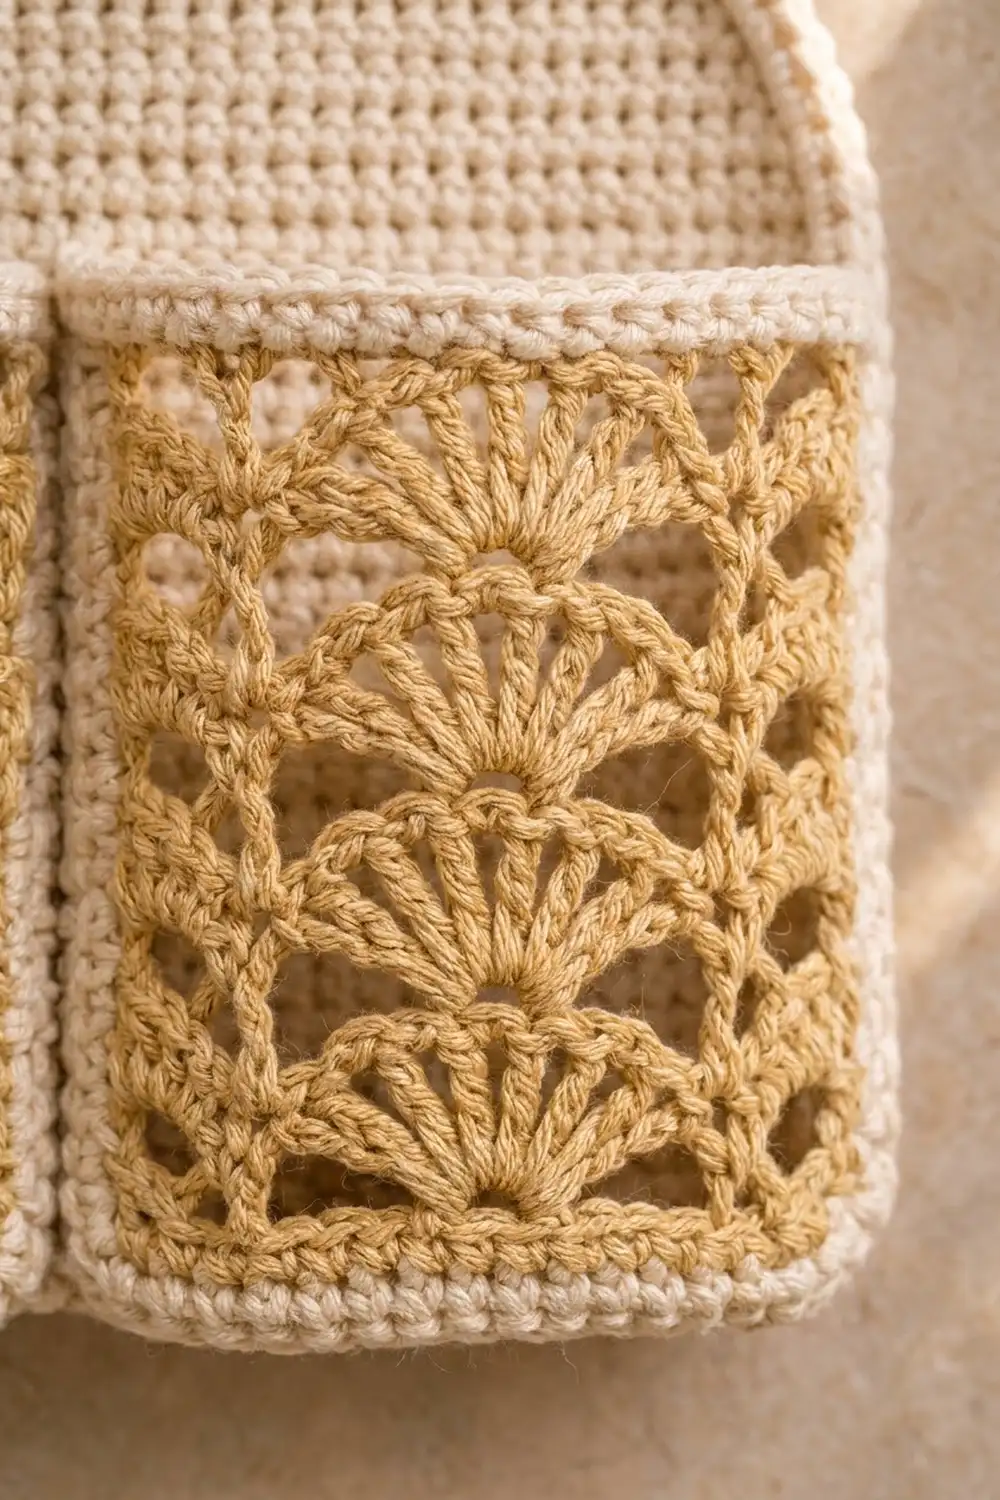
The pockets use a stacked fan lace: three fans across and four tiers high, with chain arches linking each tier. Cream trim frames each pocket, and a rope-like reverse single crochet rim runs along each opening and around the back panel. The two-color style is warm and neutral and fits spa-style or farmhouse bathrooms.
This pattern uses US crochet terms. The finished holder measures 12.5 in (31.8 cm) wide by 10.5 in (26.7 cm) tall, not counting the hanging tab.
How it’s built: You work the back panel in rows from the bottom up and decrease to shape the dome. Each pocket starts as a flat lace panel. You add a cream trim round, then work a wall straight off the trim so the pocket gets depth, then finish the opening with a rim. You sew the pockets onto the panel, work the border, and attach the tab around the ring.
Finished Size and Construction
- Finished size: 12.5 in (31.8 cm) wide × 10.5 in (26.7 cm) tall, plus a tab that extends about 1.5 in (3.8 cm) above the top
- Skill level: Intermediate
- Terminology: US
- Yarn weight: DK (#3) cotton
- Hook: 4 mm (G/6)
- Number of pieces: 4 (1 back panel, 2 pockets, 1 tab)
- Layout: 2 pockets side by side along the bottom of the back panel
- Pocket front size: 5.5 in (14.0 cm) wide × 5 in (12.7 cm) tall before the rim
- Back panel size before border: 12 in (30.5 cm) × 10 in (25.4 cm)
- Border depth: 0.25 in (0.6 cm) per side
Materials
Use a smooth, mercerized or combed DK cotton. Cotton holds its shape on the wall and shows the lace clearly. Avoid fuzzy yarns, because they blur the fans.
- Color A, Cream: 100 g, about 225 m (back panel, trim, walls, rims, border, tab)
- Color B, Honey Gold: 50 g, about 112 m (lace pocket fronts)
These quantities include a margin of roughly 25–30% for swatching and weaving in ends.
Tools:
– 4 mm (G/6) crochet hook
– Tapestry needle
– 6–8 locking stitch markers
– One wooden ring, 2 in (5.1 cm) across
– Rust-proof pins and a blocking mat
– Measuring tape
Abbreviations (US Terms)
- ch: chain
- sc: single crochet
- dc: double crochet
- tr: treble crochet
- sc2tog: single crochet 2 together
- BLO: back loop only
- rev sc: reverse single crochet (crab stitch)
- sl st: slip stitch
- sp(s): space(s)
- st(s): stitch(es)
- RS / WS: right side / wrong side
Special stitches:
– Fan: (dc, [ch 1, dc] 4 times) in the same stitch. That makes 5 dc with 4 ch-1 spaces.
– Rev sc: Work single crochet from left to right (right-handed). This makes a twisted, rope-like edge.
Gauge and Checkpoints
- Single crochet gauge: 20 sc × 22 rows = 4 in (10.2 cm), which is 5 sts and 5.5 rows per inch.
- Lace gauge: one finished lace panel (25 sts × 10 rows) measures 5 in (12.7 cm) wide × 4.5 in (11.4 cm) tall.
Make one lace pocket front first; it doubles as your lace gauge swatch. Measure it unblocked, then lightly steamed. If it comes out wider than 5 in (12.7 cm), go down half a hook size. If it is narrower, go up half a size. Check the single-crochet gauge the same way on the first 22 rows of the back panel.
Checkpoints:
– Back panel after Row 33: 12 in (30.5 cm) wide × 6 in (15.2 cm) tall
– Back panel after Row 55: 10 in (25.4 cm) tall
– Pocket front after trim: 5.5 in (14.0 cm) × 5 in (12.7 cm)
– Pocket wall: 2 in (5.1 cm) deep
– Finished holder: 12.5 in (31.8 cm) × 10.5 in (26.7 cm)
Back Panel
Use Color A.
Foundation: Ch 61.
Row 1 (RS): Sc in 2nd ch from hook and in each ch across, turn. (60 sts)
Rows 2–33: Ch 1, sc in each st across, turn. (60 sts)
Checkpoint: 12 in (30.5 cm) wide × 6 in (15.2 cm) tall.
Shaping the Dome
Decrease row: ch 1, sc2tog, sc to the last 2 sts, sc2tog, turn.
Double decrease row: ch 1, sc2tog twice, sc to the last 4 sts, sc2tog twice, turn.
Row 34: Decrease row. (58 sts)
Row 35: Ch 1, sc in each st across, turn. (58 sts)
Row 36: Decrease row. (56 sts)
Row 37: Sc across. (56 sts)
Row 38: Decrease row. (54 sts)
Row 39: Sc across. (54 sts)
Row 40: Decrease row. (52 sts)
Row 41: Sc across. (52 sts)
Rows 42–49: Decrease row on every row. After these rows you will have 50, 48, 46, 44, 42, 40, 38, and 36 sts.
Checkpoint: Row 49 has 36 sts.
Rows 50–53: Double decrease row on every row. After these rows you will have 32, 28, 24, and 20 sts.
Rows 54–55: Ch 1, sc in each st across, turn. (20 sts)
Fasten off. Checkpoint: 10 in (25.4 cm) tall. The flat top is 20 sts, or 4 in (10.2 cm) wide.
The dome loses 20 sts per side over 22 rows. Decreases start out gradual and get steeper toward the top, so the edge curves smoothly instead of forming a point.
Pocket Front: Lace Panel (Make 2)
Use Color B.
Foundation: Ch 26.
Row 1: Sc in 2nd ch from hook and in each ch across, turn. (25 sts)
Row 2 (RS, fan row): Ch 3 (counts as dc). Skip 3 sts, Fan in next st, skip 3 sts, sc in next st. Repeat from * once more. Skip 3 sts, Fan in next st, skip 3 sts, dc in the last st. Turn.
(3 Fans, 2 sc, 2 edge dc)
Row 3 (arch row): Ch 4 (counts as tr). Ch 3, sc in the center dc of the next Fan, ch 3, tr in the next sc. Repeat from * once more. Ch 3, sc in the center dc of the last Fan, ch 3, tr in the top of the turning ch-3. Turn.
(4 tr, 3 sc, 6 ch-3 sps)
Row 4 (fan row): Ch 3 (counts as dc). Skip ch-3 sp, Fan in next sc, skip ch-3 sp, sc in next tr. Repeat from * once more. Skip ch-3 sp, Fan in the last sc, skip ch-3 sp, dc in the top of the turning ch-4. Turn.
(3 Fans, 2 sc, 2 edge dc)
Each Fan sits directly above the Fan below it, which gives you the stacked columns.
Rows 5–9: Repeat Rows 3 and 4 twice, then work Row 3 once more. You now have four Fan tiers.
Row 10: Ch 1, sc in the first tr. 3 sc in the ch-3 sp, sc in the sc, 3 sc in the ch-3 sp, sc in the tr. Repeat from * 2 more times. (25 sts: 1 + 8 × 3)
Fasten off. Checkpoint: 5 in (12.7 cm) wide × 4.5 in (11.4 cm) tall.
Pocket Trim
Use Color A, RS facing, and work 1 round.
Round 1:
– Top: Join with sc in the first st of Row 10, then work 2 more sc in that st (corner). Sc in the next 23 sts, then 3 sc in the last st. (29 sts along the top, including both corner groups)
– First side: Work 2 sc in each dc row end and 3 sc in each tr row end. Skip the Row 10 and Row 1 row ends, because the corner groups already cover them. (4 × 2 + 4 × 3 = 20 sc)
– Bottom: Working into the opposite side of the foundation ch, work 3 sc in the first ch, sc in the next 23 ch, and 3 sc in the last ch. (29 sts)
– Second side: Work as the first side. (20 sc)
Sl st to the first sc. (98 sts: 29 + 20 + 29 + 20)
Fasten off. Checkpoint: 5.5 in (14.0 cm) × 5 in (12.7 cm).
Pocket Wall
Use Color A. You work the wall in rows along three edges of the trim (one side, the bottom, the other side). The top stays open.
With RS facing, join in the first side st right after a top corner group.
Row 1: Working in BLO only: sc in the 20 side sts, then sc in the 29 bottom sts, then sc in the 20 sts of the other side. Turn. (69 sts)
Rows 2–11: Ch 1, sc in each st across, turn. (69 sts)
Fasten off, leaving a 40 in (101.6 cm) tail for sewing. Checkpoint: the wall is 2 in (5.1 cm) deep.
Working Row 1 in the back loops makes the wall fold sharply back from the lace face. This turns the flat front into a box-shaped pocket. The stitch count stays the same around the bottom corners, so the wall turns each corner without ruffling.
Pocket Rim
Use Color A, with the outside of the pocket facing you. Join at the top of one wall.
Row 1: Sc along that wall’s 11 row ends as follows: sc in the next 5 row ends, skip 1, sc in the next 5 (10 sc). Sc in each of the 29 top trim sts. Work 10 sc along the other wall’s row ends the same way. (49 sts)
Row 2: Do not turn. Ch 1, rev sc in each st back across. (49 sts)
Fasten off. The rim adds about 0.25 in (0.6 cm), so the pocket is now 5.25 in (13.3 cm) tall.
Hanging Tab
Use Color A.
Foundation: Ch 9.
Row 1: Sc in 2nd ch from hook and in each ch across, turn. (8 sts)
Rows 2–22: Ch 1, sc in each st across, turn. (8 sts)
Fasten off, leaving a 16 in (40.6 cm) tail. Checkpoint: 1.6 in (4.1 cm) × 4 in (10.2 cm).
Make All Pieces
- Color A: 1 back panel and 1 tab, plus the trim, wall, and rim on both pockets
- Color B: 2 lace panels
Layout, front view, bottom section of the back panel:
+-----------------------------------+
|        (dome / back panel)        |
|                                   |
|  +--------------+--------------+  |
|  |   POCKET 1   |   POCKET 2   |  |
|  |  cols 2–30   |  cols 31–59  |  |
|  |  rows 2–24   |  rows 2–24   |  |
|  +--------------+--------------+  |
+-----------------------------------+
Column 1 and column 60 (the outermost stitches) and the foundation edge stay free for the border.
Joining
Use the wall tails and whipstitch. Sew through the last wall row and catch one strand of each back-panel stitch.
Pocket 1:
1. Place markers on Row 2 of the back panel at column 2 and column 30. That span is 29 sts, or 5.8 in (14.7 cm).
2. Sew the 29 bottom wall sts to those 29 Row 2 sts, one stitch to one stitch.
3. Sew one side segment (20 sts) up column 2 over Rows 3–24 (22 rows). Use 1 wall st per row, but let the 10th and 20th wall sts each catch 2 rows (18 + 2 × 2 = 22 rows). This spreads the 4 in (10.2 cm) side evenly over 4 in of rows.
4. Sew the other side segment up column 30 the same way.
Pocket 2: Repeat these steps on columns 31–59.
The two inner walls sit on neighboring columns (30 and 31), so the pockets meet without a gap, as in the photo.
Tension: Pull each stitch just snug. If you pull too tight, the back panel puckers. If you sew too loosely, the pockets sag forward.
Checkpoint: the back panel should still lie flat at 12 in (30.5 cm) × 10 in (25.4 cm). The pocket opening should measure about 15.3 in (38.9 cm) around (front 5.5 in + back 5.8 in + 2 walls of 2 in). That is enough for a roll up to 4.5 in (11.4 cm) across, which has a circumference of about 14.1 in (35.8 cm).
Border
Use Color A on the back panel only. Work into the panel’s own edge, outside the pockets.
Border gauge: same as the sc gauge, 5 sts per inch. The two rounds together add 0.25 in (0.6 cm) per side.
Round 1: With RS facing, join at the bottom right corner.
– Bottom: 3 sc in the first foundation ch, sc in the next 58 ch, 3 sc in the last ch. (64 sts, including both corner groups)
– First side, straight part: Working into the row ends of Rows 1–33: sc in the next 10 row ends, skip 1. Repeat from * 2 more times. (30 sc over 33 row ends)
– First side, dome:
– Rows 34–41: 1 sc in each row end (8 sc)
– Rows 42–49: 2 sc in each even-numbered row end and 1 sc in each odd-numbered row end (12 sc)
– Rows 50–53: 2 sc in each row end (8 sc)
– Rows 54–55: 1 sc in each row end (2 sc)
– (30 sc on the dome)
– Top: Sc in each of the 20 sts of Row 55. (20 sts)
– Second side: Work the dome, then the straight part, in reverse order. (60 sts)
Sl st to the first sc. (204 sts: 64 + 60 + 60 + 20)
Round 2: Ch 1, rev sc in each st around. (204 sts) Sl st to join and fasten off.
Why the math works:
– Each straight side is 6 in (15.2 cm), and 6 × 5 = 30 sts.
– The dome rises 4 in (10.2 cm) and steps in 4 in (10.2 cm), so its curved edge is about 6 in (15.2 cm), which takes 30 sts.
– The extra stitches go on the steepest rows, where each row moves sideways the most.
– The bottom gets 1 st per foundation ch, plus 2 extra at each corner so the corners lie flat.
Attach the tab: Fold the tab around the ring so the ends meet. Center the tab over the middle 8 sts of the top edge. Place one end on the front of the panel and the other on the back so the border sits between them. Sew both ends through all layers. About 1.5 in (3.8 cm) of tab shows above the top.
Final Blocking
- Lightly spray or steam the whole holder. Cotton takes steam well.
- Pin the back panel face up to 12.5 in (31.8 cm) × 10.5 in (26.7 cm). Pin the dome into a smooth curve.
- Fill each pocket with a rolled hand towel or a toilet roll so the walls stand up square.
- Use your fingertips to open each Fan evenly, keeping the spokes straight and the arches round.
- Let it dry completely, at least 12 hours, before you remove the pins.
Final Quality-Control Checklist
- [ ] Back panel stitch counts: 60 → 52 → 36 → 20
- [ ] Each lace panel has 3 Fans across and 4 stacked tiers
- [ ] Trim Round 1 has 98 sts on each pocket
- [ ] Wall rows have 69 sts and the wall is 2 in (5.1 cm) deep
- [ ] Rim Row 1 has 49 sts on each pocket
- [ ] Border has 204 sts in each round
- [ ] Holder measures 12.5 in (31.8 cm) × 10.5 in (26.7 cm)
- [ ] Tab is centered and the ring hangs straight
- [ ] All ends are woven in on the back
Troubleshooting
- Fans lean sideways: You missed a skip. Each Fan must go into the sc that sits on the center dc of the Fan below.
- Lace panel is too narrow: Go up half a hook size, or loosen your chains.
- Pocket walls ripple: The wall stitch count drifted. Recount to 69 sts.
- Dome edge has a point: Check that the gradual decrease rows (34–41) alternate with plain rows.
- Border cups or waves: Recount each side. Too many stitches makes it wave; too few makes it cup.
- Holder tilts: Re-center the tab over the middle 8 top sts.
Care
Hand wash in cool water with mild soap. Press out the water, reshape, and dry flat, filling the pockets so they keep their shape.
Final Notes
The measurements build on each other:
– The single-crochet gauge of 5 sts per inch makes the 60-st back panel 12 in (30.5 cm) wide.
– Each lace panel is 5 in (12.7 cm) wide. The trim brings each pocket front to 5.5 in (14.0 cm), and the wall makes the pocket 2 in (5.1 cm) deep.
– Each pocket is sewn over exactly 29 back-panel stitches.
– The 204-st border brings the holder to 12.5 in (31.8 cm) × 10.5 in (26.7 cm).
If every checkpoint matches, the finished holder will match. Happy crocheting!