

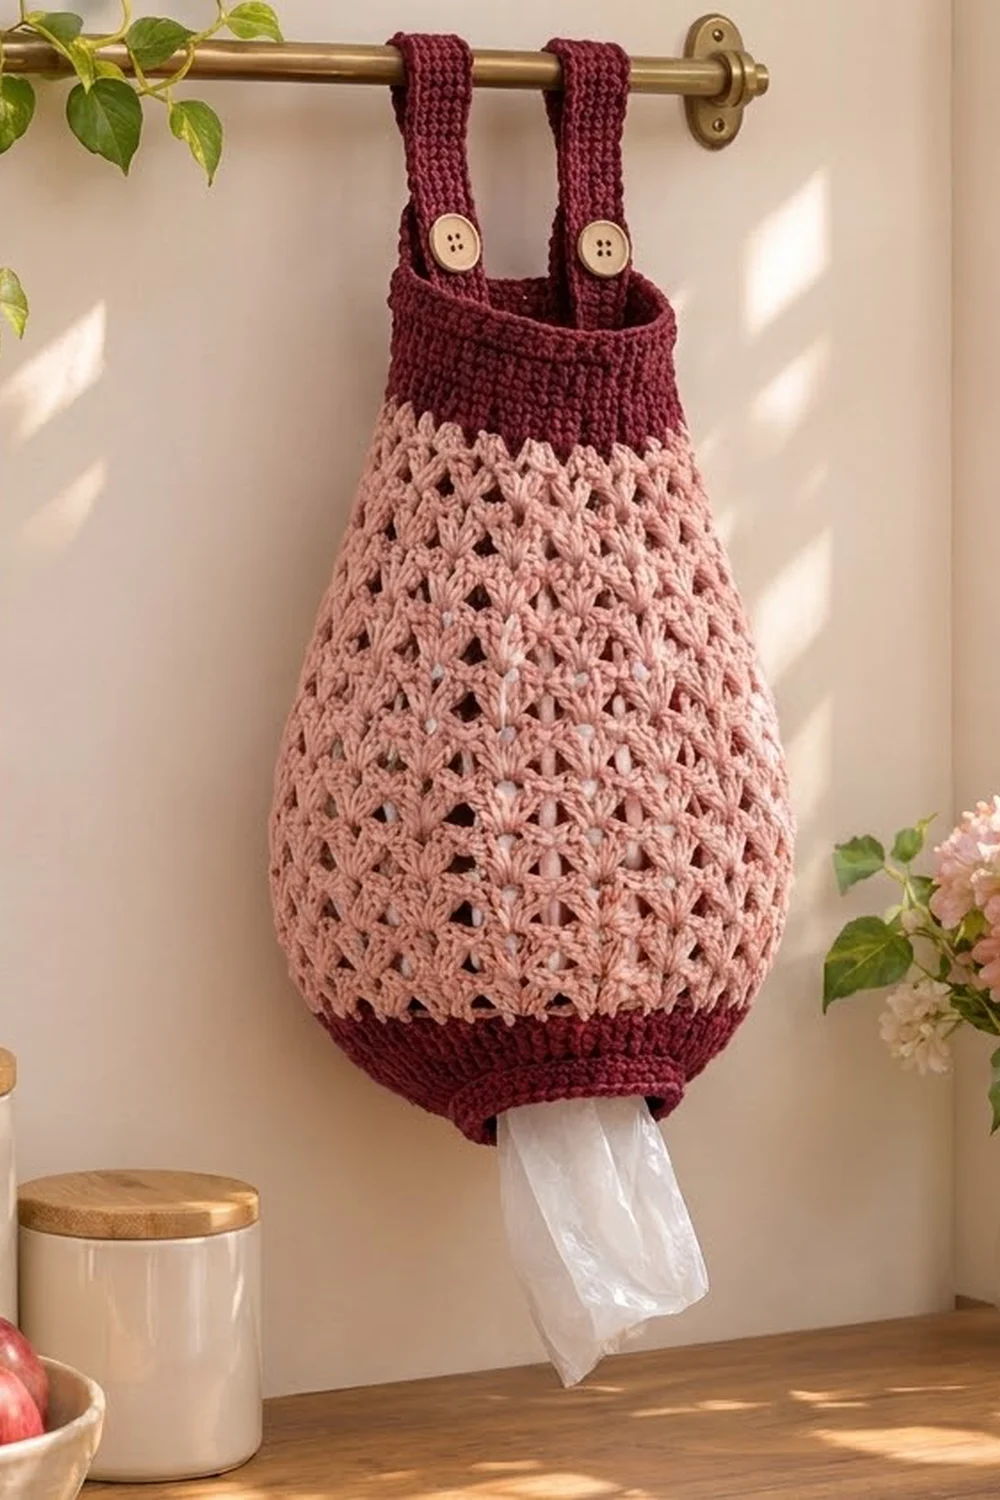
This teardrop dispenser keeps a kitchen full of plastic bags neat. You stuff bags in through the wide top and pull them out one at a time through the small rim at the bottom. It hangs from any rail, hook or cabinet bar on two buttoned straps, so you can take it down without tools.
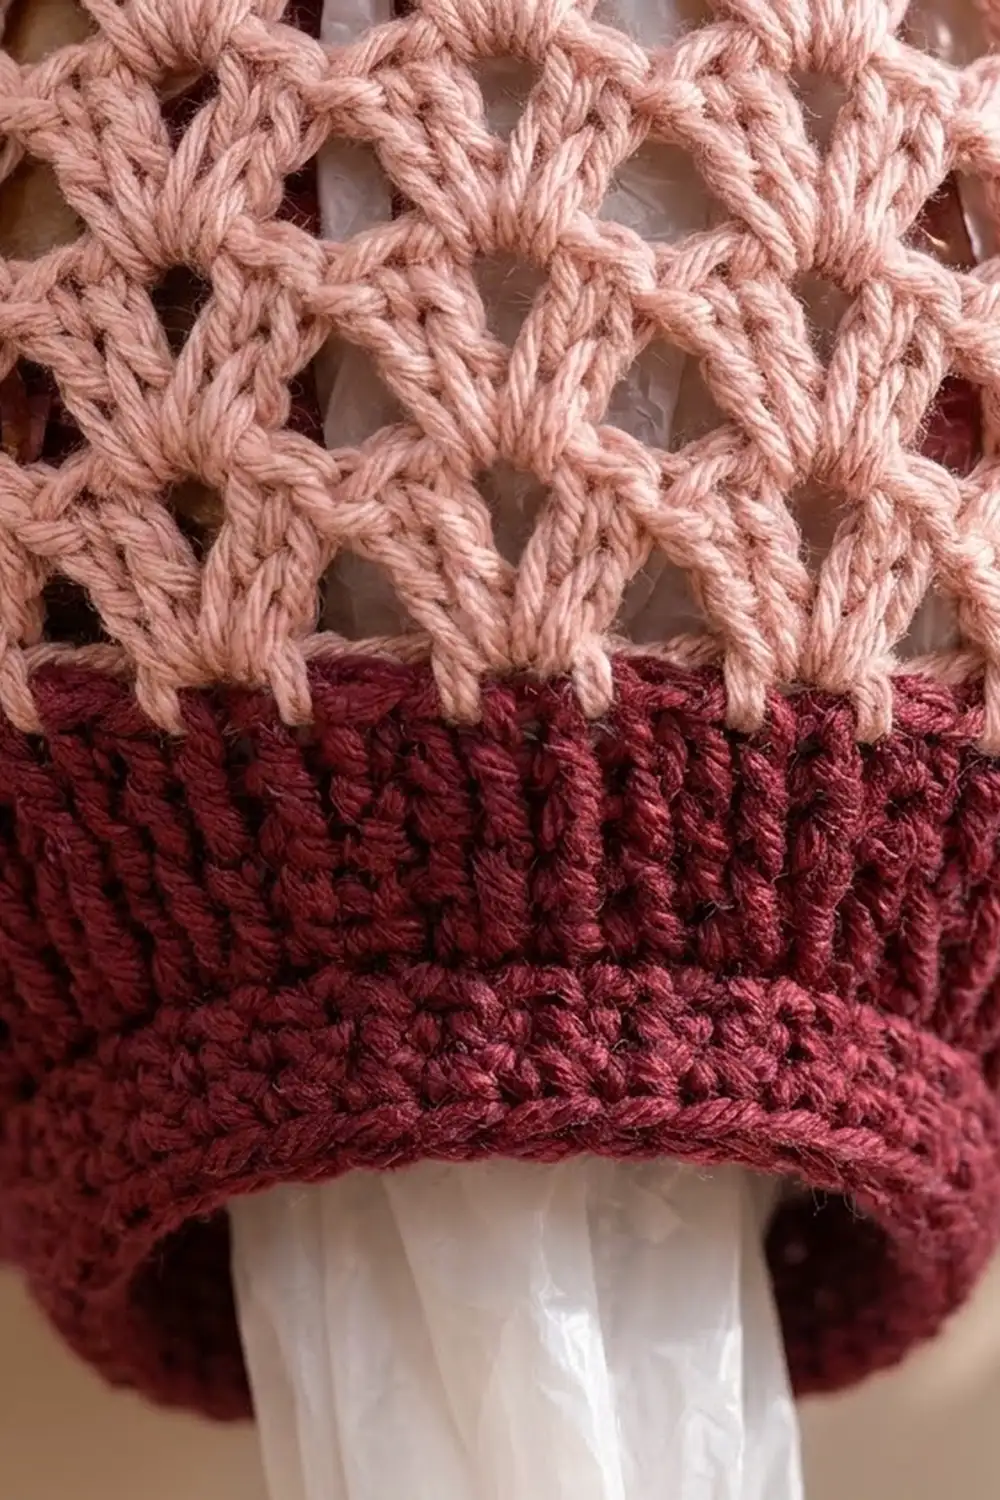
The design pairs deep burgundy with dusty rose. The burgundy is a solid single-crochet frame: the rounded bottom, the dispensing rim, the top band and the straps. The rose body is an open lace of V-stitches that swell into wider shells and then narrow again, which makes the teardrop shape. Two wooden buttons hold the straps closed.
The pattern uses US crochet terms. Hanging, the dispenser measures about 14.5 in (36.8 cm) tall from rim to top edge. Flattened, it is about 10.5 in (26.7 cm) wide at the widest point and 7.5 in (19.1 cm) wide across the top band.
Construction is bottom-up and seamless. You start with a chain ring for the dispensing hole, work a short rim, and increase into a rounded burgundy cup. Then you switch to rose for the lace body and return to burgundy for the band. The straps grow straight out of the band’s last round, and one edging round finishes the top edge and both straps.
Finished Size and Construction
- Finished size: 14.5 in (36.8 cm) tall; 10.5 in (26.7 cm) flat width at the widest point
- Skill level: Easy (advanced beginner)
- Terminology: US crochet terms
- Yarn weight: Worsted (#4), cotton or cotton blend
- Hook: 5 mm (H-8)
- Number of pieces: 1 (body and straps worked as one; only the buttons are sewn on)
- Layout: Single teardrop body worked in the round, with 2 straps worked in rows off the back of the band
- Piece size: Bottom opening 5 in (12.7 cm) flat; top band 7.5 in (19.1 cm) flat
- Size before border: 14.5 in (36.8 cm) tall, with straps 9 in (22.9 cm) long
- Border depth: 1 slip-stitch round, adding less than 1/4 in (0.6 cm)
Materials
Choose a smooth worsted-weight cotton or cotton blend. Cotton holds the teardrop shape, resists stretching under a full load of bags and washes well. The amounts below assume about 95 m per 50 g.
- Color A, Burgundy: 80 g (approx. 152 m)
- Color B, Dusty Rose: 110 g (approx. 209 m)
Tools and notions:
- 5 mm (H-8) crochet hook
- 2 wooden buttons, 7/8 in (2.2 cm)
- 4 or more locking stitch markers
- Tapestry needle
- Sewing needle and matching thread for the buttons
- Scissors
- Measuring tape
The quantities include a margin of about 15% for your gauge swatch and for differences in tension.
Abbreviations (US Terms)
- ch – chain
- sl st – slip stitch
- sc – single crochet
- sc2tog – single crochet 2 together
- dc – double crochet
- sp – space
- st(s) – stitch(es)
- rnd(s) – round(s)
- rep – repeat
- BOR – beginning of round
Special stitches:
- V-stitch (V): (dc, ch 1, dc) in the same st or sp.
- Shell: (2 dc, ch 1, 2 dc) in the same sp.
- Beginning V: ch 3 (counts as dc), ch 1, dc in the same st or sp.
- Beginning shell: ch 3 (counts as dc), (dc, ch 1, 2 dc) in the same sp.
Gauge and Checkpoints
- Sc gauge: 16 sts x 18 rnds = 4 in (10.2 cm)
- V-stitch gauge: 4 Vs = 3 in (7.6 cm); 8 rnds = 4 in (10.2 cm)
- Shell gauge: 8 shells = 7 in (17.8 cm)
Before you start the dispenser, make a flat test swatch of 20 sc by 20 rows and measure it. Then work 4 rows of V-stitch on top of it and measure again. The lace sections set the final width, so check both.
Checkpoints (measured flat):
- After Rnd 3: rim measures 5 in (12.7 cm) wide.
- After Rnd 12: cup measures 9 in (22.9 cm) wide and about 2.7 in (6.9 cm) tall.
- After Rnd 23: shell section measures 10.5 in (26.7 cm) wide.
- After Rnd 31: body measures 9 in (22.9 cm) wide and about 12.2 in (31.0 cm) tall.
- After Rnd 41: band measures 7.5 in (19.1 cm) wide; total height is 14.5 in (36.8 cm).
If your piece is too big, go down 0.5 mm in hook size. If it is too small, go up 0.5 mm. Don’t add or remove stitches: the repeat of 24 Vs and shells depends on 72 base stitches.
Bottom Rim and Cup (Color A)
Work in continuous joined rounds. Join each rnd with a sl st to the first st, and do not turn. Ch 1 at the start of each sc rnd does not count as a st.
Foundation: With A, ch 40 and join with a sl st to the first ch, taking care not to twist the chain. This ring is the dispensing hole.
Rnd 1: Ch 1, sc in each ch around, join. (40 sc)
Rnds 2–3: Ch 1, sc in each st around, join. (40 sc)
These 3 rounds form a rim about 0.7 in (1.8 cm) deep. The rim curls slightly outward, which gives the rolled lip.
Rnd 4: Ch 1, *sc in next 4 sts, 2 sc in next st; rep from * 8 times, join. (48 sc)
Rnd 5: Ch 1, sc in each st around, join. (48 sc)
Rnd 6: Ch 1, *sc in next 5 sts, 2 sc in next st; rep from * 8 times, join. (56 sc)
Rnd 7: Ch 1, sc in each st around, join. (56 sc)
Rnd 8: Ch 1, *sc in next 6 sts, 2 sc in next st; rep from * 8 times, join. (64 sc)
Rnd 9: Ch 1, sc in each st around, join. (64 sc)
Rnd 10: Ch 1, *sc in next 7 sts, 2 sc in next st; rep from * 8 times, join. (72 sc)
Rnds 11–12: Ch 1, sc in each st around, join. (72 sc)
Increasing on every other round makes the work cup upward instead of lying flat, which forms the rounded bottom of the teardrop. Fasten off A.
Lace Body (Color B)
Rnd 13: Join B in any st. Work a beginning V in the same st. *Skip 2 sts, V in next st; rep from * 22 more times. Skip the last 2 sts and join with a sl st to the 2nd ch of the beginning ch-3. (24 Vs: 48 dc and 24 ch-1 sps)
Rnds 14–15: Sl st into the first ch-1 sp, work a beginning V in the same sp, then V in each ch-1 sp around, join. (24 Vs)
Rnd 16: Sl st into the first ch-1 sp, work a beginning shell in the same sp, then shell in each ch-1 sp around, join. (24 shells: 96 dc and 24 ch-1 sps)
Rnds 17–23: Sl st into the first dc and into the ch-1 sp, work a beginning shell in the same sp, then shell in each ch-1 sp around, join. (24 shells)
The shells stack into the same columns as the Vs below them. Their extra width lets the body swell to the widest part of the teardrop.
Rnd 24: Sl st into the first dc and into the ch-1 sp, work a beginning V in the same sp, then V in each shell’s ch-1 sp around, join. (24 Vs: 48 dc and 24 ch-1 sps)
Rnds 25–31: Sl st into the first ch-1 sp, work a beginning V in the same sp, then V in each ch-1 sp around, join. (24 Vs)
Switching back to Vs pulls the body in again, which forms the upper taper. Fasten off B.
Top Band (Color A)
Rnd 32 (conversion round): Join A in any ch-1 sp. Ch 1, then sc in each dc and in each ch-1 sp around, join. That is 48 sc worked one per dc, plus 24 sc worked one per ch-1 sp. (72 sc)
Rnd 33 (decrease round): Ch 1, *sc in next 4 sts, sc2tog; rep from * 12 times, join. (60 sc)
Rnds 34–41: Ch 1, sc in each st around, join. (60 sc)
Do not fasten off.
The band is about 2.2 in (5.6 cm) deep and has 60 sts. Flatten the dispenser so the BOR sits exactly on the right-hand side fold:
- Front: sts 1–30
- Back: sts 31–60
Place markers in sts 7 and 23 of Rnd 37 on the front. These are the button positions.
Straps (Color A)
Each strap is centered 7 sts in from a side fold on the back. The buttons on the front are centered the same distance from the folds, so each strap drops straight down when buttoned.
Strap 1: With the back facing you, join A in st 35 of Rnd 41.
- Row 1: Ch 1, sc in sts 35–39, turn. (5 sc)
- Rows 2–35: Ch 1, sc in each st across, turn. (5 sc)
- Row 36 (buttonhole): Ch 1, sc in first st, ch 3, skip next 3 sts, sc in last st, turn. (2 sc and 1 ch-3 sp)
- Row 37: Ch 1, sc in first st, 3 sc in ch-3 sp, sc in last st, turn. (5 sc)
- Rows 38–40: Ch 1, sc in each st across, turn. (5 sc)
Fasten off.
Strap 2: Join A in st 51 of Rnd 41 and work Rows 1–40 as for Strap 1 over sts 51–55. Do not fasten off; the edging continues from here.
Each strap is 40 rows, about 9 in (22.9 cm) long and 1.25 in (3.2 cm) wide. The buttonhole is 0.75 in (1.9 cm) wide, which fits the 7/8 in (2.2 cm) buttons snugly with a little stretch.
Border
Work one continuous edging round with A that outlines the top edge and both straps. The edging also tightens the band edge so the opening holds its shape.
Border gauge: Work 1 sl st per st along stitch edges and 1 sl st per row-end along the strap sides. Sc rows are close to square, so this ratio keeps the edges flat.
Border Rnd (top): Continuing from Strap 2, ch 1 and work as follows:
- 5 sl st across the top of Row 40.
- 40 sl st down the first side of Strap 2 (1 per row-end).
- Sl st along the band in sts 56–60 and 1–34, which is 39 sts.
- 40 sl st up the first side of Strap 1.
- 5 sl st across the top of Strap 1.
- 40 sl st down the second side of Strap 1.
- Sl st in band sts 40–50, which is 11 sts.
- 40 sl st up the second side of Strap 2, and join to the first sl st.
Totals:
- Band: 39 + 11 = 50 sts
- Each strap: 5 + 40 + 40 = 85 sts
- Whole round: 50 + 85 + 85 = 220 sl st
Why the math works: The band has 60 sts. Each strap sits on 5 of them, so 60 − 5 − 5 = 50 band sts stay exposed for the edging. Each strap’s border count is its own 40 row-ends per side plus its 5 end sts, with no extra corner stitches added. Fasten off.
Border Rnd (rim): Join A in the free loops of the foundation chain. Sl st in each ch around (40 sl st) and join. Fasten off. This tidies the dispensing hole and firms up the rolled lip.
With matching thread, sew the buttons to the front at the marked sts 7 and 23 of Rnd 37. Weave in all ends.
Final Blocking
- Soak the dispenser in cool water for 10 minutes, then gently squeeze out the water. Do not wring it.
- Roll it in a towel and press to remove extra moisture.
- Stuff the body with a rolled towel or plastic bags to form the teardrop shape.
- Pin or pat the shell section out to a flat width of 10.5 in (26.7 cm).
- Shape the band into a round 7.5 in (19.1 cm) flat width, and lay the straps straight.
- Check that the rim opening is 5 in (12.7 cm) flat.
- Let it dry completely, then remove the stuffing.
Final Quality-Control Checklist
- Rnd 12 has 72 sc, and Rnds 13–31 have 24 Vs or shells.
- The lace columns stack straight with no spiral or lean.
- Rnd 32 has 72 sc and Rnds 33–41 have 60 sc.
- The straps sit 7 sts in from each side fold on the back.
- Both straps are 40 rows long and the buttonholes line up.
- The edging round has 220 sl st and the rim edging has 40 sl st.
- The buttons are secure and line up with the straps.
- Total height is 14.5 in (36.8 cm).
Troubleshooting
- Cup ruffles: You increased every round. Increase only on even rounds (4, 6, 8, 10).
- Bottom too flat: Your tension is loose. Go down 0.5 mm in hook size for Rnds 4–12.
- Lace leans sideways: Always start each round with a sl st into the ch-1 sp, and join into the top of the beginning ch-3.
- Shell count is off: Count the ch-1 sps. There must be 24.
- Band flares open: Check Rnd 33 for exactly 12 sc2tog.
- Strap twists: Make sure every row has 5 sts, and join each strap exactly at the marked st.
- Bags fall out of the bottom: Work the 40-st rim more tightly, or add a second sl st round.
Care
Hand wash or machine wash cold on a gentle cycle inside a mesh bag. Reshape while damp and lay flat to dry.
Final Notes
Every measurement in this dispenser builds on the one before it:
- A 40-st rim, 5 in (12.7 cm) flat
- Increases to a 72-st cup, 9 in (22.9 cm) flat
- 24 Vs that widen into 24 shells, 10.5 in (26.7 cm) flat
- 24 Vs again for the taper
- A 72-st conversion round decreased to a 60-st band, 7.5 in (19.1 cm) flat
- Two 5-st straps of 40 rows, finished with a 220-st edging
If you hit each checkpoint, the finished dispenser will hang 14.5 in (36.8 cm) tall and hold a generous stash of bags.
Happy crocheting!