

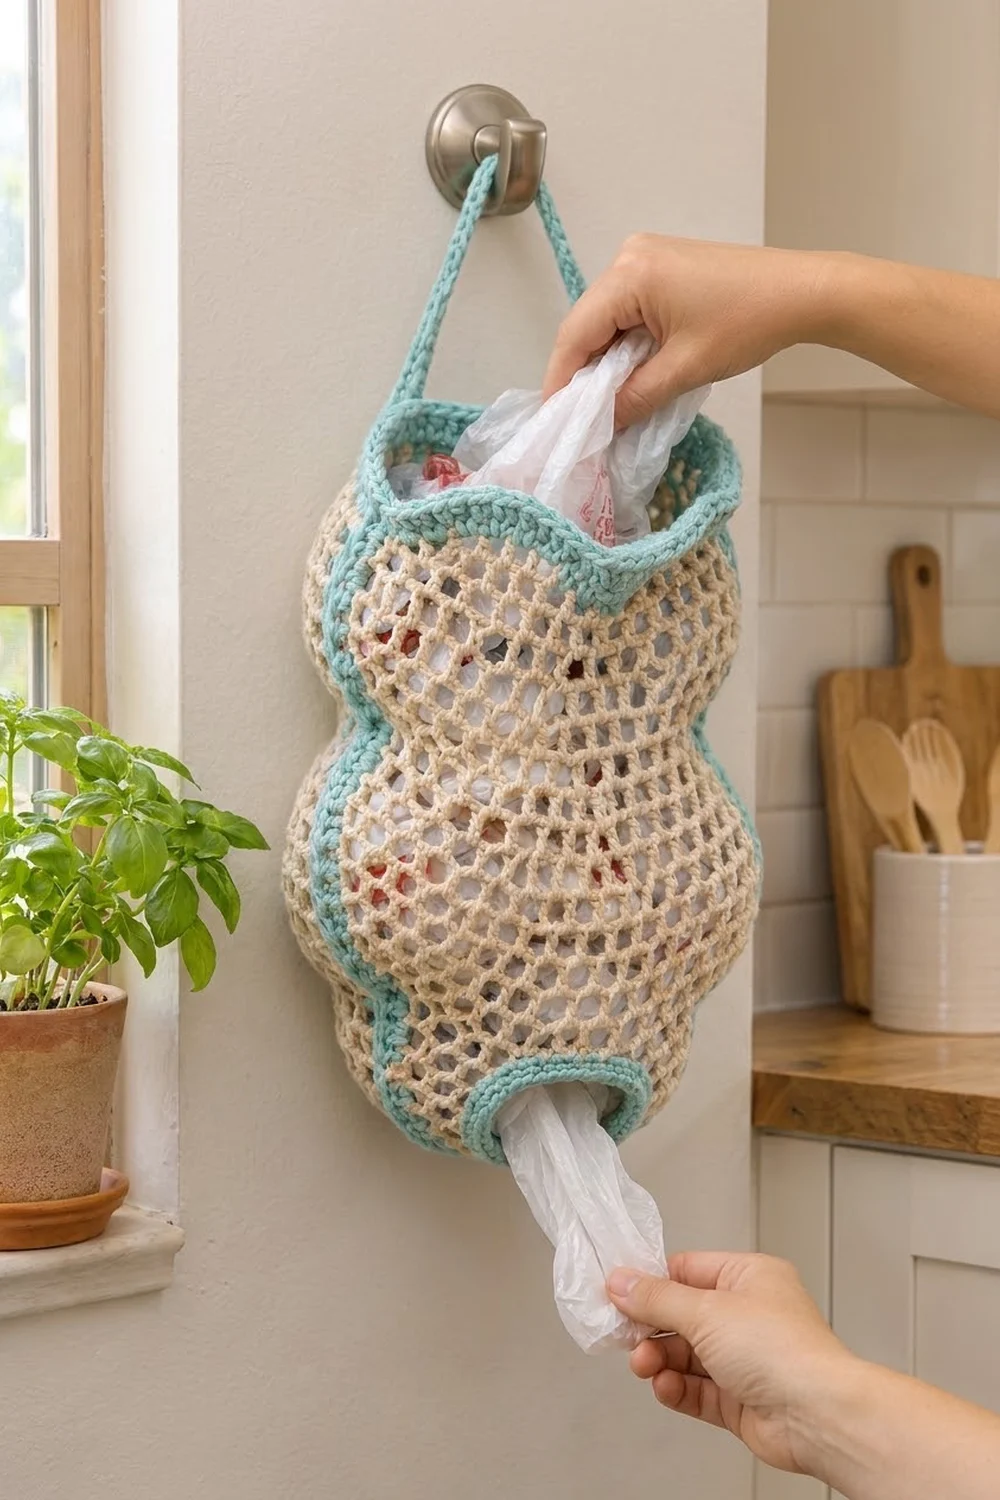
This grocery bag holder hangs on a hook and keeps plastic bags tidy. You push bags in through the wide top and pull them out one at a time through the oval ring at the bottom. The open mesh body lets you see how many bags are left, and the wavy outline makes it look more like decor than storage.
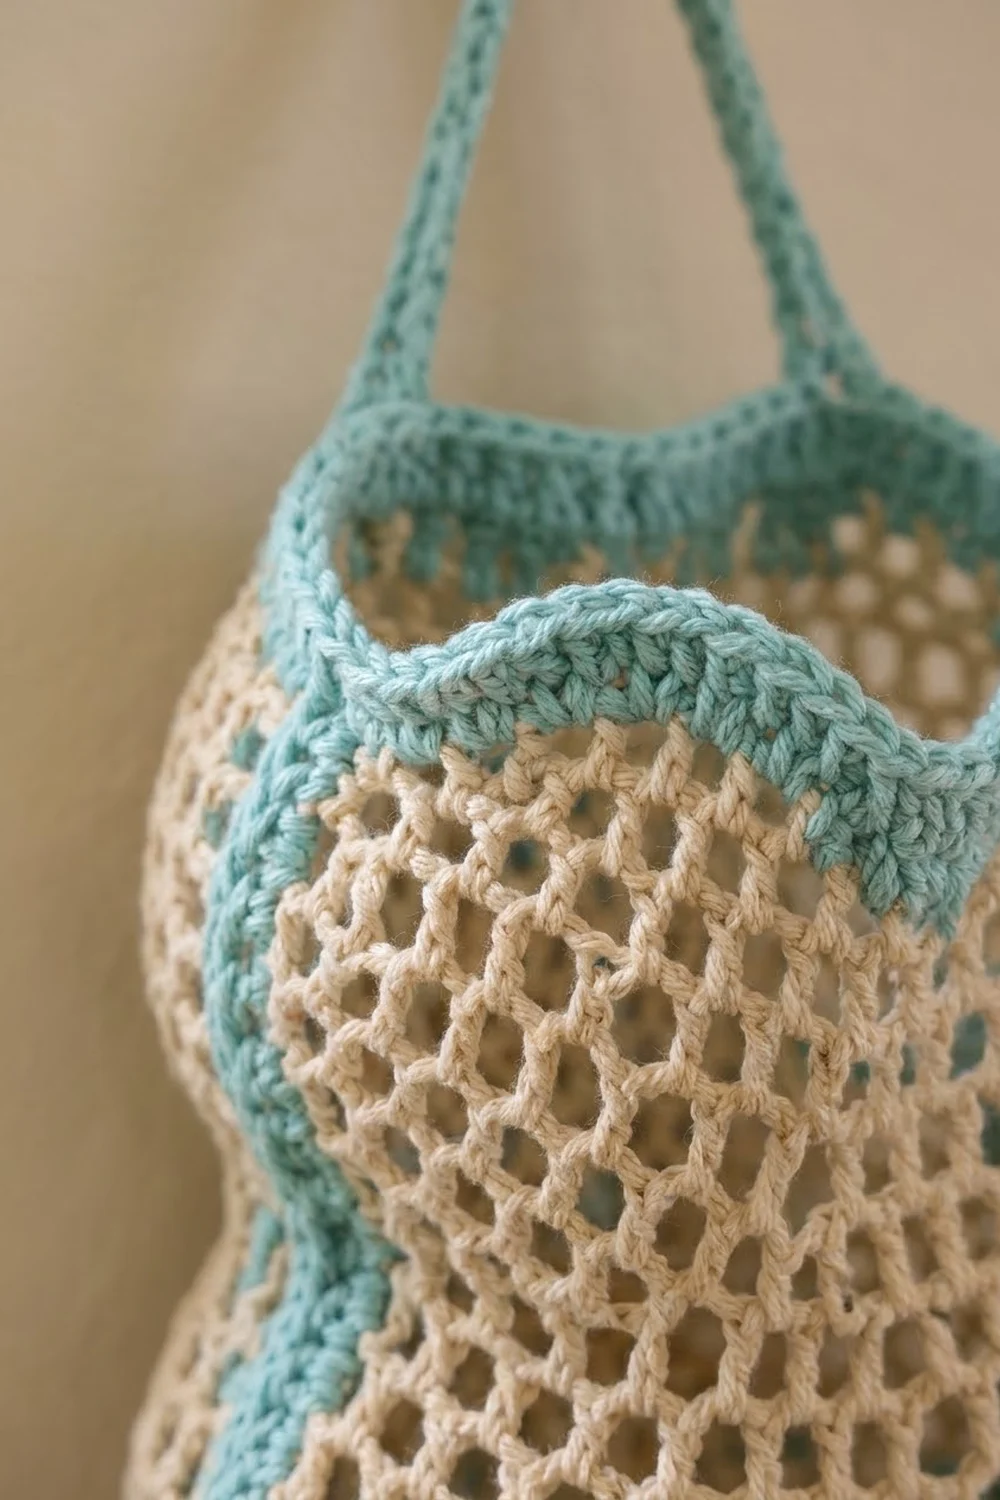
The palette is soft and coastal. The cream cotton mesh makes up most of the body, and aqua trims the side folds, the scalloped top rim, the hanging strap and the bottom ring.
The pattern uses US crochet terms. The holder measures 11″ (27.9 cm) tall and 9″ (22.9 cm) wide at its widest point, measured flat, and the strap adds a 9″ (22.9 cm) loop.
You work it in one piece from the bottom up. First you make the aqua base ring. The mesh body is worked on top of it in joined, turned rounds, with the aqua side bands built in as you go. You finish with a three-round scalloped rim and a single-crochet strap.
Finished Size and Construction
- Finished size: 11″ (27.9 cm) tall at the rim peaks × 9″ (22.9 cm) wide at the widest bulge, measured flat
- Skill level: Intermediate (simple stitches, but you manage several yarn ends at once)
- Terminology: US
- Yarn weight: Worsted (#4) cotton
- Hook: 5 mm (H-8)
- Number of pieces: 1
- Layout: One vertical tube: base ring, then mesh body, then rim, then strap
- Bottom opening: about 3.5″ × 1.5″ (8.9 cm × 3.8 cm)
- Size before border (rim): 10″ (25.4 cm) tall × 8″ (20.3 cm) wide at the top
- Border depth: 0.75″ (1.9 cm) at the center dips and 1″ (2.5 cm) at the peaks
Materials
Use a smooth worsted-weight cotton or cotton blend. Cotton holds its shape when the holder is full and doesn’t stretch out under weight. Avoid acrylic: the mesh would sag over time.
- Cream (main color): 120 g / 204 m
- Aqua (contrast color): 70 g / 119 m
Both quantities assume about 85 m per 50 g and include a margin of about 15% for gauge differences and the swatch.
Tools:
– 5 mm (H-8) crochet hook
– 4 locking stitch markers
– Tapestry needle
– Scissors
– Measuring tape
– Rust-proof pins and a rolled towel for blocking
Bobbin setup: Wind off a second small aqua ball of about 10 g (Aqua B) and a second cream ball of about 60 g (Cream K). The main aqua ball is Aqua A and the main cream ball is Cream F.
Abbreviations (US Terms)
- ch: chain
- sl st: slip stitch
- sc: single crochet
- hdc: half double crochet
- dc: double crochet
- dc2tog: double crochet 2 together
- sk: skip
- sp: space
- RS / WS: right side / wrong side
- st(s): stitch(es)
Special terms:
– Square: one dc plus one ch-1 sp. A panel of n squares contains n + 1 dc and n ch-1 sps, so it has (2 × n) + 1 sts.
– Plain panel: dc in first dc, then (ch 1, dc in next dc) across.
– Increase panel: (dc, ch 1, dc) in first dc, (ch 1, dc in next dc) to last dc, ch 1, then (dc, ch 1, dc) in last dc. This adds 2 squares.
– Decrease panel: dc2tog over the first 2 dc (skip the ch-1 sp between them), (ch 1, dc in next dc) to last 2 dc, ch 1, then dc2tog over the last 2 dc. This removes 2 squares.
– Color change: work the last yarn over of the final stitch in the new color. Bring the new strand up from under the old one so the two lock together.
Gauge and Checkpoints
Gauge: 16 sts and 8 dc rounds = 4″ (10.2 cm) in mesh, and 16 sc = 4″ (10.2 cm).
Before you start the holder, make a test swatch. Ch 22 and work 8 rows of plain mesh. It should measure 5″ (12.7 cm) wide (21 sts) and 4″ (10.2 cm) tall.
Checkpoints (measured flat):
– Base ring: outer edge 6″ (15.2 cm) across
– After Round 5: 2.5″ (6.4 cm) tall, 8″ (20.3 cm) wide
– After Round 7 (first waist): 3.5″ (8.9 cm) tall, 7″ (17.8 cm) wide
– After Round 13 (middle bulge): 6.5″ (16.5 cm) tall, 9″ (22.9 cm) wide
– After Round 16 (second waist): 8″ (20.3 cm) tall, 7″ (17.8 cm) wide
– After Round 20: 10″ (25.4 cm) tall, 8″ (20.3 cm) wide
– After the rim: 11″ (27.9 cm) tall at the peaks
If your swatch is off: If it is too big, go down 0.5 mm in hook size. If it is too small, go up 0.5 mm. Being off by a little in height only changes the overall length. Being off in width changes the depth of the curves, so match width first.
Base Ring
Use Aqua A. Work in joined rounds and don’t turn. The ch 1 at the start of each round doesn’t count as a stitch.
Foundation: Ch 30 and join with a sl st to form a ring. Don’t twist the chain.
Rnd 1: Ch 1, sc in each ch around, then join with a sl st to the first sc. (30 sts)
Rnd 2: Ch 1, (sc in next 4 sts, 2 sc in next st) 6 times, then join. (36 sts)
Rnd 3: Ch 1, (sc in next 5 sts, 2 sc in next st) 6 times, then join. (42 sts)
Rnd 4: Ch 1, (sc in next 6 sts, 2 sc in next st) 6 times, then join. (48 sts)
Don’t fasten off. The ring should lie flat like a washer, with a 6″ (15.2 cm) outer edge and a center hole of about 3.5″ × 1.5″ (8.9 cm × 3.8 cm) when you flatten it.
Place markers in Rnd 4: Mark st 1 (the start of Band A), st 22 (Front ends), st 25 (Band B ends) and st 48 (Back ends).
Mesh Body
Round structure: Each round has four sections that always sit in the same columns: Band A (3 aqua dc), the Front panel (cream), Band B (3 aqua dc) and the Back panel (cream).
Why the colors line up: Each section uses its own ball, so no strand is ever carried across the mesh. Because the rounds are turned, every ball is waiting exactly where it is needed next.
Round direction:
– RS rounds (odd numbers) begin with Band A: ch 3 (counts as the first dc).
– WS rounds (even numbers) begin with the Back panel. Start with ch 3 (counts as dc), ch 4 (counts as dc + ch 1, then dc in the same st) for an increase, or ch 2 followed by dc in the next dc (counts as dc2tog) for a decrease.
– Join every round with a sl st to the top of the beginning ch, then turn.
– Band sts: work 1 dc in each band dc.
Stitch total for every round: 3 + 3 + 2 × ((2 × n) + 1) = 8 + (4 × n), where n is the number of squares per panel.
Rnd 1 (RS, set-up):
1. With Aqua A: ch 3, dc in next 2 sc (Band A).
2. Change to Cream F: dc in next sc, then (ch 1, sk 1 sc, dc in next sc) 10 times (Front, 21 sts).
3. Change to Aqua B: dc in next 3 sc (Band B).
4. Change to Cream K: dc in next sc, then (ch 1, sk 1 sc, dc in next sc) 10 times (Back, 21 sts).
5. Join and turn. (48 sts, 10 squares per panel)
Rnd 2 (WS): Increase panel in Back, Band B, increase panel in Front, Band A. (56 sts, 12 squares)
Rnd 3 (RS): Band A, increase panel in Front, Band B, increase panel in Back. (64 sts, 14 squares)
Rnds 4–5: Plain panels. (64 sts each)
Rnd 6: Decrease panels. (56 sts, 12 squares)
Rnd 7: Plain panels. (56 sts) This is the first waist.
Rnd 8: Increase panels. (64 sts, 14 squares)
Rnd 9: Increase panels. (72 sts, 16 squares)
Rnds 10–13: Plain panels. (72 sts each) This is the middle bulge.
Rnd 14: Decrease panels. (64 sts, 14 squares)
Rnd 15: Decrease panels. (56 sts, 12 squares)
Rnd 16: Plain panels. (56 sts) This is the second waist.
Rnd 17: Increase panels. (64 sts, 14 squares)
Rnds 18–20: Plain panels. (64 sts each) This is the top flare.
Rnd 20 is a WS round, so it ends at Band A. Join and turn so the RS faces you. Fasten off Cream F, Cream K and Aqua B, and keep Aqua A attached for the rim.
How the shape forms: All shaping happens next to the side bands. The bands stay straight while the panels swell and narrow beside them, which makes the wavy outline. Flat width = (round total ÷ 2) ÷ 4 sts per inch:
| Stitches per round | Flat width |
|---|---|
| 48 | 6″ (15.2 cm) |
| 56 | 7″ (17.8 cm) |
| 64 | 8″ (20.3 cm) |
| 72 | 9″ (22.9 cm) |
Border: Scalloped Rim and Strap
Border gauge: 16 sc = 4″ (10.2 cm). Work the rim in joined rounds with Aqua A and don’t turn. The ch 1 at the start of each round doesn’t count as a stitch.
Rim Rnd 1 (RS): Ch 1. Sc in each dc and in each ch-1 sp around, then join.
– Band A: 3 sts. Front: 29 sts. Band B: 3 sts. Back: 29 sts.
– (64 sts)
Rim Rnd 2 (scallop): Ch 1.
1. Band A: sc in next 3 sts.
2. Front (29 sts): sc 2, hdc 3, dc 5, hdc 3, sc 3, hdc 3, dc 5, hdc 3, sc 2.
3. Band B: sc in next 3 sts.
4. Back: same as Front.
5. Join. (64 sts)
Check the panel sequence: 2 + 3 + 5 + 3 + 3 + 3 + 5 + 3 + 2 = 29 sts.
Rim Rnd 3: Ch 1, sc in each st around, then join. (64 sts) Don’t fasten off.
Why the math works: Each side of the rim has 3 + 29 = 32 sts, and two sides make 64. That is exactly the count from Rnd 20, so the rim neither ruffles nor pulls in. The dc groups rise to the two peaks on each face, and the sc at the center and over the bands sit lower. That gives the top its heart-shaped dip.
Strap:
1. With Aqua A, sl st across to the first of the 3 sts above Band A.
2. Row 1: ch 1, sc in each of the 3 band sts. (3 sts)
3. Rows 2–36: ch 1, turn, sc in each st. (3 sts each)
4. The strap is now 9″ (22.9 cm) long and 0.75″ (1.9 cm) wide.
5. Check that the strap isn’t twisted. Hold the last row against the 3 sts above Band B and sl st through both layers. Fasten off.
Final Blocking
- Weave in all ends along the matching color columns, so cream ends stay in the cream sections and aqua ends stay in the aqua sections.
- Soak the holder in cool water for 10 minutes, then roll it in a towel to remove the excess water.
- Stuff it firmly with a rolled towel or crumpled paper to fill out the bulges.
- Lay it flat. Pin the widest points to 9″ (22.9 cm), the waists to 7″ (17.8 cm) and the top to 8″ (20.3 cm).
- Shape the rim peaks with your fingers and press the two center dips down slightly.
- Flatten the base ring so the oval opening is 3.5″ (8.9 cm) wide.
- Let it dry completely, at least 24 hours.
Final Quality-Control Checklist
- The final stitch count is 64 after Rnd 20 and after each rim round.
- Each panel has 14 squares at the top.
- Both side bands are exactly 3 dc wide from the bottom to the top.
- The bulges and waists match on the front and back.
- The four rim peaks are even in height.
- The strap is untwisted and centered on both bands.
- The bottom ring lies flat and opens to about 3.5″ × 1.5″ (8.9 cm × 3.8 cm).
- No color shows through at the joins.
Troubleshooting
- The bands lean or spiral: You probably didn’t turn after a round. Rip back to where it starts and turn after every join.
- There are gaps at the color changes: Twist the new strand under the old one at every change.
- The bulges look flat: Recount your squares. An increase panel adds exactly 2 squares (4 sts).
- The rim ruffles: Check Rim Rnd 1. Each panel should have 29 sts, not more.
- The bottom ring cups upward: Use a looser tension, or add 1 sc in each 7th st in an extra round.
- The strap stretches: Go down 0.5 mm in hook size for the strap only.
Care
Hand wash in cool water and lay flat to dry, stuffed so it keeps its shape. Don’t tumble dry, because the mesh can shrink unevenly.
Final Notes
Everything in this pattern builds on one measurement chain:
1. A 48-st ring gives a 6″ (15.2 cm) base.
2. Mesh rounds at 8 + (4 × squares per panel) sts give widths of 7″ (17.8 cm), 8″ (20.3 cm) and 9″ (22.9 cm).
3. Twenty rounds at 0.5″ (1.3 cm) each give a 10″ (25.4 cm) body.
4. The 64-st rim brings the holder to 11″ (27.9 cm), and the 36-row strap adds a 9″ (22.9 cm) loop.
If you check your gauge at each stage, the finished holder will match. Happy crocheting!