

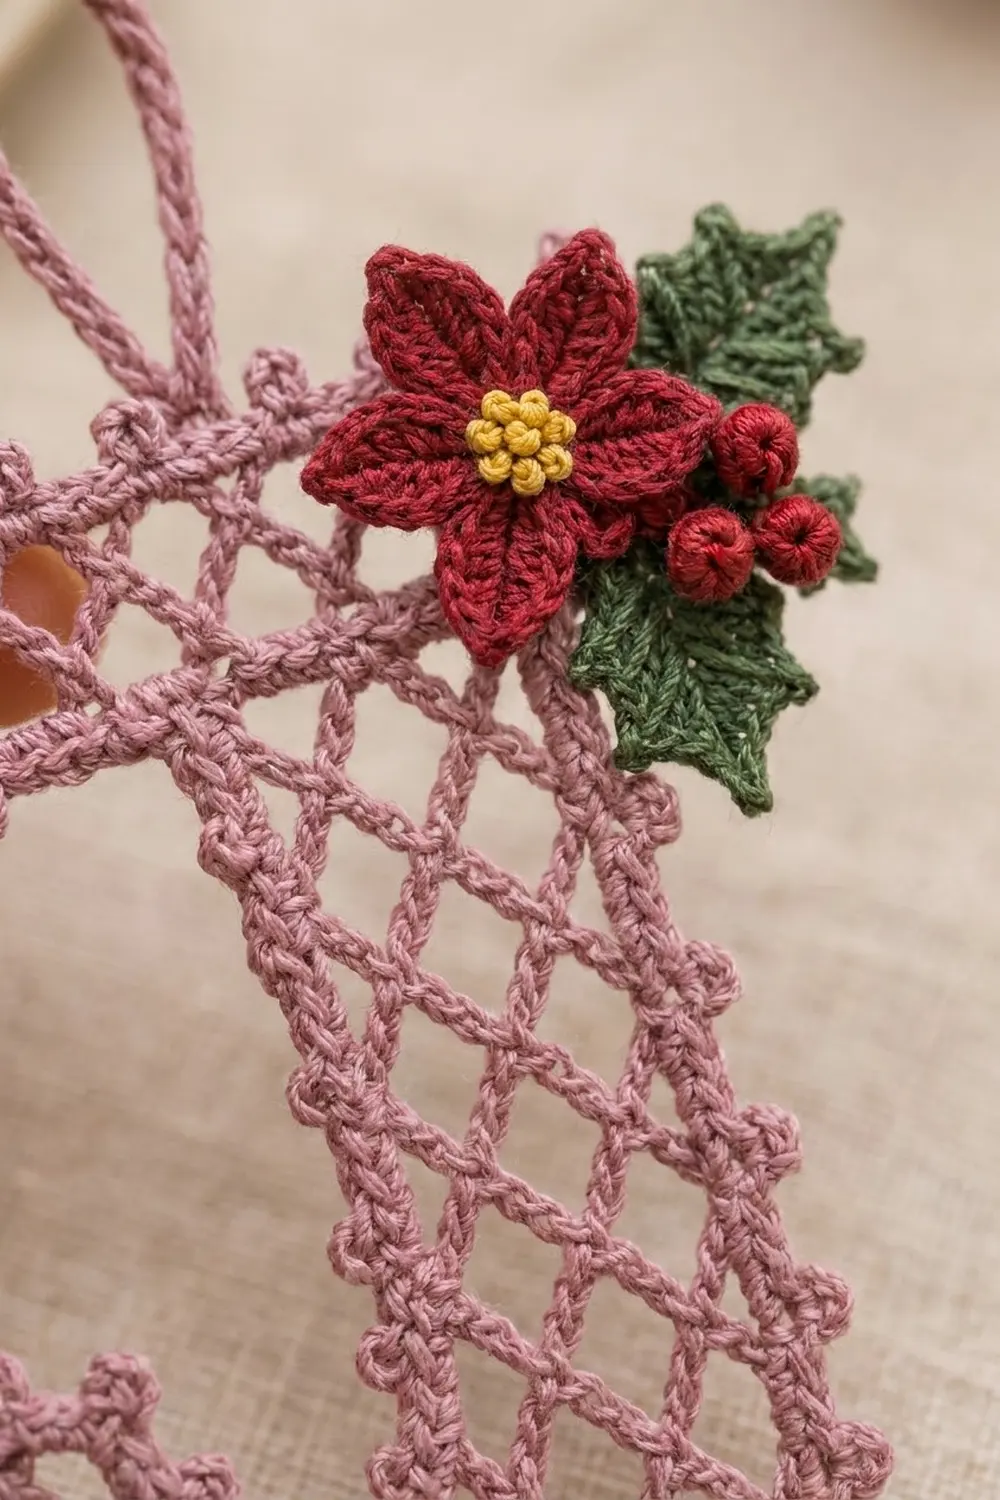
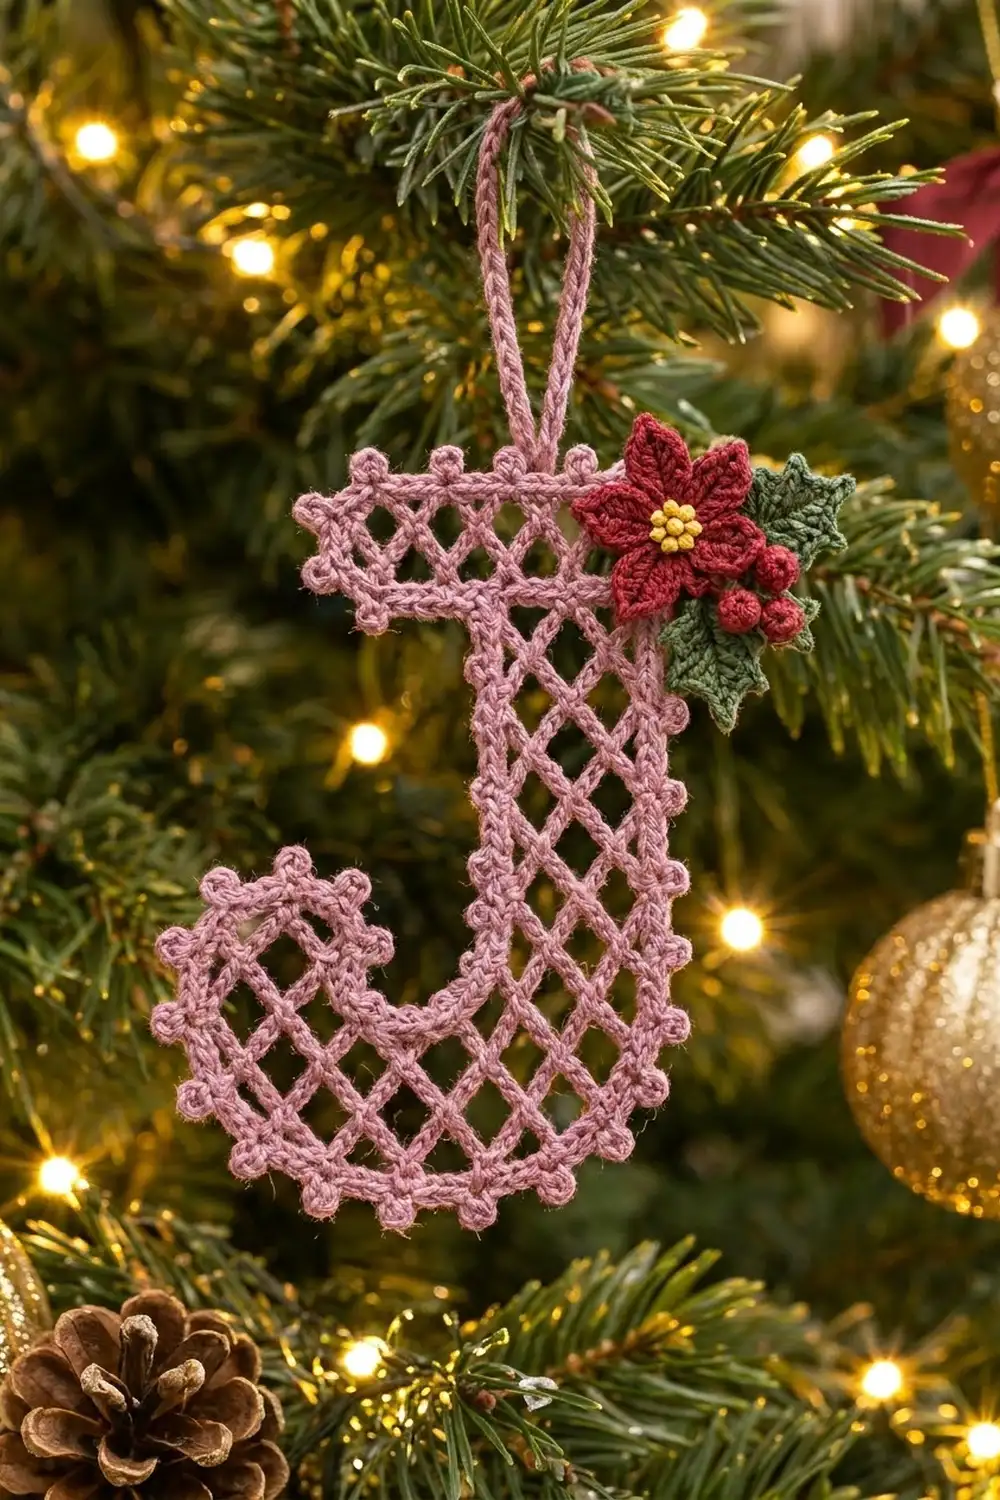
This Rosy Lattice Letter J is a light, lacy Christmas ornament made from a dusty rose diamond mesh. A tidy picot edge runs around the whole outline, and the top corner carries a small red poinsettia with holly leaves and berries.
The palette is soft mauve for the letter, deep red for the flower and berries, green for the holly, and a touch of yellow for the flower center. It looks vintage and delicate, and it works as a monogram gift tag, a name ornament, or a one-letter tree decoration.
The pattern uses US crochet terms. The finished ornament measures 3 1/2 in (8.9 cm) wide by 4 1/2 in (11.4 cm) tall, plus a 1 1/2 in (3.8 cm) hanging loop. That makes it 6 in (15.2 cm) tall overall.
You work the letter top-down as one piece: first the crossbar, then the stem, then the foot, which you widen with a chain extension. Then you add a short tip upward from that extension. After that come a two-round picot border, the hanging loop, and the sewn-on appliqué.
Finished Size and Construction
- Finished size: 3 1/2 in x 4 1/2 in (8.9 cm x 11.4 cm), plus a 1 1/2 in (3.8 cm) loop
- Skill level: Intermediate (mesh shaping, edging around concave corners)
- Terminology: US
- Yarn weight: Fingering / #1 super fine cotton
- Hook: 2.25 mm (B-1)
- Number of pieces: 1 ornament body (single piece), plus small appliqués: 1 poinsettia, 2 holly leaves, 3 berries
- Layout: Single letter, no joining
- Piece size (mesh body): 3 in x 4 in (7.6 cm x 10.2 cm)
- Size before border: 3 in x 4 in (7.6 cm x 10.2 cm)
- Border depth: 1/4 in (0.6 cm) on every edge
Materials
Use a smooth, mercerized fingering-weight cotton. It shows the diamond lattice clearly and holds its shape after starching. Stay away from fuzzy or very soft yarns, because the mesh blurs.
- Color A, dusty rose/mauve (body, border, loop): 10 g, about 35 m
- Color B, deep red (poinsettia, berries): 2 g, about 7 m
- Color C, holly green (leaves): 2 g, about 7 m
- Color D, golden yellow (flower center): 1 g, about 3.5 m
All quantities include a margin for a gauge swatch and weaving in.
Tools:
– 2.25 mm (B-1) crochet hook
– Tapestry needle and a sharp sewing needle
– Scissors
– Rustproof pins and a foam blocking board
– Spray starch or a diluted fabric stiffener
– Optional: a ruler or a printed letter outline 3 in x 4 in (7.6 cm x 10.2 cm)
Abbreviations (US Terms)
- ch – chain
- sl st – slip stitch
- sc – single crochet
- hdc – half double crochet
- dc – double crochet
- sc2tog – single crochet 2 together
- sk – skip
- sp – space
- tch – turning chain
- mr – magic ring
- st(s) – stitch(es)
Special stitch: picot. Ch 3, sl st in 3rd ch from hook.
Mesh rows. The lattice uses two alternating row types:
– A row has full ch-3 loops edge to edge, with a sc at each edge.
– B row has one fewer full loop than the A row below it, plus a ch-1 half space and a dc at each edge.
Each sc sits in the center of a loop from the row below, and that is what forms the diamonds.
Gauge and Checkpoints
Mesh gauge: 3 ch-3 loops = 1 in (2.5 cm) wide; 6 mesh rows = 1 in (2.5 cm) tall.
Border gauge: 9 sc = 1 in (2.5 cm).
Before you start the ornament, make a test piece. Work Foundation and Rows 1–4 of the crossbar below. Pin it flat and measure it.
Checkpoints:
– After Row 1: 2 1/3 in (5.9 cm) wide.
– After Row 4 (crossbar): 2/3 in (1.7 cm) tall.
– Stem width: 1 1/3 in (3.4 cm).
– After Row 17: 2 5/6 in (7.2 cm) tall from the top edge.
– Foot after Row 18: about 2 3/4 in (7.0 cm) wide.
– After Row 24: body is 3 in x 4 in (7.6 cm x 10.2 cm).
If your piece comes out too big, go down to a 2.0 mm hook or chain more tightly. If it is too small, go up to a 2.5 mm hook. Gauge matters more here than usual, because the border counts are based on these measurements.
Ornament Body
Use Color A.
Crossbar
Foundation: Ch 30.
Row 1 (A): Sc in 2nd ch from hook, [ch 3, sk 3 ch, sc in next ch] 7 times. (8 sc, 7 loops)
Row 2 (B): Ch 4 (counts as dc + ch 1), turn. Sc in first ch-3 loop, [ch 3, sc in next loop] 6 times, ch 1, dc in last sc. (7 sc, 6 full loops, plus 2 edge half spaces)
Row 3 (A): Ch 1, turn. Sc in dc, [ch 3, sc in next loop] 6 times, ch 3, sc in 3rd ch of tch. (8 sc, 7 loops)
Row 4 (B): Repeat Row 2. (7 sc, 6 full loops)
Checkpoint: 2 1/3 in x 2/3 in (5.9 cm x 1.7 cm).
Stem
Row 5 (A): Ch 1, turn. Sl st in ch-1 sp and in next sc. Ch 1, sc in same sc, [ch 3, sc in next loop] 4 times. (5 sc, 4 loops)
The stem now sits under the right part of the crossbar. On the right, a short overhang (the ch-1 sp) stays unworked. On the left, 2 loops plus the ch-1 sp stay unworked.
Row 6 (B): Ch 4, turn. Sc in first loop, [ch 3, sc in next loop] 3 times, ch 1, dc in last sc. (4 sc, 3 full loops)
Row 7 (A): Ch 1, turn. Sc in dc, [ch 3, sc in next loop] 3 times, ch 3, sc in 3rd ch of tch. (5 sc, 4 loops)
Rows 8–17: Repeat Rows 6–7 five more times. Row 17 is an A row and ends at the left edge. Do not turn.
Checkpoint: the stem is 1 1/3 in (3.4 cm) wide, and the piece is 2 5/6 in (7.2 cm) tall.
Foot
Row 18 (set-up, extends left): Ch 17. Sc in 2nd ch from hook, [ch 3, sk 3 ch, sc in next ch] 3 times. Ch 3, sk 3 ch, sc in the last sc of Row 17 (the sc at the base of the chain). Then [ch 3, sc in next loop of Row 17] 4 times, ch 1, dc in first sc of Row 17. (9 sc, 8 full loops, plus a ch-1 sp and dc at the right edge)
Rows 19–24: Ch 1, turn. Sc in dc, [ch 3, sc in next loop] 8 times, ch 1, dc in last sc. (9 sc, 8 full loops each row)
Fasten off.
Checkpoint: the body is 3 in x 4 in (7.6 cm x 10.2 cm), and the foot is about 2 3/4 in (7.0 cm) wide.
Upturned Tip
The free loops of the Row 18 chain now face up toward the crossbar.
Row T1: Join Color A with a sl st in the free loop at the base of the far-left sc. Ch 1, sc in same loop, [ch 3, sk 3 free loops, sc in next free loop] 2 times. (3 sc, 2 loops)
Row T2 (B): Ch 4, turn. Sc in first loop, ch 3, sc in next loop, ch 1, dc in last sc. (2 sc, 1 full loop)
Row T3 (A): Ch 1, turn. Sc in dc, ch 3, sc in loop, ch 3, sc in 3rd ch of tch. (3 sc, 2 loops)
Row T4 (B): Repeat Row T2. Fasten off.
The tip measures 2/3 in x 2/3 in (1.7 cm x 1.7 cm). The 7 free chain loops between the tip and the stem stay open and form the inner notch of the hook.
Border
Border gauge: 9 sc = 1 in (2.5 cm). That works out to about 3 sc per loop width and 3 sc per 2 mesh rows.
- At outer corners, work 3 sc in the corner stitch.
- At inner corners, work sc2tog across the 2 edges.
Round 1: Join Color A at the top-left corner of the crossbar (the free loop at the end of the foundation chain). Work clockwise:
- Outer corner, top-left: 3 sc.
- Crossbar top: 21 sc (1 sc in each skipped free loop of the foundation chain).
- Outer corner, top-right: 3 sc. Crossbar right end: 3 sc. Outer corner, bottom-right of the crossbar: 3 sc.
- Right overhang under the crossbar: 1 sc. Inner corner: sc2tog.
- Right edge of the stem and foot (Rows 5–24): 30 sc.
- Outer corner, bottom-right: 3 sc.
- Foot bottom: 25 sc (3 sc in each of the 8 loops, 1 sc in the ch-1 sp).
- Outer corner, bottom-left: 3 sc.
- Left edge of the foot and tip: 15 sc.
- Outer corner, tip top-left: 3 sc. Tip top: 5 sc. Outer corner, tip top-right: 3 sc.
- Inner edge of the tip: 4 sc. Inner corner: sc2tog.
- Free chain loops of the notch: 4 sc. Inner corner: sc2tog.
- Left edge of the stem (Rows 17–5): 19 sc. Inner corner: sc2tog.
- Crossbar underside, left: 7 sc (3 sc in each of the 2 loops, 1 sc in the ch-1 sp).
- Outer corner, bottom-left of the crossbar: 3 sc. Crossbar left end: 3 sc.
Sl st to the first sc.
Count: The edge runs total 137 sc. Add 8 outer corners x 3 = 24 and 4 inner sc2tog = 4, for 165 sts.
Checkpoint: 3 1/4 in x 4 1/4 in (8.3 cm x 10.8 cm).
Round 2 (picot): Ch 1. Sc in next 2 sts, sc in next st, picot. Repeat from * 55 times. Sl st to the first sc. (165 sc, 55 picots)
Why the math works: 165 divides evenly by 3, so the 55 picots repeat without a leftover stitch. At 9 sc per inch, that puts a picot every 1/3 in (0.8 cm). Every edge run in Round 1 matches the gauge. For example, the 21 sc on the crossbar top cover 2 1/3 in (5.9 cm), and the 30 sc on the right edge cover 20 rows, or 3 1/3 in (8.5 cm). Because of that, the border lies flat without ruffling or cupping. Fasten off.
Hanging Loop
Round 1 st 17 is the 14th sc of the crossbar top, which sits centered over the stem. Join Color A in the Round 2 sc above it. Ch 30, sl st in the same st. Work 40 sc over the chain loop, then sl st at the base. Fasten off.
The loop stands 1 1/2 in (3.8 cm) tall.
Poinsettia Appliqué
Flower (Color B): Mr, 5 sc in ring, sl st to the first sc. Pull the ring closed.
Petals: Ch 5, sl st in 2nd ch from hook, sc in next ch, hdc in next ch, dc in last ch, sl st in next sc of the ring. Repeat from * 5 times. (5 pointed petals)
Fasten off. The flower is about 1 in (2.5 cm) across.
Center (Color D): Work 3 French knots in the middle of the ring.
Holly leaf (Color C, make 2):
1. Ch 8. Sl st in 2nd ch from hook, sc in next ch, hdc in next ch, picot, dc in next ch, hdc in next ch, picot, sc in next ch, sl st in last ch.
2. Ch 1, then work along the free loops on the other side: sc, hdc, picot, dc, hdc, picot, sc, sl st at the tip.
3. Fasten off.
Each leaf is about 3/4 in (1.9 cm) long and has 4 side points.
Berry (Color B, make 3): Mr, 6 sc. Pull tight into a bead and fasten off, leaving a tail. Each berry is 1/4 in (0.6 cm) across.
Placement: Sew the leaves to the top-right corner of the crossbar. Angle one to the right past the edge and the other down along the top of the stem. Sew the flower over the leaf bases. Tuck the 3 berries between the flower and the lower leaf.
Final Blocking
- Wet the ornament, then press out the water in a towel.
- Pin the corners of the crossbar to 3 1/2 in (8.9 cm) at the widest point of the outline. Pin the overall height to 4 1/2 in (11.4 cm).
- Pin the stem straight at 1 3/4 in (4.4 cm) wide, border included.
- Ease the foot and tip into a smooth curve, and open the notch.
- Pin out every picot.
- Spray with starch, then let the ornament dry completely.
- Sew on the appliqué after blocking, so the flower is not flattened.
Final Quality-Control Checklist
- The body measures 3 in x 4 in (7.6 cm x 10.2 cm) before the border.
- Round 1 has 165 sts, and Round 2 has 55 picots.
- The diamonds are even, with no twisted loops.
- The inner corners are crisp and not puckered.
- The loop is centered over the stem and firmly anchored.
- All ends are woven in.
- The appliqué is stitched through at least 2 points per piece.
Troubleshooting
- The border ruffles: Your border gauge is looser than 9 sc per in. Go down a hook size for the border only.
- The border cups: Add 1 sc to the longest runs, and keep the total a multiple of 3.
- The mesh slants: Check that you sc into the center of each loop, not into the sc.
- The notch closes up: Pin it open during blocking, and do not skip the sc2tog decreases.
- The foot is narrower than the crossbar overhang: Re-count the Row 18 chain. It must be 17.
Care
Hand wash in cool water and lay flat to dry. Re-starch and re-pin if the ornament softens.
Final Notes
The measurement chain is:
- Mesh gauge: 3 loops = 1 in (2.5 cm), 6 rows = 1 in (2.5 cm).
- Body: 3 in x 4 in (7.6 cm x 10.2 cm).
- After Round 1 (165 sts): 3 1/4 in x 4 1/4 in (8.3 cm x 10.8 cm).
- After the picot round: 3 1/2 in x 4 1/2 in (8.9 cm x 11.4 cm), plus a 1 1/2 in (3.8 cm) loop.
Check each stage as you go, and the finished letter will block out neatly. Happy crocheting!