

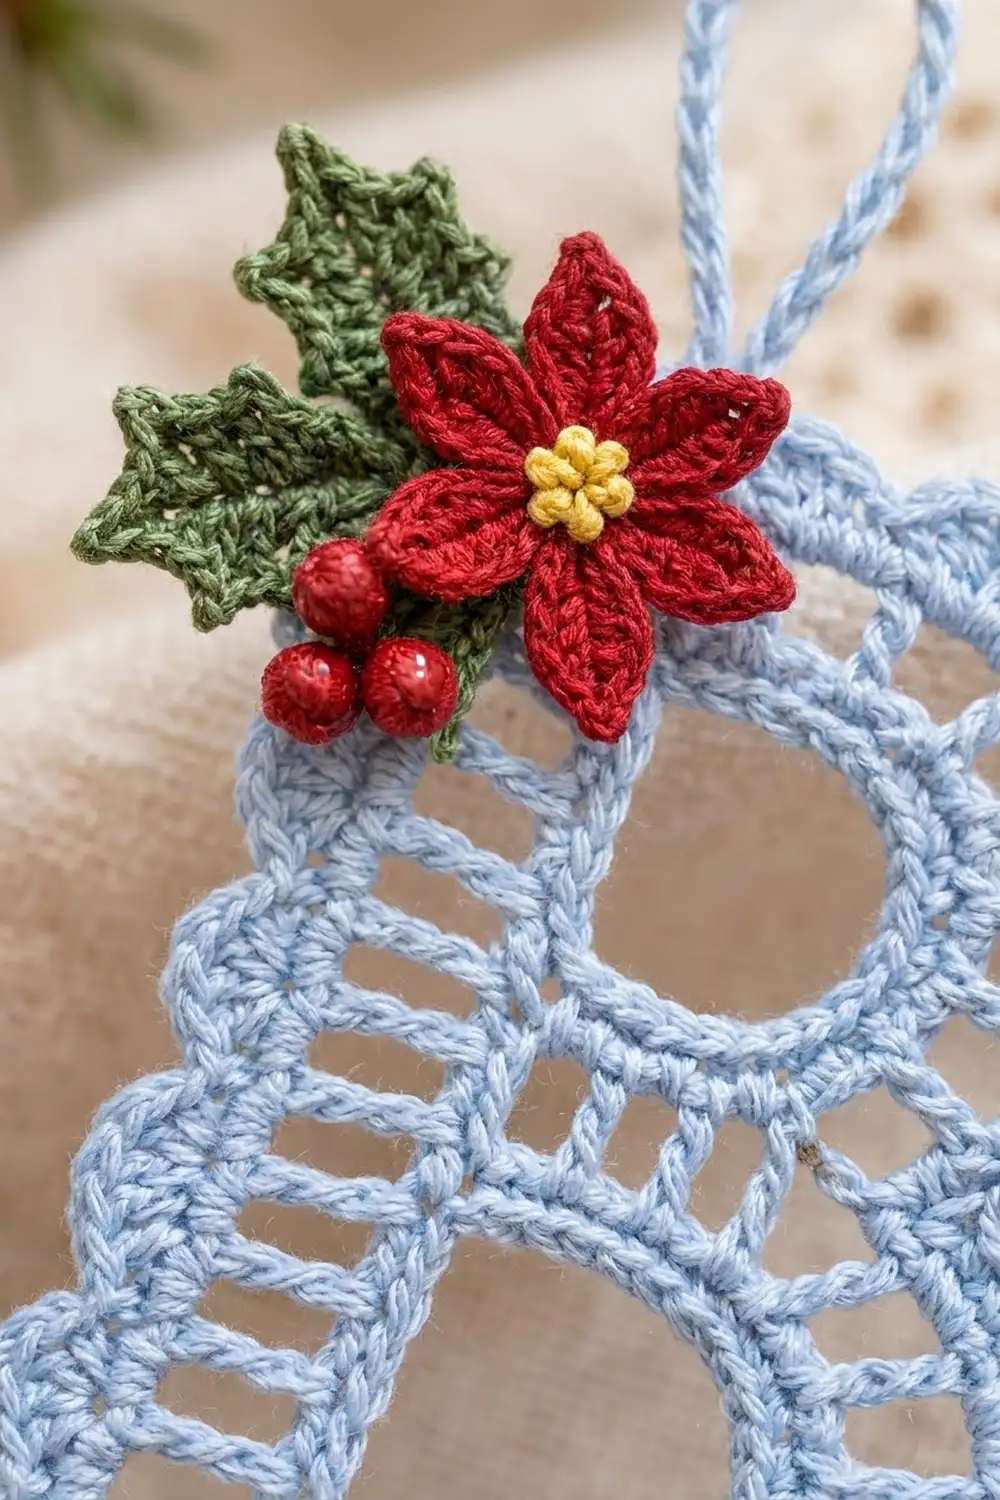
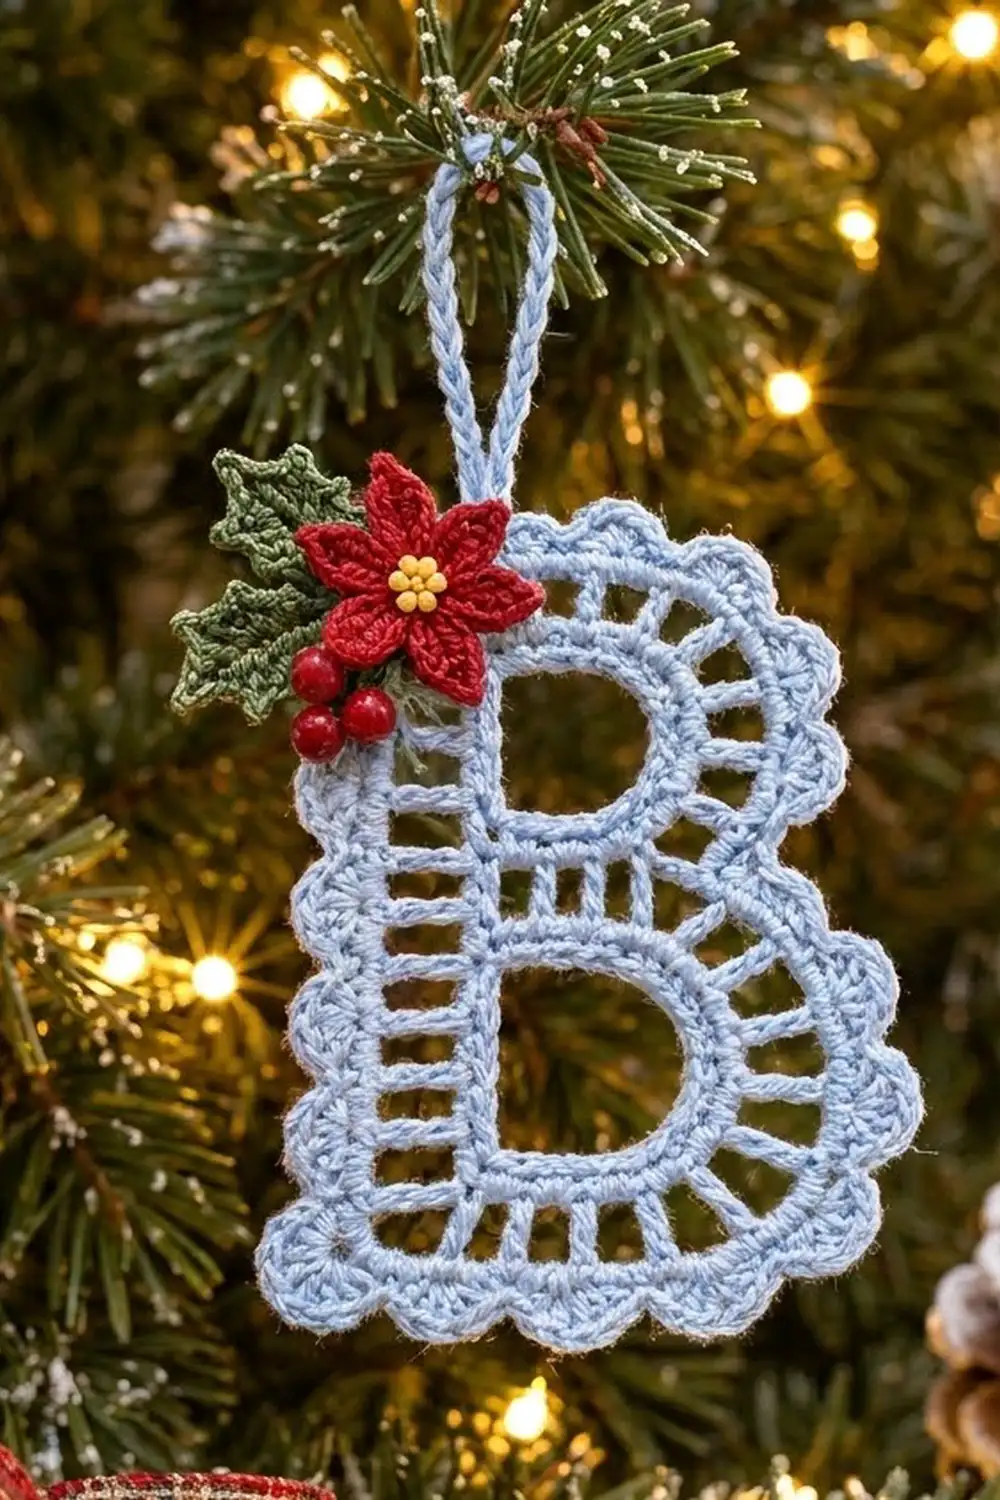
The Frosted Lace Letter B is an openwork monogram ornament in pale powder-blue thread. Ladder-style treble rungs run between smooth single crochet rails, a soft scalloped edge goes around the whole letter, and a small poinsettia sits on the top-left corner.
The colors are light blue for the letter and loop, red for the poinsettia and berries, green for two holly leaves, and yellow for the flower center. The style is vintage lace with a festive accent, so it works on a tree, a gift tag or a wreath.
The pattern uses US crochet terms. The finished letter measures 3.75 in x 4.75 in (9.5 cm x 12.1 cm), plus a 1.25 in (3.2 cm) hanging loop.
How it’s built:
1. Make a single crochet ring for the upper counter (the top hole).
2. Work a short ladder bar off the bottom of that ring.
3. Chain the lower counter from the end of the bar.
4. Work three rounds around the whole letter: a rung round, a rail round and a scallop round.
5. Make the appliqués separately and sew them on.
Finished Size and Construction
- Finished size: 3.75 in x 4.75 in (9.5 cm x 12.1 cm), not including the loop
- Skill level: Intermediate
- Terminology: US
- Yarn weight: Size 3 crochet thread (CYC 1, Super Fine)
- Hook: 2.25 mm (US B-1)
- Number of pieces: 1 letter piece plus 6 small appliqués (1 poinsettia, 2 leaves, 3 berries)
- Layout: Single ornament; no grid and no joining
- Piece size: 3.75 in x 4.75 in (9.5 cm x 12.1 cm)
- Size before border: 3.25 in x 4.25 in (8.3 cm x 10.8 cm)
- Border depth: 0.25 in (0.6 cm) on every edge
Materials
Use mercerized cotton size 3 thread. It keeps the rungs crisp and blocks sharply. Fuzzy fibers will blur the ladder openings.
- Light blue (A): 15 g / 24 m
- Red (B): 3 g / 5 m
- Green (C): 2 g / 3 m
- Yellow (D): 1 g / 2 m
Tools:
– 2.25 mm (US B-1) hook
– Sharp tapestry needle
– 4 locking stitch markers
– Rust-proof pins, a blocking mat and a spray bottle
– Spray starch (optional)
These amounts include extra thread for a gauge swatch and tails.
Abbreviations (US Terms)
- ch: chain
- sl st: slip stitch
- sc: single crochet
- hdc: half double crochet
- dc: double crochet
- tr: treble crochet
- sc2tog: single crochet 2 together
- sk: skip
- st(s): stitch(es)
- sp: space
- MR: magic ring
Special stitches
– Picot: Ch 3, sl st in 3rd ch from hook.
– Rung: (Tr, ch 1). Every tr in the rung round has its own ch 1 after it, so that round always has the same number of tr and ch-1 sps.
– Post rung: A rung worked around the post of an end tr of the middle bar, instead of into the top of a stitch.
Gauge and Checkpoints
Gauge: 8 sc = 1 in (2.5 cm). One tr row = 0.5 in (1.3 cm) tall.
Swatch: Ch 17. Sc in 2nd ch from hook and in each ch across (16 sc). The row should measure 2 in (5.1 cm). Add one row of tr; it should be 0.5 in (1.3 cm) tall.
Make the upper ring first and check it before you continue.
Checkpoints:
1. Upper ring: 34 sc. The outer edge is 4.25 in (10.8 cm) measured with a tape along the edge.
2. Middle bar: Row 2 is 1.125 in (2.9 cm) long, and the bar is 0.625 in (1.6 cm) tall.
3. Lower ring: 40 sc. The outer edge is 5 in (12.7 cm).
4. After Round B: 3.25 in x 4.25 in (8.3 cm x 10.8 cm). The rail is 13.5 in (34.3 cm) around.
5. After Round C: 3.75 in x 4.75 in (9.5 cm x 12.1 cm).
If your piece is too big, use a hook 0.25 mm smaller. If it’s too small, use a hook 0.25 mm larger. Change the hook, never the stitch counts, because every round depends on the counts before it.
Pattern
Part 1: Upper Counter Ring (Color A)
Ch 34. Sl st in the first ch to form a ring, without twisting.
Round 1: Ch 1, sc in each ch around, sl st to first sc. (34 sc)
Lay the ring flat as a “D” with the straight side on the left. Number the stitches as below, and mark sts 1, 10 and 26.
- Sts 1–9: Spine side (the straight left edge, going upward)
- Sts 10–25: Upper arc (16 sts, over the top and down the right side)
- Sts 26–34: Bottom edge (9 sts, going right to left; st 34 sits next to st 1)
Fasten off. Rejoin A in st 26.
Part 2: Middle Bar
Row 1: Ch 4 in st 26 (counts as tr), [ch 1, sk next st, tr in next st] 4 times. Turn. (5 tr, 4 ch-1 sps)
The tr land in sts 26, 28, 30, 32 and 34, so the rungs stand straight and parallel.
Row 2: Ch 1, sc in first tr, [sc in next ch-1 sp, sc in next tr] 4 times. Work the last sc in the 3rd ch of the beginning ch-4. (9 sc)
These 9 sc form the top edge of the lower counter.
Part 3: Lower Counter Ring
Ch 31. Curve the chain down the right side, across the bottom and up the left side. Sl st in the first sc of Row 2, without twisting.
Lower rail row: Turn, ch 1, sc in each of the 31 ch, sl st in the last sc of Row 2. (31 sc)
The lower ring now has 40 sts:
– 9 sc from Row 2 (top edge)
– 9 spine sts (left side)
– 22 arc sts (bottom and right side)
Mark the bottom spine st and the first arc st. Fasten off.
The letter’s shape is now set: two counters stacked one above the other, connected by the ladder bar.
Part 4: Round A, the Rung Round (Color A)
Rejoin A in the bottom spine st of the lower ring. Work around the whole outline in the order below. The lace is reversible, so if your B reads backward when you finish, just flip it over.
- S5, lower spine (9 sts): Ch 4 (counts as tr), ch 1, rung in same st (corner made). [Sk next st, rung in next st] 4 times. (6 rungs)
- S6, left end of bar: 3 post rungs around the end tr (the tr worked in st 34). (3 rungs)
- S1, upper spine (sts 1–9): [Rung in next st, sk next st] 4 times, working in sts 1, 3, 5 and 7. Then work 2 rungs in st 9 (corner made). (6 rungs)
- S2, upper arc (sts 10–25): Rung in each st. (16 rungs)
- S3, waist notch: 1 post rung around the beginning ch-4 of the bar. (1 rung)
- S4, lower arc: Rung in each of the 22 arc sts. (22 rungs)
Sl st in the 3rd ch of the beginning ch-4.
Round A total: 54 tr and 54 ch-1 sps (6 + 3 + 6 + 16 + 1 + 22 = 54).
On the straight spine, each rung covers 2 base sts, so the rungs stay parallel. On the arcs, there’s one rung per st, which fans them out like spokes.
Border
The border has two rounds: a rail round that locks the tops of the rungs, then a scallop round.
Border gauge: Each scallop covers 6 rail sts, or 0.75 in (1.9 cm). The scallops add 0.25 in (0.6 cm) of depth all around.
Round B (rail): Ch 1, sc in same st, sc in next ch-1 sp, [sc in next tr, sc in next ch-1 sp] around, sl st to first sc. (108 sc)
This is a conversion round: 54 sc (1 in each tr) + 54 sc (1 in each ch-1 sp) = 108 sc.
Rail count for each section:
– S5: 12 sc
– S6: 6 sc
– S1: 12 sc
– S2: 32 sc
– S3: 2 sc
– S4: 44 sc
The spine side (S5 + S6 + S1) has 30 sc. The bowl side (S2 + S3 + S4) has 78 sc. 30 + 78 = 108.
Checkpoint: 3.25 in x 4.25 in (8.3 cm x 10.8 cm).
Round C (scallops): Ch 1, sc in first sc, [sk 2 sts, 5 dc in next st, sk 2 sts, sc in next st] 17 times, sk 2 sts, 5 dc in next st, sk 2 sts, sl st to first sc. (18 scallops: 18 sc + 90 dc = 108 sts)
- Spine side: 30 sts ÷ 6 = 5 scallops
- Bowl side: 78 sts ÷ 6 = 13 scallops
Why the math works: Round A starts at the bottom spine corner, so Rounds B and C start there too. The 30 spine-side sc make exactly 5 scallops, which keeps the left edge straight. The 78 bowl-side sc make exactly 13 scallops, so the round closes without any fudged stitches. At 8 sc per inch, 108 sts = 13.5 in (34.3 cm), and 18 scallops x 0.75 in (1.9 cm) = 13.5 in (34.3 cm).
Don’t fasten off.
Hanging Loop
Sl st across to the sc at the start of the 6th scallop. This is at the top-left corner, where the spine meets the upper arc.
Ch 24, sl st in the same sc. Turn, work 30 sc over the chain loop, sl st in the base sc. Fasten off.
The loop is about 1.25 in (3.2 cm) tall.
Poinsettia (Color B)
Make a MR.
Round 1: Ch 1, 10 sc in ring, sl st to first sc. Pull the ring tight. (10 sc)
Round 2: [Ch 6, sl st in 2nd ch from hook, sc in next ch, hdc in next ch, dc in next ch, tr in last ch, sk next sc, sl st in next sc] 5 times. (5 pointed petals)
Each petal uses 2 sc of Round 1 (5 x 2 = 10). The flower is about 1.25 in (3.2 cm) across. Leave a 12 in (30.5 cm) tail for sewing.
Center: With D, work 5 French knots close together in the middle of Round 1.
Holly Leaves (Color C; make 2)
Ch 10.
Side 1: Sc in 2nd ch from hook, hdc in next ch, picot, dc in next 2 ch, picot, dc in next 2 ch, picot, hdc in next ch, sc in next ch, 3 sc in last ch (leaf tip).
Side 2: Working along the other side of the chain: sc in next ch, hdc in next ch, picot, dc in next 2 ch, picot, dc in next 2 ch, picot, hdc in next ch, sl st to first sc.
Each side has 8 sts and 3 picots, which make the spiky edge. Each leaf is about 1 in (2.5 cm) long.
Berries (Color B; make 3)
Make a MR.
Round 1: 6 sc in ring. (6 sc)
Round 2: Sc2tog 3 times. (3 sts)
Tuck the tails inside to stuff the berry, then sew the opening closed. Each berry is 0.25 in (0.6 cm) across.
Attaching the Appliqués
Block the letter first (see Final Blocking), then:
- Place the poinsettia over the top-left corner so it covers the base of the loop.
- Tuck both leaves behind the left side of the flower, one pointing up-left and one pointing down-left.
- Group the three berries just below the flower.
- Sew each piece through the rail sts with small, matching stitches.
Final Blocking
- Weave in all tails along the rails, not through the rungs.
- Wet the letter and roll it in a towel to remove extra water.
- Pin the rail to 3.25 in x 4.25 in (8.3 cm x 10.8 cm). Keep the spine straight and the bowls round, and press the waist notch in.
- Pin each scallop tip so the outer edge measures 3.75 in x 4.75 in (9.5 cm x 12.1 cm).
- Put one pin in each spine gap to keep the rungs parallel.
- Mist with starch if you like, then let it dry completely.
- Remove the pins and sew on the appliqués.
Final Quality-Control Checklist
- Upper ring has 34 sc; lower ring has 40 sc
- Middle bar has 5 straight rungs
- Round A has 54 rungs
- Round B has 108 sc
- Round C has 18 scallops: 5 on the spine side and 13 on the bowl side
- Finished size is 3.75 in x 4.75 in (9.5 cm x 12.1 cm)
- Loop is secure and about 1.25 in (3.2 cm) tall
- Appliqués are sewn on firmly with no knots showing
Troubleshooting
- Spine rungs slant: You worked a rung in every st. Skip 1 st between spine rungs.
- Bowls cup: Your trebles are too tight. Go up one hook size for Round A only.
- Bowls ruffle: Your ch-1 spaces are too loose. Keep them snug.
- Scallops don’t close evenly: Recount Round B; it must be 108 sc. Check S3 (2 sc) and S6 (6 sc) first.
- Lower counter is twisted: The ch-31 flipped before the join. Undo it and lay the chain flat before you sl st.
- Petals curl: Steam the flower flat before sewing it on.
Care
Hand wash in cool water with mild soap. Press out the water in a towel and dry flat, re-pinning the scallops if needed.
Final Notes
Each stage has a measurement you can check:
- Upper ring: 34 sc = 4.25 in (10.8 cm)
- Middle bar: 9 sc = 1.125 in (2.9 cm)
- Lower ring: 40 sc = 5 in (12.7 cm)
- Round A: 54 rungs
- Round B: 108 sc = 13.5 in (34.3 cm), blocking to 3.25 in x 4.25 in (8.3 cm x 10.8 cm)
- Round C: 18 scallops, finishing at 3.75 in x 4.75 in (9.5 cm x 12.1 cm)
If each checkpoint matches, you’ll get a crisp, lacy B.
Happy crocheting!