

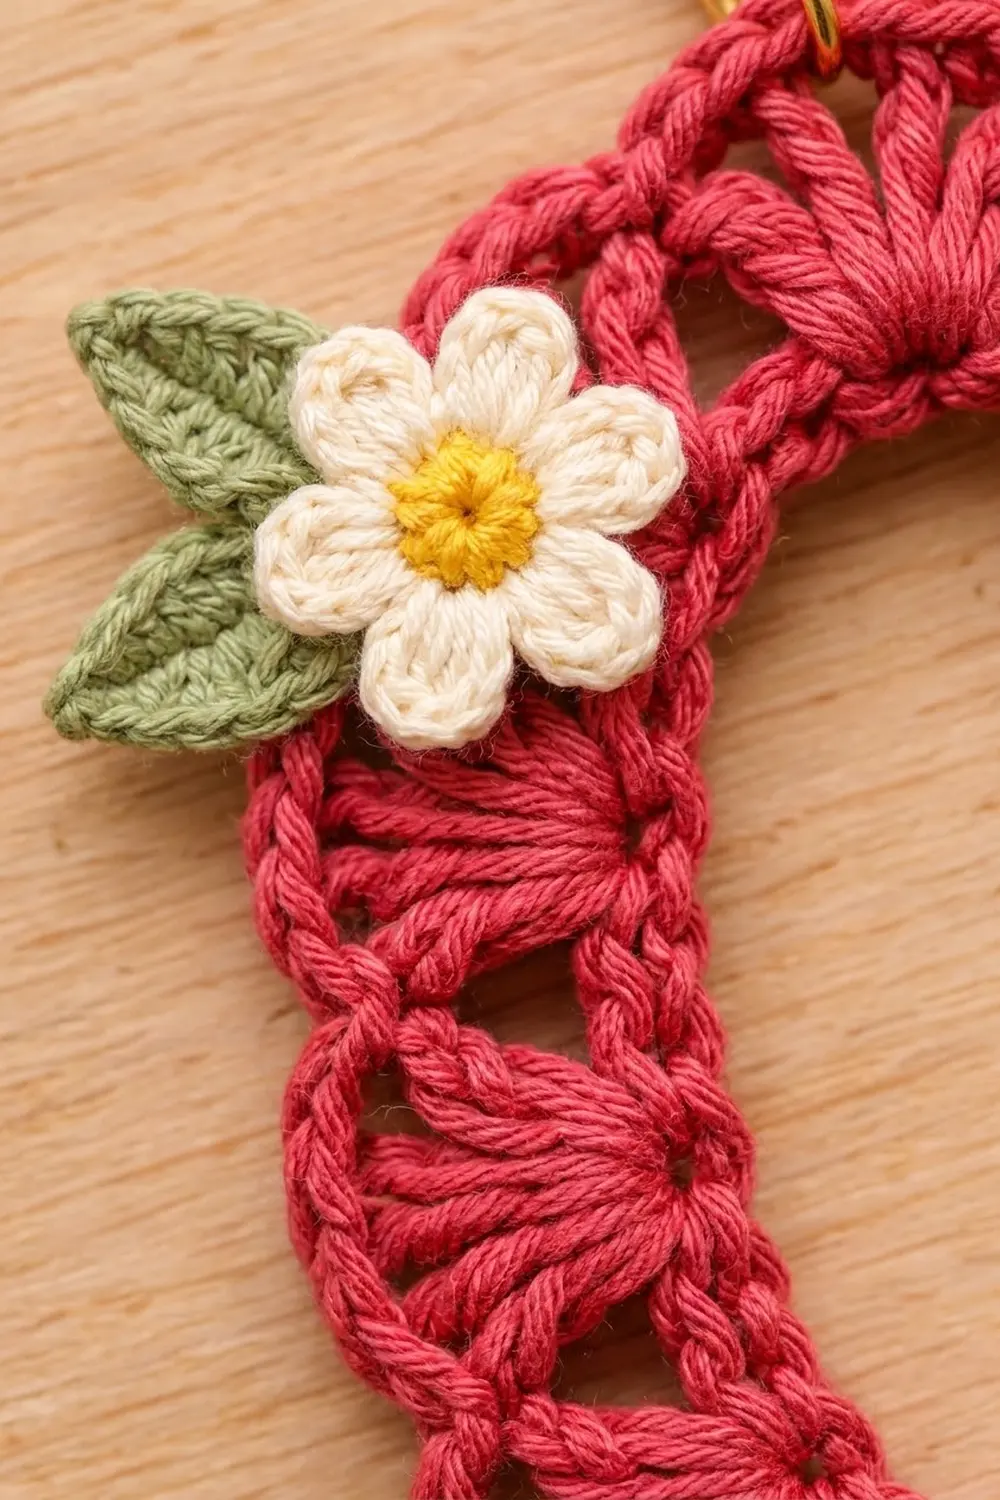
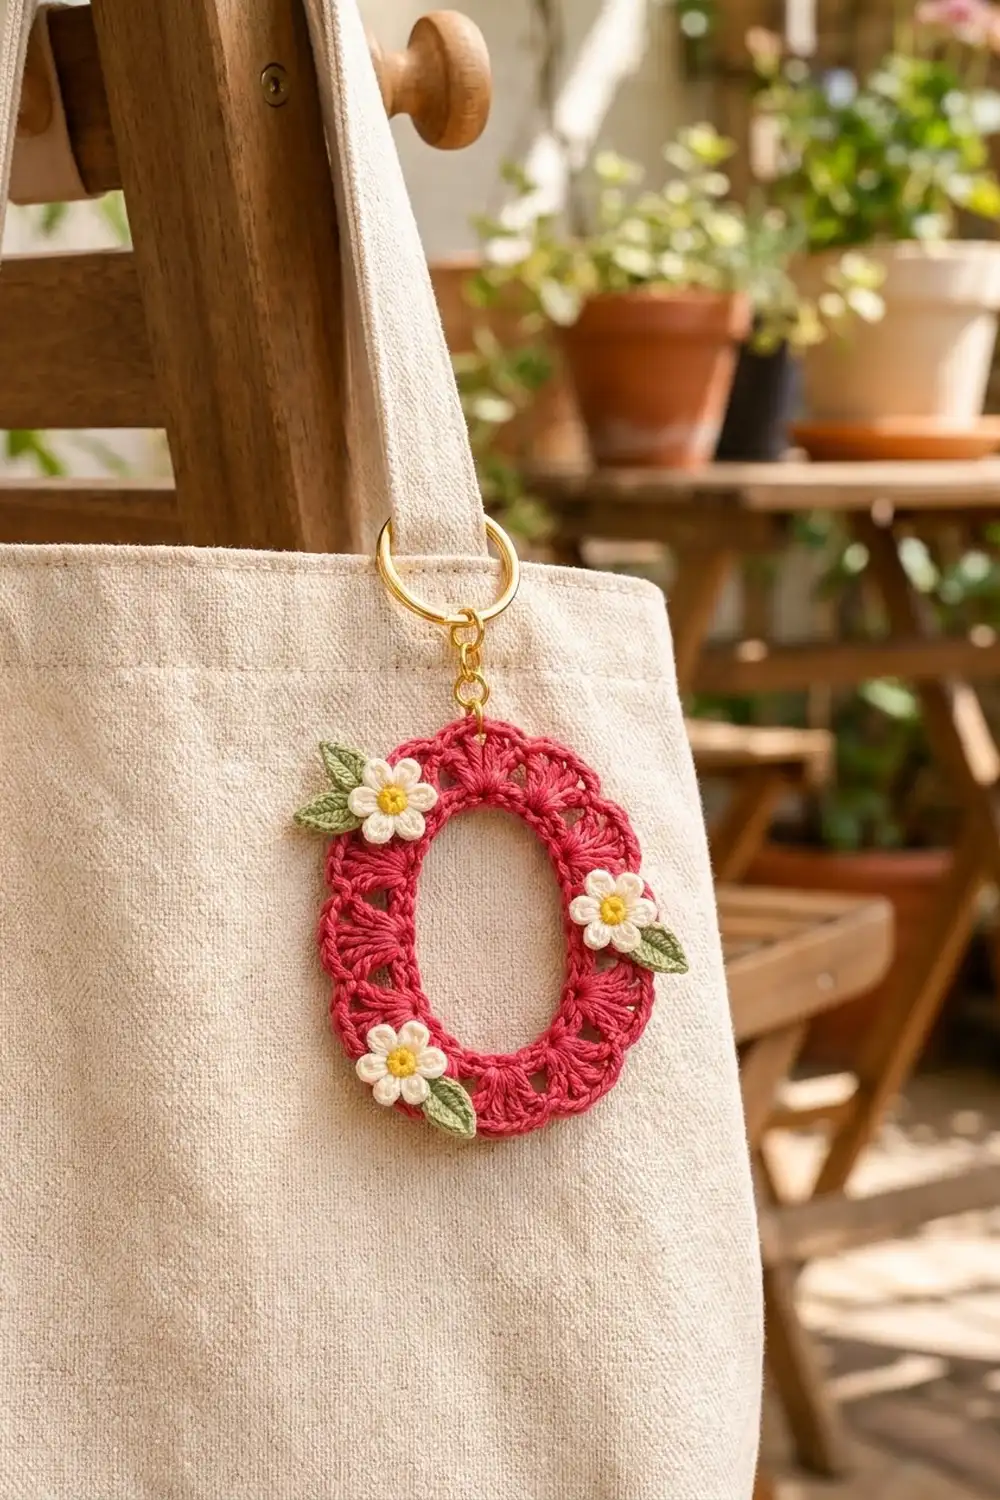
This little charm is a raspberry-red letter O with a scalloped shell edge. It is trimmed with three cream daisies and soft sage leaves. It hangs from a gold keyring, so you can clip it to a tote strap, a backpack zipper, or your keys.
The style is cottagecore and a little vintage. Ten shell fans spread out from a neat inner ring, and a single crochet border shapes each fan into a soft scallop. The flowers are small separate appliqués that you sew on at the end.
This pattern uses US crochet terms. The finished charm measures 3.75 in (9.5 cm) tall and 2.75 in (7.0 cm) wide. The open center is about 2.25 in (5.7 cm) tall and 1.25 in (3.2 cm) wide.
Construction is simple. You chain a ring and work four rounds outward: a single crochet base, a chain-space round, a fan round, and a scallop border. Then you block it into an oval, add the flowers and leaves, and attach the hardware.
Finished Size and Construction
- Finished size: 3.75 in × 2.75 in (9.5 cm × 7.0 cm), not counting the hardware
- Skill level: Easy–Intermediate
- Terminology: US crochet terms
- Yarn weight: Fingering / super fine (#1) cotton
- Hook: 2.25 mm (US B-1)
- Number of pieces: 1 main charm, plus 3 flower appliqués and 4 leaf appliqués
- Layout: One oval frame worked in the round; no joining needed
- Size before border (after Rnd 3): 3.5 in × 2.5 in (8.9 cm × 6.4 cm)
- Border depth: about 0.125 in (0.3 cm) on each side
- Band width (center opening to outer edge): about 0.75 in (1.9 cm)
Materials
Use a smooth, mercerized fingering-weight cotton. Cotton holds the shell shape well, shows stitch detail clearly, and stands up to life on a bag. Avoid fuzzy or very stretchy yarns, because they blur the fans and let the oval sag.
Yarn:
– Raspberry red (main color): 6 g, about 20 m
– Cream (petals): 2 g, about 7 m
– Yellow (flower centers): 1 g, about 3 m
– Sage green (leaves): 1 g, about 4 m
These quantities include a margin for a gauge swatch and weaving in ends.
Tools:
– 2.25 mm (US B-1) crochet hook
– Tapestry needle with a sharp tip
– Stitch marker
– Scissors
– Blocking mat or foam board and rust-proof pins
– Spray bottle of water, plus spray starch if you like (optional)
– Gold split keyring, 1 in (2.5 cm) diameter, with a short chain about 0.75 in (1.9 cm) long
– One 6 mm gold jump ring and two pairs of flat-nose pliers
Abbreviations (US Terms)
- ch – chain
- sl st – slip stitch
- sc – single crochet
- hdc – half double crochet
- dc – double crochet
- sk – skip
- sp – space
- st(s) – stitch(es)
- rep – repeat
- Rnd – round
Special stitch: Fan. Work 5 dc into the same ch-3 space. On the first fan of a round, the beginning ch 3 counts as the first dc.
Gauge and Checkpoints
Gauge: 7 sc = 1 in (2.5 cm) on a 2.25 mm hook. A dc is about 0.3 in (0.8 cm) tall.
The charm is small, so working one full test piece is the best gauge swatch. Make Rnds 1–3, measure, and adjust before you add the border.
Checkpoints:
– After Rnd 1: The 40-sc ring measures about 5.75 in (14.6 cm) around. Laid flat as a circle, it is about 1.8 in (4.6 cm) across.
– After Rnd 3: Gently shaped into an oval, the piece measures 3.5 in × 2.5 in (8.9 cm × 6.4 cm).
– After Rnd 4: The piece measures 3.75 in × 2.75 in (9.5 cm × 7.0 cm), and the outer edge is about 10 in (25.4 cm) around.
Too big? If the finished piece will be over 4 in (10.2 cm) tall, use a 2.0 mm hook or thinner cotton.
Too small? If the piece after Rnd 3 is under 3.25 in (8.3 cm) tall, use a 2.5 mm hook.
Do not change the stitch counts to fix size. The fan and border math depends on the exact counts.
Main Charm Pattern
Work with raspberry red. Do not turn at the end of any round.
Rnd 1 (base ring): Ch 40 and join with a sl st to the first ch to form a ring, taking care not to twist the chain. Ch 1 (does not count as a st). Work 1 sc in each ch around. Join with a sl st to the first sc. (40 sc)
This ring becomes the smooth inner edge of the O. Check that it lies flat and untwisted before you continue.
Rnd 2 (chain-space round): Ch 1. Sc in the same st as the join, ch 3, sk next 3 sc. Sc in next sc, ch 3, sk next 3 sc; rep from * 8 more times. Join with a sl st to the first sc. (10 sc and 10 ch-3 sps)*
Count check: each repeat uses 4 base stitches (1 sc plus 3 skipped), and 10 repeats × 4 = 40. This matches Rnd 1 exactly.
Rnd 3 (fan round): Sl st into the first ch-3 sp. Ch 3 (counts as dc), then work 4 dc in the same sp to complete the first Fan. Sc in next sc. Fan in next ch-3 sp, sc in next sc; rep from * 8 more times. The last sc goes into the first sc of Rnd 2. Join with a sl st to the top of the beginning ch 3. (10 Fans = 50 dc, plus 10 sc = 60 sts)*
The fans spread outward from the chain spaces. The sc between them pulls each gap down to the inner ring, which forms the small open triangles between fans. Lay the piece flat now and shape it into an oval to check it against the Rnd 3 checkpoint above.
Plan the layout now. Mark two neighboring fans as the top of the O. Moving clockwise, the layout is:
– Top: 2 fans
– Right side: 3 fans
– Bottom: 2 fans
– Left side: 3 fans
That adds up to 2 + 3 + 2 + 3 = 10 fans. The sc between the two top fans is where the hardware will hang. Mark it with a stitch marker.
Border
Border gauge: 7 sc = 1 in (2.5 cm), the same as the main gauge. The border has 70 sc around an outer edge of about 10 in (25.4 cm), so it lies flat without cupping or ruffling.
Rnd 4 (scallop border, trim round): Ch 1. Sc in the same st as the join (the first dc of the first Fan) and in the next dc. Work 3 sc in the next dc, which is the center dc of the Fan. Sc in each of the next 2 dc. Sk the sc between fans. *Sc in each of the next 2 dc, 3 sc in the center dc, sc in each of the next 2 dc, sk next sc; rep from * 8 more times. Join with a sl st to the first sc. Fasten off and leave a 6 in (15.2 cm) tail.
Count for Rnd 4: 50 sc worked one in each existing dc, plus 20 extra sc (2 extra at each of the 10 fan tips), for a total of 70 sc. The 10 sc from Rnd 3 are skipped and get no stitches.
Count by section (7 sc per fan):
– Top: 2 fans × 7 = 14 sc
– Right side: 3 fans × 7 = 21 sc
– Bottom: 2 fans × 7 = 14 sc
– Left side: 3 fans × 7 = 21 sc
– Total: 14 + 21 + 14 + 21 = 70 sc
Why the math works: The 3 sc at each center dc make a point at every fan tip. Skipping the sc between fans pulls the edge inward and makes a dip. Together, these create the scallops. The band from opening to edge stays the same width all the way around (about 0.75 in or 1.9 cm). Because of this, the outer edge is always about 2π × 0.75 in, or about 4.7 in (11.9 cm), longer than the inner ring, whatever the oval’s proportions. The inner ring (5.75 in or 14.6 cm) plus 4.7 in (11.9 cm) gives about 10.5 in (26.7 cm). The 70 sc measure 10 in (25.4 cm) on the straight. The dips take up the small difference, so the edge stays flat and does not frill.
Flower Appliqués (make 3)
Rnd 1 (yellow): Make a magic ring. Ch 1 and work 5 sc into the ring. Pull the ring closed and join with a sl st to the first sc. Fasten off yellow. (5 sc)
Rnd 2 (cream): Join cream with a sl st in any sc. (Ch 2, 3 dc, ch 2, sl st) all in the same sc to make one petal, then sl st in the next sc; rep from * 4 more times. Make the last sl st into the joining st. Fasten off and leave a 10 in (25.4 cm) tail for sewing. (5 petals, 15 dc total)*
Each flower is about 0.75 in (1.9 cm) across, and the yellow center is about 0.25 in (0.6 cm) across.
Leaf Appliqués (make 4)
With sage green, ch 7.
First side: Starting in the 2nd ch from the hook, work sl st, sc, hdc, dc, hdc, and sc, one stitch in each ch. That is 6 sts across the 6 chains.
Tip: Ch 1. Rotate the piece to work along the other side of the foundation chain.
Second side: Work sc, hdc, dc, hdc, sc, and sl st, one stitch in each ch. That is 6 more sts.
Sl st into the tip ch to finish. Fasten off and leave a 10 in (25.4 cm) tail. (12 sts plus a ch-1 tip)
Each leaf is pointed at both ends and about 0.875 in (2.2 cm) long.
Final Blocking
- Weave in all the ends on the main charm, but keep the appliqué sewing tails.
- Pin the charm face up on a blocking mat. Shape the opening into an oval 2.25 in (5.7 cm) tall and 1.25 in (3.2 cm) wide.
- Pin the outer edge to 3.75 in × 2.75 in (9.5 cm × 7.0 cm). Put one pin in each fan tip, for 10 pins in total, so every scallop is the same size.
- Mist the piece until it is damp, but not soaked. For a firmer charm, add a light coat of spray starch.
- Let it dry completely. This usually takes 4–6 hours.
- Block the flowers and leaves flat at the same time. Pin each petal and leaf tip so the shapes come out crisp.
- When everything is dry, sew on the appliqués:
- Upper-left flower: Place it over the outer edge at about 10–11 o’clock. Tuck one leaf behind it pointing left and a second leaf pointing up and left.
- Right flower: Place it at about 3 o’clock, just below the middle. Tuck one leaf behind it pointing down and right.
- Lower-left flower: Place it at about 7 o’clock. Tuck one leaf behind it pointing down and right.
Sew the leaves first, then sew each flower around its yellow center and through the base of each petal. Keep your stitches hidden on the back.
8. Open the jump ring with two pliers. Pass it through the marked dip between the two top fans, catching the Rnd 3 sc and the border stitches on each side of it. Hook on the end of the chain, then close the jump ring flush.
Final Quality-Control Checklist
- Rnd 1 has 40 sc, and the ring is not twisted.
- Rnd 2 has 10 ch-3 spaces, evenly spaced.
- Rnd 3 has 10 fans of 5 dc each, with 1 sc between fans, for 60 sts.
- Rnd 4 has 70 sc: 14 at the top, 21 on each side, and 14 at the bottom.
- Every fan tip has exactly 3 sc, and every dip skips its sc.
- The finished size is 3.75 in × 2.75 in (9.5 cm × 7.0 cm).
- The opening is 2.25 in × 1.25 in (5.7 cm × 3.2 cm).
- There are 3 flowers, each with 5 even petals and a yellow center.
- There are 4 leaves: 2 at the upper-left flower and 1 at each of the other two.
- No sewing stitches show on the front.
- The jump ring is fully closed and sits at the top center.
Troubleshooting
The charm twists like a figure eight. The starting chain twisted when you joined it. Rip back and rejoin, keeping all the chain “V”s facing up.
The fans ruffle. Your dc stitches are too loose for your sc gauge. Go down a hook size for Rnd 3 only, or shorten the dc by pulling up a slightly lower loop.
The border cups or curls inward. The border tension is too tight. Work Rnd 4 a little looser, or use a 2.5 mm hook for that round only.
The scallops look flat. Check that you worked 3 sc in each center dc and skipped every sc between fans.
The oval keeps going round. Re-block with starch and pin the opening to 2.25 in × 1.25 in (5.7 cm × 3.2 cm) until fully dry.
The petals flop forward. Sew through the base of each petal, not just through the yellow center.
The keyring pulls the top out of shape. Catch more stitches with the jump ring. Include the border sc on both sides of the dip.
Care
Spot clean the charm with mild soap and cool water, then press it flat and let it air dry. Re-starch it if needed, and keep it away from the dryer.
Final Notes
The measurement chain works like this. A 40-sc ring of 5.75 in (14.6 cm) gives a center opening of 2.25 in × 1.25 in (5.7 cm × 3.2 cm). Ten 5-dc fans, 60 sts in all, bring the piece to 3.5 in × 2.5 in (8.9 cm × 6.4 cm). A 70-sc scallop border adds 0.125 in (0.3 cm) on each side, for a finished charm of 3.75 in × 2.75 in (9.5 cm × 7.0 cm). Check your gauge at Rnd 3, pin every fan tip, and your letter O will come out tidy and ready to hang.
Happy crocheting!