

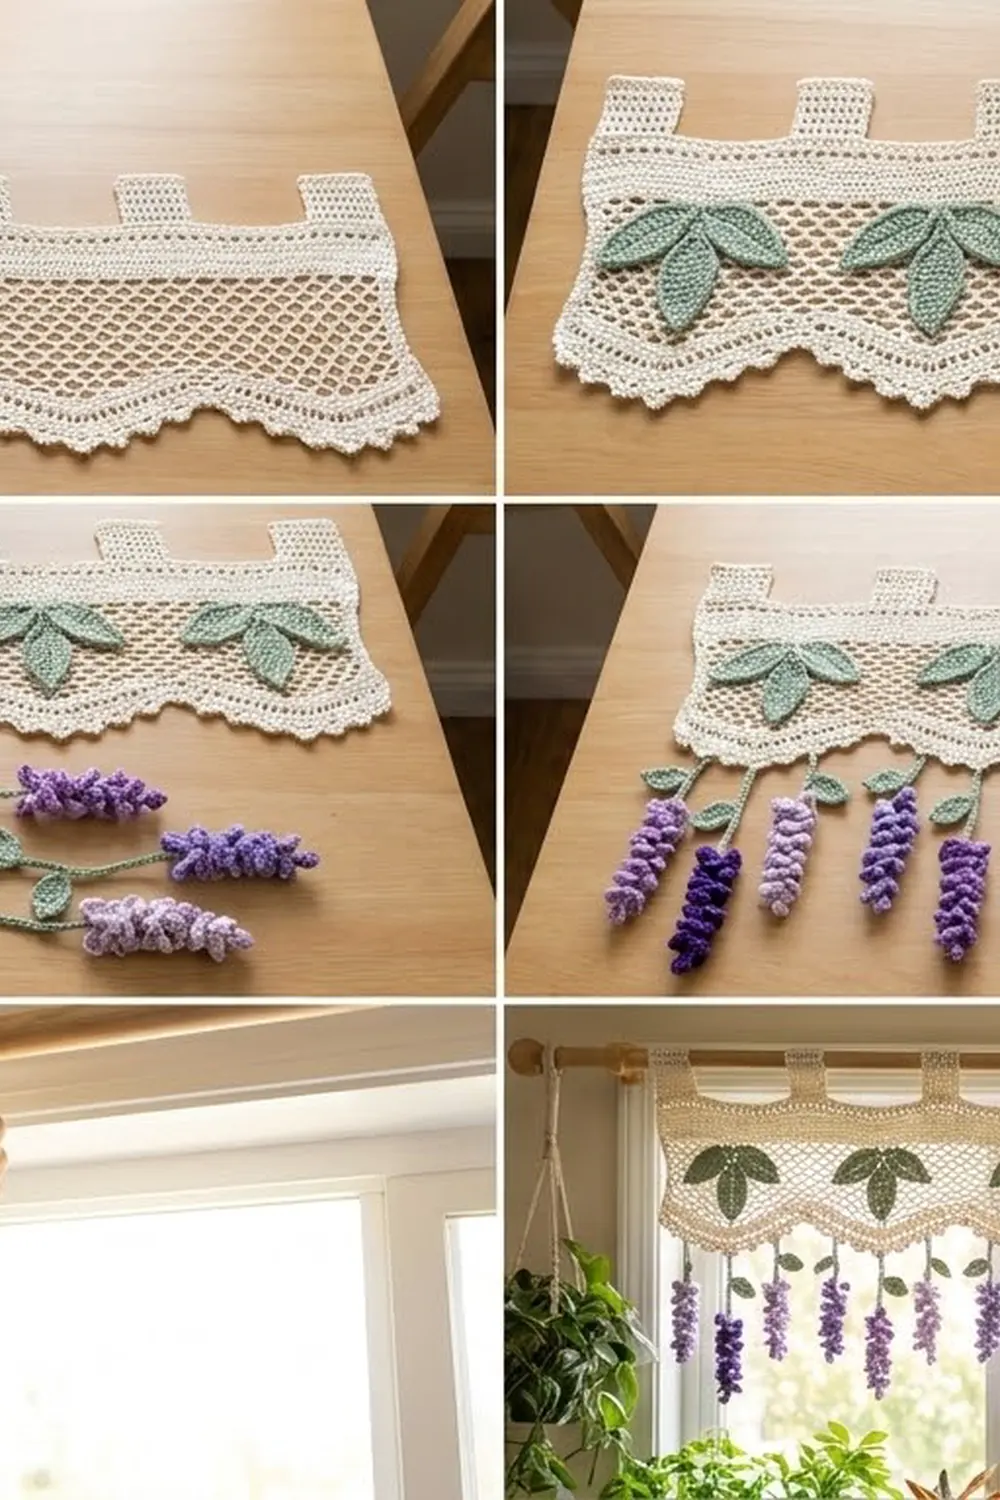
The Wisteria Cascade Valance brings a spring garden to any window. Its cream lace header has a softly scalloped lower edge and carries seven sage-green leaf trios. Below it hang thirteen green cords, and each one ends in a tapering cluster of purple wisteria petals.
The palette is cream, sage green and three purples: deep violet, medium lavender and pale lilac. The long and short strands alternate and mix shades, which gives the cascade a natural, layered look while keeping it neat.
This pattern uses US crochet terms. The finished header measures 36¾ in (93.3 cm) wide and 8½ in (21.6 cm) deep at the scallop points. Long strands hang 24½ in (62.2 cm) below the header, and short strands hang 16½ in (41.9 cm).
The construction is easy to follow:
- Work the header flat in 12 rows.
- Add a 3-round border.
- Crochet seven tab loops into the top edge.
- Sew on the leaf trios.
- Attach the thirteen strands. Each strand is worked in one piece, cord and petals together.
Finished Size and Construction
- Finished size: 36¾ in (93.3 cm) wide x 8½ in (21.6 cm) deep, plus 1¾ in (4.4 cm) tab loops
- Total drop (tab base to longest cluster): 33 in (83.8 cm)
- Skill level: Intermediate
- Terminology: US
- Yarn weight: Worsted (#4) cotton
- Hook: H-8 (5.0 mm)
- Number of pieces: 1 header panel, 21 large leaves and 13 strands (7 long, 6 short)
- Layout: 7 scallop repeats across, each 5 in (12.7 cm) wide. Strands alternate long and short.
- Header size before border: 35¼ in (89.5 cm) x 7 in (17.8 cm)
- Border depth: ¾ in (1.9 cm) on every edge
Materials
Choose a smooth worsted cotton, either mercerized or matte. Cotton holds the lace shape, doesn’t stretch under the weight of the strands, and washes well. The quantities below assume about 95 m per 50 g.
- Cream: 150 g (285 m) for the header, border and tabs
- Sage green: 100 g (190 m) for the leaves and cords
- Deep violet: 50 g (95 m) for 4 clusters
- Medium lavender: 50 g (95 m) for 5 clusters
- Pale lilac: 50 g (95 m) for 4 clusters
All quantities include a margin of roughly 20 percent for swatching and tails.
Tools: H-8 (5.0 mm) hook, tapestry needle, scissors, stitch markers, measuring tape, rust-proof pins, spray bottle and blocking mats.
Abbreviations (US Terms)
- ch: chain
- sl st: slip stitch
- sc: single crochet
- hdc: half double crochet
- dc: double crochet
- tr: treble crochet
- sk: skip
- sp: space
- st(s): stitch(es)
- RS / WS: right side / wrong side
Special stitches
- Picot: Ch 3, then sl st in the 3rd ch from the hook.
- Petal: In the same ch, work [ch 2, 3 dc, ch 2, sl st]. Each petal is a cupped shape about ½ in (1.3 cm) long.
- Back-bump sl st: Sl st into the bump on the back of a chain. This makes a firm, rounded cord.
Gauge and Checkpoints
Header gauge: 16 dc and 8 dc rows = 4 in (10.2 cm).
Cord gauge: 8 ch, with back-bump sl sts worked back along them, = 2 in (5.1 cm).
Make a swatch 20 dc wide and 10 rows tall. It should measure 5 in (12.7 cm) square. Before you start the header, also make one long strand as a test piece. Changes in your tension show up fastest in the strands.
Checkpoints:
- After Row 1: 35¼ in (89.5 cm) wide
- After Row 3: 1½ in (3.8 cm) deep
- After Row 8: 4½ in (11.4 cm) deep
- After Row 11: 6 in (15.2 cm) deep
- After Row 12: 7 in (17.8 cm) at the scallop points and 6¼ in (15.9 cm) at the valleys
- After the border: 36¾ in (93.3 cm) x 8½ in (21.6 cm)
If your swatch is too big, go down one hook size. If it’s too small, go up one size. Check your size again after Row 3 before you commit to the full header.
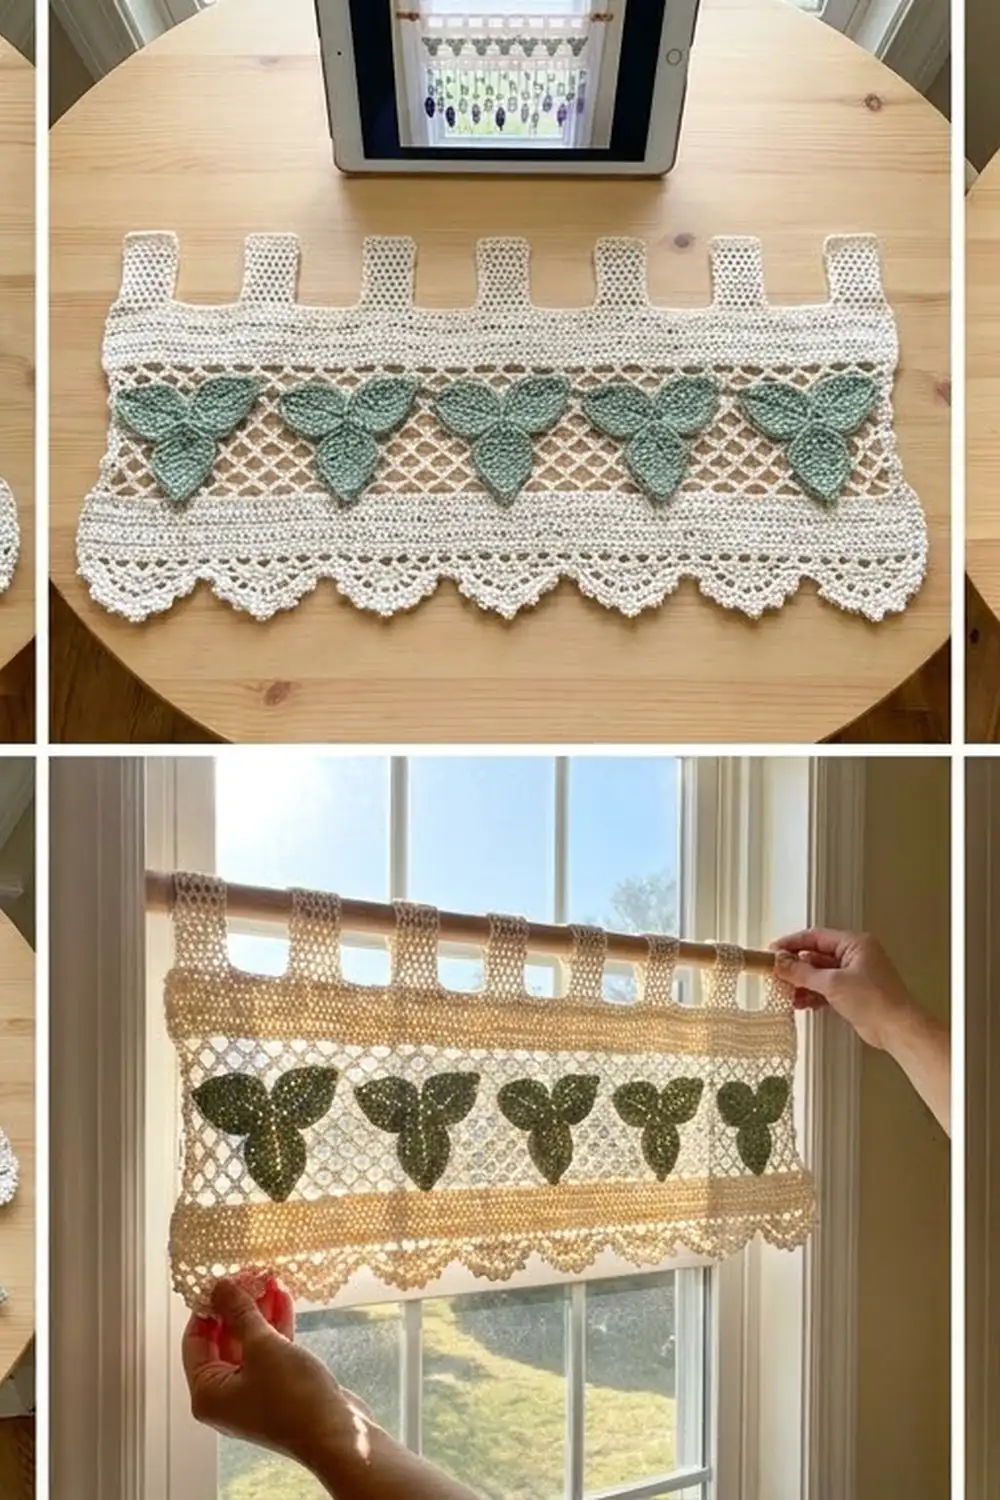
Header Panel
With cream, ch 143.
Row 1 (RS): Dc in the 4th ch from the hook (the skipped ch count as the first dc) and in each ch across. Turn. (141 dc)
Row 2 (mesh): Ch 4 (counts as dc and ch-1), sk next st, dc in next st; ch 1, sk next st, dc in next st 69 times. Turn. (71 dc and 70 ch-1 sps = 141 sts)
Row 3: Ch 3 (counts as dc), dc in each ch-1 sp and each dc across, working the last dc in the 3rd ch of the turning ch. Turn. (141 dc)
Row 4 (lattice A): Ch 1, sc in first dc; ch 5, sk 3 dc, sc in next dc 35 times. Turn. (36 sc, 35 ch-5 loops)
Row 5 (lattice B): Ch 5 (counts as dc and ch-2), sc in first ch-5 loop; ch 5, sc in next ch-5 loop 34 times; ch 2, dc in last sc. Turn. (35 sc, 34 ch-5 loops and 2 half loops)
Row 6 (lattice A): Ch 1, sc in first dc; ch 5, sc in next ch-5 loop 34 times; ch 5, sc in 3rd ch of turning ch-5. Turn. (36 sc, 35 ch-5 loops)
Row 7: Repeat Row 5.
Row 8: Repeat Row 6. (36 sc, 35 ch-5 loops)
Row 9 (conversion): Ch 3 (counts as dc); 3 dc in next ch-5 loop, dc in next sc 35 times. Turn. (36 dc worked 1 per sc + 105 dc added in loops = 141 dc)
Row 10: Repeat Row 2. (141 sts)
Row 11: Repeat Row 3. (141 dc)
Row 12 (wave): Ch 1, sc in first dc; sc in next 2, hdc in next 3, dc in next 3, tr in next 4, dc in next 3, hdc in next 3, sc in next 2 7 times. (1 + 7 x 20 = 141 sts) Don’t fasten off.
The tr groups form seven scallop points, 5 in (12.7 cm) apart. The sc groups form the six valleys between the points and the two low ends.
Leaves and Strands
Large leaf (make 21 in sage green):
- Ch 9. Sc in 2nd ch from hook, hdc in next, dc in next 3, hdc in next, sc in next, 3 sc in last ch.
- Working along the opposite side of the chain: sc in next, hdc in next, dc in next 3, hdc in next, sc in last ch (the same ch as the first sc). (17 sts)
- Sl st in first sc, then work a picot for the leaf tip. Fasten off, leaving an 8 in (20.3 cm) tail.
Each large leaf measures 2 in (5.1 cm).
Small leaf (worked into the cords):
- Ch 6. Sc in 2nd ch from hook, hdc in next, dc in next, hdc in next, 3 sc in last ch.
- Along the opposite side: hdc in next, dc in next, hdc in next, sc in last ch. (11 sts)
- Sl st in first sc, then work a picot.
Each small leaf measures 1¼ in (3.2 cm).
Long strand A (make 7):
- With green, leave a 10 in (25.4 cm) tail and ch 80. Change to purple and ch 17.
- Work back toward the tail, starting in the 2nd ch from the hook: 1 petal in each of the next 4 ch, 2 petals in each of the next 6 ch, then 3 petals in each of the next 6 ch. (16 spine ch, 34 petals) Fasten off the purple.
- Join green and work a back-bump sl st in each of the 80 green ch. After sl sts 3, 28 and 54, make a leaf pair: work a small leaf, sl st into the same cord st, work a second small leaf, then sl st into the same st again. (80 cord sts, 6 small leaves)
- Fasten off and keep the top tail for attaching.
Each long strand is a 20 in (50.8 cm) cord plus a 4½ in (11.4 cm) cluster, so it hangs 24½ in (62.2 cm) in total. Twist the cluster gently so the petals spiral around the spine.
Short strand B (make 6):
- With green, leave a 10 in (25.4 cm) tail and ch 52. Change to purple and ch 13.
- Starting in the 2nd ch from the hook: 1 petal in each of the next 4 ch, 2 petals in each of the next 4 ch, then 3 petals in each of the next 4 ch. (12 spine ch, 24 petals) Fasten off the purple.
- Join green and work a back-bump sl st in each of the 52 ch. Make leaf pairs after sl sts 3 and 28. (52 cord sts, 4 small leaves)
Each short strand is a 13 in (33.0 cm) cord plus a 3½ in (8.9 cm) cluster, so it hangs 16½ in (41.9 cm) in total.
Make All Pieces
- Header panel: 1 in cream
- Large leaves: 21 in green, 3 per trio
- Long strand A: 4 in deep violet and 3 in medium lavender
- Short strand B: 2 in medium lavender and 4 in pale lilac
Strand layout, left to right (D = deep violet, M = medium lavender, P = pale lilac):
Position: 1  2  3  4  5  6  7  8  9  10 11 12 13
Type:     A  B  A  B  A  B  A  B  A  B  A  B  A
Color:    D  P  M  M  D  P  M  P  D  M  M  P  D
The long strands hang from the seven scallop points. The short strands hang from the six valleys.
Joining
Finish the border and tabs (see the Border section) before you attach any pieces.
Leaf trios:
- Center one trio over each scallop point, in the lattice band between Rows 5 and 7.
- Point the center leaf straight up. Angle the two side leaves outward at about 45 degrees so all three bases meet at one spot.
- Pin the leaves in place. Whipstitch around each leaf’s edge with its tail, catching only the back loops of the leaf so the stitches stay hidden.
Strands:
- Thread each strand’s top tail through the base of the border Round 1 sc at its position.
- Pass the tail through twice, knot it on the WS, then weave the end through 2 in (5.1 cm) of the border.
- Attach one strand stitch to one border stitch so the strand hangs straight, with no twist.
Keep the sewing tension firm but not tight. If the scallop edge puckers when you hold the valance up, loosen that attachment.
Checkpoint: Lay the valance flat. You should have 2 strands in each 5 in (12.7 cm) repeat. The long clusters should end 24½ in (62.2 cm) below the bottom edge of the header.
Border
Border gauge: Each sc round adds ¼ in (0.6 cm), so the three rounds add ¾ in (1.9 cm) to every edge.
Round 1: Continue from Row 12. Ch 1, turn, and work around the whole panel.
- Bottom edge: 3 sc in first st, sc in next 139, 3 sc in last st. (145)
- First side: 2 sc in each of the 11 row-ends from the dc and lattice rows, then 1 sc in the Row 12 end. (23)
- Top edge, working into the foundation ch: 3 sc in first ch, sc in next 139, 3 sc in last ch. (145)
- Second side: 23 sc, as for the first side. (23)
Sl st to the first sc. (145 + 23 + 145 + 23 = 336 sc)
Round 2: Ch 1, sc in each sc, working 3 sc in the center sc of each corner group. Sl st to join. (Top 147, side 25, bottom 147, side 25 = 344 sc)
Round 3: Ch 1.
- Top edge: Sc in each of the 147 sts.
- Each side: Sc in first st, then sc in next 3, picot 8 times. (25 sc, 8 picots)
- Bottom edge: Sc in next 3, picot 49 times. (147 sc, 49 picots)
Sl st to join and fasten off. (344 sc, 65 picots)
Tabs: With the RS facing, count along the top edge and skip 9 sts. Join cream there and work the first tab:
- Row 1: Ch 3 (counts as dc), dc in next 8 sts. Turn. (9 dc)
- Row 2: Ch 4, sk 1, dc in next; ch 1, sk 1, dc in next 3 times. Turn. (5 dc and 4 ch-1 sps = 9 sts)
- Rows 3–7: Alternate Row 1 (dc in each st) and Row 2, ending with a dc row.
Fasten off, leaving a 12 in (30.5 cm) tail. Make 6 more tabs, skipping 11 sts between tabs. This leaves 9 sts after the last tab.
Fold each tab to the WS and whipstitch Row 7 to the tab’s base. Each tab is 2¼ in (5.7 cm) wide and forms a 1¾ in (4.4 cm) loop that fits a rod up to 1 in (2.5 cm) thick.
Why the math works:
- The header is 141 = 1 + 7 x 20 sts, so each 20-st repeat holds one scallop.
- The lattice works in 4-st steps, and 1 + 35 x 4 = 141.
- On the top edge, 9 + 7 x 9 + 6 x 11 + 9 = 147. The tab centers fall 20 sts (5 in, 12.7 cm) apart, right above the scallops.
- On the picot edges, 147 = 49 x 3 and 25 = 1 + 8 x 3, so the picots come out even.
Final Blocking
- Weave in all remaining tails. The strand top tails are already secured.
- Pin the header to 36¾ in (93.3 cm) x 8½ in (21.6 cm). Pin out each scallop point and each picot along the bottom edge.
- Open the lattice loops evenly with your fingers.
- Mist until damp and leave the header until it’s fully dry.
- Hang the strands and mist the clusters. Pinch the petals into cupped shapes and let the strands dry while hanging, so the cords straighten under their own weight.
Final Quality-Control Checklist
- Every header row has 141 sts.
- The header measures 36¾ in (93.3 cm) x 8½ in (21.6 cm).
- There are 7 even scallops, 7 centered tabs and 7 leaf trios.
- There are 13 strands in the color order shown, with the long strands at the scallop points.
- All leaf tips are sharp and stitched flat.
- The petals spiral, and each cluster tapers toward its tip.
- No knots or tails show on the RS.
Troubleshooting
- The header narrows in the lattice: The ch-5 loops are too tight. Chain more loosely, or use ch 6.
- The scallops look flat: Make your tr stitches taller, and pin the points firmly when blocking.
- The cords are too long: Use a smaller hook for the cords only. Check them against the cord gauge of 8 ch = 2 in (5.1 cm).
- The clusters look sparse: Pull each petal’s ch-2 snug, and twist the spine tighter before blocking.
- The valance tilts: Check that the tabs are evenly spaced and that the strands match the layout.
Care
Hand wash in cool water with mild soap, press out the water in a towel and dry the valance flat. Then reshape the clusters by hand.
Final Notes
Everything rests on gauge. At 16 dc = 4 in (10.2 cm), the 141-st header comes out 35¼ in (89.5 cm) wide and 7 in (17.8 cm) deep. The border brings it to 36¾ in (93.3 cm) x 8½ in (21.6 cm). Below it, the thirteen strands hang 16½ in (41.9 cm) and 24½ in (62.2 cm). Check each stage, and your wisteria will hang exactly as planned.
Happy crocheting!