
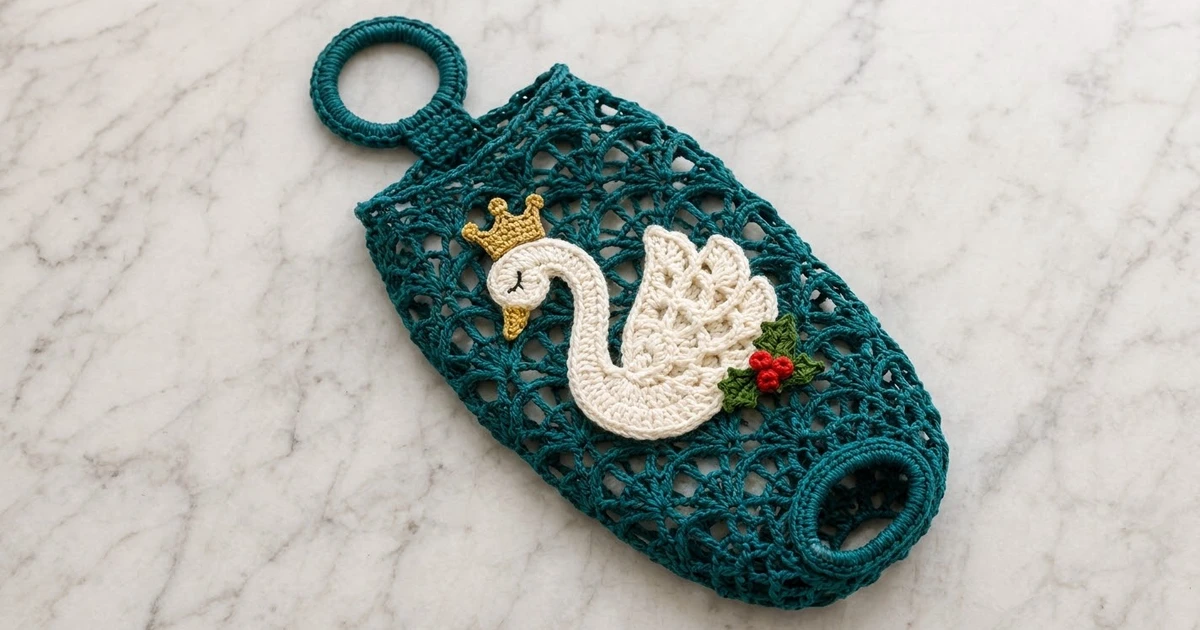
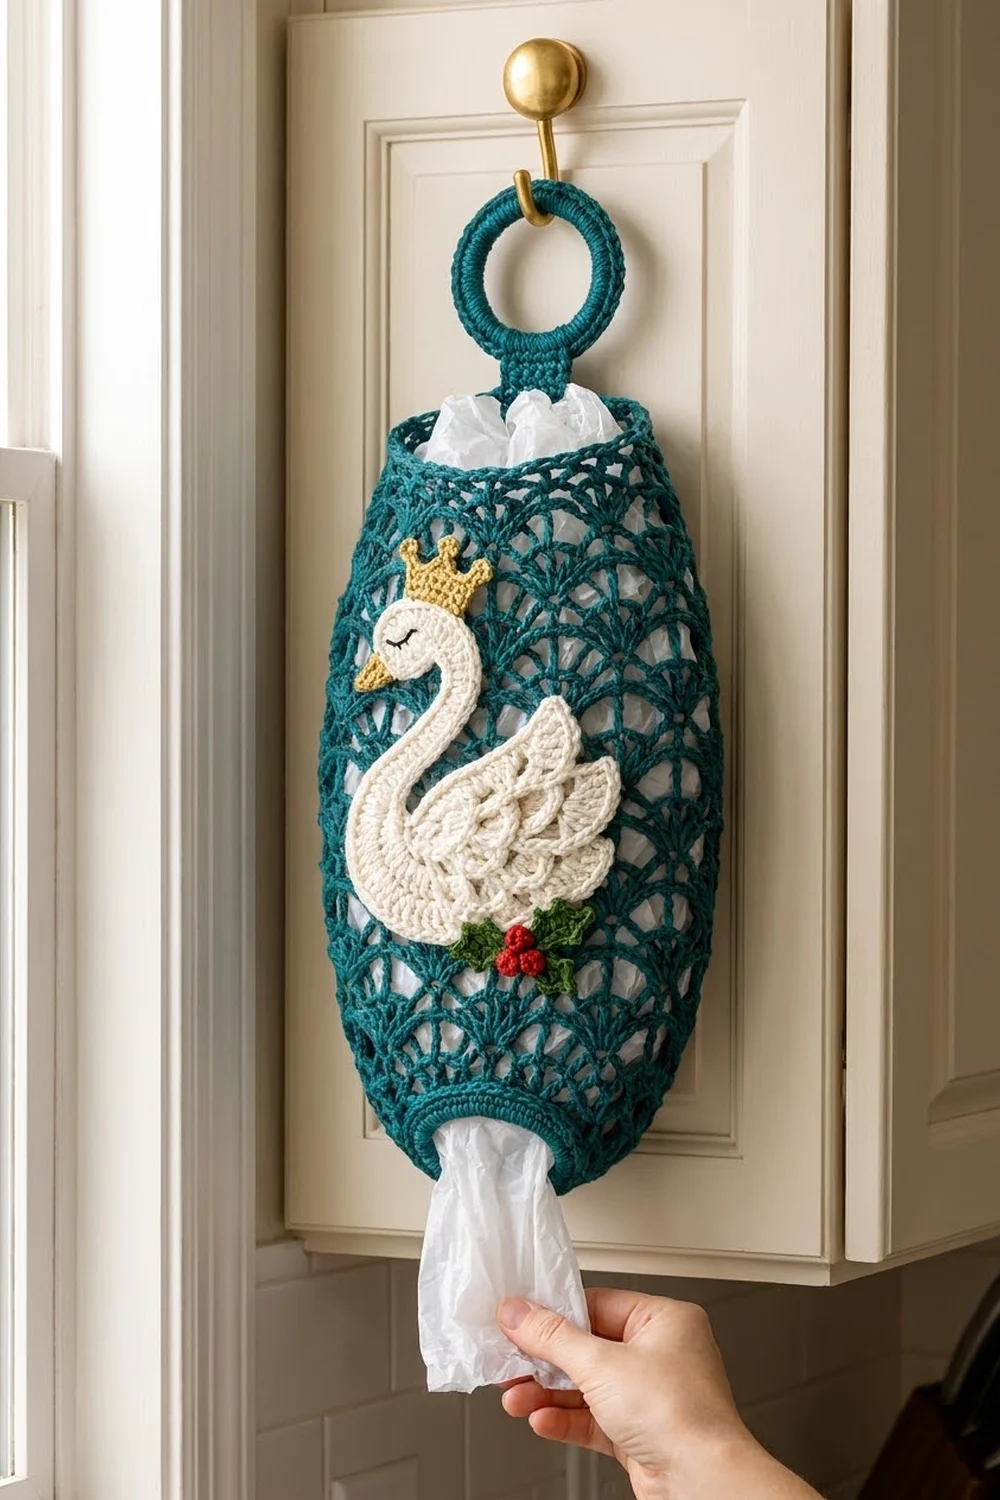
The Royal Swan Plastic Bag Holder is a tall tube of open shell lace that stores your plastic bags. You stuff bags in at the top and pull them out one at a time through the padded opening at the bottom. A cream swan with a gold crown and a sprig of holly sits on the front, so it looks right on a cabinet door all through the holidays.
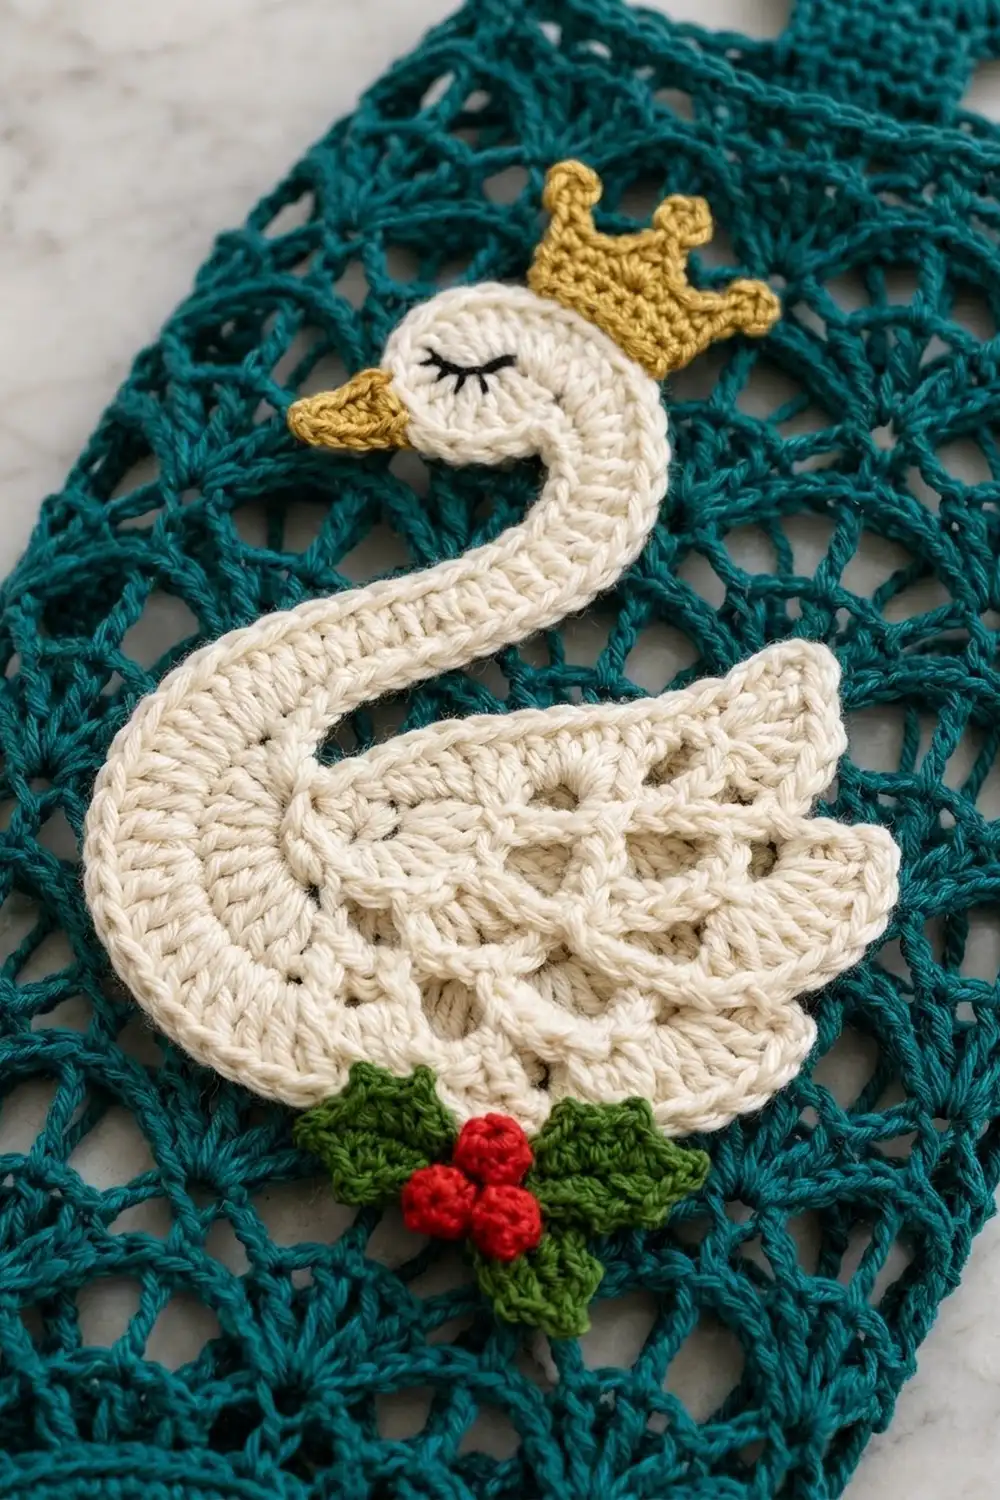
The body is deep teal. The swan is cream, with a layered, scalloped wing, a gold beak and a closed eye stitched in black. Two green holly leaves and three red berries sit at the swan’s chest. For a second colorway, make the body in burgundy and keep the appliqués the same.
This pattern uses US crochet terms. Laid flat, the body measures 7 in (17.8 cm) wide at its widest point and 15 in (38.1 cm) tall. From the bottom edge to the top of the hanging ring, the holder measures about 19.5 in (49.5 cm).
You work the body in one piece from the bottom up:
1. Make a solid single crochet ring for the bottom opening.
2. Work 18 rounds of alternating fans. The fans grow larger and then smaller again, which gives the holder its bulb shape.
3. Finish with a solid rim, then add a short strap and a covered ring for hanging.
The swan and holly are small flat pieces that you sew on at the end.
Finished Size and Construction
- Finished size: body 7 in × 15 in (17.8 cm × 38.1 cm) flat; 19.5 in (49.5 cm) long including the hanger
- Skill level: Intermediate
- Terminology: US
- Yarn weight: worsted (#4) cotton
- Hook: 4.0 mm (US G-6)
- Number of pieces: 1 body with a built-in hanger, plus 10 small appliqué parts
- Layout: a single tube, worked in the round from the bottom up
- Piece size: bottom opening 3.5 in (8.9 cm) flat; widest part 7 in (17.8 cm) flat
- Size before border: 14.25 in (36.2 cm) tall and 5.2 in (13.2 cm) wide at the top
- Border depth: 0.75 in (1.9 cm), 3 rounds
Materials
Use a smooth worsted-weight cotton. Cotton keeps the fans crisp, and it won’t sag when the holder is full of bags. Mercerized cotton gives the swan a soft sheen.
- Teal (Color A): 130 g, about 220 m
- Cream (Color B): 20 g, about 34 m
- Gold (Color C): 5 g, about 9 m
- Green (Color D): 6 g, about 10 m
- Red (Color E): 3 g, about 5 m
- Black embroidery floss: about 30 cm
All quantities include a margin of about 15 percent for swatching and ripping back.
Tools:
– 4.0 mm (US G-6) crochet hook
– 1 plastic or wooden ring, 2.5 in (6.4 cm) inside diameter
– Tapestry needle and a sharp embroidery needle
– 4 stitch markers
– Rustproof pins
– Cardboard insert, about 5 in × 12 in (12.7 cm × 30.5 cm)
– Blocking mat and spray bottle
Abbreviations (US Terms)
- ch: chain
- sl st: slip stitch
- sc: single crochet
- hdc: half double crochet
- dc: double crochet
- tr: treble crochet
- MR: magic ring
- sk: skip
- sp: space
- st(s): stitch(es)
- rep: repeat
- rnd: round
Special stitches
- SF (small fan): (dc, ch 1, dc, ch 1, dc) in the same st. This makes 3 dc and 2 ch-1 sps. The center dc is the 2nd dc.
- LF (large fan): (dc, ch 1) 4 times, then dc, all in the same st. This makes 5 dc and 4 ch-1 sps. The center dc is the 3rd dc.
- Picot: ch 3, sl st in the 3rd ch from the hook.
- Reverse sc (crab stitch): sc worked in the opposite direction, from left to right for right-handed crocheters.
Gauge and Checkpoints
- Single crochet: 18 sc and 16 rnds = 4 in (10.2 cm).
- Type D fan rounds: 1 repeat = 1.75 in (4.4 cm) wide, and 4 rnds = 3 in (7.6 cm) tall.
The other fan repeats measure:
– Type A: 1.1 in (2.8 cm)
– Type B: 1.3 in (3.3 cm)
– Type C: 1.5 in (3.8 cm)
Each fan round adds 0.75 in (1.9 cm) of height.
Use the bottom ring and the first 8 rounds as your gauge test. Take every measurement with the tube pressed flat into two layers.
| After | Width | Height |
|---|---|---|
| Rnd 3 | 3.5 in (8.9 cm) | 0.75 in (1.9 cm) |
| Rnd 5 | 4.4 in (11.2 cm) | – |
| Rnd 7 | 5.2 in (13.2 cm) | 3.75 in (9.5 cm) |
| Rnd 8 | 6 in (15.2 cm) | – |
| Rnd 17 | 7 in (17.8 cm) | 11.25 in (28.6 cm) |
| Rnd 21 | 5.2 in (13.2 cm) | 14.25 in (36.2 cm) |
| Border | 5.3 in (13.5 cm) at the rim | 15 in (38.1 cm) |
If your piece is more than 0.25 in (0.6 cm) too wide at Rnd 8, go down half a hook size. If it’s too narrow, go up half a size. If the width is right but the height is off, check that your dc are full height. Don’t add or remove rounds, because that changes the shaping.
Body
Use Color A for the whole body.
Bottom Opening Ring
Rnd 1: Ch 32 and join with a sl st to the first ch without twisting. Ch 1, sc in each ch, and join. (32 sc)
Rnds 2–3: Ch 1, sc in each sc around, and join. (32 sc)
Fan Rounds
From Rnd 5 on, start every round the same way. Sl st in each st and ch until you reach the center dc of the first fan. Then ch 1 and sc in that center dc. This sc counts as the first sc of the round. At the end of each round, join to the first sc.
Rnd 4 (set-up, Type A): Ch 1. Sc in the first sc, sk 1, SF in the next sc, sk 1. Sc in the next sc, sk 1, SF in the next sc, sk 1; rep from * 6 more times. Join. (8 SF, 8 sc = 48 sts)
Rnd 5 (Type A): Sc in the center dc of the fan, SF in the next sc; rep around. (8 SF, 8 sc = 48 sts)
Rnds 6–7 (Type B): Sc in the center dc, ch 1, SF in the next sc, ch 1; rep around. (8 SF, 8 sc, 16 ch = 64 sts each round)
Rnd 8 (Type C): Sc in the center dc, ch 1, LF in the next sc, ch 1; rep around. (8 LF, 8 sc, 16 ch = 96 sts)
Rnds 9–17 (Type D): Sc in the center dc, ch 2, LF in the next sc, ch 2; rep around. (8 LF, 8 sc, 32 ch = 112 sts each round)
Rnds 18–19 (Type C): Work as for Rnd 8. (96 sts each round)
Rnds 20–21 (Type B): Work as for Rnd 6. (64 sts each round)
In each round, the fans go into the sc of the round below, and the sc go into the center dc of the fans below. This staggers the fans so they overlap like scales. There are always 8 repeats per round. The holder gets wider and narrower only because the fans and chains change size.
Border (Top Rim)
Border gauge: 18 sc = 4 in (10.2 cm). With the tube flattened, there are 24 sts on each side.
Rnd 22 (conversion): Ch 1. Work 1 sc in each sc and each dc. Also work 1 sc in each of the 2 ch-1 sps inside every fan. Skip the ch-1 sps on either side of each sc. Join. (32 + 16 = 48 sc; 24 per side)
Rnd 23: Ch 1, sc in each sc around, and join. (48 sc; 24 per side)
Rnd 24: Ch 1, reverse sc in each sc around, and join. Fasten off. (48 sts; 24 per side)
Why the math works: Rnd 21 measures 8 × 1.3 in = 10.4 in (26.4 cm) around. The rim has 48 sc at 4.5 sts per inch, so it measures 10.7 in (27.2 cm) around, or 5.3 in (13.5 cm) flat. The two differ by only 0.3 in (0.8 cm), so the rim lies flat without ruffling or pulling in.
Hanging Ring and Strap
Ring: Join Color A around the plastic ring. Work 56 sc tightly over the ring so none of it shows. Join and fasten off. The covered ring measures about 3 in (7.6 cm) across.
Strap: Flatten the body so the round joins sit along one side fold. On the back layer, count 9 sts in from the fold and join yarn in the 10th st.
- Row 1: Ch 1, sc in the same st and in the next 5 sts. (6 sc) The strap is now centered: 9 + 6 + 9 = 24 sts.
- Rows 2–10: Ch 1, turn, sc in each sc across. (6 sc)
Fasten off, leaving a 12 in (30.5 cm) tail. The strap measures 2.5 in (6.4 cm) long and 1.25 in (3.2 cm) wide.
To attach the ring, wrap Rows 7–10 around the bottom of the covered ring and onto the back. Whipstitch Row 10 to Row 6. About 1.5 in (3.8 cm) of strap stays visible.
Appliqués
Work all appliqué pieces firmly and leave long tails for sewing.
Swan Body (Color B)
- Rnd 1: Ch 8. Work 3 sc in the 2nd ch from the hook, sc in the next 5 ch, and 3 sc in the last ch. Turn the work and sc in the next 5 ch along the other side of the chain. Join. (16)
- Rnd 2: 2 sc in each of the next 3 sts, sc in the next 5; rep once. (22)
- Rnd 3: (Sc in the next st, 2 sc in the next st) 3 times, sc in the next 5; rep once. (28)
- Rnd 4: (Sc in the next 2, 2 sc in the next st) 3 times, sc in the next 5; rep once. (34)
Tail: Work the following into the next 11 sts: sl st, sc, hdc, dc, tr, (tr, picot, tr), tr, dc, hdc, sc, sl st. The (tr, picot, tr) goes into a single st. Fasten off. The point sits slightly above center, so the tail tilts upward. The finished body measures 3.5 in × 2 in (8.9 cm × 5.1 cm).
Neck (Color B)
- Row 1: Ch 17. Sc in the 2nd ch from the hook and in each ch across. (16)
- Row 2: Ch 1, turn. Work 2 hdc in each of the next 4 sts, hdc in the next 4, sc in the next 4, and sl st in the last 4. (20)
One end flares out to form the base of the neck. The longer outer edge makes the strip curve on its own. The neck measures about 3.5 in (8.9 cm) long.
Head (Color B)
- Rnd 1: Work 6 sc in a MR.
- Rnd 2: 2 sc in each st around. (12)
The head measures 0.75 in (1.9 cm) across.
Beak (Color C)
Ch 4. Sl st in the 2nd ch from the hook, sc in the next ch, and hdc in the last ch. (3)
Wing (Color B)
- Row 1: Ch 14. Sc in the 2nd ch from the hook and in each ch across. (13)
- Row 2: Ch 1, turn. Sc in the first st. Sk 1, 5 dc in the next st, sk 1, sc in the next st; rep 2 more times. (3 shells, 4 sc)
- Row 3: Ch 1, turn. Sl st in the first sc and in the next 2 dc. Sc in the center dc. 5 dc in the next sc, sc in the center dc of the next shell; rep once. (2 shells, 3 sc)
- Row 4: Ch 1, turn. Sl st in the first sc and in the next 2 dc. Sc in the center dc, 5 dc in the next sc, sc in the center dc of the next shell. (1 shell, 2 sc)
- Row 5 (tip): Ch 1, turn. Sl st in the first sc and in the next 2 dc. Work (hdc, dc, tr, picot, dc, hdc) in the center dc. Sl st in the next 2 dc and in the last sc. Fasten off.
Each row of shells is shorter than the one below it, so the wing builds into stepped layers of scallops. It measures 3 in (7.6 cm) wide and 2.5 in (6.4 cm) tall.
Crown (Color C)
- Row 1: Ch 8. Sc in the 2nd ch from the hook and in each ch across. (7)
- Row 2: Ch 1, turn, sc across. (7)
- Row 3: Ch 1, turn. Work these steps in order:
- Sl st in the first st, then work a picot.
- Sl st in each of the next 3 sts.
- Ch 4, then sl st in the 4th ch from the hook to make a tall center point.
- Sl st in each of the next 3 sts, then work a picot.
(7 sl st, 3 points)
The crown measures 1.5 in (3.8 cm) wide.
Holly Leaves (Color D, Make 2)
- Ch 10. Starting in the 2nd ch from the hook, work in the next 8 ch: sl st, sc, hdc, picot, dc, dc, picot, dc, hdc, picot, sc.
- Work (sc, picot, sc) in the last ch to make the tip.
- Turn the work to the other side of the chain. Work sc, picot, hdc, dc, picot, dc, dc, picot, hdc, sc, sl st.
- Join. (18 sts, 7 picots)
Each leaf measures 2 in (5.1 cm) long.
Berries (Color E, Make 3)
Work 8 sc in a MR and join. Fasten off. Weave the tail through the front loops of all 8 sts and pull tight to form a ball. Each berry measures 0.5 in (1.3 cm) across.
Assembly
Slide the cardboard insert inside the body so you only stitch through the front layer. Sew through the solid dc and sc, not across the chain spaces.
- Swan body: Center it over Rnds 9–13 with the tail pointing right.
- Neck: Tuck the flared base 0.5 in (1.3 cm) under the top left of the swan body. Curve the neck up and to the left, with its longer edge facing out, and sew down both edges.
- Head and beak: Sew the head to the narrow end of the neck. Sew the beak to the left side of the head.
- Eye: With black floss, embroider a curved closed eye with 3 short lashes.
- Wing: Sew the wing’s base along the lower back of the swan body, with the tip pointing up toward the tail.
- Crown: Sew the crown to the top of the head. The top of the crown should sit 2 in (5.1 cm) below the rim.
- Holly: Sew the 2 leaves in a V at the lower right of the swan, overlapping the bottom of the wing. Stack the 3 berries where the leaves meet.
Final Blocking
- Remove the cardboard and mist the holder until it’s damp.
- Lay it flat with the round joins along one side.
- Pin Rnds 9–17 to 7 in (17.8 cm) wide, and pin the full length to 15 in (38.1 cm).
- Spread each fan open with your fingertips.
- Pin the rim to 5.3 in (13.5 cm) wide and the bottom ring to 3.5 in (8.9 cm) wide.
- Smooth the appliqués flat by hand without pinning through them.
- Let it dry completely, then turn it over and let the back dry.
Final Quality-Control Checklist
- [ ] Every fan round has 8 fans and 8 sc.
- [ ] The rim has 48 sts, with 24 on each side, and lies flat.
- [ ] The bottom ring has 32 sc and feels firm.
- [ ] The strap is centered (9 + 6 + 9) and the ring is completely covered.
- [ ] The appliqués are sewn through the front layer only.
- [ ] The crown, beak and berries stay put when you tug them gently.
- [ ] All yarn tails are woven in through solid stitches.
- [ ] The body measures 7 in × 15 in (17.8 cm × 38.1 cm).
Troubleshooting
- Fans lean or spiral: Make sure you start each round at the center dc of a fan.
- Body is too short: Your dc are too tight. Pull each first loop up to full height.
- Rim flares: In Rnd 22, check that you skipped the ch-1 sps on either side of each sc.
- Bottom opening is too tight: Redo the starting chain with a hook one size larger.
- Appliqués pucker: Loosen your sewing stitches and block again.
- Stitches show through on the back: Resew with the cardboard insert in place.
Care
Hand wash in cool water with mild soap. Roll the holder in a towel to remove water, then dry it flat and reshape the fans while it’s damp.
Final Notes
Each stage of the pattern sets up the next measurement:
– The 32-sc ring gives a 3.5 in (8.9 cm) bottom opening.
– The 18 fan rounds reach 7 in (17.8 cm) wide and 14.25 in (36.2 cm) tall.
– The 48-st rim brings the body to 15 in (38.1 cm) tall and 5.3 in (13.5 cm) wide at the top.
– The strap and ring bring the total length to 19.5 in (49.5 cm).
Check each measurement as you go, and your swan will sit neatly on a well-shaped holder.
Happy crocheting!