

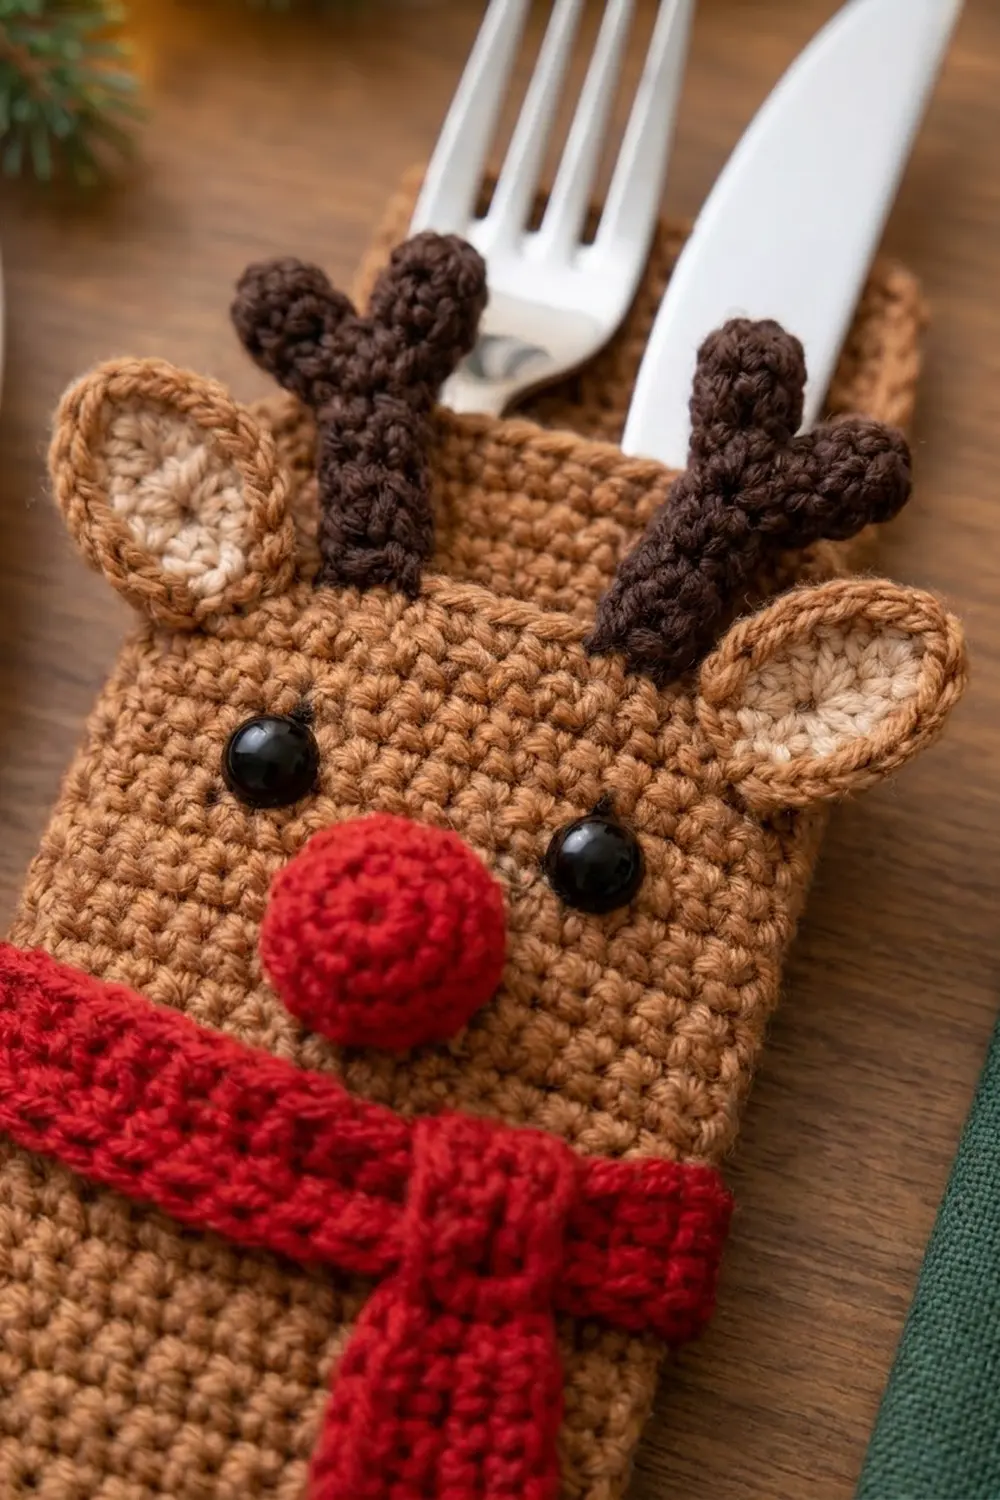
This little reindeer pocket holds a fork and knife upright, so each place setting gets its own festive guest. The body is a warm caramel-brown single crochet pouch. The front has dark chocolate antlers, two-tone ears, shiny black eyes, a round red nose, and a red scarf with fine ridges and a knotted tail.
The style is cozy and tidy. The solid single crochet fabric has no gaps, so the cutlery stays hidden, and the small appliqués sit just above the surface. The pattern uses US crochet terms throughout.
The finished holder measures about 3.3 in (8.4 cm) wide and 6.6 in (16.8 cm) tall, not counting the antlers. A standard dinner fork and knife stick out about 2 in (5.1 cm) above the opening.
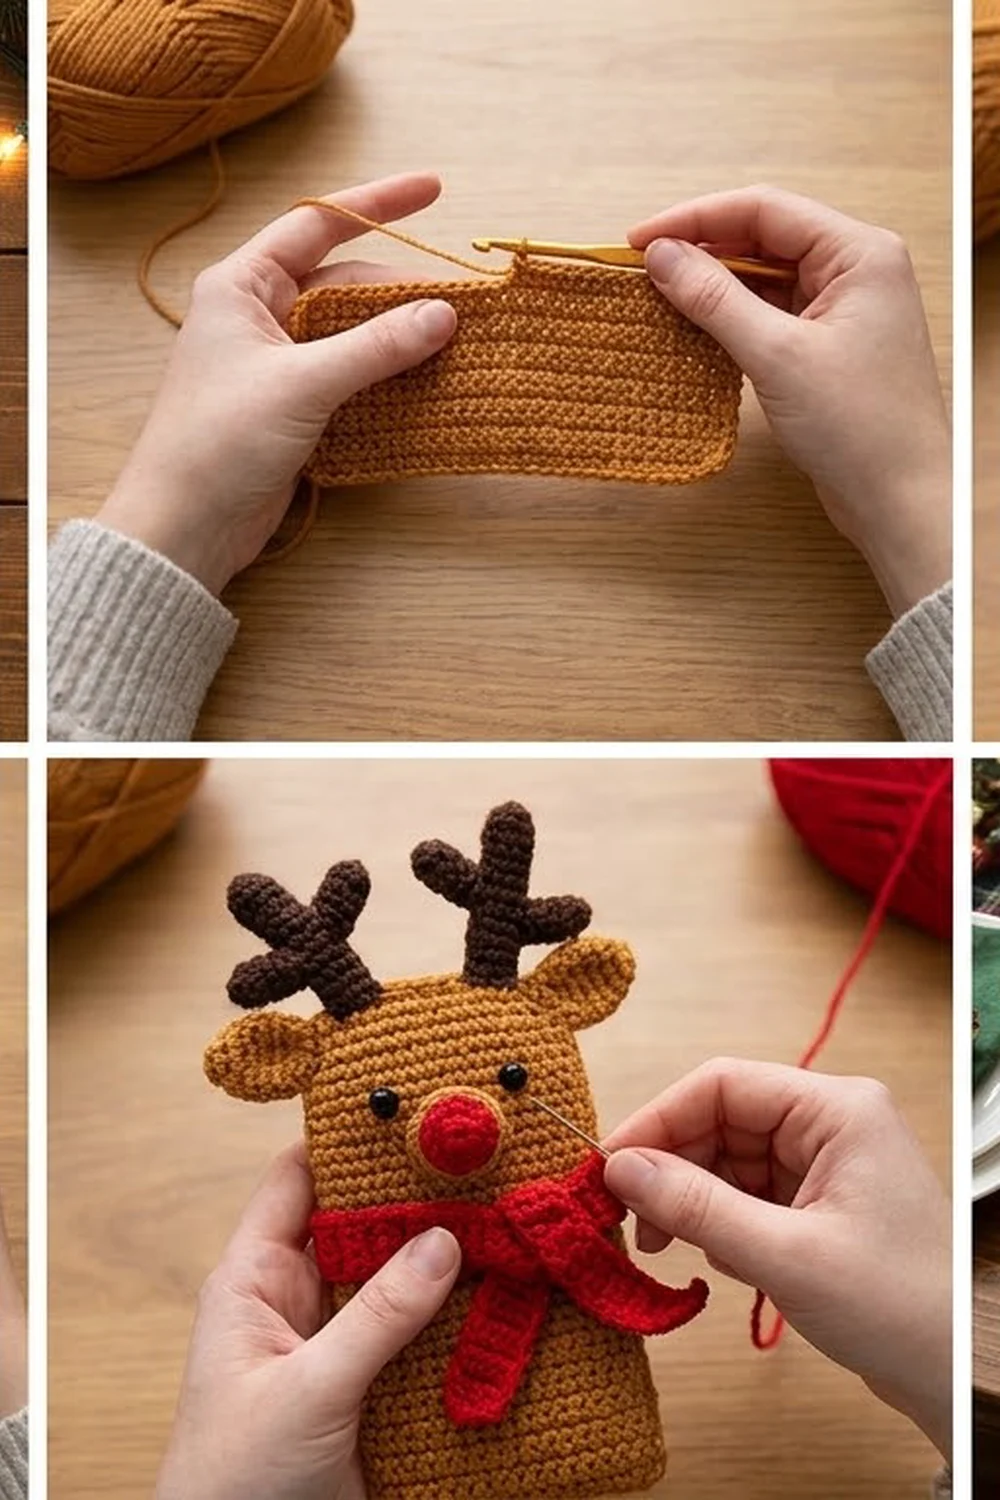
Construction is simple. You crochet one flat rectangle in rows and add one round of single crochet edging. Then you fold it in half and whipstitch the side and bottom closed. The face pieces are made separately and sewn onto the front. Make one per guest; each holder is a separate, stand-alone piece.
Finished Size and Construction
- Finished size: 3.3 in (8.4 cm) wide x 6.6 in (16.8 cm) tall, folded and seamed
- Skill level: Easy
- Terminology: US crochet terms
- Yarn weight: Worsted (#4)
- Hook: 4.0 mm (US G-6)
- Number of pieces: 1 body panel, plus 8 small appliqués (2 antlers, 2 ears, 1 nose, 3 scarf parts)
- Layout: one rectangle folded in half vertically, seamed along one long side and the bottom
- Body panel before edging: 28 sts x 31 rows, 6.2 in (15.7 cm) x 6.2 in (15.7 cm)
- Body panel after edging: 6.7 in (17.0 cm) wide x 6.6 in (16.8 cm) tall
- Edging depth: 1 round of sc, about 0.2 in (0.5 cm) on each edge
Materials
Use a smooth worsted-weight acrylic or cotton blend. Cotton blends hold up well at the table and show stitches clearly. Avoid fuzzy yarns, which blur the face details.
Amounts per holder:
- Caramel brown (body, ear edges): 25 g / 50 m
- Dark chocolate brown (antlers): 5 g / 10 m
- Light beige (inner ears): 3 g / 6 m
- Red (nose, scarf): 8 g / 16 m
- Black safety eyes: 2 x 6 mm (or black embroidery thread for embroidered eyes)
Tools:
- 4.0 mm (US G-6) crochet hook
- Tapestry needle
- Stitch markers (2–4)
- Scissors
- A small pinch of fiberfill or yarn scraps for the nose
- Pins and a ruler or tape measure
All quantities include a small safety margin. For a set of 4 holders, multiply each amount by 4.
Abbreviations (US Terms)
- ch – chain
- sl st – slip stitch
- sc – single crochet
- hdc – half double crochet
- BLO – back loop only
- MR – magic ring
- st(s) – stitch(es)
- RS / WS – right side / wrong side
Special stitch – 3-sc corner: work 3 sc into the same stitch. The middle sc of the group is the corner stitch.
Gauge and Checkpoints
Gauge: 18 sc and 20 rows = 4 in (10.2 cm) in sc worked in rows.
That works out to 4.5 sts and 5 rows per 1 in (2.5 cm). The fabric should be firm and close, so fork tines can’t poke through.
Make one complete holder before you start a set. Measure at each checkpoint:
- After Row 1: 28 sc = 6.2 in (15.7 cm) wide.
- After Row 10: 2 in (5.1 cm) tall.
- After Row 31: 6.2 in (15.7 cm) x 6.2 in (15.7 cm).
- After edging: 6.7 in (17.0 cm) x 6.6 in (16.8 cm).
- After seaming: 3.3 in (8.4 cm) x 6.6 in (16.8 cm).
If your piece is too big, go down to a 3.75 mm (US F-5) hook. If it is too small, go up to a 4.5 mm (US 7) hook. Don’t add or remove stitches, because every count below depends on 28 sts and 31 rows.
Body Panel
With caramel brown, ch 29.
Row 1 (RS): Sc in 2nd ch from hook and in each ch across. Ch 1, turn. (28 sc)
Rows 2–31: Sc in each st across. Ch 1, turn. (28 sc each row)
At the end of Row 31, don’t fasten off and don’t turn. Check that the panel is a 6.2 in (15.7 cm) square.
Edging Round
Edging gauge: same as the body, 4.5 sc per 1 in (2.5 cm). Work 1 sc per stitch across the top and bottom, and 1 sc per row end down the sides.
Edging Rnd (RS): Ch 1. Work a 3-sc corner in the first st of Row 31. Sc in each of the next 26 sts. Work a 3-sc corner in the last st.
Turn the panel to work down the side. Work 1 sc in the end of each row, from Row 31 down to Row 1. (31 sc)
Turn the panel to the bottom. Working in the free loops of the foundation chain, work a 3-sc corner in the first ch, sc in each of the next 26 ch, and work a 3-sc corner in the last ch.
Turn the panel to the second side. Work 1 sc in the end of each row, from Row 1 up to Row 31. (31 sc)
Sl st to the first sc. Fasten off, leaving a 24 in (61.0 cm) tail for seaming.
Counts per side, each including its 2 corner sts:
- Top: corner + 1 + 26 + 1 + corner = 30 sts
- Bottom: 30 sts
- Each long side: corner + 1 + 31 + 1 + corner = 35 sts
- Round total: 126 sts (30 + 30 + 35 + 35 = 130, minus the 4 corners counted twice)
Why the math works: The top and bottom each get 28 sts worked 1 per existing stitch, plus 2 extra sts from their corner groups. Each side gets 1 sc per row (31). Row ends are slightly shorter than a sc is wide, so these side sts sit a little snug, which keeps the long edges straight instead of wavy. Both long sides have the same 35 sts, so they match stitch for stitch when you seam them.
Checkpoint: 6.7 in (17.0 cm) wide x 6.6 in (16.8 cm) tall.
Appliqués
Leave a long tail (about 8 in / 20.3 cm) on every piece for sewing.
Antlers (make 2, dark chocolate brown)
Ch 9.
Hdc in 3rd ch from hook and in next ch (2 hdc, top of the main stem). Ch 4, hdc in 3rd ch from hook and in next ch (2-hdc branch). Hdc in next 2 ch of the main stem. Repeat from * to * once. Hdc in last 3 ch of the main stem. Fasten off.
Count: 7 hdc along the main stem + 2 branches of 2 hdc = 11 hdc. The main stem measures about 1.75 in (4.4 cm). Both branches point to the same side. When you sew, flip one antler over so the branches point outward on both sides.
Ears (make 2)
Rnd 1: With light beige, MR, 6 sc in ring. Sl st to first sc. Fasten off beige. (6 sc)
Rnd 2: Join caramel brown in any st. 2 sc in each of next 2 sts, 2 hdc in next st, (hdc, ch 2, hdc) in next st, 2 hdc in next st, 2 sc in next st. Sl st to first sc. Fasten off. (12 sts + one ch-2 tip)
Each ear is a rounded oval about 1.1 in (2.8 cm) long, with a beige center and a slightly pointed caramel tip.
Nose (make 1, red)
Rnd 1: MR, 6 sc in ring. (6 sc)
Rnd 2: 2 sc in each st. (12 sc)
Rnd 3: Sc in each st. (12 sc)
Sl st to first sc. Fasten off. Rnd 3 curves the circle into a shallow dome about 1 in (2.5 cm) across.
Scarf (red)
Band: Ch 17. Row 1: Sc in 2nd ch from hook and each ch across. (16 sc) Rows 2–3: Ch 1, turn, sc BLO in each st. (16 sc) Fasten off. Size: 3.6 in (9.1 cm) x 0.6 in (1.5 cm).
Tail: Ch 7. Row 1: Sc in 2nd ch from hook and each ch across. (6 sc) Rows 2–3: Ch 1, turn, sc BLO in each st. (6 sc) Fasten off. Size: 1.3 in (3.3 cm) x 0.6 in (1.5 cm).
Knot: Ch 5. Row 1: Sc in 2nd ch from hook and each ch across. (4 sc) Rows 2–3: Ch 1, turn, sc in each st. (4 sc) Fasten off. Size: 0.9 in (2.3 cm) x 0.6 in (1.5 cm).
The BLO rows create the fine ridges across the band and tail.
Assembly
Lay the panel RS up with the top edge (Row 31) away from you. The front is the left half: the 15 top-edge sts from the left corner to the center. Once folded, the front’s right edge becomes the fold and its left edge becomes the seam.
Face (before folding):
- Eyes: Insert the 6 mm safety eyes between Rows 24 and 25, 5 sts apart, centered on the front half. Snap the washers on from the WS.
- Nose: Pin it centered below the eyes, covering about Rows 19–23. Stuff it lightly with a pinch of fiberfill and whipstitch around the edge.
- Scarf band: Pin it across the front over Rows 14–16, with one end reaching just past the fold line and the other just past the side edge. Sew along both long edges.
- Knot and tail: Sew the tail on at an angle, hanging down from the band about 0.75 in (1.9 cm) in from the fold edge. Wrap the knot around the band at the top of the tail and stitch its ends together behind the band.
- Ears: Pinch the base of each ear slightly. Sew one ear at each top side of the front, overlapping the edge by about 0.25 in (0.6 cm) so the ears stick out past the sides.
- Antlers: Sew the bottom 0.5 in (1.3 cm) of each antler’s main stem to the front, just inside the ears and about 3 sts in from each side. About 1.25 in (3.2 cm) stands above the top edge.
Seaming: Fold the panel in half vertically, WS together, so the two long sides meet. The bottom edge folds between its 15th and 16th sts.
Using the long tail, whipstitch through both layers:
- Bottom: 15 sts to 15 sts, from the fold to the corner.
- Side: the remaining 34 sts of each long side, matched 1 to 1, up to the top corner.
Each layer gives 49 sts to the seam, so the edges stay even. Pull each stitch snug but not tight, so the seam lies flat without puckering. Leave the 28 top sts between the two top corners open.
Checkpoint: 3.3 in (8.4 cm) wide x 6.6 in (16.8 cm) tall.
Final Blocking
- Lightly mist the holder with water, avoiding the safety eyes if they are painted.
- Slide a piece of card cut to 3.3 in (8.4 cm) x 6.6 in (16.8 cm) inside the pocket.
- Pat the edges straight and press the scarf flat.
- Shape the ears and antlers with your fingers so they stand upright.
- Let it dry completely, then remove the card.
For acrylic, you can steam-block lightly instead. Hold the iron above the fabric and never let it touch.
Final Quality-Control Checklist
- Body panel has 28 sts and 31 rows.
- Edging total is 126 sts: 30 on the top and bottom, 35 on each long side.
- Finished pocket is 3.3 in (8.4 cm) x 6.6 in (16.8 cm).
- Eyes are level and the washers are fully pressed on.
- Nose is centered and domed.
- Antlers mirror each other with branches pointing outward.
- Scarf is straight, with the knot and tail near the fold edge.
- Seam is flat and the opening is fully open.
- All ends are woven in on the inside.
Troubleshooting
- Panel is wider than it is tall: your rows are too short. Try pulling your loops up slightly taller, or add rows in pairs and then re-check the side edging count.
- Side edges are wavy after edging: you added extra sts in the row ends. Pull the round out and work exactly 31.
- Corners curl: check that each corner group has exactly 3 sc.
- Antlers flop: sew more of the main stem’s base to the front, or use a 3.75 mm (US F-5) hook for stiffer fabric.
- Nose looks flat: add a little more stuffing before closing.
- Cutlery pokes through: go down a hook size for a denser fabric.
- Seam puckers: loosen your whipstitch and match stitches 1 to 1.
Care
Hand wash in cool water with mild soap and lay flat to dry. Clean small food marks right away so they don’t set.
Final Notes
The measurements build on each other in a few easy steps. A gauge of 18 sc x 20 rows = 4 in (10.2 cm) gives a 28-st x 31-row panel that is 6.2 in (15.7 cm) square. One round of edging brings it to 126 sts and 6.7 in (17.0 cm) x 6.6 in (16.8 cm). Folded and seamed, the finished pocket is 3.3 in (8.4 cm) x 6.6 in (16.8 cm). Check each stage as you go, and every reindeer in the set will match.
Happy crocheting!