

This little lace wreath is a flat, round Christmas ornament worked in sage-green cotton thread and finished with a plump dusty-rose bow. The center is open, and the lace builds outward in tidy rings to a scalloped edge with small picots. It looks delicate on the tree but is firm enough to hang flat.
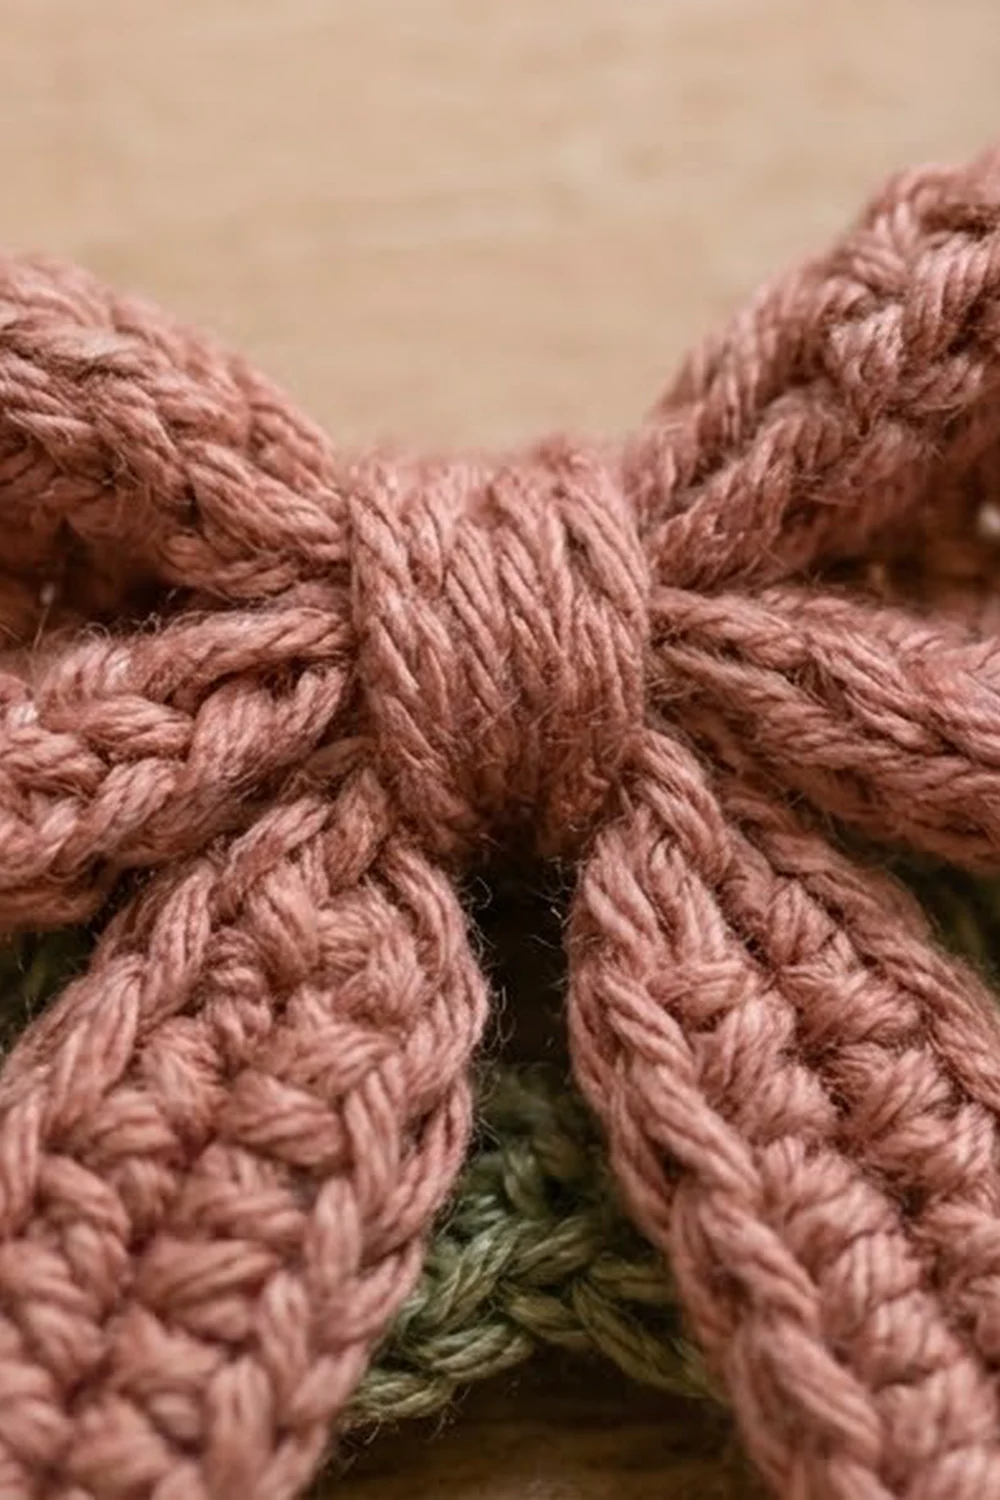
The style is soft vintage. The muted green and rose look good with natural greenery, kraft paper and warm white lights. The bow is worked in back-loop ribbing, so it has a knitted, squishy texture that stands out against the open lace.
The pattern uses US crochet terms. The finished wreath measures 4 in (10.2 cm) across with a 1.75 in (4.4 cm) center opening. The hanging loop adds about 1.5 in (3.8 cm) at the top.
Construction is simple. You chain a foundation ring and work five joined rounds outward, with the last two rounds forming the scalloped edge. Next you add the hanging loop. Then you make the bow in three small parts and sew it to the bottom of the wreath.
Finished Size and Construction
- Finished size: 4 in (10.2 cm) diameter, not counting the hanging loop
- Center opening: 1.75 in (4.4 cm)
- Skill level: Easy-intermediate
- Terminology: US
- Yarn weight: Size 3 cotton crochet thread
- Hook: 2.25 mm (US B-1)
- Number of pieces: 1 wreath plus 1 bow appliqué (made in 3 small parts)
- Layout: Single ornament. No joining between motifs.
- Piece size before the scalloped edge (after Rnd 3): 3 in (7.6 cm)
- Scalloped edge depth (Rnds 4–5): 0.5 in (1.3 cm) on each side
- Bow size: 2 in (5.1 cm) wide, about 2 in (5.1 cm) tall including the tails
Materials
Use smooth, mercerized size 3 cotton thread. It holds the lace crisply, blocks well and won’t fuzz on the tree. Matte cotton also works but gives softer stitch definition.
- Sage green: 12 g / 54 m (wreath and hanging loop)
- Dusty rose: 5 g / 23 m (bow)
Tools:
– 2.25 mm (US B-1) crochet hook
– Tapestry needle
– Small sharp scissors
– Stitch marker
– Blocking board or foam mat, rustproof pins
– Spray bottle with water (spray starch is optional)
Both quantities include a margin of about 30 percent for gauge swatching and weaving in ends.
Abbreviations (US Terms)
- ch – chain
- sl st – slip stitch
- sc – single crochet
- hdc – half double crochet
- dc – double crochet
- st(s) – stitch(es)
- sp – space
- BLO – back loop only
- rep – repeat
Special stitch:
– Picot: Ch 3, then sl st in the top of the stitch just made. It sits on top of its stitch and does not count as a stitch.
Gauge and Checkpoints
Gauge: 8 sc and 9 rows = 1 in (2.5 cm) in sage thread with a 2.25 mm hook.
Gauge sets the whole size of the ornament, so make one wreath before you plan a batch. Measure flat after each stage, before blocking:
- Foundation ring: about 1.9 in (4.8 cm) across, outside edge
- After Rnd 2: 2.4 in (6.1 cm)
- After Rnd 3: 3 in (7.6 cm)
- After Rnd 4: 3.5 in (8.9 cm)
- After Rnd 5: 4 in (10.2 cm)
If you’re more than 0.2 in (0.5 cm) over at any checkpoint, go down a hook size or tighten your chains. If you’re more than 0.2 in (0.5 cm) under, go up a hook size.
If only the chain arches in Rnd 4 come out too big or too small, adjust just your chain tension. Don’t change the stitch counts.
Wreath
Use sage thread throughout.
Foundation: Ch 48 and sl st to the first ch to form a ring. Don’t twist the chain.
Rnd 1: Ch 1, then sc in each ch around. Sl st to the first sc. (48 sts)
This firm round forms the smooth inner edge of the center opening.
Rnd 2: Ch 3 (counts as a dc), then dc in each st around. Sl st to the top of the beginning ch-3. (48 dc)
These upright posts make the second ring visible in the photo. Check: 2.4 in (6.1 cm).
Rnd 3 (fan round): Ch 1, sc in the same st. Skip 1 st, 5 dc in the next st, skip 1 st, sc in the next st. Rep from * around, ending the last rep at . Sl st to the first sc.
(12 fans of 5 dc + 12 sc = 72 sts)*
Each repeat uses 4 stitches of Rnd 2, and 48 ÷ 4 = 12 repeats. Check: 3 in (7.6 cm).
Rnd 4 (arch round): Sl st in each of the next 3 dc to reach the center (3rd) dc of the first fan. Ch 1, then sc in the same dc. Ch 6, sc in the center dc of the next fan. Rep from * 10 more times. Ch 6, then sl st to the first sc.
(12 sc + 72 ch = 84 sts; 12 ch-6 sps)
The arches bridge from one fan peak to the next, over the sc valleys, and create the open lacy band. Check: 3.5 in (8.9 cm).
Border: Scalloped Picot Edge
On this ornament the border is the scalloped edge itself. Rnd 4 is its foundation and Rnd 5 is the scallop round.
Border gauge: each finished scallop measures about 1 in (2.5 cm) along the outer curve and about 0.3 in (0.8 cm) deep.
Rnd 5 (scallops): Sl st in the first ch-6 sp. Ch 1, then work the following around:
In the ch-6 sp work (sc, hdc, 6 dc, hdc, sc). In the next sc, work sc and a picot.
Rep from * around, 12 times in total, and sl st to the first sc. Fasten off.
(12 scallops × 10 sts = 120 sts, + 12 sc = 132 sts; plus 12 picots)
Why the math works: each of the 12 Rnd 4 arches holds exactly one scallop, so the edge has 12 even scallops. Each picot sits on one of Rnd 4’s 12 sc, which are the fan peaks, so the picots land between the scallops.
At 4 in (10.2 cm) across, the outer circumference is about 12.6 in (32 cm). Divided by 12, that’s about 1 in (2.5 cm) per repeat. Ten stitches per scallop fill that length without ruffling or cupping, and 6 dc in a ch-6 sp gives a rounded, shell-like curve.
Hanging Loop
Lay the wreath right side up. Pick any picot as the top.
- Join sage with a sl st in the base sc of that picot.
- Ch 24, then sl st in the same sc.
- Ch 1 and work 30 sc over the chain loop. Sl st into the base sc.
- Fasten off.
The loop stands about 1.5 in (3.8 cm) tall. Covering the chain with sc makes it a firm cord, like the one in the photo.
Bow
Use dusty-rose thread for all three parts. The BLO rows create the ribbed, knit-like ridges.
Part A – Bow Loops
Ch 33.
Row 1: Sc in the 2nd ch from the hook and in each ch across. Turn. (32 sts)
Rows 2–5: Ch 1, sc BLO in each st across. Turn. (32 sts)
Fasten off, leaving a 6 in (15.2 cm) tail.
The strip measures about 4 in × 0.6 in (10.2 cm × 1.5 cm). Whipstitch the two short ends together to make a ring. Flatten the ring with the seam at the center back. It should measure 2 in (5.1 cm) wide.
Part B – Tails
Ch 17.
Row 1: Sc in the 2nd ch from the hook and in each ch across. Turn. (16 sts)
Rows 2–3: Ch 1, sc BLO in each st across. Turn. (16 sts)
Fasten off. The strip is about 2 in × 0.3 in (5.1 cm × 0.8 cm).
Fold it in half into an inverted V so the two tails angle down and out. Tack the fold.
Part C – Center Band
Ch 5.
Row 1: Sc in the 2nd ch from the hook and in each ch across. Turn. (4 sts)
Rows 2–8: Ch 1, sc BLO in each st across. Turn. (4 sts)
Fasten off, leaving an 8 in (20.3 cm) tail. The band is about 0.5 in × 0.9 in (1.3 cm × 2.3 cm).
Assembly
- Pinch Part A at the center with the seam at the back.
- Lay the fold of Part B behind the pinch.
- Wrap Part C around both layers so the ribs run vertically on the front.
- Sew the band’s short ends together at the back, pulling firmly so the loops puff out.
Place the bow at the bottom of the wreath, directly opposite the hanging loop. Center it over Rnds 2–4 so the tails hang down over Rnd 5. Sew it on through the center band and at the back of each loop. Keep your stitches inside the dc posts so they don’t show from the front.
Final Blocking
- Weave in all ends except the bow tail you’re using for sewing. Trim them close.
- Mist the wreath until it’s damp but not soaking. If you want a crisper ornament, use light spray starch.
- Pin it flat, right side up, on the blocking board. First pin the center opening into a true circle 1.75 in (4.4 cm) across.
- Pin each picot outward so the overall diameter is 4 in (10.2 cm). Space the picots evenly, about 1 in (2.5 cm) apart.
- Shape each scallop into a smooth curve with your fingertips.
- Let it dry completely, ideally overnight.
- Unpin, then sew on the bow. Blocking the bow flattens its texture, so sewing it on afterward keeps it plump.
Final Quality-Control Checklist
- Diameter measures 4 in (10.2 cm), and the center opening measures 1.75 in (4.4 cm).
- There are 12 fans, 12 arches, 12 scallops and 12 picots.
- Each scallop has exactly (sc, hdc, 6 dc, hdc, sc).
- The wreath lies flat with no cupping or ruffling.
- The hanging loop sits directly over a picot, opposite the bow.
- The bow’s ribs run horizontally on the loops and tails and vertically on the center band.
- All ends are hidden, and no sewing stitches show on the front.
Troubleshooting
The wreath cups into a bowl. Your arches are too tight. Loosen the ch-6, or go up a hook size for Rnd 4 only.
The edge ruffles. Your chains are too loose, or the scallops have extra stitches. Recount each scallop to 10 sts.
The center opening is too small. Your foundation chain is too tight. Chain loosely, or make the foundation chain with a hook one size larger.
The fans are uneven. Make sure you skip exactly 1 st on each side of every fan in Rnd 3, and recount Rnd 2 to 48.
The bow looks flat. Pull the center band tighter, and fluff the loops outward before you sew.
The hanging loop twists. Work the sc evenly over the chain without twisting it, then steam it straight.
Care
Hand wash in cool water with mild soap, press out the water in a towel, and re-block flat to dry. Store it flat or hanging, away from direct sunlight, so the sage and rose don’t fade.

Final Notes
The measurement chain is short and easy to check. The 48-st ring is 1.9 in (4.8 cm) across, then grows to 2.4 in (6.1 cm), 3 in (7.6 cm), 3.5 in (8.9 cm) and finally 4 in (10.2 cm). Every round after the ring builds on the same 12 repeats, so if the counts stay right the scallops line up.
Make one, check it against the checkpoints, and then make a few more for the tree or for gift tags.
Happy crocheting!