

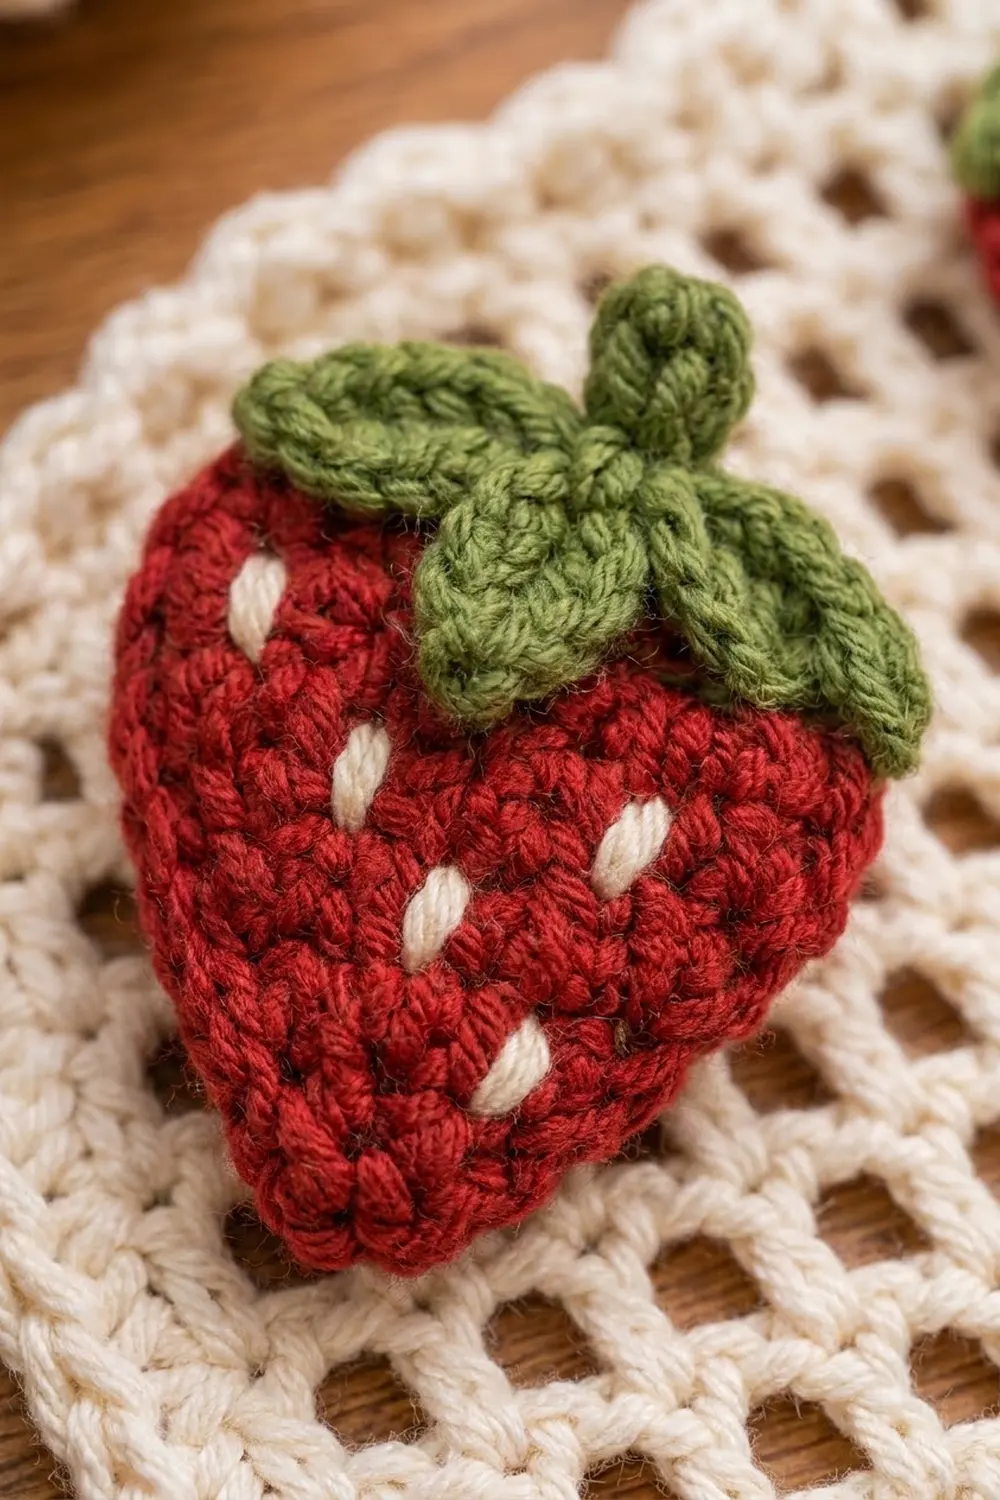
This wall-hanging paper towel holder is a cream mesh panel with three red strawberries along the top. It hangs from a single peg. Wooden dowels pass through side loops: the upper one holds a paper towel roll and the lower one holds a tea towel.
The palette is simple: soft cream for the panel, deep strawberry red for the berries, and leafy green for the caps. Short cream stitches on each berry look like seeds. The look is cottagecore and suits a country kitchen, but it is sturdy enough for daily use.
The pattern uses US crochet terms. The finished panel measures 14 in (35.6 cm) wide by 18.5 in (47.0 cm) tall, not counting the hanging strap. The strap adds about 2.5 in (6.4 cm) of height when hung.
You’ll work the panel flat in filet mesh rows, shape the shoulders with three decrease rows, and finish with a three-round border. Then you’ll make the strawberries, caps, dowel tabs and strap, and sew them on.
Finished Size and Construction
- Finished size: 14 in (35.6 cm) wide x 18.5 in (47.0 cm) tall, plus strap
- Skill level: Easy-Intermediate
- Terminology: US
- Yarn weight: Worsted (#4) cotton
- Hook: 4.5 mm (US 7)
- Number of pieces: 1 mesh panel, plus 3 strawberries, 3 leaf caps, 4 dowel tabs and 1 hanging strap sewn on
- Layout: Single panel, no joining of motifs
- Panel before border: 13 in (33.0 cm) wide x 17.5 in (44.5 cm) tall (26 meshes x 35 rows)
- Border depth: 0.5 in (1.3 cm) on every side
Materials
Use a smooth, firm 100% cotton or cotton blend. Cotton holds its shape when it carries a heavy roll, and it washes well. Avoid splitty or very soft yarns, because the mesh will sag.
- Cream: 180 g (about 342 m) for the panel, border, strap, tabs and seeds
- Red: 15 g (about 28 m) for the strawberries
- Green: 8 g (about 15 m) for the leaf caps
These amounts assume worsted cotton at about 190 m per 100 g. All quantities include a margin of about 15%.
Tools:
– 4.5 mm (US 7) crochet hook
– Tapestry needle
– 2 wooden dowels, 0.75 in (1.9 cm) diameter x 16 in (40.6 cm) long
– Stitch markers
– Scissors, pins, and a measuring tape
– Blocking mat and spray bottle
Abbreviations (US Terms)
- ch – chain
- sl st – slip stitch
- sc – single crochet
- hdc – half double crochet
- dc – double crochet
- sc2tog – single crochet 2 together
- sp – space
- RS – right side
- rev sc – reverse single crochet (crab stitch)
Special stitch: rev sc. With the RS facing, work from left to right. Insert the hook into the next stitch to the right, yarn over, pull up a loop, then yarn over and draw through both loops. This makes a corded edge.
Mesh: One mesh is 1 dc post plus 1 ch-1 space. Each row has one more dc than it has meshes.
Gauge and Checkpoints
- Mesh gauge: 4 meshes and 4 rows = 2 in (5.1 cm) square
- Sc gauge: 16 sc and 20 rows = 4 in (10.2 cm)
Test one piece first. Make a swatch of 8 meshes for 8 rows and block it. It should measure 4 in (10.2 cm) square.
Checkpoints:
– After Row 1, the strip is 13 in (33.0 cm) wide.
– After Row 4, the panel is 2 in (5.1 cm) tall.
– After Row 16, it is 8 in (20.3 cm) tall.
– After Row 32, it is 16 in (40.6 cm) tall.
– After Row 35, it is 17.5 in (44.5 cm) tall.
– After the border, it is 14 in (35.6 cm) x 18.5 in (47.0 cm).
If your piece is too big, go down a hook size. If it is too small, go up a hook size. Change hooks rather than the stitch counts, because the border math depends on 26 meshes and 35 rows.
Mesh Panel
The panel is worked in cream.
Foundation: Ch 56.
Row 1 (RS): Dc in 6th ch from hook. The skipped 5 ch count as dc, ch 1 and 1 skipped ch. Ch 1, sk next ch, dc in next ch; rep from * across. Turn. (27 dc, 26 ch-1 sp = 26 meshes)*
Row 2: Ch 4 (counts as dc, ch 1). Sk first sp, dc in next dc. [Ch 1, sk sp, dc in next dc] 24 times. Ch 1, then dc in the top of the turning chain. Turn. (26 meshes)
Rows 3–32: Repeat Row 2. (26 meshes each row)
Check the panel now: 13 in (33.0 cm) x 16 in (40.6 cm).
Shoulder Shaping
Each row below leaves one mesh unworked at each end. This makes the stepped shoulders, and the border rounds them off later.
Row 33: Sl st in first ch-1 sp and in next dc. Ch 4 (counts as dc, ch 1). Sk sp, dc in next dc. [Ch 1, sk sp, dc in next dc] 23 times. Leave the last mesh unworked. Turn. (24 meshes)
Row 34: Sl st in first ch-1 sp and in next dc. Ch 4. Sk sp, dc in next dc. [Ch 1, sk sp, dc in next dc] 21 times. Leave the last mesh unworked. Turn. (22 meshes)
Row 35: Sl st in first ch-1 sp and in next dc. Ch 4. Sk sp, dc in next dc. [Ch 1, sk sp, dc in next dc] 19 times. Leave the last mesh unworked. Fasten off. (20 meshes = 21 dc + 20 ch-1 sp)
The top edge is now 10 in (25.4 cm) wide. The panel is 17.5 in (44.5 cm) tall.
Border
Border gauge: 4 sc per 1 in (2.5 cm).
Along mesh rows, you work 1 sc in each dc and 1 sc in each ch-1 sp. That is 2 sc per mesh, and one mesh is 0.5 in (1.3 cm) wide. Along the sides, you work 2 sc per dc row-end, and each row is 0.5 in (1.3 cm) tall. Both give exactly 4 sc per inch, so the border lies flat without ruffling or pulling.
Round 1 (RS): Join cream in the first dc of Row 35. Ch 1.
1. Top: Sc in each dc and ch-1 sp across Row 35. (41 sc)
2. Shoulder: Work 2 sc in the Row 35 row-end. Work 2 sc across the exposed mesh of Row 34 (1 sc in the ch-1 sp, 1 sc in the outer dc). Work 2 sc in the Row 34 row-end. Work 2 sc across the exposed mesh of Row 33. Work 2 sc in the Row 33 row-end. Work 2 sc across the exposed mesh of Row 32. (12 sc)
3. Side: Work 2 sc in each row-end from Row 32 down to Row 1. (64 sc)
4. Bottom: Work along the underside of the foundation chain. Make 3 sc at the base of the corner dc. Then work 1 sc in each ch-sp base and 1 sc at the base of each dc across. Make 3 sc at the base of the last dc. (57 sc: 27 dc bases + 26 sp bases = 53 positions, plus 2 extra sc at each corner)
5. Second side: Work 2 sc in each row-end from Row 1 up to Row 32. (64 sc)
6. Second shoulder: Mirror step 2. (12 sc)
Join with a sl st to the first sc. (250 sc: 41 + 12 + 64 + 57 + 64 + 12)
The shoulders get no corner increases. The outward and inward corners of the steps balance each other, so the edge curves smoothly.
Round 2: Ch 1. Sc in each sc around, working 3 sc in the center sc of each bottom corner. Join. (254 sc: top 41, shoulders 12 each, sides 64 each, bottom 61 including the corner groups)
Round 3: Ch 1. Rev sc in each sc around. Join and fasten off. (254 rev sc)
The border is 0.5 in (1.3 cm) deep. The panel now measures 14 in (35.6 cm) x 18.5 in (47.0 cm).
Strawberries (Make 3)
The strawberries are worked in red sc rows, starting at the bottom point.
Row 1: Ch 2. Work 3 sc in the 2nd ch from hook. Turn. (3)
Row 2: Ch 1. Work 2 sc in the first sc, sc in next, 2 sc in the last sc. Turn. (5)
Row 3: Ch 1. Work 2 sc in the first sc, sc in next 3, 2 sc in the last sc. Turn. (7)
Row 4: Ch 1. Work 2 sc in the first sc, sc in next 5, 2 sc in the last sc. Turn. (9)
Checkpoint: the berry is 2.25 in (5.7 cm) wide.
Rows 5–7: Ch 1, sc in each sc across. Turn. (9 each row)
Row 8: Ch 1. Sc2tog, sc in next 5, sc2tog. Do not turn. (7)
Edging round: Ch 1.
1. Work 2 sc in the first st of Row 8, sc in the next 5, and 2 sc in the last st. (9)
2. Work 1 sc in each row-end down the side. (8)
3. Work 3 sc in the bottom point. (3)
4. Work 1 sc in each row-end up the other side. (8)
Join. (28 sc) Fasten off, leaving a 12 in (30.5 cm) tail.
The berry measures 2.5 in (6.4 cm) wide x 2 in (5.1 cm) tall.
Seeds: Thread cream yarn on the tapestry needle. Make 8 vertical straight stitches, each 0.25 in (0.6 cm) long, in staggered rows of 3, 2, 2 and 1 from top to bottom. Keep the seeds in the lower two-thirds of the berry, because the cap covers the top. Weave in the ends on the WS.
Leaf Caps (Make 3)
The caps are worked in green.
Center: Ch 2. Work 5 sc in the 2nd ch from hook. Join with a sl st to the first sc. (5 sc)
Leaves: Ch 5. Sl st in 2nd ch from hook, sc in next ch, hdc in next ch, dc in last ch. Sl st in the next center sc. Repeat from * to * 4 more times. (5 leaves, each about 1 in / 2.5 cm long)
Stem: Ch 4. Sl st in 2nd, 3rd and 4th ch from hook. Sl st at the center. Fasten off, leaving a 10 in (25.4 cm) tail.
The cap measures about 2.25 in (5.7 cm) across.
Layering: Center the cap on the top edge of the berry with the stem pointing up. Arrange 3 leaves so they fan down over the red, and 2 so they point sideways past the top corners. Sew down the center and each leaf tip with the green tail.
Dowel Tabs (Make 4)
The tabs are worked in cream.
Row 1: Ch 7. Sc in 2nd ch from hook and in each ch across. Turn. (6 sc)
Rows 2–18: Ch 1, sc in each sc across. Turn. (6 sc each row)
Fasten off, leaving a 14 in (35.6 cm) tail. Each tab measures 1.5 in (3.8 cm) x 3.6 in (9.1 cm).
Hanging Strap
The strap is worked in cream.
Row 1: Ch 6. Sc in 2nd ch from hook and in each ch across. Turn. (5 sc)
Rows 2–50: Ch 1, sc in each sc across. Turn. (5 sc each row)
Fasten off, leaving a long tail. The strap measures 1.25 in (3.2 cm) x 10 in (25.4 cm).
Assembly
Strawberries: Pin the berries in a row across Rows 31–35, with the cap leaves just touching the border.
– Place the outer berry centers 3.25 in (8.3 cm) in from each side edge of the mesh.
– Place the middle berry centered on the panel, 6.5 in (16.5 cm) from either edge of the mesh.
– Put the bottom points of the outer berries on Row 31. Put the middle berry’s point on Row 32 so it sits slightly higher.
Whipstitch around the edging with the red tail. Catch only the back loops of the berry and the dc posts behind it, so the stitches stay invisible.
Dowel tabs: Fold each tab in half to make a loop. Overlap both short ends 0.5 in (1.3 cm) onto the back of the side border and sew them down firmly. Each loop should stick out about 1.3 in (3.3 cm) past the edge.
– Center the upper pair 11.5 in (29.2 cm) above the bottom of the mesh, at the top of Row 23.
– Center the lower pair 3.5 in (8.9 cm) above the bottom of the mesh, at the top of Row 7.
Strap: Sew each strap end to the back of the top border, 2 in (5.1 cm) in from each top corner, overlapping 0.75 in (1.9 cm). The strap arches about 2.5 in (6.4 cm) above the panel.
Final Blocking
- Weave in all ends on the WS before blocking.
- Lightly mist the panel, avoiding the appliqués if your red is not colorfast.
- Pin the panel to 14 in (35.6 cm) x 18.5 in (47.0 cm).
- Pin every edge mesh so the openings stay square.
- Pin the shoulders into a smooth curve.
- Let the panel dry completely, for at least 12 hours.
- Unpin it and slide the dowels through each pair of tabs.
Final Quality-Control Checklist
- [ ] 26 meshes across Rows 1–32, and 20 across Row 35
- [ ] Border Round 1 has 250 sc, and Rounds 2–3 have 254
- [ ] Panel measures 14 in (35.6 cm) x 18.5 in (47.0 cm)
- [ ] Each berry has 28 edging sc, 8 seeds and a centered cap
- [ ] Tabs sit level, and each pair is the same height
- [ ] Strap ends are sewn the same distance from each top corner
- [ ] All ends are secured on the WS
Troubleshooting
- Mesh openings look rectangular: Your dc are too tall or too short for the ch-1 spaces. Adjust your yarn hold, or use a ch 2 turning chain plus 1 extra chain.
- Border ruffles: You may have worked 3 sc in some row-ends. Recount the sides to 64 sc.
- Border cups: Make sure you worked the 3-sc bottom corners. Loosen your rev sc.
- Berry curls: Block the berry flat before sewing it on, and check that the edging has exactly 28 sc.
- Panel sags under the roll: Use firmer cotton, or go down one hook size and recheck the gauge.
- Shoulders look jagged: Re-block with pins along the curve.
Care
Hand wash in cool water, roll in a towel and lay flat to dry. Remove the dowels before washing, and reshape the mesh while it is damp.

Final Notes
The measurements all depend on gauge. One mesh is 0.5 in (1.3 cm), so 26 meshes make 13 in (33.0 cm) across. Thirty-five rows make 17.5 in (44.5 cm) of height. Three border rounds at 4 sc per inch add 0.5 in (1.3 cm) on every side, for a finished panel of 14 in (35.6 cm) x 18.5 in (47.0 cm). Check your gauge at every checkpoint and the rest will fall into place.
Happy crocheting!